
Search results for "Single release" in Home Design Ideas

 Moderne Builders
Gorgeous master bath with dramatic retro "wave" tile. Peak Photography
Example of a 1950s bathroom design in Los Angeles
Example of a 1950s bathroom design in Los Angeles

 Cabinet-S-Top
This was a major remodel where the kitchen was completely gutted, flooring and soffits were removed and all the electrical in the kitchen had to be reworked and brought up to code. We used Waypoint Living Spaces for the perimeter cabinets and used a riser and crown molding to connect the cabinets to the ceiling. We chose Medallion Cabinetry for the island because the customer had her heart set on a green painted island. The hardware we used is from the Mulholland collection by Amerock. The customers have large family gathers and it was very important for them to have an island that was moveable. We used casters from Richelieu to create and island that could move easily, as well as having brakes to keep the island in place when they wanted.
Giallo Traversella granite was used on the perimeter countertops to tie together the greens and beige tones of the cabinetry and we used John Boos, walnut butcher block countertop for the island to compliment wood tones from the existing millwork in the home. The customer provided me with an inspiration picture for a backsplash, she knew she wanted a glass patterned backsplash. Ceramic Tiles International had released their Debut Petal mosaic tile and the customer loved it.
Prior to the remodel, the kitchen was very dark and very crowded, it did not function in a way that worked for my customer. We added under cabinet LED lights, one general ceiling fixture and LED Brio Disc lights with dimming capabilities so the customers could adjust the lighting to their specific needs.
Light fixtures were updated in the hallways as well as the kitchen.
My customer didn’t know exactly what they wanted as far as plumbing was concerned. They wanted products that were durable and easy to maintain. I chose the Blanco Performa undermount sink in the Truffle color due to is durability and the color complimented the other materials. We used Moen’s Arbor single handle pull down spray faucet and transitional soap dispenser due to its simplistic design, functionality and warranty. We used a ¾ horsepower Insinkerator disposal and a deluxe Steamball strainer basket.
The customer originally had Parquet flooring and they liked the look of real hardwood. Madeira 5” planks in Dark Gunstock oak was chosen for its color and durability. The flooring brought in warm neutral tones to compliment other materials. My customer wanted a larger window, but they had some safety concerns. We addressed their concerns by providing a larger Awning style window, using tempered glass and double locks.
 Cabinet-S-Top
This was a major remodel where the kitchen was completely gutted, flooring and soffits were removed and all the electrical in the kitchen had to be reworked and brought up to code. We used Waypoint Living Spaces for the perimeter cabinets and used a riser and crown molding to connect the cabinets to the ceiling. We chose Medallion Cabinetry for the island because the customer had her heart set on a green painted island. The hardware we used is from the Mulholland collection by Amerock. The customers have large family gathers and it was very important for them to have an island that was moveable. We used casters from Richelieu to create and island that could move easily, as well as having brakes to keep the island in place when they wanted.
Giallo Traversella granite was used on the perimeter countertops to tie together the greens and beige tones of the cabinetry and we used John Boos, walnut butcher block countertop for the island to compliment wood tones from the existing millwork in the home. The customer provided me with an inspiration picture for a backsplash, she knew she wanted a glass patterned backsplash. Ceramic Tiles International had released their Debut Petal mosaic tile and the customer loved it.
Prior to the remodel, the kitchen was very dark and very crowded, it did not function in a way that worked for my customer. We added under cabinet LED lights, one general ceiling fixture and LED Brio Disc lights with dimming capabilities so the customers could adjust the lighting to their specific needs.
Light fixtures were updated in the hallways as well as the kitchen.
My customer didn’t know exactly what they wanted as far as plumbing was concerned. They wanted products that were durable and easy to maintain. I chose the Blanco Performa undermount sink in the Truffle color due to is durability and the color complimented the other materials. We used Moen’s Arbor single handle pull down spray faucet and transitional soap dispenser due to its simplistic design, functionality and warranty. We used a ¾ horsepower Insinkerator disposal and a deluxe Steamball strainer basket.
The customer originally had Parquet flooring and they liked the look of real hardwood. Madeira 5” planks in Dark Gunstock oak was chosen for its color and durability. The flooring brought in warm neutral tones to compliment other materials. My customer wanted a larger window, but they had some safety concerns. We addressed their concerns by providing a larger Awning style window, using tempered glass and double locks.
Find the right local pro for your project
 Cabinet-S-Top
This was a major remodel where the kitchen was completely gutted, flooring and soffits were removed and all the electrical in the kitchen had to be reworked and brought up to code. We used Waypoint Living Spaces for the perimeter cabinets and used a riser and crown molding to connect the cabinets to the ceiling. We chose Medallion Cabinetry for the island because the customer had her heart set on a green painted island. The hardware we used is from the Mulholland collection by Amerock. The customers have large family gathers and it was very important for them to have an island that was moveable. We used casters from Richelieu to create and island that could move easily, as well as having brakes to keep the island in place when they wanted.
Giallo Traversella granite was used on the perimeter countertops to tie together the greens and beige tones of the cabinetry and we used John Boos, walnut butcher block countertop for the island to compliment wood tones from the existing millwork in the home. The customer provided me with an inspiration picture for a backsplash, she knew she wanted a glass patterned backsplash. Ceramic Tiles International had released their Debut Petal mosaic tile and the customer loved it.
Prior to the remodel, the kitchen was very dark and very crowded, it did not function in a way that worked for my customer. We added under cabinet LED lights, one general ceiling fixture and LED Brio Disc lights with dimming capabilities so the customers could adjust the lighting to their specific needs.
Light fixtures were updated in the hallways as well as the kitchen.
My customer didn’t know exactly what they wanted as far as plumbing was concerned. They wanted products that were durable and easy to maintain. I chose the Blanco Performa undermount sink in the Truffle color due to is durability and the color complimented the other materials. We used Moen’s Arbor single handle pull down spray faucet and transitional soap dispenser due to its simplistic design, functionality and warranty. We used a ¾ horsepower Insinkerator disposal and a deluxe Steamball strainer basket.
The customer originally had Parquet flooring and they liked the look of real hardwood. Madeira 5” planks in Dark Gunstock oak was chosen for its color and durability. The flooring brought in warm neutral tones to compliment other materials. My customer wanted a larger window, but they had some safety concerns. We addressed their concerns by providing a larger Awning style window, using tempered glass and double locks.

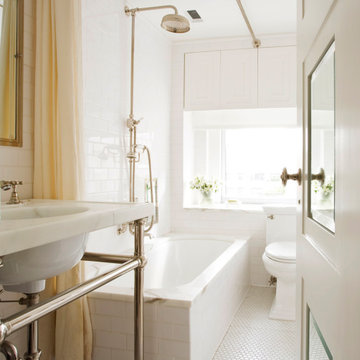
 Neumann & Rudy Architecture
**I. Spatial Composition & Architectural Volume**
This is an exercise in the disciplined choreography of a constrained footprint — a narrow, rectilinear bathroom whose length is exploited rather than disguised. The composition unfolds along a single axis, the viewer's eye drawn from the foreground console lavatory, past the drop-in tub, to the terminal glazed aperture that anchors the far wall and releases the volume outward. The photograph's vantage, taken through a partially opened multi-paneled door with its cushioned rail-and-stile profile and beveled glazing, establishes a layered threshold condition: the room is framed, glimpsed, and entered simultaneously. Ceiling height is generous relative to plan dimension, and the architect has resisted the temptation to lower it; instead, a slender crown profile and a delicate picture-rail cornice terminate the field tile at a consistent datum, reinforcing the vertical proportion. Above the tub, a bank of recessed-panel cabinetry is set flush into the reveal of a soffit, borrowing the depth of the wall assembly to gain storage without protrusion — a deft piece of joinery logic. The window is treated as an architectural niche, its deep jambs and marble sill establishing a plinth that reads as inhabited rather than merely functional. Overhead, an exposed nickel-plated curtain rod traverses the ceiling plane in a single diagonal gesture, its cantilevered support rendering the drapery a movable spatial partition rather than a fixed enclosure.
**II. Materiality, Color & Texture**
The palette is a study in monochromatic gradation, calibrated almost entirely within the white spectrum yet richly differentiated by surface behavior. Hand-glazed subway tile in a running-bond pattern clads the wet walls, its subtle undulation and pooled glaze catching light unevenly to produce a soft, ceramic luminosity that no machine-pressed tile could replicate. Underfoot, a penny-round mosaic in matte porcelain introduces fine-grain granularity and a faintly warm grout line, its curvilinear tessellation providing tactile counterpoint to the orthogonal wall coursing. Marble — likely a Calacatta or lightly veined Carrara — appears strategically at the lavatory deck, the tub apron cap, and the window sill, its ochre-gold and cool grey veining supplying the room's only true figuration and its principal chromatic warmth. Polished nickel is the unifying metal, deployed with unusual generosity: the exposed console legs and cross-braced towel bar, the exposed riser and telephone-style handshower, the cross-handle fittings, and the rose-mounted door knob with its knurled backplate. Its cool, silvery reflectivity absorbs and redistributes ambient light, dissolving the hardware into the field. The single yielding material is the shower curtain — an unlined linen or cotton voile in pale butter-yellow — whose slubby weave, gravity-drawn folds, and warm undertone break the room's cool register and introduce the necessary note of domestic softness.
**III. Lighting, Atmosphere & Style Profile**
Illumination is overwhelmingly diurnal and unapologetically singular in source: the window at the terminus floods the space with diffuse, high-key daylight that blows toward pure white at the aperture and falls off gradually along the tile, modeling the wall's minute irregularities into a low-relief texture. The absence of visible decorative fixtures — save a discreet ceiling-recessed vent or downlight above the shower — is deliberate; artificial lighting is subordinated so that the material palette performs under natural light. The resulting atmosphere is serene, hygienic without sterility, and quietly luxurious: light behaves as a material in its own right, and the white-on-white scheme functions as a reflector rather than a void. Stylistically, the room synthesizes early-twentieth-century Anglo-American sanitary vernacular — the exposed-plumbing console lavatory, the exposed-riser shower, the metro tile and penny mosaic — with a contemporary editorial restraint that strips out ornament and pattern in favor of proportion and craft. It might be characterized as Refined Classicism, or more precisely, a Transitional Pre-War Revival: historically literate in its detailing, resolutely modern in its spatial economy and tonal discipline. The single pale-yellow textile is the design's signature move, a calibrated warm accent that prevents the achromatic scheme from tipping into clinical austerity and confirms the project's essential thesis — that restraint, correctly executed, reads as generosity.
 Cabinet-S-Top
This was a major remodel where the kitchen was completely gutted, flooring and soffits were removed and all the electrical in the kitchen had to be reworked and brought up to code. We used Waypoint Living Spaces for the perimeter cabinets and used a riser and crown molding to connect the cabinets to the ceiling. We chose Medallion Cabinetry for the island because the customer had her heart set on a green painted island. The hardware we used is from the Mulholland collection by Amerock. The customers have large family gathers and it was very important for them to have an island that was moveable. We used casters from Richelieu to create and island that could move easily, as well as having brakes to keep the island in place when they wanted.
Giallo Traversella granite was used on the perimeter countertops to tie together the greens and beige tones of the cabinetry and we used John Boos, walnut butcher block countertop for the island to compliment wood tones from the existing millwork in the home. The customer provided me with an inspiration picture for a backsplash, she knew she wanted a glass patterned backsplash. Ceramic Tiles International had released their Debut Petal mosaic tile and the customer loved it.
Prior to the remodel, the kitchen was very dark and very crowded, it did not function in a way that worked for my customer. We added under cabinet LED lights, one general ceiling fixture and LED Brio Disc lights with dimming capabilities so the customers could adjust the lighting to their specific needs.
Light fixtures were updated in the hallways as well as the kitchen.
My customer didn’t know exactly what they wanted as far as plumbing was concerned. They wanted products that were durable and easy to maintain. I chose the Blanco Performa undermount sink in the Truffle color due to is durability and the color complimented the other materials. We used Moen’s Arbor single handle pull down spray faucet and transitional soap dispenser due to its simplistic design, functionality and warranty. We used a ¾ horsepower Insinkerator disposal and a deluxe Steamball strainer basket.
The customer originally had Parquet flooring and they liked the look of real hardwood. Madeira 5” planks in Dark Gunstock oak was chosen for its color and durability. The flooring brought in warm neutral tones to compliment other materials. My customer wanted a larger window, but they had some safety concerns. We addressed their concerns by providing a larger Awning style window, using tempered glass and double locks.
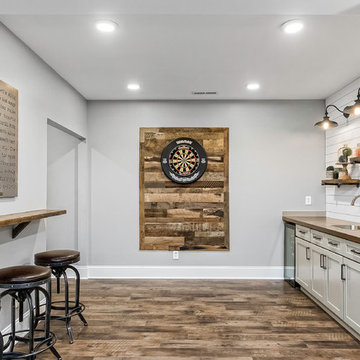
Sponsored
Sunbury, OH

J.Holderby - Renovations
Franklin County's Leading General Contractors - 2X Best of Houzz!
 Cabinet-S-Top
This was a major remodel where the kitchen was completely gutted, flooring and soffits were removed and all the electrical in the kitchen had to be reworked and brought up to code. We used Waypoint Living Spaces for the perimeter cabinets and used a riser and crown molding to connect the cabinets to the ceiling. We chose Medallion Cabinetry for the island because the customer had her heart set on a green painted island. The hardware we used is from the Mulholland collection by Amerock. The customers have large family gathers and it was very important for them to have an island that was moveable. We used casters from Richelieu to create and island that could move easily, as well as having brakes to keep the island in place when they wanted.
Giallo Traversella granite was used on the perimeter countertops to tie together the greens and beige tones of the cabinetry and we used John Boos, walnut butcher block countertop for the island to compliment wood tones from the existing millwork in the home. The customer provided me with an inspiration picture for a backsplash, she knew she wanted a glass patterned backsplash. Ceramic Tiles International had released their Debut Petal mosaic tile and the customer loved it.
Prior to the remodel, the kitchen was very dark and very crowded, it did not function in a way that worked for my customer. We added under cabinet LED lights, one general ceiling fixture and LED Brio Disc lights with dimming capabilities so the customers could adjust the lighting to their specific needs.
Light fixtures were updated in the hallways as well as the kitchen.
My customer didn’t know exactly what they wanted as far as plumbing was concerned. They wanted products that were durable and easy to maintain. I chose the Blanco Performa undermount sink in the Truffle color due to is durability and the color complimented the other materials. We used Moen’s Arbor single handle pull down spray faucet and transitional soap dispenser due to its simplistic design, functionality and warranty. We used a ¾ horsepower Insinkerator disposal and a deluxe Steamball strainer basket.
The customer originally had Parquet flooring and they liked the look of real hardwood. Madeira 5” planks in Dark Gunstock oak was chosen for its color and durability. The flooring brought in warm neutral tones to compliment other materials. My customer wanted a larger window, but they had some safety concerns. We addressed their concerns by providing a larger Awning style window, using tempered glass and double locks.
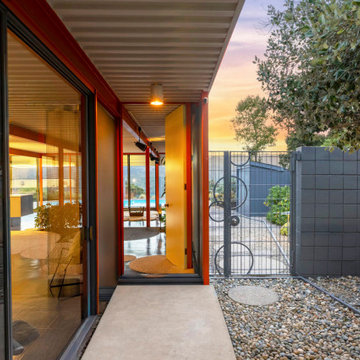
 Boyenga Team / Compass
Eichler X-100 Entry: A Threshold Between Architecture and Experience
The entry to the Eichler X-100 is not a conventional front door—it’s an intentional transition, a carefully choreographed sequence that shifts you from the outside world into a fully immersive architectural environment.
Designed by A. Quincy Jones and Frederick Emmons for Joseph Eichler, the entry reflects a core principle of Eichler design: arrival should be felt, not just seen.
A Garden Before the Door
Rather than approaching a traditional façade, visitors are guided into an entry courtyard—a private, inward-facing space that immediately softens the transition from street to home. This space acts as a buffer, both visually and emotionally, creating a sense of calm and separation.
The path is often defined by concrete stepping pads set within planted areas, reinforcing the home’s circular and geometric design language. Movement becomes deliberate—slowed, grounded, and connected to the landscape.
Light as a Guide
Above, translucent skylights filter natural light into the entry sequence, creating shifting patterns of brightness and shadow throughout the day. This interplay of light transforms the entry into something dynamic—never static, always evolving.
Rather than a single moment, the entry unfolds over time.
Blurring Interior and Exterior
The X-100’s entry challenges the idea of where the home actually begins. With interior gardens visible from the moment you arrive, the boundary between outside and inside becomes intentionally ambiguous.
Glass, open sightlines, and planted spaces work together so that by the time you reach the front door, you are already inside the architectural experience.
A Compressed-to-Open Reveal
True to mid-century modern design principles, the entry creates a subtle sense of compression before release. The approach is quiet and modest—almost understated—before opening into the expansive, light-filled interior beyond.
This contrast heightens the impact of arrival, making the interior feel even more dramatic.
A Philosophy of Arrival
The Eichler X-100 entry is not about grandeur—it’s about intention. It invites you to slow down, to notice light, material, and landscape, and to engage with the home on a deeper level.
It’s a reminder that in great architecture, even the act of entering becomes part of the design itself.
 Cabinet-S-Top
This was a major remodel where the kitchen was completely gutted, flooring and soffits were removed and all the electrical in the kitchen had to be reworked and brought up to code. We used Waypoint Living Spaces for the perimeter cabinets and used a riser and crown molding to connect the cabinets to the ceiling. We chose Medallion Cabinetry for the island because the customer had her heart set on a green painted island. The hardware we used is from the Mulholland collection by Amerock. The customers have large family gathers and it was very important for them to have an island that was moveable. We used casters from Richelieu to create and island that could move easily, as well as having brakes to keep the island in place when they wanted.
Giallo Traversella granite was used on the perimeter countertops to tie together the greens and beige tones of the cabinetry and we used John Boos, walnut butcher block countertop for the island to compliment wood tones from the existing millwork in the home. The customer provided me with an inspiration picture for a backsplash, she knew she wanted a glass patterned backsplash. Ceramic Tiles International had released their Debut Petal mosaic tile and the customer loved it.
Prior to the remodel, the kitchen was very dark and very crowded, it did not function in a way that worked for my customer. We added under cabinet LED lights, one general ceiling fixture and LED Brio Disc lights with dimming capabilities so the customers could adjust the lighting to their specific needs.
Light fixtures were updated in the hallways as well as the kitchen.
My customer didn’t know exactly what they wanted as far as plumbing was concerned. They wanted products that were durable and easy to maintain. I chose the Blanco Performa undermount sink in the Truffle color due to is durability and the color complimented the other materials. We used Moen’s Arbor single handle pull down spray faucet and transitional soap dispenser due to its simplistic design, functionality and warranty. We used a ¾ horsepower Insinkerator disposal and a deluxe Steamball strainer basket.
The customer originally had Parquet flooring and they liked the look of real hardwood. Madeira 5” planks in Dark Gunstock oak was chosen for its color and durability. The flooring brought in warm neutral tones to compliment other materials. My customer wanted a larger window, but they had some safety concerns. We addressed their concerns by providing a larger Awning style window, using tempered glass and double locks.
 Cabinet-S-Top
This was a major remodel where the kitchen was completely gutted, flooring and soffits were removed and all the electrical in the kitchen had to be reworked and brought up to code. We used Waypoint Living Spaces for the perimeter cabinets and used a riser and crown molding to connect the cabinets to the ceiling. We chose Medallion Cabinetry for the island because the customer had her heart set on a green painted island. The hardware we used is from the Mulholland collection by Amerock. The customers have large family gathers and it was very important for them to have an island that was moveable. We used casters from Richelieu to create and island that could move easily, as well as having brakes to keep the island in place when they wanted.
Giallo Traversella granite was used on the perimeter countertops to tie together the greens and beige tones of the cabinetry and we used John Boos, walnut butcher block countertop for the island to compliment wood tones from the existing millwork in the home. The customer provided me with an inspiration picture for a backsplash, she knew she wanted a glass patterned backsplash. Ceramic Tiles International had released their Debut Petal mosaic tile and the customer loved it.
Prior to the remodel, the kitchen was very dark and very crowded, it did not function in a way that worked for my customer. We added under cabinet LED lights, one general ceiling fixture and LED Brio Disc lights with dimming capabilities so the customers could adjust the lighting to their specific needs.
Light fixtures were updated in the hallways as well as the kitchen.
My customer didn’t know exactly what they wanted as far as plumbing was concerned. They wanted products that were durable and easy to maintain. I chose the Blanco Performa undermount sink in the Truffle color due to is durability and the color complimented the other materials. We used Moen’s Arbor single handle pull down spray faucet and transitional soap dispenser due to its simplistic design, functionality and warranty. We used a ¾ horsepower Insinkerator disposal and a deluxe Steamball strainer basket.
The customer originally had Parquet flooring and they liked the look of real hardwood. Madeira 5” planks in Dark Gunstock oak was chosen for its color and durability. The flooring brought in warm neutral tones to compliment other materials. My customer wanted a larger window, but they had some safety concerns. We addressed their concerns by providing a larger Awning style window, using tempered glass and double locks.

 Ganim's Garden Center and Florist, LLC
Tall Phlox or P. paniculata is a late summer favorite for height in the perennial garden.
the colors are numerous, newer introductions bloom earlier in summer and bloom into the fall. More mildew resistant varieties are available, and mid-size growth makes them more favorable since staking is not required. Pruning back in May-June will keep them shorter and fuller. Spray with Baking soda and water weekly to keep the fungus from starting.
Ganim's Garden Center LLC
 Cabinet-S-Top
This was a major remodel where the kitchen was completely gutted, flooring and soffits were removed and all the electrical in the kitchen had to be reworked and brought up to code. We used Waypoint Living Spaces for the perimeter cabinets and used a riser and crown molding to connect the cabinets to the ceiling. We chose Medallion Cabinetry for the island because the customer had her heart set on a green painted island. The hardware we used is from the Mulholland collection by Amerock. The customers have large family gathers and it was very important for them to have an island that was moveable. We used casters from Richelieu to create and island that could move easily, as well as having brakes to keep the island in place when they wanted.
Giallo Traversella granite was used on the perimeter countertops to tie together the greens and beige tones of the cabinetry and we used John Boos, walnut butcher block countertop for the island to compliment wood tones from the existing millwork in the home. The customer provided me with an inspiration picture for a backsplash, she knew she wanted a glass patterned backsplash. Ceramic Tiles International had released their Debut Petal mosaic tile and the customer loved it.
Prior to the remodel, the kitchen was very dark and very crowded, it did not function in a way that worked for my customer. We added under cabinet LED lights, one general ceiling fixture and LED Brio Disc lights with dimming capabilities so the customers could adjust the lighting to their specific needs.
Light fixtures were updated in the hallways as well as the kitchen.
My customer didn’t know exactly what they wanted as far as plumbing was concerned. They wanted products that were durable and easy to maintain. I chose the Blanco Performa undermount sink in the Truffle color due to is durability and the color complimented the other materials. We used Moen’s Arbor single handle pull down spray faucet and transitional soap dispenser due to its simplistic design, functionality and warranty. We used a ¾ horsepower Insinkerator disposal and a deluxe Steamball strainer basket.
The customer originally had Parquet flooring and they liked the look of real hardwood. Madeira 5” planks in Dark Gunstock oak was chosen for its color and durability. The flooring brought in warm neutral tones to compliment other materials. My customer wanted a larger window, but they had some safety concerns. We addressed their concerns by providing a larger Awning style window, using tempered glass and double locks.
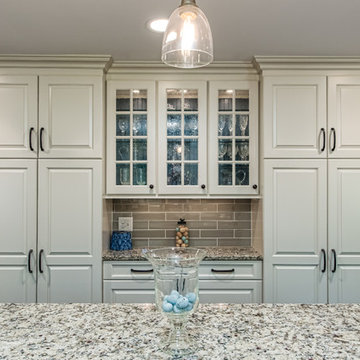
Sponsored
Columbus, OH

Trish Takacs Design
Award Winning & Highly Skilled Kitchen & Bath Designer in Columbus
 Cabinet-S-Top
This was a major remodel where the kitchen was completely gutted, flooring and soffits were removed and all the electrical in the kitchen had to be reworked and brought up to code. We used Waypoint Living Spaces for the perimeter cabinets and used a riser and crown molding to connect the cabinets to the ceiling. We chose Medallion Cabinetry for the island because the customer had her heart set on a green painted island. The hardware we used is from the Mulholland collection by Amerock. The customers have large family gathers and it was very important for them to have an island that was moveable. We used casters from Richelieu to create and island that could move easily, as well as having brakes to keep the island in place when they wanted.
Giallo Traversella granite was used on the perimeter countertops to tie together the greens and beige tones of the cabinetry and we used John Boos, walnut butcher block countertop for the island to compliment wood tones from the existing millwork in the home. The customer provided me with an inspiration picture for a backsplash, she knew she wanted a glass patterned backsplash. Ceramic Tiles International had released their Debut Petal mosaic tile and the customer loved it.
Prior to the remodel, the kitchen was very dark and very crowded, it did not function in a way that worked for my customer. We added under cabinet LED lights, one general ceiling fixture and LED Brio Disc lights with dimming capabilities so the customers could adjust the lighting to their specific needs.
Light fixtures were updated in the hallways as well as the kitchen.
My customer didn’t know exactly what they wanted as far as plumbing was concerned. They wanted products that were durable and easy to maintain. I chose the Blanco Performa undermount sink in the Truffle color due to is durability and the color complimented the other materials. We used Moen’s Arbor single handle pull down spray faucet and transitional soap dispenser due to its simplistic design, functionality and warranty. We used a ¾ horsepower Insinkerator disposal and a deluxe Steamball strainer basket.
The customer originally had Parquet flooring and they liked the look of real hardwood. Madeira 5” planks in Dark Gunstock oak was chosen for its color and durability. The flooring brought in warm neutral tones to compliment other materials. My customer wanted a larger window, but they had some safety concerns. We addressed their concerns by providing a larger Awning style window, using tempered glass and double locks.
 Cabinet-S-Top
This was a major remodel where the kitchen was completely gutted, flooring and soffits were removed and all the electrical in the kitchen had to be reworked and brought up to code. We used Waypoint Living Spaces for the perimeter cabinets and used a riser and crown molding to connect the cabinets to the ceiling. We chose Medallion Cabinetry for the island because the customer had her heart set on a green painted island. The hardware we used is from the Mulholland collection by Amerock. The customers have large family gathers and it was very important for them to have an island that was moveable. We used casters from Richelieu to create and island that could move easily, as well as having brakes to keep the island in place when they wanted.
Giallo Traversella granite was used on the perimeter countertops to tie together the greens and beige tones of the cabinetry and we used John Boos, walnut butcher block countertop for the island to compliment wood tones from the existing millwork in the home. The customer provided me with an inspiration picture for a backsplash, she knew she wanted a glass patterned backsplash. Ceramic Tiles International had released their Debut Petal mosaic tile and the customer loved it.
Prior to the remodel, the kitchen was very dark and very crowded, it did not function in a way that worked for my customer. We added under cabinet LED lights, one general ceiling fixture and LED Brio Disc lights with dimming capabilities so the customers could adjust the lighting to their specific needs.
Light fixtures were updated in the hallways as well as the kitchen.
My customer didn’t know exactly what they wanted as far as plumbing was concerned. They wanted products that were durable and easy to maintain. I chose the Blanco Performa undermount sink in the Truffle color due to is durability and the color complimented the other materials. We used Moen’s Arbor single handle pull down spray faucet and transitional soap dispenser due to its simplistic design, functionality and warranty. We used a ¾ horsepower Insinkerator disposal and a deluxe Steamball strainer basket.
The customer originally had Parquet flooring and they liked the look of real hardwood. Madeira 5” planks in Dark Gunstock oak was chosen for its color and durability. The flooring brought in warm neutral tones to compliment other materials. My customer wanted a larger window, but they had some safety concerns. We addressed their concerns by providing a larger Awning style window, using tempered glass and double locks.

 Dura Supreme Cabinetry
This contemporary kitchen features the NEW Stainless Steel Drawers and Roll-Out Shelves from Dura Supreme Cabinetry. The Bria (frameless) cabinets in Dura Supreme's "White" and Wired-Foil cabinets in Dura Supreme's "Wired-Mercury" are a great combination of cabinetry for creating the clean sleek look of this modern two-tone kitchen design.
Dura Supreme Cabinetry is excited to introduce NEW Stainless Steel Drawers and Roll-Out Shelves for their Bria Cabinetry (Frameless / Full-Access product line). For a limited time, this new metal drawer system is available exclusively from Dura Supreme as they partnered with Blum to be the first American manufacturer to bring it to market.
Dura Supreme’s Stainless Steel Drawers and Roll-Out Shelves are an attractive option for any kitchen design. Sleek, double-wall, stainless steel sides are only ½” thick and work with many of Dura Supreme’s wood drawer accessories, as well as the coordinating gray metal accessories designed specifically for Stainless Steel drawers. Concealed, undermount glides are integrated into the sides and are self-closing with a soft-close feature.
Our new Stainless Steel drawer option provides a contemporary alternative to our classic Maple dovetailed drawer. For homeowners that favor Transitional or Contemporary styling, this sleek, high-performance drawer system will be ideal!
Request a FREE Dura Supreme Brochure:
http://www.durasupreme.com/request-brochure
Find a Dura Supreme Showroom in your area:
http://www.durasupreme.com/dealer-locator
Want to become a Dura Supreme Dealer? Go to:
http://www.durasupreme.com/new-dealer-inquiry
To view a video and more info about this product go to: http://www.durasupreme.com/storage-solutions/stainless-steel-drawers-roll-outs
 Cabinet-S-Top
This was a major remodel where the kitchen was completely gutted, flooring and soffits were removed and all the electrical in the kitchen had to be reworked and brought up to code. We used Waypoint Living Spaces for the perimeter cabinets and used a riser and crown molding to connect the cabinets to the ceiling. We chose Medallion Cabinetry for the island because the customer had her heart set on a green painted island. The hardware we used is from the Mulholland collection by Amerock. The customers have large family gathers and it was very important for them to have an island that was moveable. We used casters from Richelieu to create and island that could move easily, as well as having brakes to keep the island in place when they wanted.
Giallo Traversella granite was used on the perimeter countertops to tie together the greens and beige tones of the cabinetry and we used John Boos, walnut butcher block countertop for the island to compliment wood tones from the existing millwork in the home. The customer provided me with an inspiration picture for a backsplash, she knew she wanted a glass patterned backsplash. Ceramic Tiles International had released their Debut Petal mosaic tile and the customer loved it.
Prior to the remodel, the kitchen was very dark and very crowded, it did not function in a way that worked for my customer. We added under cabinet LED lights, one general ceiling fixture and LED Brio Disc lights with dimming capabilities so the customers could adjust the lighting to their specific needs.
Light fixtures were updated in the hallways as well as the kitchen.
My customer didn’t know exactly what they wanted as far as plumbing was concerned. They wanted products that were durable and easy to maintain. I chose the Blanco Performa undermount sink in the Truffle color due to is durability and the color complimented the other materials. We used Moen’s Arbor single handle pull down spray faucet and transitional soap dispenser due to its simplistic design, functionality and warranty. We used a ¾ horsepower Insinkerator disposal and a deluxe Steamball strainer basket.
The customer originally had Parquet flooring and they liked the look of real hardwood. Madeira 5” planks in Dark Gunstock oak was chosen for its color and durability. The flooring brought in warm neutral tones to compliment other materials. My customer wanted a larger window, but they had some safety concerns. We addressed their concerns by providing a larger Awning style window, using tempered glass and double locks.
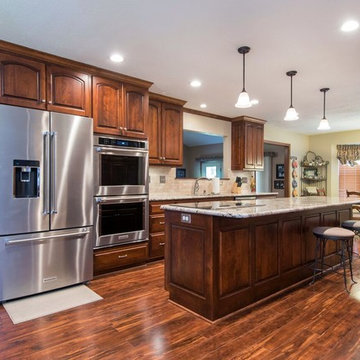

 Cabinet-S-Top
This was a major remodel where the kitchen was completely gutted, flooring and soffits were removed and all the electrical in the kitchen had to be reworked and brought up to code. We used Waypoint Living Spaces for the perimeter cabinets and used a riser and crown molding to connect the cabinets to the ceiling. We chose Medallion Cabinetry for the island because the customer had her heart set on a green painted island. The hardware we used is from the Mulholland collection by Amerock. The customers have large family gathers and it was very important for them to have an island that was moveable. We used casters from Richelieu to create and island that could move easily, as well as having brakes to keep the island in place when they wanted.
Giallo Traversella granite was used on the perimeter countertops to tie together the greens and beige tones of the cabinetry and we used John Boos, walnut butcher block countertop for the island to compliment wood tones from the existing millwork in the home. The customer provided me with an inspiration picture for a backsplash, she knew she wanted a glass patterned backsplash. Ceramic Tiles International had released their Debut Petal mosaic tile and the customer loved it.
Prior to the remodel, the kitchen was very dark and very crowded, it did not function in a way that worked for my customer. We added under cabinet LED lights, one general ceiling fixture and LED Brio Disc lights with dimming capabilities so the customers could adjust the lighting to their specific needs.
Light fixtures were updated in the hallways as well as the kitchen.
My customer didn’t know exactly what they wanted as far as plumbing was concerned. They wanted products that were durable and easy to maintain. I chose the Blanco Performa undermount sink in the Truffle color due to is durability and the color complimented the other materials. We used Moen’s Arbor single handle pull down spray faucet and transitional soap dispenser due to its simplistic design, functionality and warranty. We used a ¾ horsepower Insinkerator disposal and a deluxe Steamball strainer basket.
The customer originally had Parquet flooring and they liked the look of real hardwood. Madeira 5” planks in Dark Gunstock oak was chosen for its color and durability. The flooring brought in warm neutral tones to compliment other materials. My customer wanted a larger window, but they had some safety concerns. We addressed their concerns by providing a larger Awning style window, using tempered glass and double locks.
 Cabinet-S-Top
This was a major remodel where the kitchen was completely gutted, flooring and soffits were removed and all the electrical in the kitchen had to be reworked and brought up to code. We used Waypoint Living Spaces for the perimeter cabinets and used a riser and crown molding to connect the cabinets to the ceiling. We chose Medallion Cabinetry for the island because the customer had her heart set on a green painted island. The hardware we used is from the Mulholland collection by Amerock. The customers have large family gathers and it was very important for them to have an island that was moveable. We used casters from Richelieu to create and island that could move easily, as well as having brakes to keep the island in place when they wanted.
Giallo Traversella granite was used on the perimeter countertops to tie together the greens and beige tones of the cabinetry and we used John Boos, walnut butcher block countertop for the island to compliment wood tones from the existing millwork in the home. The customer provided me with an inspiration picture for a backsplash, she knew she wanted a glass patterned backsplash. Ceramic Tiles International had released their Debut Petal mosaic tile and the customer loved it.
Prior to the remodel, the kitchen was very dark and very crowded, it did not function in a way that worked for my customer. We added under cabinet LED lights, one general ceiling fixture and LED Brio Disc lights with dimming capabilities so the customers could adjust the lighting to their specific needs.
Light fixtures were updated in the hallways as well as the kitchen.
My customer didn’t know exactly what they wanted as far as plumbing was concerned. They wanted products that were durable and easy to maintain. I chose the Blanco Performa undermount sink in the Truffle color due to is durability and the color complimented the other materials. We used Moen’s Arbor single handle pull down spray faucet and transitional soap dispenser due to its simplistic design, functionality and warranty. We used a ¾ horsepower Insinkerator disposal and a deluxe Steamball strainer basket.
The customer originally had Parquet flooring and they liked the look of real hardwood. Madeira 5” planks in Dark Gunstock oak was chosen for its color and durability. The flooring brought in warm neutral tones to compliment other materials. My customer wanted a larger window, but they had some safety concerns. We addressed their concerns by providing a larger Awning style window, using tempered glass and double locks.
 Cabinet-S-Top
This was a major remodel where the kitchen was completely gutted, flooring and soffits were removed and all the electrical in the kitchen had to be reworked and brought up to code. We used Waypoint Living Spaces for the perimeter cabinets and used a riser and crown molding to connect the cabinets to the ceiling. We chose Medallion Cabinetry for the island because the customer had her heart set on a green painted island. The hardware we used is from the Mulholland collection by Amerock. The customers have large family gathers and it was very important for them to have an island that was moveable. We used casters from Richelieu to create and island that could move easily, as well as having brakes to keep the island in place when they wanted.
Giallo Traversella granite was used on the perimeter countertops to tie together the greens and beige tones of the cabinetry and we used John Boos, walnut butcher block countertop for the island to compliment wood tones from the existing millwork in the home. The customer provided me with an inspiration picture for a backsplash, she knew she wanted a glass patterned backsplash. Ceramic Tiles International had released their Debut Petal mosaic tile and the customer loved it.
Prior to the remodel, the kitchen was very dark and very crowded, it did not function in a way that worked for my customer. We added under cabinet LED lights, one general ceiling fixture and LED Brio Disc lights with dimming capabilities so the customers could adjust the lighting to their specific needs.
Light fixtures were updated in the hallways as well as the kitchen.
My customer didn’t know exactly what they wanted as far as plumbing was concerned. They wanted products that were durable and easy to maintain. I chose the Blanco Performa undermount sink in the Truffle color due to is durability and the color complimented the other materials. We used Moen’s Arbor single handle pull down spray faucet and transitional soap dispenser due to its simplistic design, functionality and warranty. We used a ¾ horsepower Insinkerator disposal and a deluxe Steamball strainer basket.
The customer originally had Parquet flooring and they liked the look of real hardwood. Madeira 5” planks in Dark Gunstock oak was chosen for its color and durability. The flooring brought in warm neutral tones to compliment other materials. My customer wanted a larger window, but they had some safety concerns. We addressed their concerns by providing a larger Awning style window, using tempered glass and double locks.
4