
Search results for "Specific regulations" in Home Design Ideas

 Pioneer West Homes
If you dreamed of living in rural Italy, you don’t have to go further than Villa de Palma. This 4,863 square-foot rustic Tuscan home is both beautiful and energy efficient. A beautiful stone entry introduces this unique home that features vaulted ceilings, locally handmade front door and a fully finished basement. From the tropical solarium housing an exercise pool to rustic trim work and beautiful slate tile, no detail was overlooked. The one-of-a-kind distinctive details include two fireplaces, barn door, alder cabinetry, arched doorways and rustic wood exterior accents. The luxurious interior features earth tone colors throughout that make you feel at home. The home was specifically designed to fit into the challenging hillside lot; situated to take advantage of the sensational views of the mountains to the West while still using passive solar to regulate the home’s temperature. The renewable energy systems include a 10 kW photovoltaic system and a solar thermal system for heating domestic hot water. The first two levels of the home are constructed of ICF (insulated concrete forms). Foam is sprayed on the sheeting of the roof to provide a conditioned attic space that is unvented to reduce utility cost and risk of fire. A hot water loop is used to provide hot water quickly to each fixture and reduce water waste. A HRV (heat recovery ventilator) is installed to exchange air in the home and provide point of use exhaust. Photo by Paul Kohlman
 Travis Donnelly Wallpaper
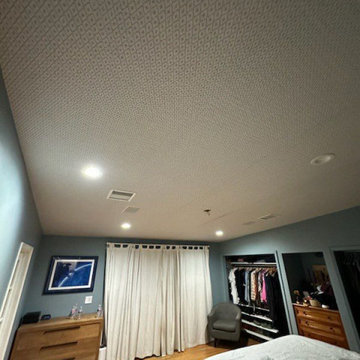
Wallpaper Installation – Ceiling in Warrington
Elevate your fifth wall with professional ceiling wallpaper installation in Warrington. As your local wallpaper specialist, I transform overlooked ceilings into stunning design features with precision craftsmanship.
✔ Ceiling-Specific Expertise
Ultra-lightweight vinyl wallpaper designed for overhead use
Specialized adhesives that prevent sagging (10-year guarantee)
Laser-guided pattern alignment across complex angles
✔ Warrington-Adapted Solutions
Humidity-resistant materials for UK climate
Thermal-regulating options for period properties
Sound-dampening textures for noise reduction
✔ Signature Ceiling Services
Coving integration for seamless transitions
Vaulted ceiling enhancements
Anaglypta restoration for heritage homes
Why Warrington Homeowners Choose Us:
✔ Free 3D Visualisation – See your ceiling design before installation
✔ Historic Building Experience – Work with conservation officers
✔ Minimal Disruption – Dust-free installation process
✔ 1-Day Transformations – Most projects completed same-day
Popular Warrington Ceiling Styles:
• Cheshire Classic – Traditional damasks and toile
• Modern Geometric – Bold contemporary patterns
• Industrial Loft – Faux metal and concrete finishes
• Nature Inspired – Cloudscapes or woodland canopies
Serving All of Warrington – From the town centre to surrounding villages.

Find the right local pro for your project

 User
User
Specifications
Plan Styles
Bedroom Features
Upstairs Master Bdrm
Walk In Closet
Garage
Oversized Garage
Side Entry Garage
Lot Characteristics
Suited For Corner Lot
Suited For Sloping Lot
Area
Upper Floor Sq Ft
924 sq ft
Total Sq Ft
2192 sq ft
Main Floor Sq Ft
1268 sq ft
Lower Floor Sq Ft
900 sq ft
Designer Notes
Included
EXTERIOR ELEVATIONS: shows the front, rear and sides of the house, including exterior materials, details and measurements.
FOUNDATION PLAN: includes drawings for a full, daylight or partial basement. Some of our plans are drawn with a crawlspace, but we do not offer plans with pole foundation. All necessary notations and dimensions are included. Foundation options will vary for each plan. If the home you want does not have the type of foundation you desire, one may be developed for you by contacting us.
DETAILED FLOOR PLANS: shows the placement of the interior walls and the dimensions for rooms, doors, windows, stairways, etc., of each level of the house.
CROSS SECTIONS: shows details of the house as though it were cut in slices from the roof to the foundation. The cross sections specify the home's construction, insulation, flooring and roofing details. Most of our Cross Sections are common sections of that particular style of house. If the house is complex a Cross Section or other form of detail will be included to help explain how parts of that house will fit together.
ROOF DETAILS: shows slope, pitch and location of dormers, gables and other roof elements, including skylights. These details may be shown on the elevation sheet or on a separate diagram. Note: If trusses are used, we suggest using a local truss manufacturer to design your trusses to comply with your local codes and regulations. If Rafters are used we suggest using your local lumber company. Most lumber companies employ structural engineers who can figure out the proper spans and loads for this type of roof system.
Additional Rooms
Great Room Living Room
Unfinished Future Space
Outdo
 Dynamic Garage Door
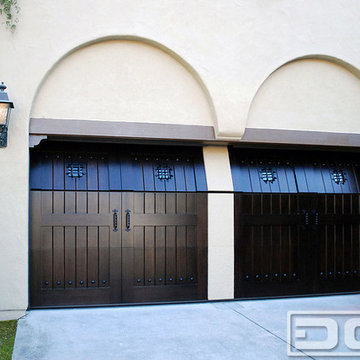
Getting your homeowner's association board to approve your new custom garage doors can seem daunting. Dynamic Garage Door as a custom design and manufacturing firm has come across this situation quite frequently with a phenomenal success approval rate!
In order to get approval for your custom garage door approval there are a few basic points you must understand. First off, your HOA is committed to preserving the neighborhood's curb appeal integrity by focusing on the impact your new custom garage doors might have on your house and the houses of your neighbors. It is important to understand that your curb appeal decisions will impact your home and neighborhood alike. Too many companies offer semi-custom wood doors without the true understanding of the client's need and the essence of their home's architectural style. The garage door design you choose needs to comply with neighborhood regulations while complement your home's architecture. At Dynamic Garage Door, our designers are well-rounded in the garage door industry and so we can suggest or develop designs that will reinforce the natural appearance of your home's style. If you can prove to your HOA that you've done your homework and that the garage door design you chose will complement not only your home but the neighborhood you'll be surprised when your proposal is marked with the approval stamp!
This garage door is actually a single double-car door not two as it appears. The reason is that this garage used to have two separate doors with a post in the middle. The post in the middle made it difficult to use the garage on a daily basis so the post was removed to facilitate the use of the garage. The HOA wasn't too happy about the removal of the post as it was an essential part of the arches located right above the garage doors. You can clearly see how that would have been disruptive if the homeowner went with a regular wood door and not one custom designed and manufactured by Dynamic Garage Door.
This garage door was specifically designed to address the HOA's concern about the center post removal and the effect it would have on the curb appeal of the home with the incomplete double arch look. So we addressed this by crafting the door with a false center post in the middle that was textured and painted the same color of the house to give off that illusion that the post is still there. Overall, it gives the home a complete finished appearance with two independent-looking doors and original post. The homeowner got the entire width of the opening to use at the push of a button so having a larger car won't be a problem anymore. The neighbors are all happy and no one seems to notice the center post is actually fake!
Got an interesting garage door project you want our designers to review and price out for you? Give us a call at (855) 343-DOOR


Sponsored
Delaware, OH

Buckeye Basements, Inc.
Central Ohio's Basement Finishing ExpertsBest Of Houzz '13-'21

 Talon Construction Inc.
Designing and building a kitchen addition is a complex process that involves multiple steps and considerations. Here is a general outline to help you get started on your kitchen addition project:
Define Your Goals and Budget:
• Determine the purpose of the kitchen addition. Is it for more cooking space, a dining area, or a combination of both?
• Establish a realistic budget for your project. Consider all costs, including construction, permits, materials, and furnishings.
Hire a Design Professional:
• Seek the services of a design build company who specializes in kitchen additions.
• Discuss your vision, needs, and budget with the design professional to create a design concept.
Site Evaluation:
• Assess the existing space and structural condition of your home to ensure it can support the addition.
• Consider factors like zoning regulations, setbacks, and building codes.
Design Development:
• Collaborate with your design professional to refine the concept, including the layout, size, and architectural style.
• Choose materials, finishes, and fixtures that fit your design and budget.
Obtain Permits:
• Consult with your local design build contractor to determine the necessary permits and approvals.
• Prepare and submit all required documents, including architectural drawings and engineering plans.
Create Construction Documents:
• Work with your design build professional to develop detailed construction drawings and specifications.
• These documents will serve as a guide for contractors during construction.
Hire a design build contractor:
• Check references, credentials, and licenses before selecting a contractor.
• Sign a detailed contract that outlines the scope of work, timeline, and payment schedule.
Construction Phase:
• Demolition: If needed, remove any existing structures or walls.
• Foundation: Construct the foundation for the addition.
• Framing: Build the structural framework of the addition.
• Plumbing, Electrical, and HVAC: Install or update utilities as required.
• Insulation: Ensure proper insulation for energy efficiency.
• Drywall and Finish Work: Complete the walls and ceilings.
• Flooring and Cabinetry: Install flooring and kitchen cabinets.
• Appliances and Fixtures: Add appliances, plumbing fixtures, and lighting.
• Paint and Finish: Apply paint and finishes to achieve the desired look.
• Final Inspection: Schedule inspections to ensure compliance with building codes.
Final Inspections and Approvals:
• Arrange for final inspections to ensure the addition meets all safety and code requirements.
• Obtain any necessary certificates of occupancy or compliance.
Move In and Enjoy:
• Once all inspections and approvals are received, you can move into your new kitchen addition and start enjoying it.
Remember that every kitchen addition project is unique, so adapt this outline to your specific needs and circumstances. Consulting with professionals and obtaining the required permits and inspections is crucial to a successful and safe project.
 Talon Construction Inc.
Designing and building a kitchen addition is a complex process that involves multiple steps and considerations. Here is a general outline to help you get started on your kitchen addition project:
Define Your Goals and Budget:
• Determine the purpose of the kitchen addition. Is it for more cooking space, a dining area, or a combination of both?
• Establish a realistic budget for your project. Consider all costs, including construction, permits, materials, and furnishings.
Hire a Design Professional:
• Seek the services of a design build company who specializes in kitchen additions.
• Discuss your vision, needs, and budget with the design professional to create a design concept.
Site Evaluation:
• Assess the existing space and structural condition of your home to ensure it can support the addition.
• Consider factors like zoning regulations, setbacks, and building codes.
Design Development:
• Collaborate with your design professional to refine the concept, including the layout, size, and architectural style.
• Choose materials, finishes, and fixtures that fit your design and budget.
Obtain Permits:
• Consult with your local design build contractor to determine the necessary permits and approvals.
• Prepare and submit all required documents, including architectural drawings and engineering plans.
Create Construction Documents:
• Work with your design build professional to develop detailed construction drawings and specifications.
• These documents will serve as a guide for contractors during construction.
Hire a design build contractor:
• Check references, credentials, and licenses before selecting a contractor.
• Sign a detailed contract that outlines the scope of work, timeline, and payment schedule.
Construction Phase:
• Demolition: If needed, remove any existing structures or walls.
• Foundation: Construct the foundation for the addition.
• Framing: Build the structural framework of the addition.
• Plumbing, Electrical, and HVAC: Install or update utilities as required.
• Insulation: Ensure proper insulation for energy efficiency.
• Drywall and Finish Work: Complete the walls and ceilings.
• Flooring and Cabinetry: Install flooring and kitchen cabinets.
• Appliances and Fixtures: Add appliances, plumbing fixtures, and lighting.
• Paint and Finish: Apply paint and finishes to achieve the desired look.
• Final Inspection: Schedule inspections to ensure compliance with building codes.
Final Inspections and Approvals:
• Arrange for final inspections to ensure the addition meets all safety and code requirements.
• Obtain any necessary certificates of occupancy or compliance.
Move In and Enjoy:
• Once all inspections and approvals are received, you can move into your new kitchen addition and start enjoying it.
Remember that every kitchen addition project is unique, so adapt this outline to your specific needs and circumstances. Consulting with professionals and obtaining the required permits and inspections is crucial to a successful and safe project.
 Talon Construction Inc.
Designing and building a kitchen addition is a complex process that involves multiple steps and considerations. Here is a general outline to help you get started on your kitchen addition project:
Define Your Goals and Budget:
• Determine the purpose of the kitchen addition. Is it for more cooking space, a dining area, or a combination of both?
• Establish a realistic budget for your project. Consider all costs, including construction, permits, materials, and furnishings.
Hire a Design Professional:
• Seek the services of a design build company who specializes in kitchen additions.
• Discuss your vision, needs, and budget with the design professional to create a design concept.
Site Evaluation:
• Assess the existing space and structural condition of your home to ensure it can support the addition.
• Consider factors like zoning regulations, setbacks, and building codes.
Design Development:
• Collaborate with your design professional to refine the concept, including the layout, size, and architectural style.
• Choose materials, finishes, and fixtures that fit your design and budget.
Obtain Permits:
• Consult with your local design build contractor to determine the necessary permits and approvals.
• Prepare and submit all required documents, including architectural drawings and engineering plans.
Create Construction Documents:
• Work with your design build professional to develop detailed construction drawings and specifications.
• These documents will serve as a guide for contractors during construction.
Hire a design build contractor:
• Check references, credentials, and licenses before selecting a contractor.
• Sign a detailed contract that outlines the scope of work, timeline, and payment schedule.
Construction Phase:
• Demolition: If needed, remove any existing structures or walls.
• Foundation: Construct the foundation for the addition.
• Framing: Build the structural framework of the addition.
• Plumbing, Electrical, and HVAC: Install or update utilities as required.
• Insulation: Ensure proper insulation for energy efficiency.
• Drywall and Finish Work: Complete the walls and ceilings.
• Flooring and Cabinetry: Install flooring and kitchen cabinets.
• Appliances and Fixtures: Add appliances, plumbing fixtures, and lighting.
• Paint and Finish: Apply paint and finishes to achieve the desired look.
• Final Inspection: Schedule inspections to ensure compliance with building codes.
Final Inspections and Approvals:
• Arrange for final inspections to ensure the addition meets all safety and code requirements.
• Obtain any necessary certificates of occupancy or compliance.
Move In and Enjoy:
• Once all inspections and approvals are received, you can move into your new kitchen addition and start enjoying it.
Remember that every kitchen addition project is unique, so adapt this outline to your specific needs and circumstances. Consulting with professionals and obtaining the required permits and inspections is crucial to a successful and safe project.
 Talon Construction Inc.
Designing and building a kitchen addition is a complex process that involves multiple steps and considerations. Here is a general outline to help you get started on your kitchen addition project:
Define Your Goals and Budget:
• Determine the purpose of the kitchen addition. Is it for more cooking space, a dining area, or a combination of both?
• Establish a realistic budget for your project. Consider all costs, including construction, permits, materials, and furnishings.
Hire a Design Professional:
• Seek the services of a design build company who specializes in kitchen additions.
• Discuss your vision, needs, and budget with the design professional to create a design concept.
Site Evaluation:
• Assess the existing space and structural condition of your home to ensure it can support the addition.
• Consider factors like zoning regulations, setbacks, and building codes.
Design Development:
• Collaborate with your design professional to refine the concept, including the layout, size, and architectural style.
• Choose materials, finishes, and fixtures that fit your design and budget.
Obtain Permits:
• Consult with your local design build contractor to determine the necessary permits and approvals.
• Prepare and submit all required documents, including architectural drawings and engineering plans.
Create Construction Documents:
• Work with your design build professional to develop detailed construction drawings and specifications.
• These documents will serve as a guide for contractors during construction.
Hire a design build contractor:
• Check references, credentials, and licenses before selecting a contractor.
• Sign a detailed contract that outlines the scope of work, timeline, and payment schedule.
Construction Phase:
• Demolition: If needed, remove any existing structures or walls.
• Foundation: Construct the foundation for the addition.
• Framing: Build the structural framework of the addition.
• Plumbing, Electrical, and HVAC: Install or update utilities as required.
• Insulation: Ensure proper insulation for energy efficiency.
• Drywall and Finish Work: Complete the walls and ceilings.
• Flooring and Cabinetry: Install flooring and kitchen cabinets.
• Appliances and Fixtures: Add appliances, plumbing fixtures, and lighting.
• Paint and Finish: Apply paint and finishes to achieve the desired look.
• Final Inspection: Schedule inspections to ensure compliance with building codes.
Final Inspections and Approvals:
• Arrange for final inspections to ensure the addition meets all safety and code requirements.
• Obtain any necessary certificates of occupancy or compliance.
Move In and Enjoy:
• Once all inspections and approvals are received, you can move into your new kitchen addition and start enjoying it.
Remember that every kitchen addition project is unique, so adapt this outline to your specific needs and circumstances. Consulting with professionals and obtaining the required permits and inspections is crucial to a successful and safe project.
 Talon Construction Inc.
Designing and building a kitchen addition is a complex process that involves multiple steps and considerations. Here is a general outline to help you get started on your kitchen addition project:
Define Your Goals and Budget:
• Determine the purpose of the kitchen addition. Is it for more cooking space, a dining area, or a combination of both?
• Establish a realistic budget for your project. Consider all costs, including construction, permits, materials, and furnishings.
Hire a Design Professional:
• Seek the services of a design build company who specializes in kitchen additions.
• Discuss your vision, needs, and budget with the design professional to create a design concept.
Site Evaluation:
• Assess the existing space and structural condition of your home to ensure it can support the addition.
• Consider factors like zoning regulations, setbacks, and building codes.
Design Development:
• Collaborate with your design professional to refine the concept, including the layout, size, and architectural style.
• Choose materials, finishes, and fixtures that fit your design and budget.
Obtain Permits:
• Consult with your local design build contractor to determine the necessary permits and approvals.
• Prepare and submit all required documents, including architectural drawings and engineering plans.
Create Construction Documents:
• Work with your design build professional to develop detailed construction drawings and specifications.
• These documents will serve as a guide for contractors during construction.
Hire a design build contractor:
• Check references, credentials, and licenses before selecting a contractor.
• Sign a detailed contract that outlines the scope of work, timeline, and payment schedule.
Construction Phase:
• Demolition: If needed, remove any existing structures or walls.
• Foundation: Construct the foundation for the addition.
• Framing: Build the structural framework of the addition.
• Plumbing, Electrical, and HVAC: Install or update utilities as required.
• Insulation: Ensure proper insulation for energy efficiency.
• Drywall and Finish Work: Complete the walls and ceilings.
• Flooring and Cabinetry: Install flooring and kitchen cabinets.
• Appliances and Fixtures: Add appliances, plumbing fixtures, and lighting.
• Paint and Finish: Apply paint and finishes to achieve the desired look.
• Final Inspection: Schedule inspections to ensure compliance with building codes.
Final Inspections and Approvals:
• Arrange for final inspections to ensure the addition meets all safety and code requirements.
• Obtain any necessary certificates of occupancy or compliance.
Move In and Enjoy:
• Once all inspections and approvals are received, you can move into your new kitchen addition and start enjoying it.
Remember that every kitchen addition project is unique, so adapt this outline to your specific needs and circumstances. Consulting with professionals and obtaining the required permits and inspections is crucial to a successful and safe project.
 Talon Construction Inc.
Designing and building a kitchen addition is a complex process that involves multiple steps and considerations. Here is a general outline to help you get started on your kitchen addition project:
Define Your Goals and Budget:
• Determine the purpose of the kitchen addition. Is it for more cooking space, a dining area, or a combination of both?
• Establish a realistic budget for your project. Consider all costs, including construction, permits, materials, and furnishings.
Hire a Design Professional:
• Seek the services of a design build company who specializes in kitchen additions.
• Discuss your vision, needs, and budget with the design professional to create a design concept.
Site Evaluation:
• Assess the existing space and structural condition of your home to ensure it can support the addition.
• Consider factors like zoning regulations, setbacks, and building codes.
Design Development:
• Collaborate with your design professional to refine the concept, including the layout, size, and architectural style.
• Choose materials, finishes, and fixtures that fit your design and budget.
Obtain Permits:
• Consult with your local design build contractor to determine the necessary permits and approvals.
• Prepare and submit all required documents, including architectural drawings and engineering plans.
Create Construction Documents:
• Work with your design build professional to develop detailed construction drawings and specifications.
• These documents will serve as a guide for contractors during construction.
Hire a design build contractor:
• Check references, credentials, and licenses before selecting a contractor.
• Sign a detailed contract that outlines the scope of work, timeline, and payment schedule.
Construction Phase:
• Demolition: If needed, remove any existing structures or walls.
• Foundation: Construct the foundation for the addition.
• Framing: Build the structural framework of the addition.
• Plumbing, Electrical, and HVAC: Install or update utilities as required.
• Insulation: Ensure proper insulation for energy efficiency.
• Drywall and Finish Work: Complete the walls and ceilings.
• Flooring and Cabinetry: Install flooring and kitchen cabinets.
• Appliances and Fixtures: Add appliances, plumbing fixtures, and lighting.
• Paint and Finish: Apply paint and finishes to achieve the desired look.
• Final Inspection: Schedule inspections to ensure compliance with building codes.
Final Inspections and Approvals:
• Arrange for final inspections to ensure the addition meets all safety and code requirements.
• Obtain any necessary certificates of occupancy or compliance.
Move In and Enjoy:
• Once all inspections and approvals are received, you can move into your new kitchen addition and start enjoying it.
Remember that every kitchen addition project is unique, so adapt this outline to your specific needs and circumstances. Consulting with professionals and obtaining the required permits and inspections is crucial to a successful and safe project.
 Talon Construction Inc.
Designing and building a kitchen addition is a complex process that involves multiple steps and considerations. Here is a general outline to help you get started on your kitchen addition project:
Define Your Goals and Budget:
• Determine the purpose of the kitchen addition. Is it for more cooking space, a dining area, or a combination of both?
• Establish a realistic budget for your project. Consider all costs, including construction, permits, materials, and furnishings.
Hire a Design Professional:
• Seek the services of a design build company who specializes in kitchen additions.
• Discuss your vision, needs, and budget with the design professional to create a design concept.
Site Evaluation:
• Assess the existing space and structural condition of your home to ensure it can support the addition.
• Consider factors like zoning regulations, setbacks, and building codes.
Design Development:
• Collaborate with your design professional to refine the concept, including the layout, size, and architectural style.
• Choose materials, finishes, and fixtures that fit your design and budget.
Obtain Permits:
• Consult with your local design build contractor to determine the necessary permits and approvals.
• Prepare and submit all required documents, including architectural drawings and engineering plans.
Create Construction Documents:
• Work with your design build professional to develop detailed construction drawings and specifications.
• These documents will serve as a guide for contractors during construction.
Hire a design build contractor:
• Check references, credentials, and licenses before selecting a contractor.
• Sign a detailed contract that outlines the scope of work, timeline, and payment schedule.
Construction Phase:
• Demolition: If needed, remove any existing structures or walls.
• Foundation: Construct the foundation for the addition.
• Framing: Build the structural framework of the addition.
• Plumbing, Electrical, and HVAC: Install or update utilities as required.
• Insulation: Ensure proper insulation for energy efficiency.
• Drywall and Finish Work: Complete the walls and ceilings.
• Flooring and Cabinetry: Install flooring and kitchen cabinets.
• Appliances and Fixtures: Add appliances, plumbing fixtures, and lighting.
• Paint and Finish: Apply paint and finishes to achieve the desired look.
• Final Inspection: Schedule inspections to ensure compliance with building codes.
Final Inspections and Approvals:
• Arrange for final inspections to ensure the addition meets all safety and code requirements.
• Obtain any necessary certificates of occupancy or compliance.
Move In and Enjoy:
• Once all inspections and approvals are received, you can move into your new kitchen addition and start enjoying it.
Remember that every kitchen addition project is unique, so adapt this outline to your specific needs and circumstances. Consulting with professionals and obtaining the required permits and inspections is crucial to a successful and safe project.

 Ismerio Construction LLC
Transform Your Workspace with Our Office Addition Services
At Ismerio Construction, we understand that your office space is more than just a place to work—it's the heart of your business. Whether you're expanding to accommodate a growing team, reconfiguring your layout for better productivity, or enhancing your space to reflect your brand's identity, our office addition services are designed to meet your specific needs with precision and creativity.
Why Choose Us for Your Office Addition?
1. Tailored Solutions:
We take the time to understand your business requirements and vision. Our team collaborates with you to design and build an office addition that seamlessly integrates with your existing space, enhancing both functionality and aesthetics.
2. Expert Craftsmanship:
Our skilled professionals bring years of experience and a keen eye for detail to every project. We use high-quality materials and innovative construction techniques to ensure your office addition is built to last.
3. Efficient Project Management:
From initial consultation to final inspection, we manage every aspect of your project with efficiency and transparency. Our streamlined process minimizes disruptions to your daily operations, ensuring a smooth and timely completion.
4. Sustainable Practices:
We are committed to environmentally responsible construction. Our office additions incorporate sustainable materials and energy-efficient designs, helping you create a greener workplace.
Our Office Addition Services Include:
Space Planning and Design:
Detailed planning and design to maximize your office layout and functionality.
Interior and Exterior Construction:
Comprehensive construction services for both the interior and exterior of your office addition.
Custom Fixtures and Finishes:
Bespoke solutions to match your unique style and requirements, from custom cabinetry to specialized lighting.
Compliance and Safety:
Ensuring all additions meet local building codes and safety regulations for a secure work environment.
Let's Build Your Future Together
Ready to expand your office space? Contact [Your Company Name] today to schedule a consultation. Let us help you create an inspiring and efficient workspace that supports your business growth and success.

 Stonelace Designs
Originally, the exterior of the Napa ranch residence was a standard knocked down stucco finish. We covered over the entire exterior of the house with a natural plaster product that has been made in Italy for centuries, known as Rialto or Vero. This product is a combination of slaked lime mixed with 60% reconstituted crushed marble dust. Quarried from the legendary Carrara marble mines. The finish itself is a vertically combed striated texture embedded into the plaster. While it cures, a transparent group of patinas are applied to the stone-like plaster substance to create a look of an aged villa.
 Windy City Painters
Elevate Your Chicago High-Rise: Expert Painting and Drywall Repair
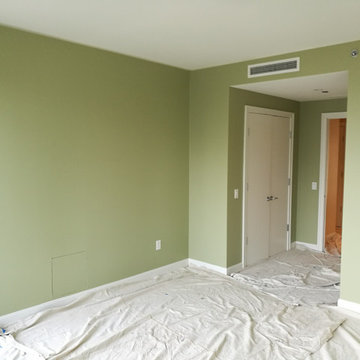
Looking for a professional painter near me in downtown Chicago? From the sleek glass towers of the Loop and Lakeshore East to the historic loft conversions in the West Loop, our team delivers premium craftsmanship tailored to the heart of the city. This recent project in a luxury downtown condo highlights our expertise in blending modern aesthetics with the structural demands of urban living.
We specialize in high-end finishes, utilizing premium Benjamin Moore and Sherwin-Williams coatings specifically selected for Chicago’s unique interior environments. Whether it's refreshing a contemporary penthouse or performing seamless drywall repair in a River North flat, we ensure a flawless finish every time.
OUR PROCESS: PRECISION IN THE HEART OF CHICAGO
1. Expert Drywall Repair & Prep
Living in downtown Chicago means dealing with building vibrations and settling. Our thorough surface inspection often reveals hairline cracks or settling gaps. As a leading Chicago painting contractor, we perform expert drywall repair, patching, and sanding to ensure a perfectly smooth "Level 5" finish before a drop of paint even touches the wall.
2. Specialized Priming
High-rise walls often feature various textures or previous high-gloss finishes. We apply specialized, low-VOC primers to ensure maximum adhesion and color vibrance while keeping your indoor air quality clean—a must for city dwellers.
3. Professional Paint Application
Using a combination of precision brushwork and specialized rollers, we apply multiple coats to achieve rich, even depth. Our techniques are designed to highlight the architectural lines of modern Chicago floor plans.
4. Meticulous Final Review
The "Windy City" standard means no mess left behind. Our team performs a rigorous final inspection and deep cleanup, ensuring your downtown home is move-in ready the moment we finish.
WHY CHICAGO DOWNTOWN HOMES REQUIRE SPECIALISTS
Urban painting presents specific challenges that suburban contractors might miss:
Building Regulations: We navigate strict HOA rules, freight elevator bookings, and insurance requirements (COIs) common in Loop high-rises.
Climate Control: Managing humidity and temperature fluctuations in glass-walled units to ensure proper paint curing.
Drywall Integrity: Addressing cracks caused by the natural swaying and settling of Chicago’s tallest buildings.
Pro Tip: When hiring a Chicago painter, always verify they carry the high-limit liability insurance required by downtown property management companies.
FREQUENTLY ASKED QUESTIONS
Q: Why choose a painter near me for downtown Chicago?
A: Local contractors are familiar with the logistical hurdles of the Loop and Gold Coast, including parking, building access, and specific structural challenges of high-rise units.
Q: Can you handle drywall repair and painting in one project?
A: Yes! As a full-service painting contractor, we handle everything from water damage repair and settling cracks to the final decorative coat, providing a seamless experience.
Q: Are your paints safe for small condo spaces?
A: Absolutely. We prioritize low-VOC and Zero-VOC premium paints that are odorless and safe for high-density living environments.
Q: How do I get an estimate for my downtown unit?
A: We offer flexible scheduling for on-site consultations throughout the West Loop, Streeterville, and the South Loop.
Ready to transform your urban space?
See more of our work and request a free estimate at windypainters.com.
Windy City Painters | Chicago’s Premier Painting & Drywall Specialists
 Hierarchy Architecture + Design, PLLC
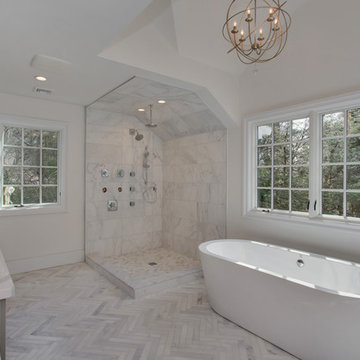
Master bathroom with an elegant freestanding bathtub underneath a traditional light fixture and finished with varying white & gray patterned tiling in this updated 1940's Custom Cape Ranch. Chevron floor tiling. The classically detailed arched doorways and original wainscot paneling in the living room, dining room, stair hall and bedrooms were kept and refinished, as were the many original red brick fireplaces found in most rooms. These and other Traditional features were kept to balance the contemporary renovations resulting in a Transitional style throughout the home. Large windows and French doors were added to allow ample natural light to enter the home. The mainly white interior enhances this light and brightens a previously dark home.
Architect: T.J. Costello - Hierarchy Architecture + Design, PLLC
Interior Designer: Helena Clunies-Ross
 User
User
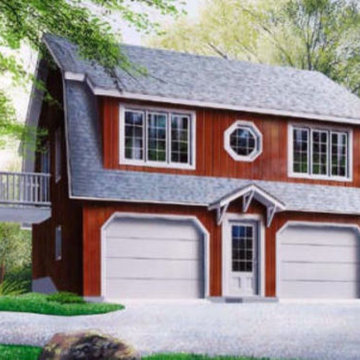
Country house plan - 23-441 from Houseplans.com
Questions? Call us at 1-800-913-2350
Photographs may show modified designs. All images are copyrighted.
Plan 23-441
992 sq ft
2 beds
1.50 baths
28' wide
28' deep
×
Plans
Main Floor Plan
Reverse
Upper Floor Plan
Reverse
Lower Floor Plan
Reverse
Specifications
Plan Styles
Country
Farmhouse
Exterior Wall Framing
Framing
2"x6"
Bedroom Features
Main Floor Bed Bath
Area
Main Floor Sq Ft
896 sq ft
Total Sq Ft
992 sq ft
Garage Sq Ft
800 sq ft
Lower Floor Sq Ft
96 sq ft
Garage
Garage Under
Basic Features
Baths
1.50
Garage Stalls
2
Stories
2
Bedrooms
2
Potential Bedrooms
0
Dimension
Depth
28'
Width
28'
Designer Notes
Included
EXTERIOR ELEVATIONS: Detailed drawings showing how the house will look from each elevation once it is built.
FLOOR PLANS: These drawings will show each level of the house, indicating the dimensions of each room, the location of walls, windows, stairs, structure to hold the possible floor above and basic electrical layout.
FOUNDATION PLAN: This fully detailed drawing is showing all pertinent notes, the dimensions, height and thickness of the poured foundation. Structure to hold the floor above is also shown. Most plans come with a full basement, unless otherwise specified.
CROSS SECTION: These construction drawings will show you sections of the house as it cuts through the length and depth indicating the height and details for each volume.
ROOF PLAN: This layout will help you understand the structure of the roofing system and the location of each of the main trusses.
TRUSS DIAGRAM: General layout and truss diagram that you can bring to a local manufacturer or simply to help the builder with his structure.
CONSTRUCTION DETAILS: wall sections and stair section: In these pages you will get general construction details and staircase section to conform with up to date ways of building and regulations.
Pricing
Plan Set
Price
5 Copy Set
$755.00
8 Copy Set
$780.00
PDF Set
$935.00
Reproducible Set
$935.00
CAD Set
$1
 Michael Hally Design, Inc
Waterview Times Two
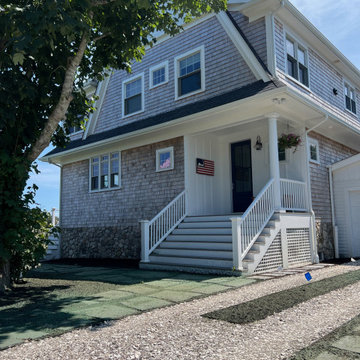
It is all about view here where river meets sea. The “new home” (actually an addition) is well-positioned on the site. Views are framed in traditional double hung windows with a six lites over one lite configuration. The waterside elevations are clad in a variety of multi-leaf sliding glass doors for view and access to the outdoor decks. For these glass panels, a simple “top row” of lites fits the bill. Here they seem to say, “I’m a traditionalist, but I’m walking a modern edge along the shore to promote better view, light and connection to the water.”
The views require no detailing or enhancements, but the house does. The roofline is unmistakably traditional. It keeps the roof line low, a must for a structure designed to conform with the FEMA prescribed BFE (Base Flood Elevation.) The exterior comes to life thanks to generous trim at the rake, fascia, soffits and frieze boards of the traditional gambrel roof. A skin of cedar shingles at 5” exposure reinforces the site-specific design. As you look around everywhere on this vacation peninsula, you’ll notice the consistency of weathered shingled exteriors. Its “dormered” second floor is tucked nicely in the roofline to also make sure it fits within the context of the neighboring older homes.
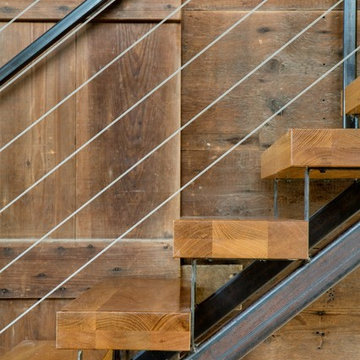
Because the coastal FEMA regulations pushed our home higher from the surrounding ground and safely from the impending storm surges, expansive decks extend along the water side. The decks are our de facto landscape and outdoor rooms. They are positioned vertically two stair risers below the finished first floor. The drop in deck heights preserves interior views over furniture and guests from inside the home. Steel cable railings provide a see-through safety “guard” as required by the building codes.
The open plan on the interior provides the perpetual connection to the water. View dominates and directs the floor plan. Symmetrical window groupings will organize the first-floor plan. There will be plenty of space to handle the guests, but its mission is to provide good order for day to day living for just the homeowners themselves. Beds on the upper level are positioned with view in mind too. Waking up to the sun reflecting off the water is opportunity not to pass up.
With the dust and noise finally behind us, we begin our plan for phase two. More Updates coming soon!
5