
Search results for "Start signing" in Home Design Ideas

 Valentini Kids Furniture Brooklyn NY
Modern Italian Wall Unit Exential Art Ronci 1 by Spar
Made in Italy
Exential Art by Spar is an italian modular wall unit line that could be an excellent design solution for any modern or contemporary styled living room. A renewed modern design with a high functionality creates an entertainment center of refined rarity. With Exential Art, a new concept of values, culture and passionate living is born. This italian wall unit will enter your house and the areas of your daily life not only as an aesthetic but also as a functional addition, featuring an abundance of storage space so essential in an everyday life use. The artwork of international fame by Rossano Ronci is reproduced and signed on refined surface of glass making this wall unit composition a precious object giving a value to your home. The composition is shown in a White Gloss lacquer.
PLEASE NOTE: The ART Exential is a modular wall unit line offering a wide variety of units in different sizes. You can order this wall unit either as a complete composition, as shown in the main picture, or build your own composition according to your own dimensions and preferences. Please contact our office about details on the customization of this wall unit.
MATERIAL/CONSTRUCTION:
Structure: Made with particle board of wood, covered with E1 melamine finishes or high gloss lacquer
Drawers: Made with panels of wood particles in E1-coated finish PVC beech. Metal runners with fine race to fall
Glass Doors: Decorated by Rossano Ronci
The starting price is for the Wall Unit Composition Ronci 01 as shown in the main picture.
Dimensions:
Wall Unit Composition: W130" x D22.8" x H72.2"
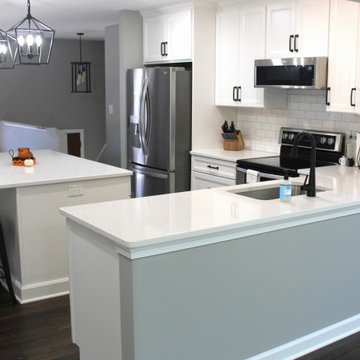
 Talon Construction Inc.
Designing and building a kitchen addition is a complex process that involves multiple steps and considerations. Here is a general outline to help you get started on your kitchen addition project:
Define Your Goals and Budget:
• Determine the purpose of the kitchen addition. Is it for more cooking space, a dining area, or a combination of both?
• Establish a realistic budget for your project. Consider all costs, including construction, permits, materials, and furnishings.
Hire a Design Professional:
• Seek the services of a design build company who specializes in kitchen additions.
• Discuss your vision, needs, and budget with the design professional to create a design concept.
Site Evaluation:
• Assess the existing space and structural condition of your home to ensure it can support the addition.
• Consider factors like zoning regulations, setbacks, and building codes.
Design Development:
• Collaborate with your design professional to refine the concept, including the layout, size, and architectural style.
• Choose materials, finishes, and fixtures that fit your design and budget.
Obtain Permits:
• Consult with your local design build contractor to determine the necessary permits and approvals.
• Prepare and submit all required documents, including architectural drawings and engineering plans.
Create Construction Documents:
• Work with your design build professional to develop detailed construction drawings and specifications.
• These documents will serve as a guide for contractors during construction.
Hire a design build contractor:
• Check references, credentials, and licenses before selecting a contractor.
• Sign a detailed contract that outlines the scope of work, timeline, and payment schedule.
Construction Phase:
• Demolition: If needed, remove any existing structures or walls.
• Foundation: Construct the foundation for the addition.
• Framing: Build the structural framework of the addition.
• Plumbing, Electrical, and HVAC: Install or update utilities as required.
• Insulation: Ensure proper insulation for energy efficiency.
• Drywall and Finish Work: Complete the walls and ceilings.
• Flooring and Cabinetry: Install flooring and kitchen cabinets.
• Appliances and Fixtures: Add appliances, plumbing fixtures, and lighting.
• Paint and Finish: Apply paint and finishes to achieve the desired look.
• Final Inspection: Schedule inspections to ensure compliance with building codes.
Final Inspections and Approvals:
• Arrange for final inspections to ensure the addition meets all safety and code requirements.
• Obtain any necessary certificates of occupancy or compliance.
Move In and Enjoy:
• Once all inspections and approvals are received, you can move into your new kitchen addition and start enjoying it.
Remember that every kitchen addition project is unique, so adapt this outline to your specific needs and circumstances. Consulting with professionals and obtaining the required permits and inspections is crucial to a successful and safe project.
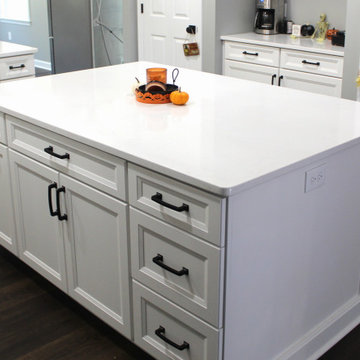 Talon Construction Inc.
Designing and building a kitchen addition is a complex process that involves multiple steps and considerations. Here is a general outline to help you get started on your kitchen addition project:
Define Your Goals and Budget:
• Determine the purpose of the kitchen addition. Is it for more cooking space, a dining area, or a combination of both?
• Establish a realistic budget for your project. Consider all costs, including construction, permits, materials, and furnishings.
Hire a Design Professional:
• Seek the services of a design build company who specializes in kitchen additions.
• Discuss your vision, needs, and budget with the design professional to create a design concept.
Site Evaluation:
• Assess the existing space and structural condition of your home to ensure it can support the addition.
• Consider factors like zoning regulations, setbacks, and building codes.
Design Development:
• Collaborate with your design professional to refine the concept, including the layout, size, and architectural style.
• Choose materials, finishes, and fixtures that fit your design and budget.
Obtain Permits:
• Consult with your local design build contractor to determine the necessary permits and approvals.
• Prepare and submit all required documents, including architectural drawings and engineering plans.
Create Construction Documents:
• Work with your design build professional to develop detailed construction drawings and specifications.
• These documents will serve as a guide for contractors during construction.
Hire a design build contractor:
• Check references, credentials, and licenses before selecting a contractor.
• Sign a detailed contract that outlines the scope of work, timeline, and payment schedule.
Construction Phase:
• Demolition: If needed, remove any existing structures or walls.
• Foundation: Construct the foundation for the addition.
• Framing: Build the structural framework of the addition.
• Plumbing, Electrical, and HVAC: Install or update utilities as required.
• Insulation: Ensure proper insulation for energy efficiency.
• Drywall and Finish Work: Complete the walls and ceilings.
• Flooring and Cabinetry: Install flooring and kitchen cabinets.
• Appliances and Fixtures: Add appliances, plumbing fixtures, and lighting.
• Paint and Finish: Apply paint and finishes to achieve the desired look.
• Final Inspection: Schedule inspections to ensure compliance with building codes.
Final Inspections and Approvals:
• Arrange for final inspections to ensure the addition meets all safety and code requirements.
• Obtain any necessary certificates of occupancy or compliance.
Move In and Enjoy:
• Once all inspections and approvals are received, you can move into your new kitchen addition and start enjoying it.
Remember that every kitchen addition project is unique, so adapt this outline to your specific needs and circumstances. Consulting with professionals and obtaining the required permits and inspections is crucial to a successful and safe project.
Find the right local pro for your project
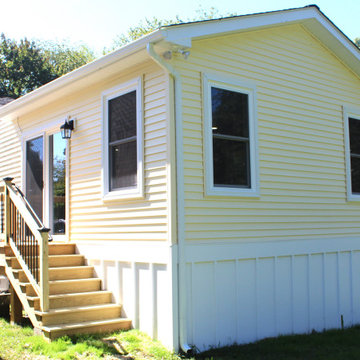 Talon Construction Inc.
Designing and building a kitchen addition is a complex process that involves multiple steps and considerations. Here is a general outline to help you get started on your kitchen addition project:
Define Your Goals and Budget:
• Determine the purpose of the kitchen addition. Is it for more cooking space, a dining area, or a combination of both?
• Establish a realistic budget for your project. Consider all costs, including construction, permits, materials, and furnishings.
Hire a Design Professional:
• Seek the services of a design build company who specializes in kitchen additions.
• Discuss your vision, needs, and budget with the design professional to create a design concept.
Site Evaluation:
• Assess the existing space and structural condition of your home to ensure it can support the addition.
• Consider factors like zoning regulations, setbacks, and building codes.
Design Development:
• Collaborate with your design professional to refine the concept, including the layout, size, and architectural style.
• Choose materials, finishes, and fixtures that fit your design and budget.
Obtain Permits:
• Consult with your local design build contractor to determine the necessary permits and approvals.
• Prepare and submit all required documents, including architectural drawings and engineering plans.
Create Construction Documents:
• Work with your design build professional to develop detailed construction drawings and specifications.
• These documents will serve as a guide for contractors during construction.
Hire a design build contractor:
• Check references, credentials, and licenses before selecting a contractor.
• Sign a detailed contract that outlines the scope of work, timeline, and payment schedule.
Construction Phase:
• Demolition: If needed, remove any existing structures or walls.
• Foundation: Construct the foundation for the addition.
• Framing: Build the structural framework of the addition.
• Plumbing, Electrical, and HVAC: Install or update utilities as required.
• Insulation: Ensure proper insulation for energy efficiency.
• Drywall and Finish Work: Complete the walls and ceilings.
• Flooring and Cabinetry: Install flooring and kitchen cabinets.
• Appliances and Fixtures: Add appliances, plumbing fixtures, and lighting.
• Paint and Finish: Apply paint and finishes to achieve the desired look.
• Final Inspection: Schedule inspections to ensure compliance with building codes.
Final Inspections and Approvals:
• Arrange for final inspections to ensure the addition meets all safety and code requirements.
• Obtain any necessary certificates of occupancy or compliance.
Move In and Enjoy:
• Once all inspections and approvals are received, you can move into your new kitchen addition and start enjoying it.
Remember that every kitchen addition project is unique, so adapt this outline to your specific needs and circumstances. Consulting with professionals and obtaining the required permits and inspections is crucial to a successful and safe project.
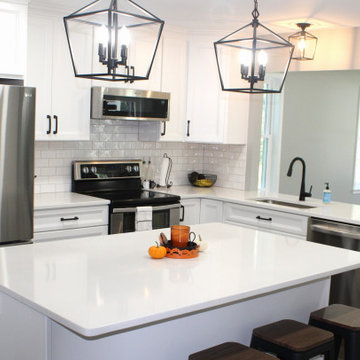 Talon Construction Inc.
Designing and building a kitchen addition is a complex process that involves multiple steps and considerations. Here is a general outline to help you get started on your kitchen addition project:
Define Your Goals and Budget:
• Determine the purpose of the kitchen addition. Is it for more cooking space, a dining area, or a combination of both?
• Establish a realistic budget for your project. Consider all costs, including construction, permits, materials, and furnishings.
Hire a Design Professional:
• Seek the services of a design build company who specializes in kitchen additions.
• Discuss your vision, needs, and budget with the design professional to create a design concept.
Site Evaluation:
• Assess the existing space and structural condition of your home to ensure it can support the addition.
• Consider factors like zoning regulations, setbacks, and building codes.
Design Development:
• Collaborate with your design professional to refine the concept, including the layout, size, and architectural style.
• Choose materials, finishes, and fixtures that fit your design and budget.
Obtain Permits:
• Consult with your local design build contractor to determine the necessary permits and approvals.
• Prepare and submit all required documents, including architectural drawings and engineering plans.
Create Construction Documents:
• Work with your design build professional to develop detailed construction drawings and specifications.
• These documents will serve as a guide for contractors during construction.
Hire a design build contractor:
• Check references, credentials, and licenses before selecting a contractor.
• Sign a detailed contract that outlines the scope of work, timeline, and payment schedule.
Construction Phase:
• Demolition: If needed, remove any existing structures or walls.
• Foundation: Construct the foundation for the addition.
• Framing: Build the structural framework of the addition.
• Plumbing, Electrical, and HVAC: Install or update utilities as required.
• Insulation: Ensure proper insulation for energy efficiency.
• Drywall and Finish Work: Complete the walls and ceilings.
• Flooring and Cabinetry: Install flooring and kitchen cabinets.
• Appliances and Fixtures: Add appliances, plumbing fixtures, and lighting.
• Paint and Finish: Apply paint and finishes to achieve the desired look.
• Final Inspection: Schedule inspections to ensure compliance with building codes.
Final Inspections and Approvals:
• Arrange for final inspections to ensure the addition meets all safety and code requirements.
• Obtain any necessary certificates of occupancy or compliance.
Move In and Enjoy:
• Once all inspections and approvals are received, you can move into your new kitchen addition and start enjoying it.
Remember that every kitchen addition project is unique, so adapt this outline to your specific needs and circumstances. Consulting with professionals and obtaining the required permits and inspections is crucial to a successful and safe project.
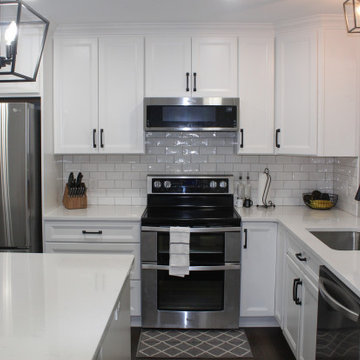 Talon Construction Inc.
Designing and building a kitchen addition is a complex process that involves multiple steps and considerations. Here is a general outline to help you get started on your kitchen addition project:
Define Your Goals and Budget:
• Determine the purpose of the kitchen addition. Is it for more cooking space, a dining area, or a combination of both?
• Establish a realistic budget for your project. Consider all costs, including construction, permits, materials, and furnishings.
Hire a Design Professional:
• Seek the services of a design build company who specializes in kitchen additions.
• Discuss your vision, needs, and budget with the design professional to create a design concept.
Site Evaluation:
• Assess the existing space and structural condition of your home to ensure it can support the addition.
• Consider factors like zoning regulations, setbacks, and building codes.
Design Development:
• Collaborate with your design professional to refine the concept, including the layout, size, and architectural style.
• Choose materials, finishes, and fixtures that fit your design and budget.
Obtain Permits:
• Consult with your local design build contractor to determine the necessary permits and approvals.
• Prepare and submit all required documents, including architectural drawings and engineering plans.
Create Construction Documents:
• Work with your design build professional to develop detailed construction drawings and specifications.
• These documents will serve as a guide for contractors during construction.
Hire a design build contractor:
• Check references, credentials, and licenses before selecting a contractor.
• Sign a detailed contract that outlines the scope of work, timeline, and payment schedule.
Construction Phase:
• Demolition: If needed, remove any existing structures or walls.
• Foundation: Construct the foundation for the addition.
• Framing: Build the structural framework of the addition.
• Plumbing, Electrical, and HVAC: Install or update utilities as required.
• Insulation: Ensure proper insulation for energy efficiency.
• Drywall and Finish Work: Complete the walls and ceilings.
• Flooring and Cabinetry: Install flooring and kitchen cabinets.
• Appliances and Fixtures: Add appliances, plumbing fixtures, and lighting.
• Paint and Finish: Apply paint and finishes to achieve the desired look.
• Final Inspection: Schedule inspections to ensure compliance with building codes.
Final Inspections and Approvals:
• Arrange for final inspections to ensure the addition meets all safety and code requirements.
• Obtain any necessary certificates of occupancy or compliance.
Move In and Enjoy:
• Once all inspections and approvals are received, you can move into your new kitchen addition and start enjoying it.
Remember that every kitchen addition project is unique, so adapt this outline to your specific needs and circumstances. Consulting with professionals and obtaining the required permits and inspections is crucial to a successful and safe project.

 Nejad Rugs
A beautifully designed room is one that perfectly balances scale, color, design and style in a space that makes the heart sign upon entering. We all have had this experience when visiting professionally designed fine estates or public spaces, but few have been successful in capturing this experience in their own home.
Starting with a gorgeous handmade Oriental rug from Nejad Gallery is an excellent place to begin the process. In the case of this elegant formal living room our Tabriz Rug Design M023 with an all-over pattern in an opulent black background and soft gold border was chosen by the designer for both its impact as a beautiful piece of art and its rich color palette. Everything else in the room was chosen based on the rug making the selection process flow naturally and beautifully.
The furniture’s richly textured chair and sofa fabrics were selected to perfectly complement the colors of the Tabriz Oriental rug. The simplicity of the coordinated window treatments exude class and elegance. The light beige wall color enlarges the space by reflecting light and is the perfect backdrop for hung art work and beautiful room appointments. The extremely talented interior designer created a memorable room that is a pleasure to enter and spend time in.
Our expert staff at Nejad Gallery has over thirty years of experience working with top designers and architects from across the country. Whether you are working with a design professional or designing a space yourself, our talented Oriental rug specialists are here to assist you in the selection of the perfect rug for your home.
Happy Rug Shopping!
www.nejad.com

 Master Odor Removal - Albany
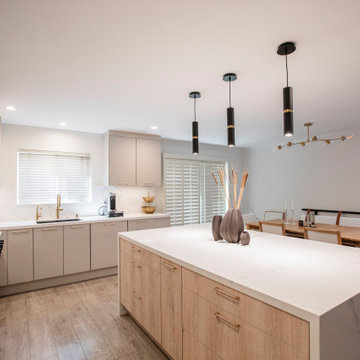
COOKING PAN SMOKE ODOR — 7500 Sq. Ft. Home
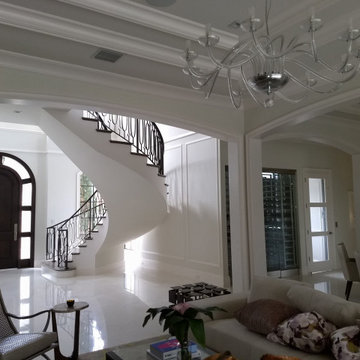
In July 2018, Master Odor Removal successfully completed an odor removal service in a luxury 7500 sq. ft. home in Boca Raton, FL. The odor issue was caused by smoldering cooking pan that had started to burn and was left for several hours. The 1700 sq. ft. area had 20 ft ceilings, three islands which led to the open adjacent dining and family room and large spiral stair case lead to the upstairs narrow hall and bedroom.
All areas had a Level 5 (1-5 scale) burnt or scorched smell which included the cabinets, furniture, drapes and custom carpeting and in closeted large food pantry. The home had four air conditioning units which were in the attic that would have to be treated separately.
The owner prior to our visit, had tried to just air it out and then used common cover-ups after cleaning the stove area – which only contributed to making the source odor smell pronounced throughout the homes other living areas. The owner was only interested in a rush and same day service!
The odor was caused by tiny microscopic burnt plastic particles that were clinging to ceiling walls, furniture, floors, clothing and other items now inside most of the home carried in part by the time of smoke exposure and air conditioning cycling on and off. Smoke particles get into the tiniest nooks and crannies and can be difficult to remove. The stove area / back splash had visible signs of carbon though the other areas had no blackness that could be seen or even evident in the microfiber white cloths that we used to test prior to molecular chemical application. All living areas of the home had been expertly cleaned prior to our inspection.
The scope of our work included odor source remediation, ceiling and wall treatments using a 20-foot ladder, and fogging treatments in the entire main home’s, kitchen, bedrooms, living areas and pantry. A/C electrochemical fogging in attic.
Carbon was remediated and air quality tested.

 R.S. Walsh Landscaping, Inc.
This British Colonial theme new residence sits atop the ridgeline on the west end of Sanibel Island overlooking the Gulf. Carefully manicured dune and beach access offer breathtaking views from the main and upper patios of the residence to the beach and the sunset.
A lush, tropical entry runs the length of each side property line from the road, along each side of the house, to the CCCL line and provides a dense privacy barrier from the beach access path along the east property line. Tropical bamboo, white bird of paradise, traveler palms, dwarf leaf clusia and relocated native trees and shrubs make up the dense buffer.
In the front of the residence a specimen multi-stem Sylvester Date Palm anchors the center drive island while stately royal palms, foxtail palms and multi-stem adonidia palms accent the foundation of the residence. Curved coconut palms march down the driveway to the street. Individual theme gardens were created in the side yards which include a Moon Garden, Fruit Garden, Butterfly Garden, Wetland Garden, Tropical Garden and Bamboo Garden.
Architectural garden elements include a Walpole garden gate, arbor and mail box with a custom house name sign attached. As one walks the many different specimen gardens, large concrete garden benches from Curry & Co. offer a place to pause while botanical plant label stakes indicate plant species and origin. A California style espalier wall with confederate jasmine vine softens the back side of the pool wall, which is visible upon the entrance to the garages and espalier on the pool side wall for trellis bougainvillea offer vertical elements to connect the house and the landscape with tropical vegetation and color.
This ideal client had a specific idea for their property which we were able to visualize and bring to reality.

 Cure Design Group
This designer client relationship is one based on friendship. Senior Designer Cori Dyer and client have an indescribable partnership and unmentioned understanding when it comes to decorating this home. A vintage charmer with a modern flair, filled with collectables and uncommon goods that make this space a unique and spectacular.
Cori Dyer:
I first met Sally when our boys became friends at Chaminade in 2007.
Since then, we have stayed close and become great friends.
Several years back she asked for my help giving her ideas on ways to spruce things up a bit and work with her on a major remodel.
A little intimidating as Sally has a beautiful home and is an avid collector of vintage finds.... way before the trend of blending old and new was popular.
She has an eye for unique ways to use vintage pieces and incorporating those into some of the most interesting and compelling displays. What has made this design relationship work is simply one of respect. I know when to give her that push outside of her comfort zone and incorporate her collections with selections that work with what she has, but that offer a new spin on putting it all together.
From that initial "spruce up" has come a makeover in her Living Room and currently one completed in her Family Room.
Although there are signs of my design throughout her home, the detail and selection of the collections and vintage finds are all Sally!!
I truly think that is how Design should be. Blending old and new, and a Designer listening to what makes the client happy.
Client: It was fun to be in style for a year or two, but it’s back to being the quirky lady. I started collecting in my teens and enjoy the hunt for new finds of all types. Cori helped me to enjoy my collections in a new and modern way! As always I had too many things. With her designer eye she taught me to blend the old and the new and to use different materials. The best part was going shopping with one of my best friends, who just happens to be a designer!! She is definitely the ying to my much needed yang.

 McCall Design & Planning
This project is truly one of those designed by setbacks. The owners fell in love with the setting, sitting on a bank above the river, but a sewer easement through the center of the property, parallel to the road, cut the building envelope in half. Our goal was a 1,400 sq ft home with outside space on the river side of the home.
We started with an attached garage concept, which is very desirable in our snowy climate, but it was forcing a compromise with no patio on the back of the house. We negotiated an agreement with the city staff to allow us to build a breezeway over the 25’ sewer easement. The breezeway was designed and constructed to be removable by forklift in 3 pieces, if it ever becomes necessary to work on the sewer line, buried about 20’ below grade.
The owners had varying taste in the style of home they wanted, one on the more traditional end and one on a more contemporary bent. They also wanted low maintenance materials. The result is a simple gable form with over-sized knee braces and gable end vents for function as well as character. The home is finished with cedar shingle siding with a horizontal corrugated metal wainscot below. We opened the back of the house up with windows and sliding doors, giving great views into the trees and down to the river below. The greatest feature is the back patio perched on the bank with the sound of the river rising up from below.
 Cure Design Group
This designer client relationship is one based on friendship. Senior Designer Cori Dyer and client have an indescribable partnership and unmentioned understanding when it comes to decorating this home. A vintage charmer with a modern flair, filled with collectables and uncommon goods that make this space a unique and spectacular.
Cori Dyer:
I first met Sally when our boys became friends at Chaminade in 2007.
Since then, we have stayed close and become great friends.
Several years back she asked for my help giving her ideas on ways to spruce things up a bit and work with her on a major remodel.
A little intimidating as Sally has a beautiful home and is an avid collector of vintage finds.... way before the trend of blending old and new was popular.
She has an eye for unique ways to use vintage pieces and incorporating those into some of the most interesting and compelling displays. What has made this design relationship work is simply one of respect. I know when to give her that push outside of her comfort zone and incorporate her collections with selections that work with what she has, but that offer a new spin on putting it all together.
From that initial "spruce up" has come a makeover in her Living Room and currently one completed in her Family Room.
Although there are signs of my design throughout her home, the detail and selection of the collections and vintage finds are all Sally!!
I truly think that is how Design should be. Blending old and new, and a Designer listening to what makes the client happy.
Client: It was fun to be in style for a year or two, but it’s back to being the quirky lady. I started collecting in my teens and enjoy the hunt for new finds of all types. Cori helped me to enjoy my collections in a new and modern way! As always I had too many things. With her designer eye she taught me to blend the old and the new and to use different materials. The best part was going shopping with one of my best friends, who just happens to be a designer!! She is definitely the ying to my much needed yang.

 Ballard + Mensua Architecture
Built originally in the late 1800's, and lived in by only two families, this gem of a historic mansion was in need of a lot of work.
The goal of this project was to add central air, renovate and expand 3-1/2 baths, add one bath, add a 2nd level laundry, replace old wall paper, and to combine a kitchen, breakfast room, laundry and butler's pantry into one large farmhouse style kitchen. We also added radiator covers, replaced kitchen flooring, added a mudroom, and added wainscot to the main stair. Finally, we upgraded all lighting and wiring throughout the house. We are about to start phase 2 of the project to restore the windows, new landscaping, painting and restoring the trim and siding for the house and restoring the roofing and flashing. We are also looking to add a side porch and deck.
The challenge of this project was to do all of this work, but to keep the soul and character of the house in tact. The owners loved the house as it was, so it was very important to keep and restore as much as possible.
In the rest of the house, the owners decided to just add tongue oil to the floors. Fireplaces were kept in tact. Original pine trim and millwork were restored and we added a window seat on the 3rd floor.
The further challenge was to do this work, including planning and all interior design in 4-1/2 months. By signing up Hyo Lee and his company Millennium Homes as our contractor from the beginning, we met the demanding schedule.
We looked back to the time period and selected finishes and details that seemed appropriate. The client built a large idea book on Houzz which helped throughout the project to make sure we could design to their style.
Bathrooms carry a theme of natural marble and stones.
The kitchen features an antique oak herringbone floor from Mountain Lumber. Cabinets are inset, with a small bead to emulate antiques in the owner's collection and to maintain the simple details of the existing Butler's Pantry cabinets which we kept and restored. Wallpaper selections were made by the client with help from Mona Berman Interiors.
We are very proud of how this team effort turned out and how the house is beaming with the new life of its upgrades, and new life from a new family moving in.
Michael Geissinger photographer. www.mikegphotos.com

 Molly's Marketplace, a home renovation's paradise
We completely updated this home from the outside to the inside. Every room was touched because the owner wanted to make it very sell-able. Our job was to lighten, brighten and do as many updates as we could on a shoe string budget. We started with the outside and we cleared the lakefront so that the lakefront view was open to the house. We also trimmed the large trees in the front and really opened the house up, before we painted the home and freshen up the landscaping. Inside we painted the house in a white duck color and updated the existing wood trim to a modern white color. We also installed shiplap on the TV wall and white washed the existing Fireplace brick. We installed lighting over the kitchen soffit as well as updated the can lighting. We then updated all 3 bathrooms. We finished it off with custom barn doors in the newly created office as well as the master bedroom. We completed the look with custom furniture!

 Emily’s Interiors
Bright, Clean Kitchen With White Cabinets and Granite Countertops
Eat-in kitchen - large transitional u-shaped light wood floor eat-in kitchen idea in Boston with an undermount sink, raised-panel cabinets, white cabinets, granite countertops, white backsplash, mosaic tile backsplash, stainless steel appliances, an island and white countertops
Eat-in kitchen - large transitional u-shaped light wood floor eat-in kitchen idea in Boston with an undermount sink, raised-panel cabinets, white cabinets, granite countertops, white backsplash, mosaic tile backsplash, stainless steel appliances, an island and white countertops
 Cure Design Group
This designer client relationship is one based on friendship. Senior Designer Cori Dyer and client have an indescribable partnership and unmentioned understanding when it comes to decorating this home. A vintage charmer with a modern flair, filled with collectables and uncommon goods that make this space a unique and spectacular.
Cori Dyer:
I first met Sally when our boys became friends at Chaminade in 2007.
Since then, we have stayed close and become great friends.
Several years back she asked for my help giving her ideas on ways to spruce things up a bit and work with her on a major remodel.
A little intimidating as Sally has a beautiful home and is an avid collector of vintage finds.... way before the trend of blending old and new was popular.
She has an eye for unique ways to use vintage pieces and incorporating those into some of the most interesting and compelling displays. What has made this design relationship work is simply one of respect. I know when to give her that push outside of her comfort zone and incorporate her collections with selections that work with what she has, but that offer a new spin on putting it all together.
From that initial "spruce up" has come a makeover in her Living Room and currently one completed in her Family Room.
Although there are signs of my design throughout her home, the detail and selection of the collections and vintage finds are all Sally!!
I truly think that is how Design should be. Blending old and new, and a Designer listening to what makes the client happy.
Client: It was fun to be in style for a year or two, but it’s back to being the quirky lady. I started collecting in my teens and enjoy the hunt for new finds of all types. Cori helped me to enjoy my collections in a new and modern way! As always I had too many things. With her designer eye she taught me to blend the old and the new and to use different materials. The best part was going shopping with one of my best friends, who just happens to be a designer!! She is definitely the ying to my much needed yang.
 Cure Design Group
This designer client relationship is one based on friendship. Senior Designer Cori Dyer and client have an indescribable partnership and unmentioned understanding when it comes to decorating this home. A vintage charmer with a modern flair, filled with collectables and uncommon goods that make this space a unique and spectacular.
Cori Dyer:
I first met Sally when our boys became friends at Chaminade in 2007.
Since then, we have stayed close and become great friends.
Several years back she asked for my help giving her ideas on ways to spruce things up a bit and work with her on a major remodel.
A little intimidating as Sally has a beautiful home and is an avid collector of vintage finds.... way before the trend of blending old and new was popular.
She has an eye for unique ways to use vintage pieces and incorporating those into some of the most interesting and compelling displays. What has made this design relationship work is simply one of respect. I know when to give her that push outside of her comfort zone and incorporate her collections with selections that work with what she has, but that offer a new spin on putting it all together.
From that initial "spruce up" has come a makeover in her Living Room and currently one completed in her Family Room.
Although there are signs of my design throughout her home, the detail and selection of the collections and vintage finds are all Sally!!
I truly think that is how Design should be. Blending old and new, and a Designer listening to what makes the client happy.
Client: It was fun to be in style for a year or two, but it’s back to being the quirky lady. I started collecting in my teens and enjoy the hunt for new finds of all types. Cori helped me to enjoy my collections in a new and modern way! As always I had too many things. With her designer eye she taught me to blend the old and the new and to use different materials. The best part was going shopping with one of my best friends, who just happens to be a designer!! She is definitely the ying to my much needed yang.
 Cure Design Group
This designer client relationship is one based on friendship. Senior Designer Cori Dyer and client have an indescribable partnership and unmentioned understanding when it comes to decorating this home. A vintage charmer with a modern flair, filled with collectables and uncommon goods that make this space a unique and spectacular.
Cori Dyer:
I first met Sally when our boys became friends at Chaminade in 2007.
Since then, we have stayed close and become great friends.
Several years back she asked for my help giving her ideas on ways to spruce things up a bit and work with her on a major remodel.
A little intimidating as Sally has a beautiful home and is an avid collector of vintage finds.... way before the trend of blending old and new was popular.
She has an eye for unique ways to use vintage pieces and incorporating those into some of the most interesting and compelling displays. What has made this design relationship work is simply one of respect. I know when to give her that push outside of her comfort zone and incorporate her collections with selections that work with what she has, but that offer a new spin on putting it all together.
From that initial "spruce up" has come a makeover in her Living Room and currently one completed in her Family Room.
Although there are signs of my design throughout her home, the detail and selection of the collections and vintage finds are all Sally!!
I truly think that is how Design should be. Blending old and new, and a Designer listening to what makes the client happy.
Client: It was fun to be in style for a year or two, but it’s back to being the quirky lady. I started collecting in my teens and enjoy the hunt for new finds of all types. Cori helped me to enjoy my collections in a new and modern way! As always I had too many things. With her designer eye she taught me to blend the old and the new and to use different materials. The best part was going shopping with one of my best friends, who just happens to be a designer!! She is definitely the ying to my much needed yang.
 Cure Design Group
This designer client relationship is one based on friendship. Senior Designer Cori Dyer and client have an indescribable partnership and unmentioned understanding when it comes to decorating this home. A vintage charmer with a modern flair, filled with collectables and uncommon goods that make this space a unique and spectacular.
Cori Dyer:
I first met Sally when our boys became friends at Chaminade in 2007.
Since then, we have stayed close and become great friends.
Several years back she asked for my help giving her ideas on ways to spruce things up a bit and work with her on a major remodel.
A little intimidating as Sally has a beautiful home and is an avid collector of vintage finds.... way before the trend of blending old and new was popular.
She has an eye for unique ways to use vintage pieces and incorporating those into some of the most interesting and compelling displays. What has made this design relationship work is simply one of respect. I know when to give her that push outside of her comfort zone and incorporate her collections with selections that work with what she has, but that offer a new spin on putting it all together.
From that initial "spruce up" has come a makeover in her Living Room and currently one completed in her Family Room.
Although there are signs of my design throughout her home, the detail and selection of the collections and vintage finds are all Sally!!
I truly think that is how Design should be. Blending old and new, and a Designer listening to what makes the client happy.
Client: It was fun to be in style for a year or two, but it’s back to being the quirky lady. I started collecting in my teens and enjoy the hunt for new finds of all types. Cori helped me to enjoy my collections in a new and modern way! As always I had too many things. With her designer eye she taught me to blend the old and the new and to use different materials. The best part was going shopping with one of my best friends, who just happens to be a designer!! She is definitely the ying to my much needed yang.
14