
Search results for "Starting disconnected" in Home Design Ideas

 Red Rock Custom Homes, Inc.
Gourmet kitchen with professional cook top range, pot filler, double oven with a special place for the television
Amy Braswell
Inspiration for a timeless kitchen remodel in Chicago with an undermount sink, beaded inset cabinets, white cabinets, granite countertops, gray backsplash and stainless steel appliances
Inspiration for a timeless kitchen remodel in Chicago with an undermount sink, beaded inset cabinets, white cabinets, granite countertops, gray backsplash and stainless steel appliances
 JayMarc Homes
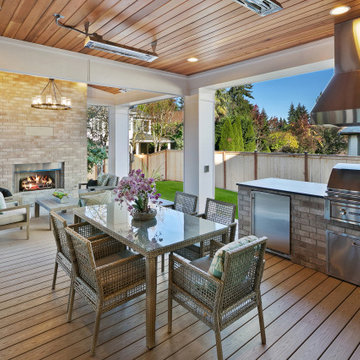
The Kelso's Porch is a stunning outdoor space designed for comfort and entertainment. It features a beautiful brick fireplace surround, creating a cozy atmosphere and a focal point for gatherings. Ceiling heaters are installed to ensure warmth during cooler days or evenings, allowing the porch to be enjoyed throughout the year. The porch is covered, providing protection from the elements and allowing for outdoor enjoyment even during inclement weather. An outdoor covered living space offers additional seating and lounging areas, perfect for relaxing or hosting guests. The porch is equipped with outdoor kitchen appliances, allowing for convenient outdoor cooking and entertaining. A round chandelier adds a touch of elegance and provides ambient lighting. Skylights bring in natural light and create an airy and bright atmosphere. The porch is furnished with comfortable wicker furniture, providing a cozy and stylish seating arrangement. The Kelso's Porch is a perfect retreat for enjoying the outdoors in comfort and style, whether it's for relaxing by the fireplace, cooking and dining al fresco, or simply enjoying the company of family and friends.

 McCann Design Group
Example of an island style medium tone wood floor and brown floor enclosed dining room design in Miami with multicolored walls and no fireplace
Find the right local pro for your project

 HartmanBaldwin Design/Build
A major aspect of the project included an extensive kitchen remodel, as the previous kitchen was disconnected from the main living area. Our clients wanted a bright and cohesive space to enjoy with their family and friends. New contemporary style, oak cabinets complement the sleek, walnut upper cabinets and island. Teak wood slats found behind a section of floating upper cabinets elegantly hide the staircase leading to the first floor.
 Oak & Iron Construction Group
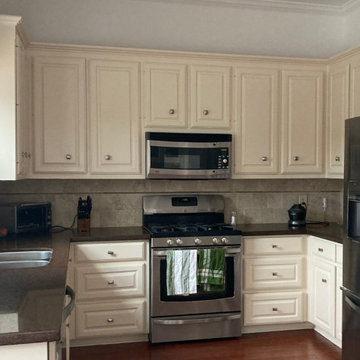
Before the renovation, this kitchen featured a more traditional layout with heavy cabinetry, darker finishes, and limited natural light. The closed-off design and dated materials created a space that felt compact and disconnected from the rest of the home. This “before” view highlights the starting point for the transformation — a full reimagining into a bright, open, and modern kitchen that seamlessly blends function, simplicity, and timeless design.
 Home Styles by Athina
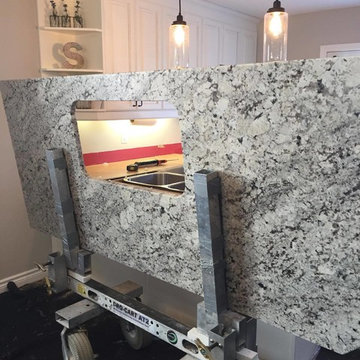
The next item to deal with was the countertop. My clients are big fans of granite, so that was our starting point. I was very careful in which stone was selected because I wanted to make sure it blended seamlessly with the existing flooring as well as complemented their kitchen style.
This stone has tiny flecks of brown in it, to pull the brown in the flooring upwards. The last thing I wanted was to have a total disconnect between the "new" kitchen and the rest of the home.
 lilach shahaf
We met about five years ago, we started talking, I gave a price and nothing really happened. After about two months I went back to her and then she said to me, "Well, I think we'll get on." And ... we started ... many sketches, I send, she returns and so on for a short period of time. Even in the advanced stages things were very dynamic out of the need of both of us to be involved in all the little details. The result is a special home for a special woman. Part of the house was designed so that he could connect and disconnect according to the needs of the landlady and her daughters. Most of the contents of the house and its accessories were imported personally from China - from the carvings and the sweeps - through the lighting, the kitchen and most of the carpentry, and of course the furniture and even the aluminum. The house is located at the end of the moshav and turns north to the fields and banana groves, so that most of the windows of the house look like rustic countryside. The planning process was such that it was clear that we planned a lifestyle, not just walls. I am of course biased, but it seems to me that the result is not the same as anything else. Photography for a great photographer Einat Dekel Architecture photography was a real treat and a special client Hagit Nof - you are always in my heart ...

 User
This is an organic Lime Wash done with a true lime wash product as opposed to a brick mortar or concrete that is often seen on new houses. This product can be applied as a solid coating making the surface completely white, or can be applied and "washed off" in many artistic ways, as seen here. If you hate your brick or just want something unique this is a great option!
Photo credit: Jeff Murrey

 Oran Remodeling Inc.
A job of this scope always starts by having our client meet with our architect, designer and project manager to go over what their vision is. Once the project is understood drawings are made and submitted to the client and the city for approval.
Once everything is submitted and approved we had to have perimeter fencing, a container for all the debris, a secure gate, and a portable restroom facility for our workers.
After the site has been prepped and is ready for work we disconnected all the electrical and main water line to begin the demolition. For this project, we had to demolish most of the walls in the kitchen.
In addition, this is what we did:
Demo all vinyl tile and carpet from the living room, kitchen, hallway, and bathroom.
Block outlet above the stove
Install in the kitchen faucet and garbage disposal- customer to supply
Demo the shower and install a new faucet
New outlet above vanity
New hot mop, new wood stud as necessary, new fan and install new shower door
Install tile in the shower
Install 2 LED fluorescent light above the garage
Remove 1 heater
Install 12-foot walls, drywall both sides
Replace LED lights
There were many, many details in this project that we don’t have the space to go into here.
 Strom Architects
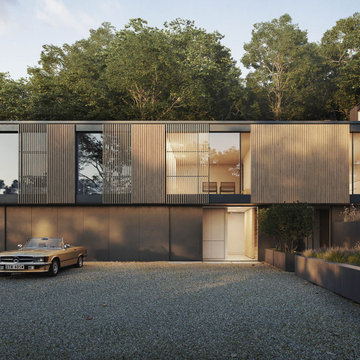
Waystation is a new-build family home that replaces a dilapidated 1960’s modernist house in Kent. The existing house has some architectural merit but fails to respond to the family’s needs. The entrance level and bedrooms are disconnected from the living space which makes for torturous circulation and a lack of connection with the garden. After full evaluation, it has proved to be too expensive to adapt and repair the existing house.
Starting from scratch gave us the opportunity to develop a detailed brief with our client, to create a warm and open family home that maximises the site’s potential and forms a meaningful connection to the garden.
The design of the proposed house seeks to acknowledge the legacy of the existing with a clarity of form and elegant use of natural materials. The horizontal design respects the form and ethos of the existing house, with the timber cladding providing a warm and contemporary aesthetic. The upper and lower forms are proposed in a contrasting black render.
The design concept seeks to create a building with a deliberately lightweight appearance which floats above the landscape and sits harmoniously in the wooded setting.
The lower ground floor contains garage, entrance, guest rooms and ancillary spaces. The upper ground floor comprises the children’s bedrooms and the open plan living spaces which connect seamlessly to the outdoor terrace and garden. The master bedroom suite at first floor is orientated south and designed with an intimate terrace that enjoys panoramic views of the countryside.
For the external spaces, the design intention is to create a sense of space and elegance, allowing light to penetrate the areas around the house but also to create a great sense of privacy and calm. Thus, architecture and landscape combine to create a place for the family to come together and enjoy.
The house is scheduled to start on site late spring 2020.
 Oran Remodeling Inc.
A job of this scope always starts by having our client meet with our architect, designer and project manager to go over what their vision is. Once the project is understood drawings are made and submitted to the client and the city for approval.
Once everything is submitted and approved we had to have perimeter fencing, a container for all the debris, a secure gate, and a portable restroom facility for our workers.
After the site has been prepped and is ready for work we disconnected all the electrical and main water line to begin the demolition. For this project, we had to demolish most of the walls in the kitchen.
In addition, this is what we did:
Demo all vinyl tile and carpet from the living room, kitchen, hallway, and bathroom.
Block outlet above the stove
Install in the kitchen faucet and garbage disposal- customer to supply
Demo the shower and install a new faucet
New outlet above vanity
New hot mop, new wood stud as necessary, new fan and install new shower door
Install tile in the shower
Install 2 LED fluorescent light above the garage
Remove 1 heater
Install 12-foot walls, drywall both sides
Replace LED lights
There were many, many details in this project that we don’t have the space to go into here.
 Oran Remodeling Inc.
A job of this scope always starts by having our client meet with our architect, designer and project manager to go over what their vision is. Once the project is understood drawings are made and submitted to the client and the city for approval.
Once everything is submitted and approved we had to have perimeter fencing, a container for all the debris, a secure gate, and a portable restroom facility for our workers.
After the site has been prepped and is ready for work we disconnected all the electrical and main water line to begin the demolition. For this project, we had to demolish most of the walls in the kitchen.
In addition, this is what we did:
Demo all vinyl tile and carpet from the living room, kitchen, hallway, and bathroom.
Block outlet above the stove
Install in the kitchen faucet and garbage disposal- customer to supply
Demo the shower and install a new faucet
New outlet above vanity
New hot mop, new wood stud as necessary, new fan and install new shower door
Install tile in the shower
Install 2 LED fluorescent light above the garage
Remove 1 heater
Install 12-foot walls, drywall both sides
Replace LED lights
There were many, many details in this project that we don’t have the space to go into here.
 Oran Remodeling Inc.
A job of this scope always starts by having our client meet with our architect, designer and project manager to go over what their vision is. Once the project is understood drawings are made and submitted to the client and the city for approval.
Once everything is submitted and approved we had to have perimeter fencing, a container for all the debris, a secure gate, and a portable restroom facility for our workers.
After the site has been prepped and is ready for work we disconnected all the electrical and main water line to begin the demolition. For this project, we had to demolish most of the walls in the kitchen.
In addition, this is what we did:
Demo all vinyl tile and carpet from the living room, kitchen, hallway, and bathroom.
Block outlet above the stove
Install in the kitchen faucet and garbage disposal- customer to supply
Demo the shower and install a new faucet
New outlet above vanity
New hot mop, new wood stud as necessary, new fan and install new shower door
Install tile in the shower
Install 2 LED fluorescent light above the garage
Remove 1 heater
Install 12-foot walls, drywall both sides
Replace LED lights
There were many, many details in this project that we don’t have the space to go into here.

 Chi Renovation & Design
This gut rehab was truly a cinderella story. This family wanted to convert a 3 flat into a beautiful urban single family home. After gutting the whole place down to it’s bare studs, we started with a blank canvas; creating a new floor plan to the specific needs of this family’s lifestyle and tastes. The first floor was kept open and airy by using unique ceiling accents as a way to define one room from another. Using different shapes in individual tray ceilings to define the kitchen from the dining room and living room, the family could still feel the difference of one room from another without the disconnected nature which walls tend to create. The second floor housed a master suite, a nursery, and the kid's bedroom and bathroom. Within the basement, we created quite a homey floor plan; complete with a guest bedroom, bathroom, wet bar, and a spacious living area. All in all, this family truly created their dream luxury home from the ground up and we were happy to assist in building their fairytale ending.
For more about Chi Renovation & Design, click here: https://www.chirenovation.com/

 N C R
This gut rehab was truly a cinderella story. This family wanted to convert a 3 flat into a beautiful urban single family home. After gutting the whole place down to it’s bare studs, we started with a blank canvas; creating a new floor plan to the specific needs of this family’s lifestyle and tastes. The first floor was kept open and airy by using unique ceiling accents as a way to define one room from another. Using different shapes in individual tray ceilings to define the kitchen from the dining room and living room, the family could still feel the difference of one room from another without the disconnected nature which walls tend to create. The second floor housed a master suite, a nursery, and the kid's bedroom and bathroom. Within the basement, we created quite a homey floor plan; complete with a guest bedroom, bathroom, wet bar, and a spacious living area. All in all, this family truly created their dream luxury home from the ground up and we were happy to assist in building their fairytale ending.

 Michael Nash Design, Build & Homes
For this recently moved in military family, their old rambler home offered plenty of area for potential improvement. An entire new kitchen space was designed to create a greater feeling of family warmth.
It all started with gutting the old rundown kitchen. The kitchen space was cramped and disconnected from the rest of the main level. There was a large bearing wall separating the living room from the kitchen and the dining room.
A structure recessed beam was inserted into the attic space that enabled opening up of the entire main level. A large L-shaped island took over the wall placement giving a big work and storage space for the kitchen.
Installed wood flooring matched up with the remaining living space created a continuous seam-less main level.
By eliminating a side door and cutting through brick and block back wall, a large picture window was inserted to allow plenty of natural light into the kitchen.
Recessed and pendent lights also improved interior lighting.
By using offset cabinetry and a carefully selected granite slab to complement each other, a more soothing space was obtained to inspire cooking and entertaining. The fabulous new kitchen was completed with a new French door leading to the sun room.
This family is now very happy with the massive transformation, and are happy to join their new community.
 Independent Home Walk in Tubs of Florida
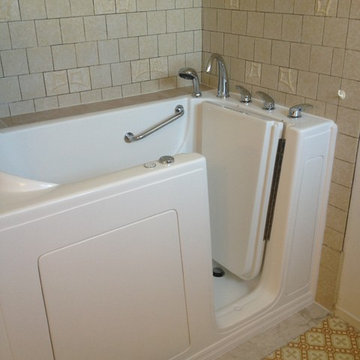
Independent Home recently completed a walk in tub installation in Orlando. John contacted us looking to surprise his mom, Colleen, with a tub that would help maintain her independence. Check out our installation process and how a walk in tub could help you or a loved one.
The process started with meeting with John for a pre-installation meeting. We discussed what type tub would best fit Colleen’s needs, the best location, and what type of finish to add. Our installation team decided that our celebrity walk in tub model was the best option for Colleen.
The celebrity model was the best choice because of its safety and spa like features. For safety, the tub has a non-slip floor, seat, and a low threshold for simple entering and exiting. With the hydrotherapy spa, Colleen is able to enjoy a deep soaking massage that will help take away her joint pain.
After the pre-installation meeting, our installation experts were able to begin the preparation period. Preparation includes taking out the customer’s old tub or shower, removing the foundation, and disconnecting the plumbing fixtures.
The installation of Colleen’s walk in tub could now begin. The installation included bringing in the tub, leveling the legs, connecting the plumbing, and making sure that leaking wouldn’t occur. The final step in the installation process was building the finish. John had wanted to maintain his mom’s tile wall surround, which was simple to do.
 Michael Nash Design, Build & Homes
For this recently moved in military family, their old rambler home offered plenty of area for potential improvement. An entire new kitchen space was designed to create a greater feeling of family warmth.
It all started with gutting the old rundown kitchen. The kitchen space was cramped and disconnected from the rest of the main level. There was a large bearing wall separating the living room from the kitchen and the dining room.
A structure recessed beam was inserted into the attic space that enabled opening up of the entire main level. A large L-shaped island took over the wall placement giving a big work and storage space for the kitchen.
Installed wood flooring matched up with the remaining living space created a continuous seam-less main level.
By eliminating a side door and cutting through brick and block back wall, a large picture window was inserted to allow plenty of natural light into the kitchen.
Recessed and pendent lights also improved interior lighting.
By using offset cabinetry and a carefully selected granite slab to complement each other, a more soothing space was obtained to inspire cooking and entertaining. The fabulous new kitchen was completed with a new French door leading to the sun room.
This family is now very happy with the massive transformation, and are happy to join their new community.
 Michael Nash Design, Build & Homes
For this recently moved in military family, their old rambler home offered plenty of area for potential improvement. An entire new kitchen space was designed to create a greater feeling of family warmth.
It all started with gutting the old rundown kitchen. The kitchen space was cramped and disconnected from the rest of the main level. There was a large bearing wall separating the living room from the kitchen and the dining room.
A structure recessed beam was inserted into the attic space that enabled opening up of the entire main level. A large L-shaped island took over the wall placement giving a big work and storage space for the kitchen.
Installed wood flooring matched up with the remaining living space created a continuous seam-less main level.
By eliminating a side door and cutting through brick and block back wall, a large picture window was inserted to allow plenty of natural light into the kitchen.
Recessed and pendent lights also improved interior lighting.
By using offset cabinetry and a carefully selected granite slab to complement each other, a more soothing space was obtained to inspire cooking and entertaining. The fabulous new kitchen was completed with a new French door leading to the sun room.
This family is now very happy with the massive transformation, and are happy to join their new community.
 Michael Nash Design, Build & Homes
For this recently moved in military family, their old rambler home offered plenty of area for potential improvement. An entire new kitchen space was designed to create a greater feeling of family warmth.
It all started with gutting the old rundown kitchen. The kitchen space was cramped and disconnected from the rest of the main level. There was a large bearing wall separating the living room from the kitchen and the dining room.
A structure recessed beam was inserted into the attic space that enabled opening up of the entire main level. A large L-shaped island took over the wall placement giving a big work and storage space for the kitchen.
Installed wood flooring matched up with the remaining living space created a continuous seam-less main level.
By eliminating a side door and cutting through brick and block back wall, a large picture window was inserted to allow plenty of natural light into the kitchen.
Recessed and pendent lights also improved interior lighting.
By using offset cabinetry and a carefully selected granite slab to complement each other, a more soothing space was obtained to inspire cooking and entertaining. The fabulous new kitchen was completed with a new French door leading to the sun room.
This family is now very happy with the massive transformation, and are happy to join their new community.
1