
Search results for "Step closer" in Home Design Ideas
 Ground One Landscape Design + Build
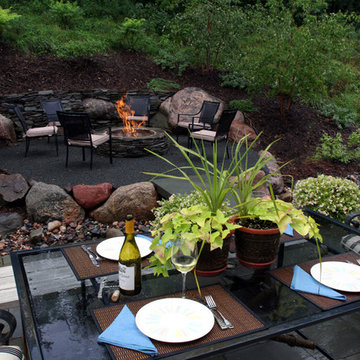
Ground One designed and built a deck off the back of the house for casual sitting, mirroring the house’s front porch. This deck and the screened porch steps descend to a patio terrace. To expand the entertaining space and accommodate the setback restrictions for a permitted gas firepit, we excavated the lot’s back slope to gain bonus space and create a rustic campfire spot. Large boulders found on the site during house construction are incorporated into a retaining wall. Colonial bluestone fills the gaps between these large accent stones and surrounds the firepit. Additional boulders hold up the patio and a slab of bluestone bridges the terrace and patio, preserving the overall drainage pattern. Bluestone is the common thread throughout the project, but it is used in different forms; clean lines closer to the house transition to a more weathered look as you move toward the natural area. The swale is a variety of boulder sizes and river rock to create a more visually-compelling creekbed.
The firepit patio is comfortable for just two people, but can also accommodate a larger group. It is close to the dining space, but physical separation allows for entertaining in different configurations: pre-dinner cocktails around the fire, a roaring flame as backdrop during dinner, kids roasting marshmallows while the adults linger within sight at the dining table, or the gang huddled around a bonfire.

 Tile Doctor Ltd
This customer from the historic city of Cardiff was keen to see what Tile Doctor could do to put some life back into their treasured Limestone kitchen floor that was laid in 2008. My first observations were mainly centred on the horrific condition of the surface which although adequately sealed initially the floor had not received any subsequent maintenance and its condition had deteriorated over time. The light shining in from the patio doors highlighted all the imperfections in the floor caused by surface wear and tear commonly seen in high traffic areas such as a kitchen.
Upon closer inspection, there were further problems: the floor was stained and scuffed, and in most places the sealer had worn off completely allowing the dirt to become ingrained into the pores of the Limestone. Additionally the grout was recessed but was now flush with the tile surface due to dirt build-up. There were also areas contaminated with grease and kitchen cooking oil.
The Limestone floor tiles were 20mm thick French Limestone, and had been laid very well so there was no requirement to do any tile or grout repairs however to get this floor back to its original condition the surface would need to be reconditioned using the Tile Doctor four stage burnishing system.
I started by giving the floor a wash with a medium dilution of Tile Doctor Pro-Clean, focusing mainly on the grout lines in order to remove the muck that had built-up there. I used a special stiff grout brush for this activity; it’s quite narrow and ideal for grout scrubbing.
This worked well, but the significant build-up of dirt along some of the grout lines meant more work was required. I tackled this problem with a hand scraper assisted with steam. At the end of this process, the whole floor was then rinsed down with water to remove any soil and the resulting slurry was then extracted using a wet vacuum.
The next step was to start the burnishing process, which basically involves applying four diamond encrusted floor pads in sequence over the floor. Each pad is a different grade, starting with the most abrasive coarse pad and moving through to the finer grades using a little water to lubricate and rinsing away any slurry between each pad.
I eventually finished with the extra fine pad which builds up shine and lustre on the tile; it had taken two days to clean the grout and burnish the Limestone but the floor was much improved and so after a final rinse down I left the floor to dry off overnight with the aid of the underfloor heating.
During this time, I also addressed the stained Limestone in the area of the kitchen where the dustbin was situated. This had been a major upset for the customer and I’m happy to report I managed to deal with it. However, it was quite an involved process, so I’ll write about this in a separate post.
On the third day I came back to seal the floor, checking first that it had dried sufficiently with a damp meter. Fortunately, the underfloor heating had done a great job of drying the stone and I was able to seal the floor using three coats of Tile Doctor Colour Grow sealant. This sealant not only provides a durable seal but also penetrates deep into the pores of the stone protecting it from within and enhancing the natural colours of the Limestone in the process.
After the final layer of sealant, I worked over the floor again with the extra fine burnishing pad both to add shine again following sealing, and to ensure that no smear marks were visible as the lighting conditions were unforgiving and highlighted any imperfections.
The customer was delighted with the results: so much so, in fact, that they booked me in to restore their Victorian hallway floor as well but that’s a story for another time!
Julian Iancono
SE Wales Tile Doctor
 RPI Company
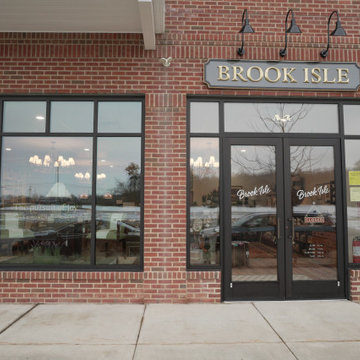
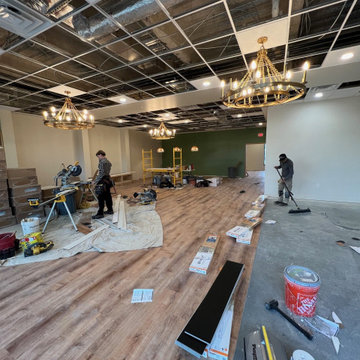
This customer came to us with a vision for a brick-and-mortar store for her Home Decore company. After discovering all the information needed to pull permits. We started our project with cutting the floor to run our electrical and plumbing. Once that was completed, we framed the back room, bathroom, and register area, next step was drywall, paint. then we installed flooring. This project also included some masonry work as we had to expand the front entrance from a single door to double to accommodate for furniture sales. Get a closer look for yourself, go check out Brook Isle in Chester Springs!
Find the right local pro for your project
 Devine Bath & Kitchen
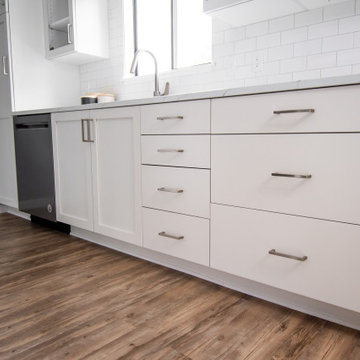
This condo was stuck in the 70s: dingy brown cabinets, worn out fixtures, and ready for a complete overhaul. What started as a bathroom update turned into a complete remodel of the condo. The kitchen became our main target, and as we brought it out of the 70s, the rest came with it.
Our client wanted a home closer to their grandchildren, but to be comfortable and functional, it needed an update. Once we begin on a design plan for one space, the vision can spread across to the other rooms, up the walls, and down to the floors. Beginning with the bathroom, our client opted for a clean and elegant look: white quartz, subway tile, and floating shelves, all of which was easy to translate into the kitchen.
The shower and tub were replaced and tiled with a perfectly sized niche for soap and shampoo, and a slide bar hand shower from Delta for an easy shower experience. Perfect for bath time with the grandkids! And to maximize storage, we installed floating shelves to hide away those extra bath toys! In a condo where the kitchen is only a few steps from the master bath, it's helpful to stay consistent, so we used the same quartz countertops, tiles, and colors for a consistent look that's easy on the eyes.
The kitchen received a total overhaul. New appliances, way more storage with tall corner cabinets, and lighting that makes the space feel bright and inviting. But the work did not stop there! Our team repaired and painted sheetrock throughout the entire condo, and also replaced the doors and window frames. So when we're asked, "Do you do kitchens?" the answer is, "We do it all!"
 By The Shore Vintage
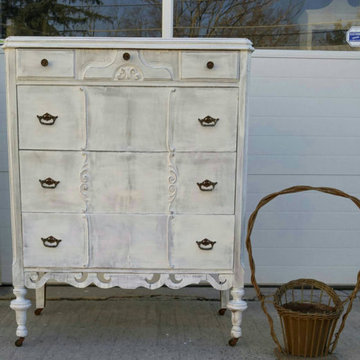
Great vintage piece loaded with character! Painted in Annie Sloan White Chalk Paint. Another piece where the imperfections were made to perfection! Heavily distressed for a warm and worn feel. There is so much detail here. The top drawer has inlays and a raised design. The three larger drawers have a raised, scroll woodwork design. Along the bottom is a scalloped cutout wood piece. Stands on carved legs that are on wheels. The hardware is original and has great aged, patina. You can zoom in on any picture for a closer view. Along the bottom and the sides you will see where the vaneer had started to lift. Some areas are missing and some have been glued down. This is not the first piece where I have done this. It all blends in great with the finish and I think, adds more Shabby character! You will see in the last picture along the back where a mirror once sat. That was also painted. Really only noticeable when looking at it from the side. The piece is very sturdy and well made. It stands 45 1/2". 36" across and 19" wide.
 Mark S. Garff, Landscape Architect
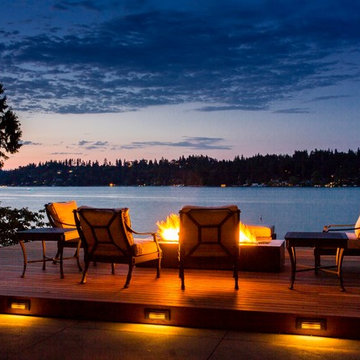
A Mercer Island couple wanted to transform their yard from mushy lawn into a more usable, beach-like space. We added new concrete pads to connect the stairs to the waterfront complete with salvaged, cedar logs around a deconstructed wood-burning firepit, invigorating the space and creating a place to relax and entertain right on the water. Closer to the house, an ipe deck built around a new Paloform gas firepit created a new outdoor room for enjoying endless summer evenings. LED landscape lighting completes the improvements.
Photography by: Miranda Estes Photography
 Serenity Design
It is truly a joy to work with so many homeowners and see all their different visions come to life. This complete remodel was no exception.
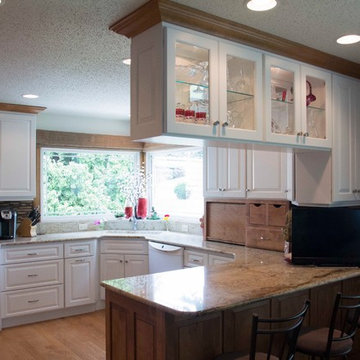
The original galley style kitchen had an undersized and rarely used breakfast nook under the corner window. We talked about it prior to the remodel and agreed this was space that could be far better used and accordingly removed it. We also removed the wall that separated the kitchen and dining room, which gave us many more options to work with.
First, the owners wanted a largely contemporary feel to their new kitchen, hence the all new, custom built white cabinets we used extensively. To keep the feel a bit warmer, we used alder wood for the cabinets around the fridge and for all the highlights, including all the trim.
With the nook removed, we relocated the sink to the corner to better enjoy the view and to make better use of the new space. We located the dishwasher to one side of the sink and the trash receptacle to the other side, making clean up a much more efficient process without so many steps being taken around the kitchen.
Note how the custom granite counter is shaped to allow closer access to the sink and the shelf below the window. The original windows were also replaced with bigger openings to allow more light into the smaller space.
There’s an entry door near one end of the kitchen. We added some apothecary drawers just under the upper cabinets to eliminate the “junk drawer” so many kitchens seem to end up with after a while. There’s a drawer here for each of the four occupants of the home for each to use as they desire, like car keys, coupons, notes, or anything else they may desire. This also allows each person to keep their drawer as clean or messy as they like without interfering with the other occupants.
The spice cabinet was particularly fun to design for this space. The rack itself tucks neatly inside, then pulls out to spin a full 360 degrees, making superb use of the corner cabinet and providing easy access to all the spices.
We have enough options for appliance garages that we prefer to call them condos. This particular example is one of our smaller units that neatly hides and protects all the assorted countertop appliances, while also keeping the counters tidy.
With the opened wall to the dining room, we were able to add significantly more cabinet space. For the row of cabinets over the bar we added glass faces on both sides of the cabinets to allow more light to pass through (providing a much more open feeling), then also added lights inside the cabinets to help highlight family heirlooms.
We finished it all off with a mosaic backsplash to add just a bit more character while adding to the contemporary feel of this magnificent new kitchen.

 Green Home Systems
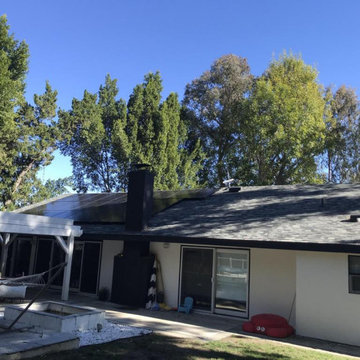
At Green Home Systems, we provide our customers with top tier solar solutions at the most economical price. Recently, we had the pleasure of helping Ian V. in Woodland Hills, CA with a 10 kW solar system that was completed in less than a month. Here’s a closer look at why Ian chose us and what made this project a success.
Competitive Pricing
When it comes to solar solutions, pricing is the biggest factor that drives customer decisions. We understand this better than anyone else and strive to make sure that our prices are low enough to remain competitive while still maintaining our high quality of service and products. We believe that this is why Ian chose us for his project in Woodland Hills – he wanted quality services and products at an unbeatable price point.
Superior Customer Service
Aside from pricing, another important factor for customers when choosing a solar solution provider is customer service. We take great pride in providing our customers with the best service in the industry. Our team of experts works closely with each customer to ensure that their needs are met and their expectations exceeded. From the beginning to end of every project, we strive to provide unmatched attention to detail and excellent communication so that no stone goes unturned and no questions go unanswered. This level of service is exactly why Ian chose us for his project in Woodland Hills – he knew he could trust us with his project and would receive superior customer service throughout the process.
Unparalleled Solar Solutions
In addition to providing competitive pricing and superior customer service, we also offer unparalleled solar solutions that meet each individual customer’s needs and budget. As part of this process, we work closely with our customers to help them understand their options and make informed decisions about which products are best for them. For Ian’s project in Woodland Hills, we worked together to determine which type of system was best for his home – a 10 kW system – as well as which specific products would work best for his needs and budget. With our expertise and guidance, Ian was able to make an informed decision about what type of system was best for him and his home.
Project Results
The results of Ian’s project were nothing short of amazing! The entire project went smoothly from start to finish thanks to our team’s expertise and attention to detail throughout the process. We were able to complete the 10 kW solar system within a month despite numerous obstacles such as weather delays and scheduling issues – all while providing top notch customer service every step of the way! With his new solar system now up and running, Ian is now saving money on energy bills while helping reduce his carbon footprint - proving that going green can also be economical!
Conclusion
At Green Home Systems, we are proud to offer our customers unparalleled solar solutions at an unbeatable price point along with superior customer service throughout each project’s completion! Thanks to our team’s hard work, dedication, expertise - as well as Ian's trust - we were able to complete this 10 kW solar system within a month while helping him save money on energy bills while reducing his carbon footprint! If you're looking for quality services and products at an unbeatable price point along with top notch customer service throughout your project's completion - then look no further than Green Home Systems!
 Dexter Builders
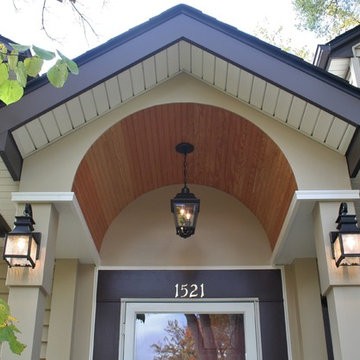
A Closer Look At The Bead Board Barrel Ceiling That Lines The Inside Of The Covered Front Porch
Elegant exterior home photo in Detroit
Elegant exterior home photo in Detroit
 yardscapes Inc.
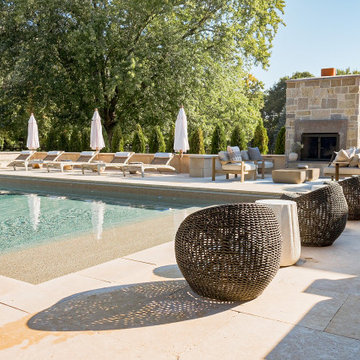
This Edina, MN project started when the client’s contacted me about their desire to create a family friendly entertaining space as well as a great place to entertain friends. The site amenities that were incorporated into the landscape design-build include a swimming pool, hot tub, outdoor dining space with grill/kitchen/bar combo, a mortared stone wood burning fireplace, and a pool house.
The house was built in 2015 and the rear yard was left essentially as a clean slate. Existing construction consisted of a covered screen porch with screens opening out to another covered space. Both were built with the floor constructed of composite decking (low lying deck, one step off to grade). The deck also wrapped over to doorways out of the kitchenette & dining room. This open amount of deck space allowed us to reconsider the furnishings for dining and how we could incorporate the bar and outdoor kitchen. We incorporated a self-contained spa within the deck to keep it closer to the house for winter use. It is surrounded by a raised masonry seating wall for “hiding” the spa and comfort for access. The deck was dis-assembled as needed to accommodate the masonry for the spa surround, bar, outdoor kitchen & re-built for a finished look as it attached back to the masonry.
The layout of the 20’x48’ swimming pool was determined in order to accommodate the custom pool house & rear/side yard setbacks. The client wanted to create ample space for chaise loungers & umbrellas as well as a nice seating space for the custom wood burning fireplace. Raised masonry walls are used to define these areas and give a sense of space. The pool house is constructed in line with the swimming pool on the deep/far end.
The swimming pool was installed with a concrete subdeck to allow for a custom stone coping on the pool edge. The patio material and coping are made out of 24”x36” Ardeo Limestone. 12”x24” Ardeo Limestone is used as veneer for the masonry items. The fireplace is a main focal point, so we decided to use a different veneer than the other masonry areas so it could stand out a bit more.
The clients have been enjoying all of the new additions to their dreamy coastal backyard. All of the elements flow together nicely and entertaining family and friends couldn’t be easier in this beautifully remodeled space.
 By Darash - Kitchen Cabinets, Vanities & Closets
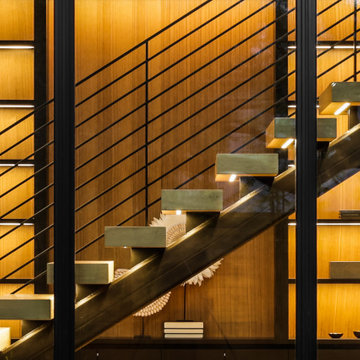
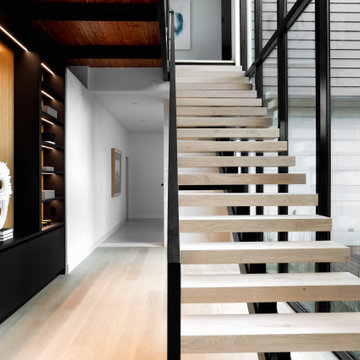
A closer look of the beautiful interior. Intricate lines and only the best materials used for the staircase handrails stairs steps, display cabinet lighting and lovely warm tones of wood.
 DC Design LLC
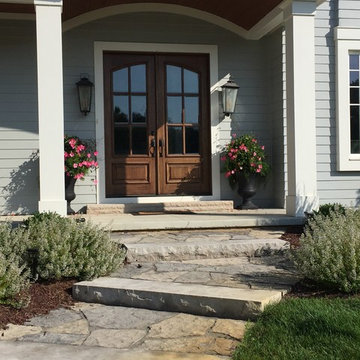
This is a view showing the curved stone walk leading to the front door with colorful planters flanking the entryway. Billowy Calamint provide a frothy texture on the sides of the walk.
 Cutuli Homes
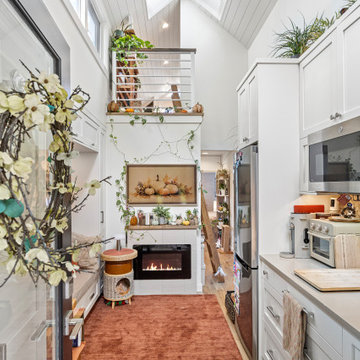
Built in 2023 by Cutuli Homes, this custom detached accessory dwelling unit was designed as a true mother-in-law home—a private, beautifully finished residence that allows three generations of one family to live close together while maintaining their own individual spaces.
The DADU was built as a companion to the homeowners' main residence, which Cutuli Homes had extensively remodeled and expanded two years earlier. Rather than treating the new structure as an afterthought, the goal was to create a home that felt architecturally connected to the existing property. Its traditional exterior, white siding, steeply pitched roof, generous windows and carefully proportioned trim give the small residence the character of an established home.
The project was created for the homeowners' mother, who downsized from her large lakefront home in the Midwest to move closer to her family and young grandchild. The result captures one of the greatest advantages of multigenerational living: family and shared community just steps away, balanced with the independence, privacy and comfort of a home of her own.
Inside, every inch was carefully considered. The compact footprint feels remarkably open thanks to a vaulted, white-paneled ceiling, abundant natural light, tall windows and an open vertical design that draws the eye upward. A loft level expands the usable living space without sacrificing the airy feeling of the main floor.
Traditional white Shaker-style cabinetry provides extensive built-in storage throughout the home and gives the interior a clean, timeless architectural character. In the kitchen, cabinetry extends upward to take advantage of the available height, while warm neutral countertops and a textured herringbone-pattern backsplash introduce subtle depth and contrast. Stainless-steel appliances are thoughtfully incorporated into the compact layout, creating a highly functional kitchen without overwhelming the living space.
One of the home's most charming features is the intimate living area tucked beneath custom built-in cabinetry. A built-in upholstered window-seat-style sofa with drawers below transforms what could have been unused space into a comfortable place to read, relax or visit. Across from it, a contemporary fireplace is integrated into a compact feature wall, with a wood display ledge above providing space for artwork, plants and personal collections.
Warm wood accents soften the predominantly white interior. Natural wood ledges, shelving, flooring and the loft ladder bring warmth and texture to the rooms, while greenery and personal furnishings give the home the comfortable character of a full-size residence rather than a conventional accessory dwelling unit.
The private sleeping area demonstrates the same emphasis on intelligent space planning. Built-in cabinetry surrounds the bed and continues overhead, providing substantial storage without requiring bulky freestanding furniture. A softly textured wall treatment, warm wood shelving and abundant natural light make the compact bedroom feel inviting and finished.
Above, the loft takes advantage of the dramatic roofline with a white tongue-and-groove style paneled ceiling extending from wall to wall. Built-in storage is incorporated beneath the sloped portions of the ceiling, turning otherwise difficult spaces into useful cabinetry while preserving an open central area for a desk, music, hobbies or additional flexible living space.
Even the exterior reflects the home's attention to detail. Large windows bring daylight deep into the interior, while the private patio extends the living space outdoors. Traditional siding and trim allow the DADU to complement the architecture of the main residence while still having an identity of its own.
At every turn, this project demonstrates that downsizing does not have to mean compromising on craftsmanship, beauty, storage or individuality. Through custom cabinetry, creative built-ins, vertical space planning and carefully considered architectural details, Cutuli Homes transformed a modest footprint into an elegant and highly personalized residence.
More than simply a DADU, this is a thoughtfully designed multigenerational home—close enough for grandparents, parents and grandchildren to share everyday life, while giving everyone the privacy and independence of having a place of their own.

 Maier Architects
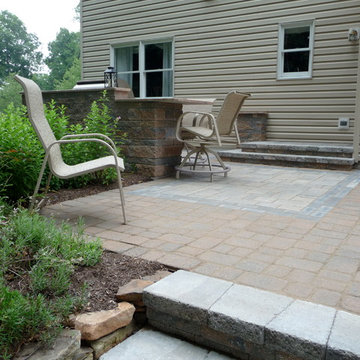
This is a new paver patio incorporated into an existing older paver patio. The walls form additional granite countertop food prep area. There is also a new eating area that brings the guests closer to the cook. The herb garden in foreground is very accessible to the kitchen. Some of the existing pavers in autumn blend were removed and used as a border for the new Techo- Bloc Mista pavers. Photo by Beth Brannick Maier

 RPI Company
his customer came to us with a vision for a brick-and-mortar store for her Home Decore company. After discovering all the information needed to pull permits. We started our project with cutting the floor to run our electrical and plumbing. Once that was completed, we framed the back room, bathroom, and register area, next step was drywall, paint. then we installed flooring. This project also included some masonry work as we had to expand the front entrance from a single door to double to accommodate for furniture sales. Get a closer look for yourself, go check out Brook Isle in Chester Springs!
 RPI Company
his customer came to us with a vision for a brick-and-mortar store for her Home Decore company. After discovering all the information needed to pull permits. We started our project with cutting the floor to run our electrical and plumbing. Once that was completed, we framed the back room, bathroom, and register area, next step was drywall, paint. then we installed flooring. This project also included some masonry work as we had to expand the front entrance from a single door to double to accommodate for furniture sales. Get a closer look for yourself, go check out Brook Isle in Chester Springs!
Sponsored
Westerville, OH

Custom Home Works
Franklin County's Award-Winning Design, Build and Remodeling Expert
 By Darash - Kitchen Cabinets, Vanities & Closets
A closer look of the beautiful interior. Intricate lines and only the best materials used for the staircase handrails stairs steps, display cabinet lighting and lovely warm tones of wood.
 Lagois Design Build Renovate
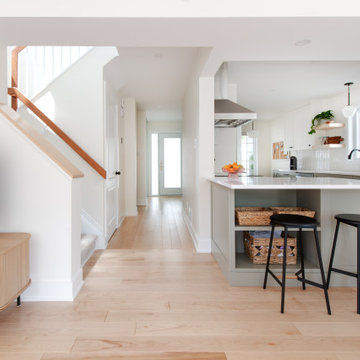
Step into a cozy and inviting atmosphere – a Hygge-inspired Scandinavian kitchen that is sure to warm the heart and bring the family closer together. Previously closed off and isolated from the rest of the home and family, we opened up walls between the kitchen and dining room and created an open-concept space that encourages togetherness and shared moments. Goodbye to isolation and hello to a kitchen that not only looks stunning but also fosters a sense of unity and connection.
The front of the home now has a full glass door as well as a full glass side panel to allow more light into the front entrance. The homeowners needed more storage, so we created a floor-to-ceiling bank of pantry cupboards in an unused part of the eat-in kitchen, and we also created more storage under the bench.
The removal of the wall was a little challenging because it was a load-bearing wall. We needed to add a full-span beam around to the back of the home and have it installed in one piece. We had to reroute the mechanical systems, a bulkhead and mechanical chase now to hide the beam and the plumbing.
The selections and colours – light cabinetry with sage-coloured lower cabinets, white countertops and natural maple hardwood – add to the beautiful open feeling the homeowners wanted. The original kitchen had dated finishes and was tired looking. The peninsula and meal-homework-and-crafts nook make the perfect setting for a young family.

23