
Search results for "Subfloor" in Home Design Ideas
 YW CONSTRUCTION SERVICES
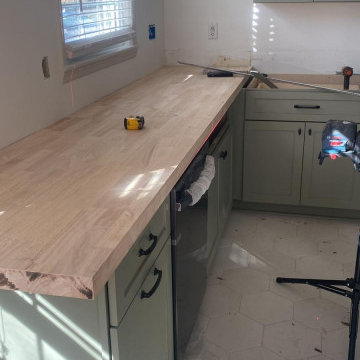
This kitchen remodel combines timeless functionality with a fresh, modern touch. We installed custom butcher block countertops, carefully cut and fitted to the existing layout, adding warmth and durability to the workspace.
The cabinets were refinished and painted in a soft sage green, creating a clean and inviting contrast with the natural wood tones. Electrical wiring for new ceiling fixtures was prepared for final installation, and the space was reconfigured to optimize workflow and comfort.
The project also included:
– New countertop installation with precision cuts
– Cabinet refinishing and hardware updates
– Electrical prep for ceiling lighting
– Subfloor protection and cleanup phase in progress
Perfect for homeowners looking to upgrade their kitchen with a cozy, craftsman-inspired style that feels both modern and functional.

 Automated Lifestyles
Example of a large classic enclosed carpeted and blue floor home theater design with blue walls and a projector screen

 User
Photography by Mike Kelly
Inspiration for a mid-sized contemporary master white tile and stone tile ceramic tile drop-in bathtub remodel in Los Angeles with a drop-in sink, recessed-panel cabinets, white cabinets, granite countertops, a one-piece toilet and beige walls
Inspiration for a mid-sized contemporary master white tile and stone tile ceramic tile drop-in bathtub remodel in Los Angeles with a drop-in sink, recessed-panel cabinets, white cabinets, granite countertops, a one-piece toilet and beige walls
Find the right local pro for your project

 Renovisions
It’s no surprise these Hanover clients reached out to Cathy and Ed of Renovisions for design and build services as they wanted a local professional bath specialist to turn their plain builder-grade bath into a luxurious handicapped accessible master bath.
Renovisions had safety and universal design in mind while creating this customized two-person super shower and well-appointed master bath so their clients could escape to a special place to relax and energize their senses while also helping to conserve time and water as it is used simultaneously by them.
This completely water proofed spacious 4’x8’ walk-in curb-less shower with lineal drain system and larger format porcelain tiles was a must have for our senior client –with larger tiles there are less grout lines, easier to clean and easier to maneuver using a walker to enter and exit the master bath.
Renovisions collaborated with their clients to design a spa-like bath with several amenities and added conveniences with safety considerations. The bench seat that spans the width of the wall was a great addition to the shower. It’s a comfortable place to sit down and stretch out and also to keep warm as electric mesh warming materials were used along with a programmable thermostat to keep these homeowners toasty and cozy!
Careful attention to all of the details in this master suite created a peaceful and elegant environment that, simply put, feels divine. Adding details such as the warming towel rack, mosaic tiled shower niche, shiny polished chrome decorative safety grab bars that also serve as towel racks and a towel rack inside the shower area added a measure of style. A stately framed mirror over the pedestal sink matches the warm white painted finish of the linen storage cabinetry that provides functionality and good looks to this space. Pull-down safety grab bars on either side of the comfort height high-efficiency toilet was essential to keep safety as a top priority.
Water, water everywhere for this well deserving couple – multiple shower heads enhances the bathing experience for our client with mobility issues as 54 soft sprays from each wall jet provide a soothing and cleansing effect – a great choice because they do not require gripping and manipulating handles yet provide a sleek look with easy cleaning. The thermostatic valve maintains desired water temperature and volume controls allows the bather to utilize the adjustable hand-held shower on a slide-bar- an ideal fixture to shower and spray down shower area when done.
A beautiful, frameless clear glass enclosure maintains a clean, open look without taking away from the stunning and richly grained marble-look tiles and decorative elements inside the shower. In addition to its therapeutic value, this shower is truly a design focal point of the master bath with striking tile work, beautiful chrome fixtures including several safety grab bars adding aesthetic value as well as safety benefits.

 Flooret
Lato Signature from the Modin Rigid LVP Collection - Crisp tones of maple and birch. The enhanced bevels accentuate the long length of the planks.
Small mid-century modern vinyl floor and yellow floor entry hall photo in San Francisco with gray walls and a red front door
Small mid-century modern vinyl floor and yellow floor entry hall photo in San Francisco with gray walls and a red front door
 Kitchen Solvers of Spring Hill
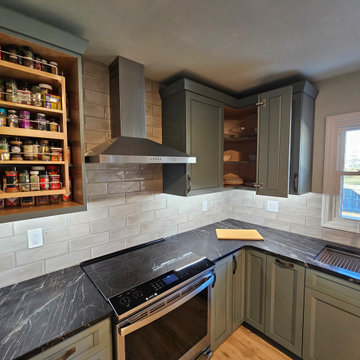
This veteran family had gone through a remodel years ago that left a closed in impractical space and a not so well installed tile floor. After living with it the past decade they decided it was time for a change and to create a kitchen they could be proud of! After a thorough inspection and detailed design process we came up with the perfect solution for handling all their storage needs, opened up the space and created much better flow by gutting everything to the studs and subfloor! We installed new cabinets, a double pantry for extra storage, a range hood vented outside, small island for seating and entertaining, streamlined lighting, beautiful LVP flooring, and customized cabinets to best utilize every square inch of space. This modern cottage transitional style is now warm and inviting. This family now loves to cook, entertain, and relax in their new kitchen!
 M & D Buildings
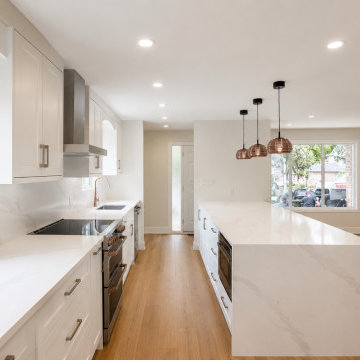
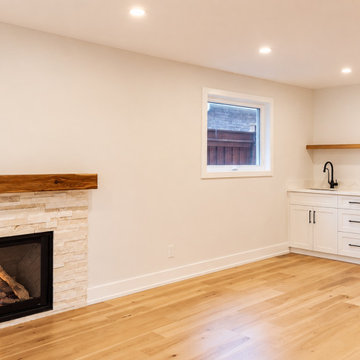
This Mississauga South project was a complete main-floor transformation from the structural engineering and permit stage through construction, mechanical work, cabinetry and final finishes.
The existing layout was extensively reconfigured to create a brighter, more functional and open living space.
The project included:
✓ Structural engineering, drawings & permits
✓ Removal and modification of existing walls
✓ Flush LVL structural beams
✓ Complete kitchen relocation and redesign
✓ Custom 20 ft kitchen
✓ Large 4' × 10' waterfall island
✓ Custom cabinetry and millwork
✓ HVAC ductwork relocation
✓ Extensive plumbing relocations
✓ Electrical rewiring and new lighting layout
✓ New flooring and interior finishes
✓ Custom dining-area cabinetry
✓ New interior doors, subfloor, fireplace, painting and trim
The result is a completely transformed main floor where the kitchen, dining and living areas now work together as one cohesive space — with significantly more storage, natural light and functionality.
M & D Buildings
Residential & Commercial Contractors
Engineering • Design • Permits • Construction
Mississauga • Oakville • GTA
 M & D Buildings
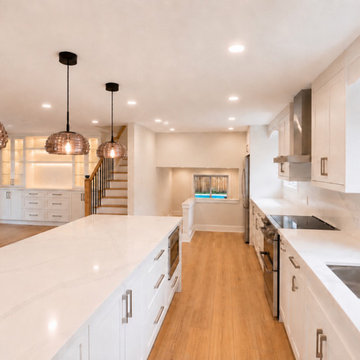
This Mississauga South project was a complete main-floor transformation from the structural engineering and permit stage through construction, mechanical work, cabinetry and final finishes.
The existing layout was extensively reconfigured to create a brighter, more functional and open living space.
The project included:
✓ Structural engineering, drawings & permits
✓ Removal and modification of existing walls
✓ Flush LVL structural beams
✓ Complete kitchen relocation and redesign
✓ Custom 20 ft kitchen
✓ Large 4' × 10' waterfall island
✓ Custom cabinetry and millwork
✓ HVAC ductwork relocation
✓ Extensive plumbing relocations
✓ Electrical rewiring and new lighting layout
✓ New flooring and interior finishes
✓ Custom dining-area cabinetry
✓ New interior doors, subfloor, fireplace, painting and trim
The result is a completely transformed main floor where the kitchen, dining and living areas now work together as one cohesive space — with significantly more storage, natural light and functionality.
M & D Buildings
Residential & Commercial Contractors
Engineering • Design • Permits • Construction
Mississauga • Oakville • GTA
 M & D Buildings
This Mississauga South project was a complete main-floor transformation from the structural engineering and permit stage through construction, mechanical work, cabinetry and final finishes.
The existing layout was extensively reconfigured to create a brighter, more functional and open living space.
The project included:
✓ Structural engineering, drawings & permits
✓ Removal and modification of existing walls
✓ Flush LVL structural beams
✓ Complete kitchen relocation and redesign
✓ Custom 20 ft kitchen
✓ Large 4' × 10' waterfall island
✓ Custom cabinetry and millwork
✓ HVAC ductwork relocation
✓ Extensive plumbing relocations
✓ Electrical rewiring and new lighting layout
✓ New flooring and interior finishes
✓ Custom dining-area cabinetry
✓ New interior doors, subfloor, fireplace, painting and trim
The result is a completely transformed main floor where the kitchen, dining and living areas now work together as one cohesive space — with significantly more storage, natural light and functionality.
M & D Buildings
Residential & Commercial Contractors
Engineering • Design • Permits • Construction
Mississauga • Oakville • GTA

 Old Town Design Group
The color scheme of the front porch is so inviting. The yellow chairs are in harmony with the stamped wood grain concrete and really draws out the black panes of the windows.
Photos By: Thomas Graham

 Allison Smith Interiors
Home Gym featuring diamond plating on the walls and rubber flooring. Getz Creative Photography
Inspiration for a huge transitional gray floor home gym remodel with gray walls
Inspiration for a huge transitional gray floor home gym remodel with gray walls

 Yellowstone Traditions
Peter Zimmerman Architects // Peace Design // Audrey Hall Photography
Staircase - rustic l-shaped wood railing staircase idea
Staircase - rustic l-shaped wood railing staircase idea
 Tile Doctor Ltd
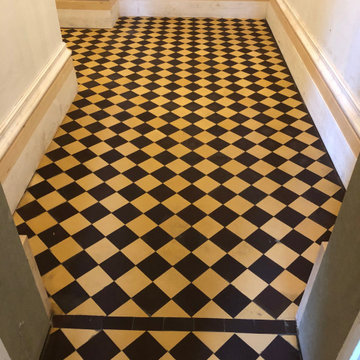
I thought I would share this case history of a Yellow and Black Victorian Tiled floor that we worked on at a large house in Lancaster last year. It’s a great example of the typical problems we face with old Victorian floors, especially around door thresholds where the transition between the different foundation invariable cause problems.
I didn’t know the full history of the floor, but it was now in quite a state and recent renovation work had left the floor unstable with loose and cracked tiles. The tiles needed to be removed and then the damaged subfloor carefully scraped out and replaced. Once that was done the floor would need relaying and then cleaned and sealed so everything would blend in.
After visiting the property and providing a quotation we were given the go ahead and agreed a date to do the work.
We returned on the agreed date and set about carefully removing the loose and cracked Victorian tiles and put them aside for later use. Some would need replacing however this would not present a problem and they are still widely available, and I have several contacts I can turn to for this.
Once this was done and the subfloor exposed and cleaned up, I used self-levelling cement to bring the floor level up and in-line with the existing. This now needed to set hard, so the rest of the day was spent cleaning up the tiles we removed earlier with Tile Doctor Grout Clean-up and Pro-clean. Our goal is to reuse as many of the original tiles as possible to preserve the heritage of the floor.
The next day with the new subfloor set it was ready for tiling. This involves laying out the tiles first without adhesive carefully cutting and fitting new tiles as needed to maintain the overall pattern of the floor. Once I was happy the tiles were moved to a board and then fitted with fresh adhesive.
I came back on day three with the aim of cleaning the floor so it could be sealed however whilst inspecting my new tiling I was disappointed to discover some were not as level as I had hoped. I had noticed the replacement tiles were not the same thickness as the originals the previous day but I had worked around this by using different levels of adhesive, clearly this plan was not as effective as I had hoped for.
To counter this problem, I used a set of 50-Grit, 100-grit and then 200-grit diamond pads in sequence to mill the floor flat and remove the lippage between them. This is done with water to lubricate the process and a weighted floor buffer. The pads generate a lot of slurry and so you need to rinse this off with more water and extract all the soil after each pad.
I followed this up with various Diamond burnishing pads of increasingly finer grits across the whole floor until we achieved a consistent finish and had the added benefit of getting the whole floor clean. More water is used to rinse the tiles after burnishing and the soil extracted with a wet vacuum as before. Once done and inspected the floor was left to dry off overnight.
Tile Doctor Colour Grow was applied to enhance the appearance of the tiles and protect them going forward. This product copes well with damp which can always be a problem with old floors like this one with no damp proof membrane present.
The floor looked amazing when finished and our attention to detail had really paid off, in fact you simply could not tell we had done any tiling work or replaced any tiles. For aftercare I recommend the use of Tile Doctor Neutral Cleaner which is designed for the regular cleaning of sealed tiles.
Russell Taylor
Lancashire Tile Doctor
 Kitchen Culture Cambridgeshire
This bathroom in Little Paxton is a great example of how thoughtful design and careful planning can turn a tricky space into something beautifully simple.
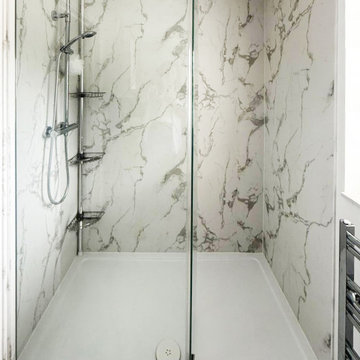
We recently supplied and installed this lovely en-suite bathroom for a customer in Little Paxton. With a sloping ceiling, the room had its challenges — but by making a few changes at design stage, we were able to create space for sensible storage and a generous shower.
The original subfloor wasn’t solid and the tiles had cracked, so the room had to be completely stripped out and repaired. Once the groundwork was done, we carried out all the electrics, plumbing, plastering, and tiling, along with underfloor heating and Calacatta-style wall panels in the shower.
This bathroom has a clean, contemporary feel. The floor tiles were chosen to complement the wall panels in the shower, keeping the design cohesive throughout. A glass shower enclosure keeps things open, while the splashback of blue-green tiles behind the sink adds a pop of colour. Silver-toned fittings and an oval countertop basin bring a polished, modern finish to the room.
It may not be a large space, but this one came together beautifully. A straightforward layout, clean finishes, and a touch of luxury where it counts. Simple, effective and elegant. Love it!
 Kitchen Solvers of Spring Hill
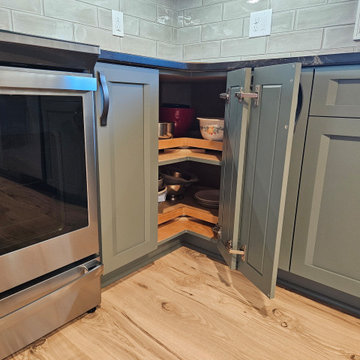
This veteran family had gone through a remodel years ago that left a closed in impractical space and a not so well installed tile floor. After living with it the past decade they decided it was time for a change and to create a kitchen they could be proud of! After a thorough inspection and detailed design process we came up with the perfect solution for handling all their storage needs, opened up the space and created much better flow by gutting everything to the studs and subfloor! We installed new cabinets, a double pantry for extra storage, a range hood vented outside, small island for seating and entertaining, streamlined lighting, beautiful LVP flooring, and customized cabinets to best utilize every square inch of space. This modern cottage transitional style is now warm and inviting. This family now loves to cook, entertain, and relax in their new kitchen!
 Hello Norden
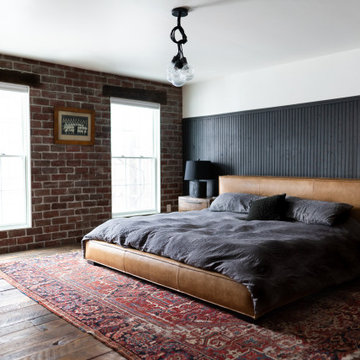
This space started as a living room with green carpet, 2 walls with 8’-wide bay windows, and a third wall that was open to the front entrance and hallway of the home. We framed in the hallway so that it’d house one of two closets and the new bedroom door. We then popped through the fourth wall to move the entrance of the hall bathroom to create a master-suite. Now to the finishes. Every wall has a texture on it to create warmth and a cozy mood. One wall has two new nearly floor-to-ceiling windows topped with subfloor pieces we grabbed from the kitchen, and covered with historic street pavers pulled from the Midwest. We installed traditional bead-board paneling on the headboard wall, but stopped it high up so that it serves as both a headboard and art allowing for simplicity and less stuff in the room. We painted it a moody soft black to give the room an intimate feel. The first closet has a vintage barn door for texture, and the bathroom wall houses a second closet created by building a vintage UofM cabinet into the wall, which houses a TV and loads of clothes, that we then flanked with a custom hanging-clothes closet and some hidden HVAC both covered in 8” wood paneling. We continue the texture on the floor with the addition of a mix of reclaimed hardwoods that we had milled into flooring, sealed with a natural wax to maintain its old-world charm. The lighting is simple. Just various sizes of exposed light bulbs dangling from cloth-covered wires and tied up in a loose knot. We styled it with just a few simple but bold furniture pieces as the architectural elements in this space are the true focal point.
 Kitchen Solvers of Spring Hill
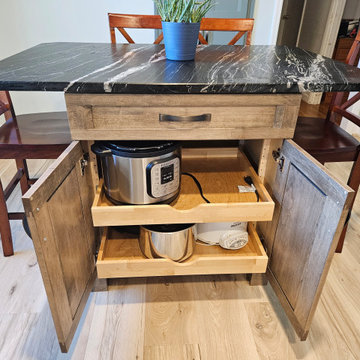
This veteran family had gone through a remodel years ago that left a closed in impractical space and a not so well installed tile floor. After living with it the past decade they decided it was time for a change and to create a kitchen they could be proud of! After a thorough inspection and detailed design process we came up with the perfect solution for handling all their storage needs, opened up the space and created much better flow by gutting everything to the studs and subfloor! We installed new cabinets, a double pantry for extra storage, a range hood vented outside, small island for seating and entertaining, streamlined lighting, beautiful LVP flooring, and customized cabinets to best utilize every square inch of space. This modern cottage transitional style is now warm and inviting. This family now loves to cook, entertain, and relax in their new kitchen!
 M & D Buildings
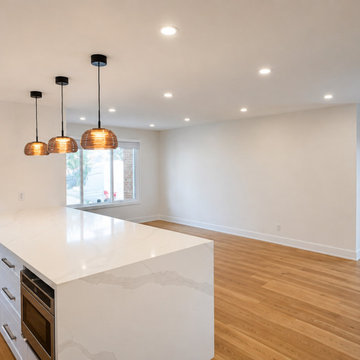
This Mississauga South project was a complete main-floor transformation from the structural engineering and permit stage through construction, mechanical work, cabinetry and final finishes.
The existing layout was extensively reconfigured to create a brighter, more functional and open living space.
The project included:
✓ Structural engineering, drawings & permits
✓ Removal and modification of existing walls
✓ Flush LVL structural beams
✓ Complete kitchen relocation and redesign
✓ Custom 20 ft kitchen
✓ Large 4' × 10' waterfall island
✓ Custom cabinetry and millwork
✓ HVAC ductwork relocation
✓ Extensive plumbing relocations
✓ Electrical rewiring and new lighting layout
✓ New flooring and interior finishes
✓ Custom dining-area cabinetry
✓ New interior doors, subfloor, fireplace, painting and trim
The result is a completely transformed main floor where the kitchen, dining and living areas now work together as one cohesive space — with significantly more storage, natural light and functionality.
M & D Buildings
Residential & Commercial Contractors
Engineering • Design • Permits • Construction
Mississauga • Oakville • GTA
 Pelican Int'l
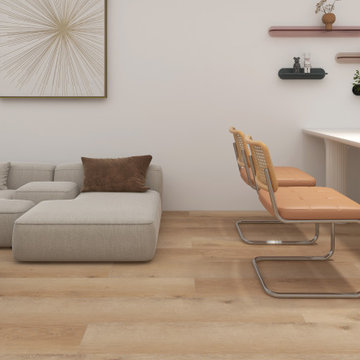
Bright yet refined, Vanderbilt dazzles while staying subdued. Its lighter color scheme pairs well with both soft and dark design aesthetics. This specific style features a unique Gra-Matt™ finish.
This stylish matte coating eliminates reflections and harsh glares, while its granular surface resists scratches and heavy wear. Unlike high-gloss finishes that highlight fingerprints and smudges, the Gra-Matt™ finish masks everyday marks. Its slip-resistant quality makes it a safer option for areas with kids, pets, or elderly occupants. Plus, its dense protective layer prevents solvent permeation, such as acetone, nitric acid, and other harsh chemicals.
Part of the Solstone Coastal Collection, Vanderbilt is a premier option in Luxury Vinyl Plank flooring. Esteemed for its 100% waterproof construction and exceptional durability, this series utilizes advanced technologies to authentically replicate the intricate textures of natural wood and stone. Solstone's distinctive rigid core exhibits unparalleled strength, rendering it an optimal solution for high-traffic areas and commercial settings. Easily install over uneven subfloors, and existing hard surfaces, including tile.
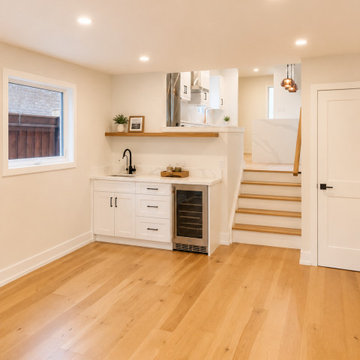 M & D Buildings
This Mississauga South project was a complete main-floor transformation from the structural engineering and permit stage through construction, mechanical work, cabinetry and final finishes.
The existing layout was extensively reconfigured to create a brighter, more functional and open living space.
The project included:
✓ Structural engineering, drawings & permits
✓ Removal and modification of existing walls
✓ Flush LVL structural beams
✓ Complete kitchen relocation and redesign
✓ Custom 20 ft kitchen
✓ Large 4' × 10' waterfall island
✓ Custom cabinetry and millwork
✓ HVAC ductwork relocation
✓ Extensive plumbing relocations
✓ Electrical rewiring and new lighting layout
✓ New flooring and interior finishes
✓ Custom dining-area cabinetry
✓ New interior doors, subfloor, fireplace, painting and trim
The result is a completely transformed main floor where the kitchen, dining and living areas now work together as one cohesive space — with significantly more storage, natural light and functionality.
M & D Buildings
Residential & Commercial Contractors
Engineering • Design • Permits • Construction
Mississauga • Oakville • GTA
68