
Search results for "Sucking" in Home Design Ideas


 Casini Masonry
This is a 50'' Orton Style Rumford Fireplace at my home in Oxford,CT.
A Rumford Firplace is made with either a straight rear wall or a slanted one. The slanted ones are the better heaters and I just proved "the more efficient" as they do not have a bigger throat area than the straight variety. The book "The Forgotten Art of Building a Good Fireplace" written bu Vrest Orton in the late 60's descibes the slanted variety well and that is where they picked up the name. He did not invent them rather he wrote of what he witnessed as being nice enjoyable good heating Rumfords .
It uses my self made damper and burns all winter long with the damper blade at only a 1-3/4'''' gap opening.
This represents a throat area to fireplace opening area of 1 to 30 a achievement that recently left the top authority on Rumford Fireplaces in awe and disbelief as his straight backed Rumfords only get to a 1:20 ratio. Although he remained skeptical and wanting more explicit videos and refusing to sign a nondisclosure agreement, he wanted to know if I could do the same with his chosen styled Rumfords.
With a large or small fire the damper stays fixed.
Weather is a non issue, even foggy drizzly nights do not effect this fireplace. There are videos at FCasini on You Tube showing the 50'' burning along with my basement 36'' Orton which I did experimenting last winter . The basement [never used before] has no face, so I affixed a steel panel on it to see if it could burn at the same ratio as my 50'' which uses my self made 30 year old damper.
Iinstead it has a custom vestal damper which I cut the front off as I occasionally do when the budget is limited.
It burned good at a 1 to 26 ratio which is way above the 1/17 that Straight Back Rumfords normally do although their very best is 1/20 ..both of which depend on the use of the highly suggested Tee Pee Fire which will assist any fireplace in smoke evacuation due to solely emitting the smoke form the high end of the standing logs!
Both of my fireplaces certainly can use this style fire but I enjoy the horizontal log cabin style because of the easy loading and longer lasting fire per load.
This winter I am going to affix a glass panel to get a good look at the throat and inner breast chamber while the fireplace is burning. This will be done in my third [ also un faced like the basement] Rumford. This one uses an outside chimney that is about 18' tall, much shorter than the other two and not as warm an environment being the other two are interior chimneys. I am anxious to see if it will compete with a lesser draft ?
I have been searching the patent data base and to date there is nothing close to even resemble the way I get these slanted fireplaces to pass the smoke through such a ridiculously thin throat which I call "The Gates Of Hell".
The prototype is complete and installed into this fireplace which is in it's second year of performance testing and doing better than I expected, in fact before installing it last week I cleaned the throat and chimney and damper blade which hasn't been done in 6 years. This did help the performance a lot as the passage is so thin any build up greatly slows it down from the added viscosity ie flow drag.
For those that don't understand the benefit of a 1:30 ratio it is half the loss of heated air up the chimney and results in a 50% increase in heat efficiency.
This equals a 100% enjoyment factor for anyone whom takes fireplace burning seriously like have done and do for the past 30 years!
The house doesn't get sucked cold!

 Liebherr Appliances North America
MONOLITH INCEPTION KITCHEN
designed by Richard T. Anuszkiewicz
Featured brands include
Premier Custom-Built Cabinetry
SUPERIORE ranges
KALLISTA Plumbing
Dekton by Cosentino countertops
Burchette & Burchette Hardwood Floors,
Bradley USA Bridget Beari Designs wallpaper
Grothouse Lumber Custom Wood Surfaces.
Find the right local pro for your project
 Phoenix Home Remodeling
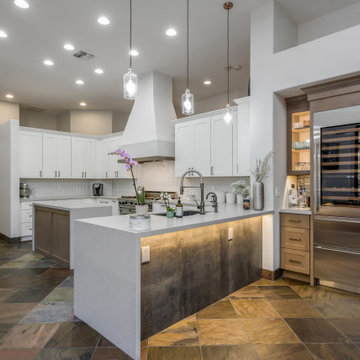
Siene & Kentay’s tired kitchen needed some attention. The large and heavy stone covered hood vent paired with the dark stained cabinets sucked the life and light out of the room.
One thing that struggled was lighting. Even with the walls of windows the dark features just absorbed the light.
We started by using a soft white shaker cabinet called Dove White as the main cabinet color in the kitchen. We removed the stone from the hood and the dark slate from the backsplash.
We also removed the dated shape of the peninsula by squaring it off. By doing this, the new walking area improved and allows for transitioning between rooms.
The oddly shaped island in the center struggled to give them the storage they needed. They were large cabinets, but items usually got stuck or lost.
After determining that Siene wanted to prepare food here, we opted to do deep drawer cabinets to store a lot of her prep items at arm’s reach.
The Island and bar cabinets are in a natural stain called Fawn. This color complimented the existing slate flooring. We also lined the hood in trim that matches the island.
The island is also waterfalled on both sides with quartz from Arizona Tile called Ivory White Honed.
Just off the kitchen there was a bar, however it was hidden from all rooms. We decided that we would move the bar to a more prominent place in the home, and the existing would be turned into an appliance pantry.
A place for the coffee maker, microwave, and other smaller appliance storage.
We finished the kitchen with a simple backsplash in a lantern white mosaic with a natural tan grout. The door hardware, faucet from Delta and the new pendant lighting are all in the stainless family allowing for depth and consistency.
The new bar features a Sub-Zero wine column with refrigerated storage below. The upper lit glass cabinets offer a chance to showcase stemware and spirits.
This custom cabinet install allows the wood to shine and offers storage.
Lastly, the additional lighting installed in all areas now is controllable. Siene and Kentay have full control and can direct the light and how much is used.
When they want a night in, they can turn down the lights and relax. In their new updated family room in front of a newly integrated modern fireplace.
 Tile Doctor Ltd
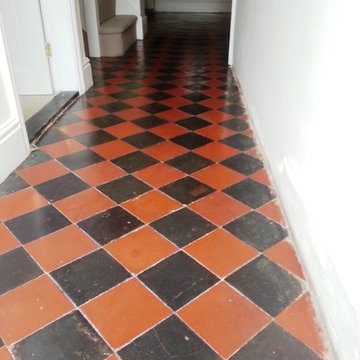
Details below of a restorative clean and seal that I recently completed on a Quarry tiled hallway at a house in the small village of Riseley, North Bedfordshire.
The floor was a mix of fantastic black and red tiles; however, it had lost its character after a long period without professional maintenance. My client commissioned me to strip off the old sealer from the floor and replace it, but not before providing a thorough clean, including tackling some adhesive staining and inherent grout haze.
The first task involved mixing our high alkaline cleaner, known as Tile Doctor Pro-Clean, with water to form a strong solution. The solution was applied to the tiled floor and left to dwell for a short period. This dwelling time allows for the Pro-Clean to seep into the stone to get underneath the ingrained dirt and lift it out. Pro-Clean also contains stripping properties, and thus helped to break down the old (and now ineffectual) sealer.
After completing this initial clean I rinsed the floor using a standard mop and bucket method. With the old sealer removed, it became evident that there was also plaster residue marking the tiles, as well as inherent grout haze on the surface of the tile probably from the original installation. To tack these problems I used Tile Doctor Grout Clean-Up, which is an acid-based cleaner that dissolves the adhesive and the grout. Being an acid you have to be careful and ensure the floor is rinsed thoroughly after use and if you’re considering using this product yourself read the label and make sure you use the right protective equipment.
After the floor was thoroughly rinsed with water it was dried as much as possible using a wet vacuum which literally sucks the water off the floor. The floor was then left to dry for four days, with the help of several air movers. By the time I returned to the house, the floor was completely dry and ready to take the seal.
I opted to use a combination of sealers, including one coat of our colour enhancing, impregnating sealer, known as Colour Grow, followed by three coats of Tile Doctor Seal & Go to provide a truly robust and aesthetically pleasing surface seal.
The photographs demonstrate the finished results better than words can and I think you will agree the floor is quite transformed.
Andrew Evans
Bedfordshire Tile Doctor

 CertainTeed Living Spaces®
Primary Product: CertainTeed Cedar Impressions® Perfection Shingles
Size: Double 7" Staggered
Color: Mountain Cedar
Mid-sized ornate red three-story vinyl exterior home photo in Philadelphia
Mid-sized ornate red three-story vinyl exterior home photo in Philadelphia
 Phoenix Home Remodeling
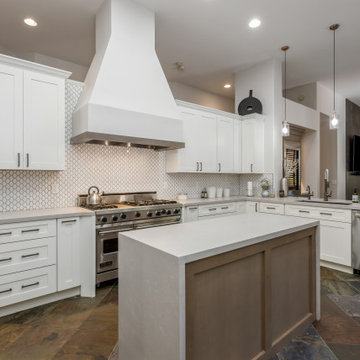
Siene & Kentay’s tired kitchen needed some attention. The large and heavy stone covered hood vent paired with the dark stained cabinets sucked the life and light out of the room.
One thing that struggled was lighting. Even with the walls of windows the dark features just absorbed the light.
We started by using a soft white shaker cabinet called Dove White as the main cabinet color in the kitchen. We removed the stone from the hood and the dark slate from the backsplash.
We also removed the dated shape of the peninsula by squaring it off. By doing this, the new walking area improved and allows for transitioning between rooms.
The oddly shaped island in the center struggled to give them the storage they needed. They were large cabinets, but items usually got stuck or lost.
After determining that Siene wanted to prepare food here, we opted to do deep drawer cabinets to store a lot of her prep items at arm’s reach.
The Island and bar cabinets are in a natural stain called Fawn. This color complimented the existing slate flooring. We also lined the hood in trim that matches the island.
The island is also waterfalled on both sides with quartz from Arizona Tile called Ivory White Honed.
Just off the kitchen there was a bar, however it was hidden from all rooms. We decided that we would move the bar to a more prominent place in the home, and the existing would be turned into an appliance pantry.
A place for the coffee maker, microwave, and other smaller appliance storage.
We finished the kitchen with a simple backsplash in a lantern white mosaic with a natural tan grout. The door hardware, faucet from Delta and the new pendant lighting are all in the stainless family allowing for depth and consistency.
The new bar features a Sub-Zero wine column with refrigerated storage below. The upper lit glass cabinets offer a chance to showcase stemware and spirits.
This custom cabinet install allows the wood to shine and offers storage.
Lastly, the additional lighting installed in all areas now is controllable. Siene and Kentay have full control and can direct the light and how much is used.
When they want a night in, they can turn down the lights and relax. In their new updated family room in front of a newly integrated modern fireplace.
 Phoenix Home Remodeling
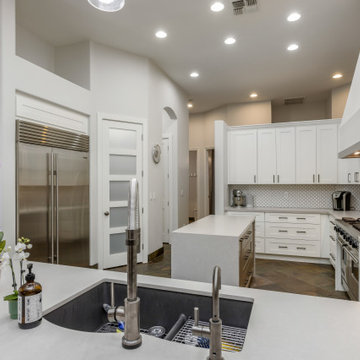
Siene & Kentay’s tired kitchen needed some attention. The large and heavy stone covered hood vent paired with the dark stained cabinets sucked the life and light out of the room.
One thing that struggled was lighting. Even with the walls of windows the dark features just absorbed the light.
We started by using a soft white shaker cabinet called Dove White as the main cabinet color in the kitchen. We removed the stone from the hood and the dark slate from the backsplash.
We also removed the dated shape of the peninsula by squaring it off. By doing this, the new walking area improved and allows for transitioning between rooms.
The oddly shaped island in the center struggled to give them the storage they needed. They were large cabinets, but items usually got stuck or lost.
After determining that Siene wanted to prepare food here, we opted to do deep drawer cabinets to store a lot of her prep items at arm’s reach.
The Island and bar cabinets are in a natural stain called Fawn. This color complimented the existing slate flooring. We also lined the hood in trim that matches the island.
The island is also waterfalled on both sides with quartz from Arizona Tile called Ivory White Honed.
Just off the kitchen there was a bar, however it was hidden from all rooms. We decided that we would move the bar to a more prominent place in the home, and the existing would be turned into an appliance pantry.
A place for the coffee maker, microwave, and other smaller appliance storage.
We finished the kitchen with a simple backsplash in a lantern white mosaic with a natural tan grout. The door hardware, faucet from Delta and the new pendant lighting are all in the stainless family allowing for depth and consistency.
The new bar features a Sub-Zero wine column with refrigerated storage below. The upper lit glass cabinets offer a chance to showcase stemware and spirits.
This custom cabinet install allows the wood to shine and offers storage.
Lastly, the additional lighting installed in all areas now is controllable. Siene and Kentay have full control and can direct the light and how much is used.
When they want a night in, they can turn down the lights and relax. In their new updated family room in front of a newly integrated modern fireplace.

 RI Studio
Spanish meets modern in this Dallas spec home. A unique carved paneled front door sets the tone for this well blended home. Mixing the two architectural styles kept this home current but filled with character and charm.

 Creative Design Cabinetry
A modern update in a Salt Lake City penthouse home office with tremendous views of the city. Shaker style cabinets with a 3 cm Silver Waves granite countertop.

 Mottram Architecture
Timber frame homes offer unique challenges during a remodel. What often makes them beautiful and attractive to most homeowners, also makes them challenging for space requirements.
Context: The lovely couple that owned this home were struggling with some interesting floor plan challenges that just didn't work for their family. The loved the beautiful timbers and woodwork of their home, but the dramatically sloping ceilings on the second floor, particularly in the bathroom, just didn't work for this 1 1/2 bath home. Needing to use the skylight to approach the toilet was a less then ideal scenario. Although the bathroom footprint was more then adequate, the sloped ceiling only made half of the space useable. Check out the Before/After post on our blog to see the photos of the house pre-renovation. As much as they loved all the wood features in their home, another challenge they had was light. The wood ceiling made everything inside the house darker, even with a fantastic array of south facing windows, there were spaces in the home that felt dark and small. When they contacted us they wanted to know how could they make their brighter and more inviting, were there solutions to the 2nd floor sloped ceiling issues, and if they were going to do all of this work, how could they make their home more comfortable and efficient. A nagging water leak in the upstairs bathroom spurred them into action and here is how we solved their dilemma.
Conclusion: First, we added a little dormer to the rear of the house so we could get full headroom in nearly all of the upstairs bathroom! Then we decided to extend that dormer one more timber bay over to create a walk in closet with natural light and plenty of space. Since we were contemplating energy efficiency, we resolved a nagging issue that is present in a lot of timber frame construction, air tightness. Commonly found in timber frame construction, fiberglass insulation is installed in the rafter bays and board ceilings are installed over top. Unfortunately, board ceilings are anything but air tight, and fiberglass insulation needs to be in an airtight cavity for maximum effectiveness. So we were able to solve two issues at the same time for this homeowner. We removed the board ceiling and fiberglass insulation, we dense packed the rafter bays with cellulose insulation, and installed sheetrock in place of the boards. The boards were salvaged for re-use by the homeowner, and the space and light quality was dramatically improved. Some may think that losing the board ceiling took something away from the space, but what you'll see in the pictures is that it highly accentuates the heavy timbers and really makes them stand out in a beautiful way. Now with this added airtightness, better insulation, and brighter space, the homeowner hardly runs their wood stove, and it's so quiet in the space, an added bonus from changing the insulation. It became necessary to also add a sheetrock ceiling to the living room to hide the plumbing from the new bathroom layout above. Changing this ceiling gave the homeowner some real quality lighting that was lacking in the living room before. The brighter ceiling and new lighting layout completely transforms the living room into a space you want to hang out, even though the layout didn't change at all. When the homeowner saw the finished spaces she said "I can't believe this is my house, I want to live in this house"
Energy Efficiency: I touched a little on the efficiency above, but like all projects done with Mottram Architecture, we always want to leave you with a little extra. Timber frame construction with board ceilings and fiberglass insulation are notoriously leaky! If you want to know what we think about fiberglass insulation, check our our blog post on Why Fiberglass Insulation Sucks. By installing cellulose insulation and covering it with sheetrock we were able to greatly reduce the heat flowing out of this home. It not only improves cashflow it improves the comfort level in the space. Who wants to sit in their living room and feel a draft? Let us remind you, we are not saying cellulose insulation is an air barrier, we use the sheetrock to help with that, but it does significantly reduce the air flow over fiberglass insulation. And when we reduce the airflow, we reduce the heat flow. And when we reduce the heat flow, we reduce the need to re-heat that drafty air from outside. When it comes to energy efficiency the first and best place to start is air infiltration. We greatly reduced the air infiltration with the new insulation, but we also added a hat and warm boots. What I mean by that is, we improved the insulation in the roof, and we installed insulation in the basement. Maybe it's a silly analogy, but when you think about keeping warm, we always start with the hat and boots! With sustainability in mind, the next project will be to add a deck to the front of this house with rain catchment barrels from the metal roof. They are planning to plant a garden in the spring and the rain catchment system will help to irrigate the new garden.
Builder: East Shore Builders
Photographer: Michael Eric Berube

 Beth Diana Smith Interior Design
Rhino hooks
Patrick Cline
Mid-sized eclectic master carpeted bedroom photo in New York with purple walls and no fireplace
Mid-sized eclectic master carpeted bedroom photo in New York with purple walls and no fireplace

 K & D Landscaping, Inc.
Residential home in Santa Cruz, CA
This stunning front and backyard project was so much fun! The plethora of K&D's scope of work included: smooth finished concrete walls, multiple styles of horizontal redwood fencing, smooth finished concrete stepping stones, bands, steps & pathways, paver patio & driveway, artificial turf, TimberTech stairs & decks, TimberTech custom bench with storage, shower wall with bike washing station, custom concrete fountain, poured-in-place fire pit, pour-in-place half circle bench with sloped back rest, metal pergola, low voltage lighting, planting and irrigation! (*Adorable cat not included)
 Tile Doctor Ltd
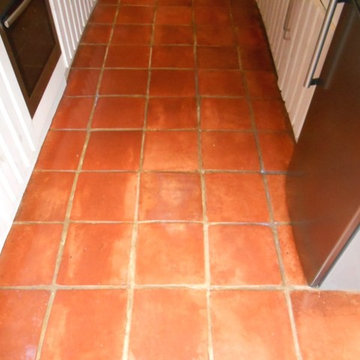
Not too long ago, I visited a house in the town of Fulwood in Preston, Lancashire. My client had a Terracotta tiled floor which had been neglected for many years and in their attempt to improve it had unfortunately been given some very poor advice by tile retailers, all of whom sold him different products, and each of which was unsuitable. Using these different products in succession had resulted in the depreciation of the floor’s texture and smoothness, in turn making the clay difficult to clean and maintain.
As per my usual process I ran a small test clean to demonstrate what could be done to improve the floor and I was commissioned to restore the floor back to its former glory.
I started by mixing a strong cleaning solution consisting of one part Tile Doctor Pro-Clean to three parts water. The solution was applied to the floor and left it to dwell for a short period. The high alkaline cleaner seeps into the pores of the tile getting underneath and lifting out the ingrained dirt and breaking down the old sealers. Then, I agitated the floor using a scrubbing pad fitted to a rotary floor machine before using a wet vacuum to suck up the resulting soiled solution.
There were a few paint marks dotted across the floor, but these were not noticeable until after I had given the Terracotta a deep clean. To remove the paint marks I used Tile Doctor Remove & Go, which is specially formulated to break down paint stains, adhesives and coatings. This product was used in combination with a steamer which, when applied directly to the tiles, helped to lift the paint out. Following this, I rinsed the entire floor a couple of times to remove any trace of cleaning product, and vacuumed up the excess moisture.
It’s always best to let the floor dry completely prior to sealing as applying sealer to a damp floor will affect the sealer. I left the house to allow this to take place overnight returning the next day. To get the best out of the Terracotta I sealed the floor using one coat of Tile Doctor Colour Grow, which is an impregnating sealer that soaks into the pores of the tile and acts as both as a bonding sealer enhancing the natural colours and darkening the clay (as requested by my client).
After the coat of Colour Grow had dried, I applied a further seven coats of Tile Doctor Seal & Go, which achieves a nice, low sheen Satin finish. Before leaving my happy client to enjoy his newly restored Terracotta floor, I made sure to provide some professional cleaning and long-term maintenance advice.
Russell Taylor
Lancashire Tile Doctor


 Carlton Edwards
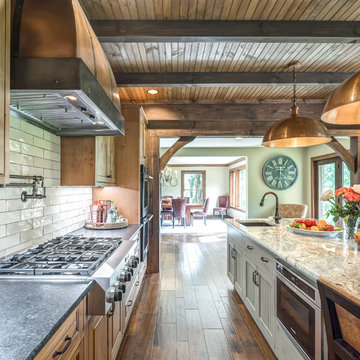
The interior was primarily a cosmetic renovation and also, kitchen renovation. So, the idea was to be very respectful of the original architectural details. With the kitchen, in particular, it was important to maximize function, space, and storage so every inch counted. The detailing was updated still respectful of the original architecture, but fresher approach.
The appliances were rearranged to maximize functionality and incorporated in some space from an existing porch that had been enclosed.
The floor is an ebony stain pine, and then I added a tall wainscot around the room to integrate with the cabinetry more.
 Tile Doctor Ltd
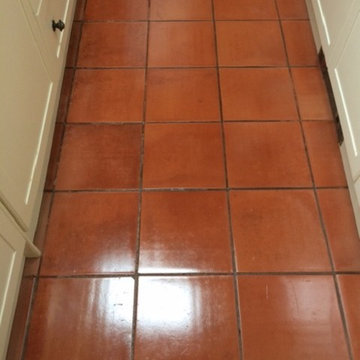
Terracotta is an interesting type of stone manufactured using a variety of techniques dependant on the country of origin which leads to a number of differences such as Spanish Terracotta being less porous than its Mexican counterpart: the former is semi-hand made and finished in a factory kiln, while the latter is completely handmade. Spanish Terracotta is therefore a lot less than porous and ultimately, of a higher quality.
But despite the Spanish Terracotta being less porous, and therefore being less prone to ingrained dirt, it still, like any other stone, needs regular maintenance to keep it looking smart. In the tiling trade, we quite often refer to this as a good old fashioned ‘Clean and Seal’ and this is exactly what was requested by this property owner in Halifax, for their Spanish Terracotta tiled floors in the kitchen and adjacent hallway.
I cleaned both sets of Terracotta tiles using the same process, which involved the application of our reliable alkaline cleaner known as Tile a Doctor Pro Clean, diluted with five parts of warm water. Once the solution had been left to dwell for a short period, it was scrubbed into the tiles to remove all dust, dirt, and general muck. This created a slurry of cleaning residue, which I promptly soaked up using a wet vac. A wet vac machine is an essential tool when it comes to cleaning porous tiles since, unlike a traditional mop and bucket, it sucks the excess trapped dirt out of the clay and thus provides a superior clean.
Following this, I applied a small amount of our heavy duty remover, known as Tile Doctor Remove & Go, to deal with some of the more stubborn stains and paint splashes, before rinsing with clean water and wet vaxing in a similar fashion to before.
Once the clean had been completed I left the tiles to dry completely. This can take 12 to 24 hours depending on numerous factors including whether a Damp proof Membrane and underfloor heating has been installed which can really help reduce drying times. Letting the tiles dry completely before sealing is paramount as moisture can cloud the sealer and affect its performance.
Upon my return to the property I ran some quick damp tests, which revealed the tiles were ready to be sealed. I then applied several coats of Tile Doctor Seal and Go, our topical sealer which provides a satin finish and accentuates colour. A new coat of this product is recommended every six months on Terracotta to ensure the continuous protection of the tiles’ soft clay particles.
My customer was extremely pleased with her refreshed Terracotta tiles. It goes to show what a big difference a bit of regular maintenance can make. I advised the customer that an everyday cleaner called Tile Doctor pH Neutral cleaner can also be used regularly to keep the tiles looking great without damaging the sealer.
Nigel Stoker
North West Yorkshire Tile Doctor
 Phoenix Home Remodeling
Their Kitchen Remodel
Siene & Kentay’s tired kitchen needed some attention. The large and heavy stone covered hood vent paired with the dark stained cabinets sucked the life and light out of the room.
One thing that struggled was lighting. Even with the walls of windows the dark features just absorbed the light.
We started by using a soft white shaker cabinet called Dove White as the main cabinet color in the kitchen. We removed the stone from the hood and the dark slate from the backsplash.
We also removed the dated shape of the peninsula by squaring it off. By doing this, the new walking area improved and allows for transitioning between rooms.
The oddly shaped island in the center struggled to give them the storage they needed. They were large cabinets, but items usually got stuck or lost.
After determining that Siene wanted to prepare food here, we opted to do deep drawer cabinets to store a lot of her prep items at arm’s reach.
The Island and bar cabinets are in a natural stain called Fawn. This color complimented the existing slate flooring. We also lined the hood in trim that matches the island.
The island is also waterfalled on both sides with quartz from Arizona Tile called Ivory White Honed.
Kitchen getting remodeled before & after photo
Kitchen being remodeled before and after photo
Just off the kitchen there was a bar, however it was hidden from all rooms. We decided that we would move the bar to a more prominent place in the home, and the existing would be turned into an appliance pantry.
A place for the coffee maker, microwave, and other smaller appliance storage.
We finished the kitchen with a simple backsplash in a lantern white mosaic with a natural tan grout. The door hardware, faucet from Delta and the new pendant lighting are all in the stainless family allowing for depth and consistency.
The new bar features a Sub-Zero wine column with refrigerated storage below. The upper lit glass cabinets offer a chance to showcase stemware and spirits.
This custom cabinet install allows the wood to shine and offers storage.
Lastly, the additional lighting installed in all areas now is controllable. Siene and Kentay have full control and can direct the light and how much is used.
When they want a night in, they can turn down the lights and relax. In their new updated family room in front of a newly integrated modern fireplace.
Kitchen getting renovated before and after photo
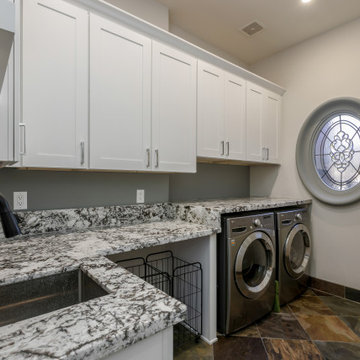
Laundry Room Remodeling
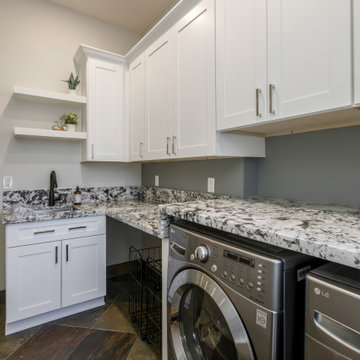
Jokingly, Siene called her Laundry Room the Christmas Box. We traded the red and green wallpaper for paint called Drift of Mist from Sherwin Williams.
The new white cabinetry offers a lot of storage they are , and a dedicated folding station was integrated for easy transitioning between loads of laundry.
 Phoenix Home Remodeling
Their Kitchen Remodel
Siene & Kentay’s tired kitchen needed some attention. The large and heavy stone covered hood vent paired with the dark stained cabinets sucked the life and light out of the room.
One thing that struggled was lighting. Even with the walls of windows the dark features just absorbed the light.
We started by using a soft white shaker cabinet called Dove White as the main cabinet color in the kitchen. We removed the stone from the hood and the dark slate from the backsplash.
We also removed the dated shape of the peninsula by squaring it off. By doing this, the new walking area improved and allows for transitioning between rooms.
The oddly shaped island in the center struggled to give them the storage they needed. They were large cabinets, but items usually got stuck or lost.
After determining that Siene wanted to prepare food here, we opted to do deep drawer cabinets to store a lot of her prep items at arm’s reach.
The Island and bar cabinets are in a natural stain called Fawn. This color complimented the existing slate flooring. We also lined the hood in trim that matches the island.
The island is also waterfalled on both sides with quartz from Arizona Tile called Ivory White Honed.
Kitchen getting remodeled before & after photo
Kitchen being remodeled before and after photo
Just off the kitchen there was a bar, however it was hidden from all rooms. We decided that we would move the bar to a more prominent place in the home, and the existing would be turned into an appliance pantry.
A place for the coffee maker, microwave, and other smaller appliance storage.
We finished the kitchen with a simple backsplash in a lantern white mosaic with a natural tan grout. The door hardware, faucet from Delta and the new pendant lighting are all in the stainless family allowing for depth and consistency.
The new bar features a Sub-Zero wine column with refrigerated storage below. The upper lit glass cabinets offer a chance to showcase stemware and spirits.
This custom cabinet install allows the wood to shine and offers storage.
Lastly, the additional lighting installed in all areas now is controllable. Siene and Kentay have full control and can direct the light and how much is used.
When they want a night in, they can turn down the lights and relax. In their new updated family room in front of a newly integrated modern fireplace.
Kitchen getting renovated before and after photo
Laundry Room Remodeling
Jokingly, Siene called her Laundry Room the Christmas Box. We traded the red and green wallpaper for paint called Drift of Mist from Sherwin Williams.
The new white cabinetry offers a lot of storage they are , and a dedicated folding station was integrated for easy transitioning between loads of laundry.

 Chi Renovation & Design
A complete gut rehab job we finished for a rental unit in Chicago. We wanted to provide the best layout and design for future tenants, so we created a 3 bedroom home with an open kitchen and living room area. One bedroom includes a large ensuite bath, and all rooms boast large and convenient closet space.
With a clean and simple design, this unit will complement any interior style that the tenants may have. Easy maintenance and easy-to-clean hardwood floors are an additional plus!
For more about Chi Renovation & Design, click here: https://www.chirenovation.com/
18