
Search results for "Terracotta" in Home Design Ideas


Find the right local pro for your project
 Archatrak Inc.
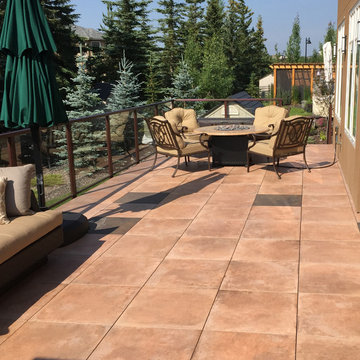
Rustic look porcelain pavers give Tuscan inspired look to outdoor landscaping. Architrex 'Terracotta' porcelain pavers were laid over the existing patio to blend with the ocher colored walls.

 Steven Allen Designs, LLC
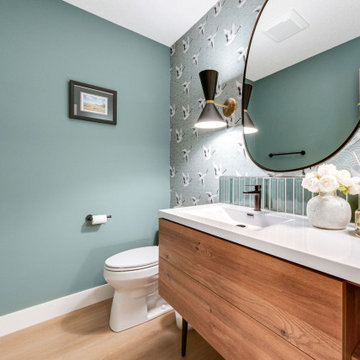
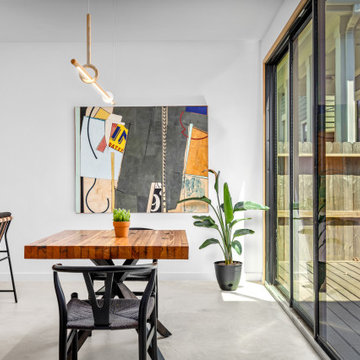
Design + Build by Steven Allen Designs, LLC 2023 - "Terracotta Moderna" - Earthy Tones Baked in Modern Lines
Example of a trendy dining room design in Houston
Example of a trendy dining room design in Houston
 User
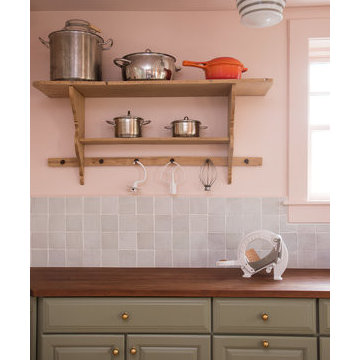
tickle me pink! this irish channel hideaway is bursting with pastel energy thanks to the two clé tiles used: zellige squares in weathered white and antique terracotta hexes on the floor! the eccentric and summery residence stands out with its use of bright walls and unexpected tile pairings. this interior design is anything but boring and a great example of how bold choices pay off! shop the two tiles here: zellige - https://www.cletile.com/products/zellige-terracotta-weathered-white-4x4 & antique terracotta - https://www.cletile.com/products/antique-terracotta-provincial-red-6-hex
design by logan killen interiors, photography by augusta sagnelli
Sponsored
Columbus, OH

Snider & Metcalf Interior Design, LTD
Leading Interior Designers in Columbus, Ohio & Ponte Vedra, Florida
 Atelier Renata Santos Machado
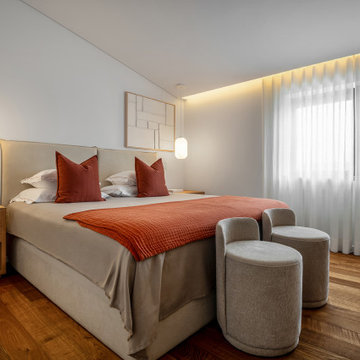
Master bedroom with terracotta bed linen, an upholstered bed, bedside tables and wall lamps. The wardrobe wall and window curtains define the room perimeter.

 Rustico Tile & Stone
12x12 Antique Saltillo tile. Tile was ordered presealed, installed by Rustico Tile and Stone. Dark grout was left behind in texture to create a reclaimed terracotta tile look. Topcoat sealed with Terranano Sealer in Low Gloss finish.
Counters and bottom of hood is Pinon Cantera stone with painted Talavera Tiles throughout.
Materials Supplied and Installed by Rustico Tile and Stone. Wholesale prices and Worldwide Shipping.
(512) 260-9111 / info@rusticotile.com / RusticoTile.com
Rustico Tile and Stone
Photos by Jeff Harris, Austin Imaging
 Tile Doctor Ltd
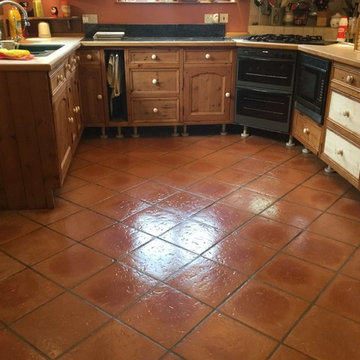
This Terracotta tiled floor was installed in the kitchen of a cottage in the small village of Maidford near Towcester. The tiles were not looking their best and the owner of the property realised it was time to do something about it and contacted Tile Doctor to have the floor stripped and resealed. Stripping and Sealing tile and stone floors is our bread and butter so I was more than happy to pop round and survey the floor which was approximately 9m2.
The grout had darkened with dirt and the previous tile sealer was failing so dirt was now getting ingrained in the Terracotta making it difficult to clean in places and leading to a patchy appearance. We discussed the work involved, my quote was accepted, and a date agreed for me to return and complete the work which would take two days, one to clean and one to seal.
After tidying up the Kitchen and removing the kickboards from underneath the kitchen units I set about working on cleaning and stripping the Terracotta floor of old sealers. To start I tested a small area with a strong dilution of Tile Doctor Wax Away. Wax was quite often used on Terracotta so I figured this product would be a good place to start. My suspicions were proved correct, and I found this to be the best product for removing the many layers of sealant on the floor. Wax Away is a new alkaline product by Tile Doctor and ideal for cleaning clay-based tiles such as Terracotta.
With my sights set on the rest of the floor Wax Away was scrubbed into the tile using a 17” rotary floor scrubbing machine and a black scrubbing pad running on a slow speed which helps to reduce splashing. This activity soon brought the dirt off the floor and the soiled cleaning solution was removed using a wet vacuum and the floor was rinsed down with clean water. The cleaning process was repeated a couple of times until I was happy with the floor, a stiff hand brush was then used along the grout lines with a dilution of Tile Doctor Pro-Clean to clean up the grout.
After rinsing and extracting the floor again the floor was inspected, and I noticed there were a few stubborn paint splashes on the tiles. I managed to remove these and these by spot treating the affected area with Tile Doctor Remove and Go and a steamer to lift the stain out of the clay tile. Once happy the floor was clean it was given a thorough rinse to neutralise it and remove any trace of cleaning products and then left it to dry.
I allowed the floor to dry for several days before returning to seal the Terracotta using numerous coats of Tile Doctor Seal and Go which is an ideal sealer for Terracotta and provides durable stain protection together with a low sheen finish. Terracotta is by its nature very porous and so it’s not unknown for it to take up to nine coats of sealer, which can take some time to apply as like paint you have to wait until it’s dry before it will take the next coat.
The customer was so impressed by the results I achieved in their kitchen they decided to go ahead and book me in to carry out this process throughout the whole of the ground floor which included lounge, study and hallway.
Phil Vissian
Northamptonshire Tile Doctor

 Qualityflooring4less.com
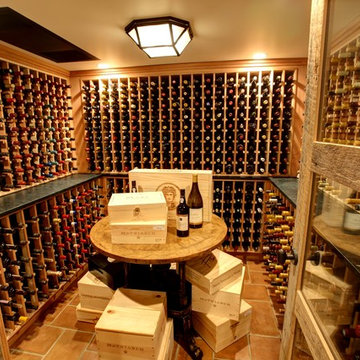
This beautiful wine cellar creates an intimate ambiance with Mirage African Mahogany Terracotta Engineered Hardwood Flooring.
Elegant dark wood floor wine cellar photo in San Francisco
Elegant dark wood floor wine cellar photo in San Francisco
 Tile Doctor Ltd
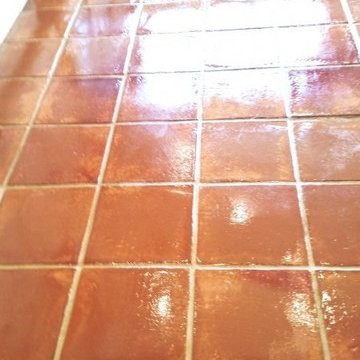
Sealers really do bring out the best in Terracotta tiles, however the catch is they will wear off over time and if you want to maintain that appearance you have to work out a regular maintenance plan. If you don’t maintain the sealer you will find that the sealer near the most heavily used areas such as doors etc. will wear away first and once that happens dirt will become ingrained in the tile and becomes difficult to clean resulting in a patchy appearance.
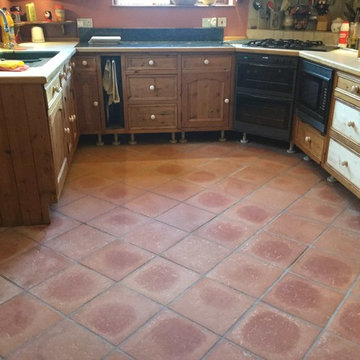
The remaining sealer on this Terracotta tiled kitchen floor at a house in the town of Wickford, Essex was no longer effective and had worn completely off in places. The solution was to strip off the old sealer, clean the Terracotta tile and gout and then re-seal with a fresh seal.
I started by giving the floor a deep clean with Tile Doctor Pro Clean diluted 2 parts water to 1 part cleaner. This is quite a strong dilution designed to allow the removal of the sealer and was left to dwell on the floor for ten minutes before working it into the floor using a scrubbing machine fitted with a black pad. Surprisingly the sealer was proving difficult to shift in certain areas and I had to repeat the process a few times and made sure to give the grout a good scrubbing as well.
I managed to get rid of most of the sealer using this process and for the remaining stubborn areas I used a stronger product called Tile Doctor Remove and Go which is a very effective coatings remover that is safe to use on tiles. This did the trick and the floor was now free of sealers and the grout was looking much better too, the resultant slurry was removed using a wet vacuum and I then rinsed the floor several times with water before leaving it to dry for weekend.
Tile Doctor Colour Grow which is an impregnating sealer that seeps into the pores of the tile to block them and prevent contaminates becoming ingrained in there and it also enhances the natural colours. Once this was dry I followed up with a number of coats of Tile Doctor Seal and Go which is topical sealer that will protect the surface and adds a nice sheen to the floor and is a popular choice for Terracotta and Quarry tiles.
I’m not sure my photographs do this post any justice however hopefully you can see that floor was quite transformed, the grout is much cleaner and the colours in the Terracotta have really come to life.
Nick Murphy
South Essex Tile Doctor

 Terracotta Studio
Photography by Jeff Herr
Trendy formal brown floor living room photo in Atlanta with a standard fireplace and a brick fireplace
Trendy formal brown floor living room photo in Atlanta with a standard fireplace and a brick fireplace

 TDM Tiling
Tuscan terra-cotta tile kitchen photo in San Francisco with a farmhouse sink, white cabinets, blue backsplash, custom tile backsplash and stainless steel appliances
 Luxe Home Renovations
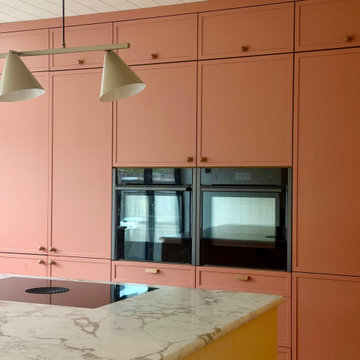
Bespoke terracotta kitchen cabinetry creates a striking backdrop to this colourful kitchen renovation in Bengeo, Hertfordshire. Integrated double ovens, a marble-effect island worktop and contrasting mustard yellow cabinetry bring together bold design and everyday practicality.
 Atelier Renata Santos Machado
Master bedroom view with white wardrobes, an upholstered bed and terracotta bed linen. The image shows storage, sleeping area and bedside lighting in one frame.
 Anchor Down Renovations
Introduction
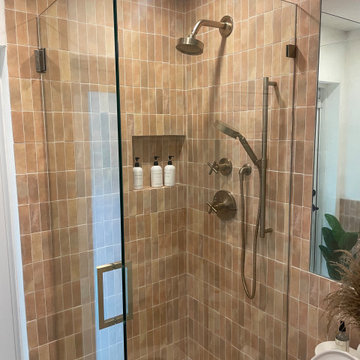
Welcome to the Anchor Down Renovation, where we take pride in sharing our exceptional projects that bring beauty and functionality to living spaces. In this edition, we are thrilled to showcase a remarkable bathroom remodeling project featuring a stunning natural modern terracotta style with exquisite silver accents and a custom vanity. Join us as we dive into the details of this project, which highlights Anchor Down's commitment to craftsmanship, attention to detail, and the creation of exquisite spaces inspired by nature.
Celebrating Nature’s Warmth
The bathroom, once lacking character and warmth, was ready for a complete transformation. Our client approached Anchor Down with a vision of creating a space that embraces the beauty of nature. Inspired by this vision, our team set out to design a bathroom that combines the modern elements of terracotta with the warmth and authenticity of natural materials.
The Timeless Appeal of Terracotta
To infuse the bathroom with a natural and modern aesthetic, our design experts recommended a terracotta style as the foundation of this remodel. Terracotta tiles exude a rustic charm that adds character and warmth to any space. Their earthy tones and unique textures create a natural backdrop that sets the tone for a serene and inviting atmosphere.
Silver Accents for Contemporary Elegance
To enhance the modern appeal of the terracotta style, we incorporated stunning silver accents throughout the bathroom. Silver fixtures, such as faucets, towel bars, and hardware, were thoughtfully chosen to add a touch of contemporary elegance. The silver accents create a harmonious contrast against the terracotta backdrop, elevating the overall design with their sleek and sophisticated appeal.
Custom Vanity: Tailored to Perfection
In line with our dedication to creating personalized spaces, we designed and installed a custom vanity for this bathroom remodel. The custom vanity not only enhances the functionality of the space but also serves as a statement piece. Incorporating natural wood elements and exquisite craftsmanship, the custom vanity exudes organic beauty while providing ample storage space for a clutter-free environment.
Illuminating Serenity
Proper lighting is essential in creating a soothing and inviting bathroom atmosphere. In this project, we carefully planned the lighting to highlight the natural beauty of the terracotta tiles and enhance the serene ambiance. Thoughtfully placed fixtures, such as wall sconces, recessed lighting, and accent lights, create a balanced and inviting environment, ensuring a tranquil retreat within the bathroom.
Craftsmanship and Attention to Detail
At Anchor Down, we are committed to delivering the highest level of craftsmanship and attention to detail. From the precise installation of each terracotta tile to the flawless integration of silver accents and the custom vanity, our skilled craftsmen ensured perfection in every element. We paid meticulous attention to the alignment, grout lines, and finishing touches, creating a bathroom that showcases our unwavering dedication to excellence.

 Advance Design Studio, Ltd.
Jennifer and Dan have lived in their Deer Park Illinois home for 15 years, slowly making minor fixes like painting and decorating; but they had a new plan for their kitchen the entire time. An awkwardly placed garage door, and an island cooktop with a terrible downdraft made a full-scale kitchen remodel an absolute must. Jennifer had many ideas in mind and wanted to work with a company that could provide high-end work, while partnering with a designer that would tailor the kitchen to her ideas.
She was intrigued by the phrase “Common Sense Remodeling” in Advance Design’s feature she discovered while perusing an issue of the community’s Quintessential Barrington Magazine. Doing further research on the company’s website, as she looked through project profiles and read about Advance Design’s “Common Sense Remodeling” philosophy, she promptly scheduled an appointment to see if the people and ideas she read about were truly who they said they were. The more she read, the more she knew that the “Common Sense” approach to remodeling they described was exactly the type of company she was looking for.
The partnership was sealed after an initial consultation with Owner Todd Jurs and Project Designer Michelle Lecinski. They displayed a combination of friendliness, professionalism and respect that was unmatched by any of the other companies Jennifer talked to. She knew that with Advance Design, she would be able to retain the vision that she had in mind with high-quality craftsmanship.
“I reached out to Advance Design because of the ‘Common Sense Remodeling’ tagline,” Jennifer said. “That’s what lingered for me”. “Advance Design was the most respectful- of the house and of my design ideas, and the most professional of the handful of companies that looked at my project”.
Soon after the meeting Jennifer began working with Michelle on the project design. They quickly developed chemistry. Jennifer loved how Michelle researched and located every detail that Jennifer wanted for the kitchen. Between the two of them, every concept and idea was worked through and perfected. “Jennifer had definite ideas about what she wanted the new kitchen to look like, she just didn’t know how to bring it all together. We worked together really well to make her ideas into the practical reality necessary for a well-functioning kitchen, with the look and feel that she had envisioned”, says Michelle.
“Michelle was wonderful in using the CAD system she would show me new drawings every time we changed the layout while working through the design,” Jennifer said. “She was a really wonderful partner in execution, she made sure everything happened quickly and easily.”
The finished design drew out elements of Jennifer’s style and personality. The pair call the look “sophisticated farmhouse” to describe the kitchen renovation to family and friends. The result was a beautifully crafted, authentic-feeling space that satisfied Jennifer’s dreams 15 years in the making. The whole project consisted of a kitchen remodel, mudroom upgrade with powder room, and garage entry relocation. “The projects I personally like the best, are the ones that put the client’s dreams on display,” Project Designer Michelle said. “And this is one of those projects.”
The main focal point of the kitchen is custom zinc and brass ventilation hood with a vintage sheen, which was hand made to order by a small company in Indiana named Vogler Metalworking. “It’s like sculpture, a true work of art”, says Jennifer. Your eye is immediately drawn towards this elegant yet practical hood that eliminated the home’s downdraft problem and added a striking conversation piece at the same time. The carpenters had to use special gloves when transporting and installing it, so they didn’t smudge it with fingerprints. The beautiful hood centers proudly over the stunning black enamel and brass LaCornue Range. “I had a friend who had a LaCornue range and after learning how easy it was to cook perfect meals, I was convinced I wanted to have one”, says Jennifer. This unique, breathtaking combination anchors the entire kitchen and is apparent immediately as you walk into the great room the surrounds the space.
DuraSupreme Crestwood cabinets with a Kendall Panel add function and sophistication. A custom gray paint color paired with a storm blue was developed so that the new kitchen looked like it belonged to the existing space. Unlacquered brass faucets and hardware were important to Jennifer because she wanted the living finishes to age over time. Remarkable brass diamond mesh cabinet door inserts imported from the UK continue to add this one-of-a-kind kitchen renovation; giving it a “you won’t see this everywhere” quality. The use of old railcar flooring for the coffee bar countertop and reclaimed oak for the open shelving gives an authenticity to the space uncommon in kitchens today.
Jennifer and Michelle fell in love with the Limestone Grey Stone while they were investigating unique island countertop ideas. They liked the fact that the limestone as a living finish will age and change over time. Calcutta Miel Quartz countertops made for an excellent pairing around the perimeter, as it’s durable and perfect for cooking preparations. A textured white subway tile backsplash that runs to the ceiling keeps your eye moving towards the open shelving, and to the main focal point of the stunning range hood combination.
“The kitchen functions beautifully, and it’s gorgeous,” beams Jennifer as she gestures with both hands while smiling ear to ear. “The most important thing was I wanted a kitchen that had a wonderful flow, cooked beautiful meals and was a great gathering place for family and friends, and this space does that perfectly! Beauty wise, it turned out exactly how I had envisioned. I felt the function part was the hardest part, and that was nailed”!
Relocating the garage entry to the new mudroom was a huge priority and has finally separated the family’s arriving home functions from their kitchen. Now coats and shoes and bags have their own area for dropping once members arrive home. Matching gray DuraSupreme cabinetry helped create gorgeous, purposeful lockers for the family. A reclaimed vintage sink and custom wall paper were added to the tiny powder room to beautify the once previously only functional space. Advance Design was even able to create a custom space for their dog to sleep while the family is away.
“It was unbelievable that a project of this size was completed in such a short time, and I think that’s because of the large amount of planning and preparation that went into it,” Jennifer marveled, “When we started, we were ready, and everything was prepared”.
When it came to execution, Project Manager Justin Davis and his crew were quick, accessible, and organized. Projects like this kitchen are typically completed in as little as 8-10 weeks. Jennifer’s kitchen however despite the relocation of some challenging HVAC in a soffit and moving of an exterior door was completed remarkably fast in part because the team was working with an existing tile floor that ran throughout the first floor that the client really loved.
“You get to know these people really well because they’re living in your house while you’re living in your house. They were so fast and really good, it didn’t take as long as even planned” reported Jennifer. “I would text Justin and he always responded almost immediately. I got to know all the guys who were working in our house and they were all wonderful people”.
Details in a customized kitchen like this one require skill and care from the people who install it. “All the guys on the job were skilled at what the did. I wanted small details like little feet to look like furniture, that is where their carpentry skill came in to make these all perfect”, said Jennifer. “The tile guys were wonderful. They even let me determine how I wanted the texture with the grout to appear for a salt and pepper look; now that is a very skilled trade person making it custom”.
In Jennifer’s interview, she continued to reference Advance Design’s “Common Sense Remodeling”, so I took a minute to ask her exactly what that phrase meant to her and how it played out in her experience with her project and the Advance Design team. Here is what she said: “I was intrigued about Common Sense Remodeling and in my head that there would be clear costs and prices, great communication between the design team, the execution team and me”, said Jennifer. They did deliver on that, it was so clear about the cost breakdown, what I could expect from everyone who came to my house, and everything that we had ordered. That to me is the Common Sense”!
It’s great to see a client take literally our assertion that a well-planned remodeling project is simply “Common Sense”! She anticipated each step of the way would be clear, concise, and predictable, all the while protecting the outcome due to the careful upfront planning. “Advance Design delivered on their ‘Common Sense Remodeling’ promise,” Jennifer said. “From the design team, to the execution team - everything was straight forward like I imagined. The project turned out exactly how I envisioned, I enjoyed this process and absolutely would recommend Advance Design Studio to anyone.”
11