
Search results for "Tools dont" in Home Design Ideas

 Nar Design Group
This modern zen-like kitchen is finished in Columbia frameless rift white oak composite and walnut cabinets with accents of aluminum frame doors with frosted glass. The panel front doors on the refrigerator allow it to seamlessly blend into the pantry. The white striated tile back-splash goes from counter to ceiling. The counter tops are Caesarstone Frosty Carina, while the island is a black walnut butcher block. Stainless steel is incorporated in the range hood, modern faucet, and farmhouse sink. The dedicated wine bar space features open cubby storage for wine bottles.
Photo Credit: Nar Fine Carpentry, Inc.

 Centoni Restoration & Development, Inc.
Another view of the Open kitchen with Omega maple cabinets and CeasarStone quartz countertops and island. Low-profile Kohler single basin/undermount sink with Rohl side spray with metal lever faucet. High-end Wolf Cooktop and down draft vent system, Viking professional series wall oven and a Bosch standard dishwasher. Rejuvenation pendant ceiling "Chicago" Black Matte fixture.

 OKLAHOMA SHUTTERS
Benefits of Plantation Shutters
Plantation shutters offer advantages and benefits to homeowners over other window coverings including:
• A permanent addition to a house: While they don't add much to the sale price and don't guarantee a return on investment, the curb appeal helps the house sell faster. The permanency of plantation shutters allows them to be included in appraisals.
• Versatility: Many have the ability to open only halfway if desired. If you want to let in all the light, plantation shutters swing away from the window to grant an unobstructed view.
• Insulation: When all louvers are closed, a good insulating barrier is created, trapping unwanted temperatures and saving you money on your energy bill.
• Easy maintenance: With wide louvers, a simple wipe-down is often all that's needed. Vinyl shutters can be taken off their hinges and sprayed off for a major cleaning.
• Elegance: The classic, yet modern look conveys a permanency like no other window dressing can. Whether painted or natural wood, they all have a look that says; welcome home.
Wood vs. Faux Wood
It's not hard to argue that natural wood is more appealing than vinyl or PVC. However, "faux wood," as it's sometimes called, has some advantages:
• Price -- Faux wood shutters are often lower in price than real wood.
• Weight -- Because some shutters are made "hollow core" (as opposed to vinyl-wrapped medium density fiberboard, MDF), they can be significantly lighter.
• Moisture Resistance -- If you live in an area with high humidity, hollow faux wood or aluminum core will resist expanding and sagging. (MDF core louvers will tend to expand and crack as the material swells with moisture.)
Natural wood is the choice for those who have a very healthy budget or for whom a specific appearance is a must. Among the advantages are:
• Size -- Because wood plantation shutters are made of hardwood, they can be quite a bit larger than plastic or vinyl. Vinyl shutters larger than 29 inches may be prone to sag, so they need divider rails or other supports which can destroy the traditional look of a plantation shutter.
• Natural -- While vinyl or plastic shutters can be painted to match any color scheme, the natural shades and finishes of the various species of wood have something for every look.
• Classic -- While many plastic shutters can be made to look like real wood, the faux wood finishes can vary significantly depending on manufacturer and model. Up close, it can be easy to tell they're plastic. The warmth of natural wood is a classic feel that's impossible to beat.
Popular Plantation Shutter Brands
When you go to purchase your plantation shutters, brands names may offer a good representation of high-, mid-, and low-cost range of what's available. Which one you choose depends on your budget and your tastes. Hunter-Douglas and Norman Shutters produce three lines of plantation shutters in both real wood and faux wood styles. A higher-end product, Hunter-Douglas may be worth the cost for beauty and quality of workmanship. The Window Outfitters and Sunland produce a mid-cost line of shutters. The mid-range pricing may be for those who are balancing aesthetics with a budget. National franchise and or box stores may not offer an in-house expert or designer. Look to local companies that specialize in plantation shutters looking online may offer a low-cost brand for budget-minded DIYers. Available in both faux and real wood, the affordability combines with the visual appeal to make this a very popular choice for plantation shutters. Regardless of which line you go with, be sure to ask about frames. Generally all manufactures offer frame choices and may add to the cost, but they add an unsurpassed beauty and warmth to a room with plantation shutters.
Plantation shutters look like similar to wooden blinds, but there are significant differences. Blinds are often narrow, made of aluminum or vinyl, and the slats tilt based on a gear and pulley mechanism and they hang in the window with cords. By contrast, plantation shutters have wide compound louvers that fit into a frame and are controlled by way of a wooden rod running up the middle. When not needed, they can be manufactured to swing back onto the wall. Options to are available to build a more contemporary look with a larger view with a “hidden tilt” feature.
Cost of Plantation Shutters
Nationally, the cost of plantation shutters, depending on their size and the material, whether or not they are custom arches and colors or stains, may vary. Most manufacturers want their shutters to be professionally installed to keep the warranty intact which is a benefit to the customer in the long run. They will usually have a limited lifetime warranty.
Cost of Installation
Costs for having plantation shutters installed by a contractor are a bit more predictable. Contractors who have installed plantation shutters before can quickly get accurate measurements and suggest which materials would work best in different rooms. For example, while natural wood may look beautiful in your living room, it might not be so practical in a bathroom where moisture will cause the wood to warp. The size, material, and quality of the shutter will have a significant effect on the cost. Contractors usually go through a shutter supplier and can get various sizes that are not normally available at home improvement stores. Hiring a professional team of knowledgeable suppliers and installers is a good choice.
Here are some sample prices of the shutters most contractors use for standard-sized windows: In general, plantation shutters should cost approximately $20 to $26 per square foot. Labor costs depend on factors such as the contractor's workload, remoteness of the location, environment, and the contractor's overhead. Labor generally runs about $100 per hour and will be added to the shutter cost.
• 16x20 -- Faux wood $120. Real wood $156
• 24x50 -- Faux wood $160. Real wood $208
• 36x54 -- Faux wood $270. Real wood $351
• 36x60 -- Faux wood $300 Real wood $390
• 42x72 -- Faux wood $420. Real wood $546
• 48x82 -- Faux wood $550. Real wood $715
DIY
Plantation shutters can be purchased and installed by the homeowners. How much they cost will depend on size and material. Faux wood shutter’s cost depends on size and wooden shutter’s cost will depend on size and whether or not they are painted or stained.
• Natural wood is $90-$600 depending on size. Many companies offer standard stained selection but custom color matching may be available from $175 -$250.
• Faux wood will be from $120-$500.
• Additional tools include: Hang Strips $4-$15 and about $4 for mounting hardware. Locks or closures can cost up to $15 for each shutter.
Finally, if you order them online, you can expect to pay $30-$70 shipping per shutter or per set of shutters per window depending on the supplier. Keep in mind that even if you're handy with tools, installing shutters can be time-consuming if you've never done it before there is defiantly a learning curve.
Find the right local pro for your project

 California Closets of Michigan
This exquisite unit is dedicated to your wine connoisseurs. Beautifully contrasting a white finish with the black countertop, the system integrates any and all wine storage needs. The glass shelves along with puck lighting provide a warm, elegant feeling for everyone to enjoy.
"Beautifully crafted storage and shelving and a functional layout create an organized area tailored to the specific needs of storing and drinking wine. Door and drawer faces, countertops, and lighting set the mood for a space anchored in enjoyment. A custom designed wine bar creates a perfect space for storing your collection and fits your entertaining needs when hosting guests.
Storage for wine bottles allows for easy viewing and access. Counter space provides a place for pouring and serving wine. Lighting in a wine bar enhances functionality and dramatically changes the aesthetic of a simple design. Shelves and cabinetry can be designed to accommodate an integrated wine refrigerator. Racks and accessories display beautiful glassware and stemware. Doors elegantly conceal liquor bottles and supplies you’d like to keep hidden."

 Free Lancing
Effective residential construction project management is crucial in today’s fast-moving building industry. It means overseeing every step of building a home, from planning to finishing, to ensure projects are completed time, within budget, and with high quality. Unlike commercial projects, residential projects require special attention to meet homeowners' unique needs and wishes, requiring a customized approach from the beginning to the end.
In 2025, the construction sector will use advanced technologies like AI and integrated project delivery (IPD) to streamline processes and improve stakeholder collaboration. However, project managers face significant challenges, including managing risks, maintaining quality control, and ensuring effective communication among team members.
A WIP Report (Work-in-Progress Report) is a key tool that helps track a project's budget, progress, and resource use. It provides clear insights, making managing costs easier, avoiding delays, and making informed decisions.
By adopting best practices and using modern construction management tools, project managers can overcome these challenges and deliver successful residential construction projects that meet client expectations and contribute to a sustainable future.
This article provides a brief overview of residential construction project management, highlights its importance, and touches on the challenges faced by project managers while incorporating the latest trends and technologies in the field.
Types of Residential Construction Management
Here are the different types of Residential Construction Management:
Single-Family Homes: These are standalone houses built for individual families. Managing these projects involves overseeing construction from planning to completion, ensuring that the home meets the owner's preferences and budget.
Multi-Family Housing: This includes apartments, condominiums, and townhouses. Projects of this type require managing multiple units, often with shared facilities, and ensuring compliance with local building codes.
Custom Home Building: This involves constructing homes tailored to specific client needs. Close collaboration with architects and designers is required to ensure the house reflects the owner's personality and preferences.
Home Renovation and Remodeling: These projects focus on updating or expanding existing homes. They often involve working with subcontractors for specialized tasks like electrical or plumbing work.
Components of Residential Construction Project Management
Managing a residential construction project requires carefully coordinating people, materials, and timelines. A well-structured approach ensures efficiency, cost control, and high-quality results.
Roles and Responsibilities
A project manager plays a vital role in residential construction. They oversee every step from planning to completion and ensure the project stays on schedule, within budget, and meets quality standards.
Project Manager’s Role in Home Construction
The project manager is responsible for organizing tasks, managing resources, and solving problems that arise during construction. They coordinate between different teams, track progress, and ensure safety regulations are followed.
Collaboration with Contractors, Architects, and Stakeholders
Successful residential construction requires teamwork. Project managers work closely with architects to bring designs to new heights, coordinate with contractors to manage labor and materials, and keep stakeholders (such as homeowners and investors) informed about project updates.
Client Communication and Expectations Management
Clear communication with clients is essential. The project manager keeps homeowners updated on timelines, changes, and challenges. Setting realistic expectations and providing regular updates, they help avoid misunderstandings and keep the project running smoothly.
Project Scope & Planning
Practical project planning sets the foundation for a successful residential construction project. It ensures clear goals, minimizes risks, and keeps the project on track.
Defining Project Objectives and Deliverables:
Clearly outlining what needs to be done and what the final result should look like is essential. This involves setting specific, measurable goals that align with the homeowner's vision and budget.
Managing Homeowner Expectations and Scope Creep:
Homeowners often have changing needs or ideas. Effective project managers must manage these expectations to prevent "scope creep," which can delay projects and increase costs. This involves open communication and setting clear boundaries.
Ensuring Compliance with Zoning Laws and Permits:
Before construction begins, it's crucial to ensure that all necessary permits are obtained and that the project complies with local zoning laws. This step avoids costly fines and delays, ensuring the project moves forward smoothly.
Budgeting & Cost Control
Proper budgeting is essential for keeping residential construction projects financially viable. Effective cost management prevents overspending and ensures profitability.
Accurate Cost Estimation for Residential Projects
A precise cost estimate considers labor, materials, permits, and unexpected expenses. Using historical data and Sage 300 CRE for financial management improves accuracy and helps set realistic budgets.
Budget Allocation and Tracking
Allocating funds efficiently ensures that each phase of the project receives the necessary resources. Tracking expenses through Construction & Financial Dashboards allows for real-time monitoring and early detection of budget deviations.
Preventing Budget Overruns
Uncontrolled costs can derail a project. Regular financial reviews, automated alerts for overspending, and contingency planning help keep expenses in check and prevent financial strain.
Scheduling & Timeline Management
Timely project completion is crucial in residential construction. Effective scheduling minimizes delays and ensures a smooth workflow.
Creating Detailed Project Schedules
A structured schedule outlines all tasks, deadlines, and dependencies. Breaking down the project into phases, planning, execution, and finishing, helps maintain order and clarity.
Preventing Delays & Meeting Deadlines
Delays can result from labor shortages, weather conditions, or supply chain issues. To avoid problems, it’s good to check for risks ahead of time, add extra time to schedules, and keep everyone on the same page.
Using Gantt Charts and Critical Path Methods
CPM for Construction helps identify critical activities that directly impact project completion, while Gantt charts provide a visual timeline of tasks. Both tools optimize scheduling and improve efficiency.
Residential Construction Project Management Phases
Managing a residential construction project effectively requires a structured approach through various phases. Each phase plays a critical role in ensuring the project's success, from initial planning to completion.
Pre-Construction Phase
The pre-construction phase sets the foundation for a smooth and efficient building process. Proper planning at this stage helps prevent costly changes and delays later.
Site Analysis & Approvals: A thorough site analysis assesses soil conditions, topography, and environmental factors. Feasibility studies evaluate project viability, including costs and regulatory compliance. Obtaining zoning approvals, permits, and other legal clearances is crucial before breaking ground.
Selecting Materials and Procurement Strategies: Choosing the right materials impacts durability, sustainability, and cost efficiency. A well-planned procurement strategy, including bulk purchasing and reliable supplier partnerships, ensures timely delivery and cost savings. Using Sage 300 CRE for procurement management helps streamline material sourcing and financial planning.
Construction Phase
The construction phase transforms plans into reality. Effective coordination and strict quality control ensure a successful build.
Resource Allocation and Workflow Coordination: Efficiently managing labor, equipment, and materials is key to maintaining progress. Using CPM for Construction, project managers can allocate resources strategically, prevent bottlenecks, and optimize workflows for timely completion.
Quality Control and Ensuring Compliance with Safety Regulations: Strict adherence to building codes and safety standards is non-negotiable. Regular inspections, worker training, and real-time quality monitoring ensure a structurally sound and legally compliant project. Proactive safety measures prevent accidents and project disruptions.
Project Closeout & Handover
The final phase of residential construction project management is crucial for ensuring a smooth transition from construction to occupancy. Proper closeout procedures guarantee quality, client satisfaction, and long-term project success.
Final Inspections and Quality Assurance: Before finishing the project, a final inspection checks that everything meets safety rules and quality standards. Any problems need to be fixed quickly. Using Procore helps make inspections and tracking issues easier, ensuring a high-quality final product.
Client Walkthrough and Support: A final check helps homeowners see the finished work, ask questions, and make sure it meets their expectations. This is also a chance to explain important home features and maintenance tips. Good communication here builds trust and strengthens relationships.
Warranty Management and Feedback: Efficient warranty management ensures clients get quick help for any issues after construction. A clear process for tracking requests and keeping in touch with homeowners boosts satisfaction. Collecting feedback helps improve future projects. Using S-Curve Forecasting tracks performance trends and refines management strategies.
Software for Residential Construction Project Management
The integration of technology in residential construction project management has revolutionized the way projects are planned, executed, and monitored. Digital tools streamline operations, reduce costs, and improve communication, making them essential for modern construction firms.
Importance of Digital Tools
Investing in digital tools is crucial for construction firms as it transforms the industry by enhancing efficiency, accuracy, and collaboration across the entire project lifecycle. They also improve project management by streamlining processes, automating tasks, and facilitating real-time stakeholder communication.
Top Construction Management Software for Residential Projects
Several software solutions are available for managing residential construction projects:
Procore: Known for its comprehensive project management features, including document management and collaboration tools.
Sage 300 CRE: Offers robust accounting and financial management capabilities, ideal for large-scale construction projects.
Buildertrend: Specializes in residential construction, providing tools for project scheduling, budgeting, and client communication.
CoConstruct: Focuses on custom home building and remodeling, offering features for estimating, scheduling, and project management.
WIP Reports: Useful for tracking work-in-progress and managing project finances effectively.
Features Comparison and Best Use Cases:
Procore: Best for large projects requiring extensive collaboration and document management.
Sage 300 CRE: Ideal for firms needing robust financial management.
Buildertrend: Suitable for residential builders focusing on client communication and project scheduling.
CoConstruct: Perfect for custom home builders who need detailed estimating and scheduling tools.
WIP Reports: Useful for firms needing to track project finances closely.
How Software Improves Project Efficiency
Construction management software significantly enhances project efficiency in several ways:
Automating Accounting and Job Costing: Software like Sage 300 CRE automates financial tasks, reducing manual errors and improving budget tracking.
Streamlining Document Management and Communication: Tools like Procore centralize documents and facilitate real-time communication among team members, reducing misunderstandings and delays.
Mobile-Friendly Solutions for Real-Time Tracking: Mobile apps from platforms like Buildertrend allow for on-site access to project data, enabling real-time tracking and decision-making.
These digital tools and software solutions are essential for modern residential construction project management, offering benefits such as improved efficiency, enhanced collaboration, and better financial control.
Challenges in Residential Construction Project Management
Residential construction projects face a variety of challenges that can impact their success. Here are some of the key issues project managers encounter:
Managing Subcontractors and Labor Shortages
One of the biggest challenges in residential construction is managing subcontractors and dealing with labor shortages. Subcontractors often have their own schedules and priorities, which can lead to delays if not coordinated properly. Additionally, labor shortages can slow down projects and increase costs due to the need for overtime or hiring temporary workers.
Budget Overruns and Unexpected Costs
Budget overruns are common in residential construction due to factors like material price fluctuations, unexpected site conditions, or changes in project scope. Effective budget management involves regularly monitoring expenses and having contingency plans for unexpected costs.
Changing Construction and Eco Rules
Construction and Eco Rules are always changing, so project managers need to keep up with the latest regulations. This involves following guidelines for saving energy, protecting the environment, and ensuring safety. Ignoring these rules can lead to fines, delays, or even stopping the project.
Best Practices
To ensure your residential construction projects run smoothly and successfully, follow these essential best practices:
Setting Clear Project Goals and Milestones
Clearly defining what you want to achieve is the first step to success. Set specific, measurable, achievable, relevant, and time-bound (SMART) goals. This helps everyone involved understand what needs to be done and by when. For example, instead of saying "build a house," say "build a house with three bedrooms and two bathrooms within the next nine months."
Stakeholder Collaboration
Good communication is key to keeping everyone on the same page. Regular meetings with contractors, suppliers, and homeowners help prevent misunderstandings and ensure that everyone knows what's happening and what's next. This open dialogue also helps resolve issues quickly, preventing small problems from becoming big delays.
Using Data-Driven Insights for Decision-Making
Making decisions based on facts rather than guesses is crucial. Use data and analytics to understand project progress, identify potential issues early, and make informed decisions. For instance, if data shows that a particular material is consistently causing delays, you can plan ahead to avoid those delays in the future.
Proactive Risk Management Strategies
Things don't always go as planned, so being prepared is essential. Identify potential risks early and have a plan to manage them. This might include having backup suppliers, planning for weather conditions, or setting aside extra funds for unexpected expenses. Being proactive can prevent small issues from turning into major problems.
Conclusion
Effective residential construction project management requires careful planning, clear communication, and the right digital tools. From single-family homes to multi-family housing and custom projects, managing timelines, budgets, and quality is essential for success.
By following best practices, using project management software, and staying ahead of industry trends, project managers can ensure smooth execution and client satisfaction despite challenges like labor shortages, budget overruns, and regulatory compliance; modern technology and strategic planning help mitigate risks.
Construction firms can improve efficiency, enhance collaboration, and maintain financial control by adopting advanced tools like Procore, Sage 300 CRE, and Buildertrend. A well-managed project delivers a quality home and builds trust and long-term success in the industry.
FAQs
What is residential construction project management?
It involves overseeing all aspects of building residential properties, from initial planning and design to construction and completion, ensuring projects are completed on time, within budget, and to the desired quality standards.
How can I prevent budget overruns in my construction project?
Accurate cost estimation, continuous budget tracking, and having contingency plans for unexpected expenses are key strategies to prevent budget overruns.
What are the main stages of a residential construction project?
The primary stages include design, pre-construction, procurement, and construction.
How does construction management software improve project efficiency?
It streamlines processes like scheduling, budgeting, and communication, providing real-time data access and collaboration among stakeholders, which enhances overall project efficiency.
How can I ensure my project complies with local building codes and regulations?
Engage professionals familiar with local laws, obtain all necessary permits before starting, and conduct regular inspections to ensure adherence to building codes and regulations.



 Tile Doctor Ltd
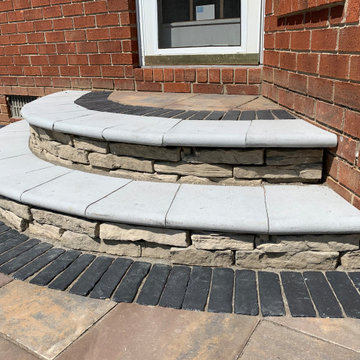
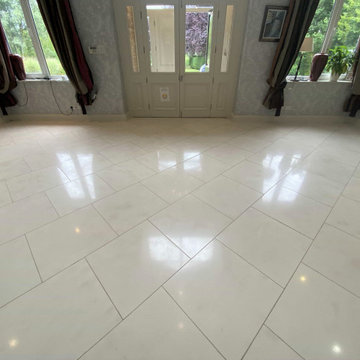
This job was for a repeat client in Toft near Cambridge who had aa stunning large hallway that was tiled in beautiful pale Limestone. My client had asked me back to work on the floor having previously completed the deep clean and seal of a Terracotta floor previously.
The Limestone tiling in the entrance hall had years of some type of topical sealer applied to it. This caused the stone to look slightly discoloured and from certain lights showed up hundreds of scratches and smudges embedded in the seal. I’ve tried to capture this problem in the photographs on this page, but it was very difficult.
A topical sealer sits on the surface of the tile where it is vulnerable to scratching, hallways are generally high traffic areas and so more likely to see this sort of problem. Ideally an impregnating sealer should have been applied, impregnators work by occupying the pores in the stone thus preventing soiling from becoming ingrained in the stone.
Before starting we protected the woodwork against splashing with blue film, I don’t usually make a great deal of mess, but you can never be too careful when working in someone’s property especially one as beautiful as this.
To strip off the old sealer I began by applying a strong dilution of Tile Doctor Remove and Go to the Limestone tiles. I split the floor into sections and used a 400-grit diamond burnishing pad to work the Tile Doctor Remove and Go into the tiles. The floor was then rinsed off using our high-pressure cleaning system that applies pressurised hot water to the floor whilst simultaneously extracting the soil with its built-in vacuum. The system is quite heavy, so it is built into my van, and I run a large flexible hose to a spinner tool that does the cleaning. It is an expensive tool, but it saves a lot of time and leaves the floor fairly dry afterwards.
The 400-grit pad had released a lot of the sealer but there were quite a few layers to get through, so I changed the burnishing pad to a coarse 200-grit pad and repeated the process. After another rinse and extract I would see it had the desired effect and I was able to carry on building up the finish on the Limestone by apply the 400-grit followed by the 800, 1500 grit pads. It was a large floor and so this took up much of the day so once complete I left for the day so it could dry off overnight.
The next day I finished the polishing process with the application of a 3000-grit burnishing pad which is applied with a little water sprayed onto the tile and really brings up the polish on the stone. This process has the added advantage of leaving the floor dry so not long afterwards I was able to move on to sealing.
For this floor two coats of Tile Doctor Ultra-Seal were applied, it is an impregnating sealer that won’t alter the colour of the tiles leaving a natural look.
My client was much happier with the new finish and has asked for another quotation on some more Terracotta flooring that needs attention. For aftercare I recommend using Tile Doctor stone soap, it’s a special formula that builds on the patina which will help maintain the polished appearance of the Limestone.
Tom Conlon
Cambridge Tile Doctor

 Tracy Berman Interiors
This outdated bathroom had a large garden tub that took up to much space and a very small shower and walk in closet. Not ideal for the primary bath. We removed the tub surround and added a new free standing tub that was better proportioned for the space. The entrance to the bathroom was moved to the other side of the room which allowed for the closet to enlarge and the shower to double in size. A fresh blue pallet was used with pattern and texture in mind. Large scale 24" x 48" tile was used in the shower to give it a slab like appearance. The marble and glass pebbles add a touch of sparkle to the shower floor and accent stripe. A marble herringbone was used as the vanity backsplash for interest. Storage was the goal in this bath. We achieved it by increasing the main vanity in length and adding a pantry with pull outs. The make up vanity has a cabinet that pulls out and stores all the tools for hair care.
A custom closet was added with shoe and handbag storage, a built in ironing board and plenty of hanging space. LVP was placed throughout the space to tie the closet and primary bedroom together.

 Cypress Design Co.
Example of a large classic l-shaped ceramic tile eat-in kitchen design in Providence with an island, raised-panel cabinets, medium tone wood cabinets, granite countertops, beige backsplash, ceramic backsplash, stainless steel appliances, an undermount sink and green walls

 Dura Supreme Cabinetry
This modern farmhouse kitchen features a beautiful combination of Navy Blue painted and gray stained Hickory cabinets that’s sure to be an eye-catcher. The elegant “Morel” stain blends and harmonizes the natural Hickory wood grain while emphasizing the grain with a subtle gray tone that beautifully coordinated with the cool, deep blue paint.
The “Gale Force” SW 7605 blue paint from Sherwin-Williams is a stunning deep blue paint color that is sophisticated, fun, and creative. It’s a stunning statement-making color that’s sure to be a classic for years to come and represents the latest in color trends. It’s no surprise this beautiful navy blue has been a part of Dura Supreme’s Curated Color Collection for several years, making the top 6 colors for 2017 through 2020.
Beyond the beautiful exterior, there is so much well-thought-out storage and function behind each and every cabinet door. The two beautiful blue countertop towers that frame the modern wood hood and cooktop are two intricately designed larder cabinets built to meet the homeowner’s exact needs.
The larder cabinet on the left is designed as a beverage center with apothecary drawers designed for housing beverage stir sticks, sugar packets, creamers, and other misc. coffee and home bar supplies. A wine glass rack and shelves provides optimal storage for a full collection of glassware while a power supply in the back helps power coffee & espresso (machines, blenders, grinders and other small appliances that could be used for daily beverage creations. The roll-out shelf makes it easier to fill clean and operate each appliance while also making it easy to put away. Pocket doors tuck out of the way and into the cabinet so you can easily leave open for your household or guests to access, but easily shut the cabinet doors and conceal when you’re ready to tidy up.
Beneath the beverage center larder is a drawer designed with 2 layers of multi-tasking storage for utensils and additional beverage supplies storage with space for tea packets, and a full drawer of K-Cup storage. The cabinet below uses powered roll-out shelves to create the perfect breakfast center with power for a toaster and divided storage to organize all the daily fixings and pantry items the household needs for their morning routine.
On the right, the second larder is the ultimate hub and center for the homeowner’s baking tasks. A wide roll-out shelf helps store heavy small appliances like a KitchenAid Mixer while making them easy to use, clean, and put away. Shelves and a set of apothecary drawers help house an assortment of baking tools, ingredients, mixing bowls and cookbooks. Beneath the counter a drawer and a set of roll-out shelves in various heights provides more easy access storage for pantry items, misc. baking accessories, rolling pins, mixing bowls, and more.
The kitchen island provides a large worktop, seating for 3-4 guests, and even more storage! The back of the island includes an appliance lift cabinet used for a sewing machine for the homeowner’s beloved hobby, a deep drawer built for organizing a full collection of dishware, a waste recycling bin, and more!
All and all this kitchen is as functional as it is beautiful!
Request a FREE Dura Supreme Brochure Packet:
http://www.durasupreme.com/request-brochure

 Cantoni Irvine
Designed By: Sarah Buehlman
Marc and Mandy Maister were clients and fans of Cantoni before they purchased this harbor home on Balboa Island. The South African natives originally met designer Sarah Buehlman and Cantoni’s Founder and CEO Michael Wilkov at a storewide sale, and quickly established a relationship as they bought furnishings for their primary residence in Newport Beach.
So, when the couple decided to invest in this gorgeous second home, in one of the ritziest enclaves in North America, they sought Sarah’s help in transforming the outdated 1960’s residence into a modern marvel. “It’s now the ultimate beach house,” says Sarah, “and finished in Cantoni from top to bottom—including new custom cabinetry installed throughout.”
But let’s back up. This project began when Mandy contacted Sarah in the midst of the remodel process (in December 2010), asking if she could come take a look and help with the overall design.
“The plans were being drawn up with an architect, and they opted not to move anything major. Instead, they updated everything—as in the small carpeted staircase that became a gorgeous glass and metal sculpture,” Sarah explains. She took photographs and measurements, and then set to work creating the scaled renderings. “Marc and Mandy were drawn to the One and Only Collection. It features a high-gloss brown and white color scheme which served as inspiration for the project,” says Sarah.
Primary pieces in the expansive living area include the Mondrian leather sectional, the Involution sculpture, and a pair of Vladimir Kagan Corkscrew swivel chairs. The Maisters needed a place to house all their electronics but didn’t want a typical entertainment center. The One and Only buffet was actually modified by our skilled shop technicians, in our distribution center, so it could accommodate all the couple’s media equipment. “These artisans are another one of our hidden strengths—in addition to the design tools, inventory and extensive resources we have to get a job done,” adds Sarah. Marc and Mandy also fell in love with the exotic Makassar ebony wood in the Ritz Collection, which Sarah combined in the master bedroom with the Ravenna double chaise to provide an extra place to sit and enjoy the beautiful harbor views.
Beyond new furnishings, the Maisters also decided to completely redo their kitchen. And though Marc and Mandy did not have a chance to actually see our kitchen displays, having worked with Sarah over the years, they had immense trust in our commitment to craftsmanship and quality. In fact, they opted for new cabinetry in four bathrooms as well as the laundry room based on our 3D renderings and lacquer samples alone—without ever opening a drawer. “Their trust in my expertise and Cantoni’s reputation were a major deciding factor,” says Sarah.
This plush second home, complete with a private boat dock right out back, counts as one of Sarah’s proudest accomplishments. “These long-time clients are great. They love Cantoni and appreciate high quality Italian furnishings in particular. The home is so gorgeous that once you are inside and open the Nano doors, you simply don’t want to leave.” The job took almost two years to complete, but everyone seems quite happy with the results, proving that large or small—and in cases necessitating a quick turnaround or execution of a long-term vision—Cantoni has the resources to come through for all clients.

 TOC design & construction inc.
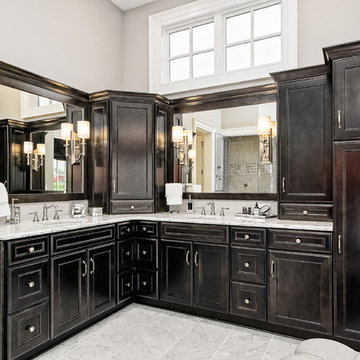
Have fun with your color choices by: Tania Scardellato - TOC design
Every unforgettable living room design begins with a fabulous paint color. The right color scheme can set the tone for any space, embodying whichever mood or style you wish, whether it be elegantly traditional or edgy and modern. As you stand in front of that daunting display filled with hundreds of tiny paint swatches, each color more perfect than the next, you may be asking yourself how to choose just one shade. Selecting living room color schemes can be an easy and enjoyable process if you have fabulous inspiration and the right design tools.
A beautiful color palette will instantly transform any drab and outdated living room into a trendy contemporary den found on the pages of your favorite designer magazines. The right shade can set the tone for the entire space, embodying whichever décor concept you desire. For this reason, when searching those isles for the perfect color scheme it is very important to choose wisely, understanding the particular look and style that each hue will evoke. Every great design will begin with fabulous inspiration.. Imagine your room in a rainbow of outstanding new hues, and then select the color that best reflects your home’s personality and individual décor style.
The importance to color is repeat, Don’t use too much of the same color in large amounts and always repeat a small touch of that color in your open concept.
For This young couple we went with a neutral pallet as they desired pops of colors with their furnishings, The wall paint color acted as a canvas, and the furniture, painting and accessories as there focal point.
Sponsored
Sunbury, OH

J.Holderby - Renovations
Franklin County's Leading General Contractors - 2X Best of Houzz!
 TOC design & construction inc.
Have fun with your color choices by: Tania Scardellato - TOC design
Every unforgettable living room design begins with a fabulous paint color. The right color scheme can set the tone for any space, embodying whichever mood or style you wish, whether it be elegantly traditional or edgy and modern. As you stand in front of that daunting display filled with hundreds of tiny paint swatches, each color more perfect than the next, you may be asking yourself how to choose just one shade. Selecting living room color schemes can be an easy and enjoyable process if you have fabulous inspiration and the right design tools.
A beautiful color palette will instantly transform any drab and outdated living room into a trendy contemporary den found on the pages of your favorite designer magazines. The right shade can set the tone for the entire space, embodying whichever décor concept you desire. For this reason, when searching those isles for the perfect color scheme it is very important to choose wisely, understanding the particular look and style that each hue will evoke. Every great design will begin with fabulous inspiration.. Imagine your room in a rainbow of outstanding new hues, and then select the color that best reflects your home’s personality and individual décor style.
The importance to color is repeat, Don’t use too much of the same color in large amounts and always repeat a small touch of that color in your open concept.
For This young couple we went with a neutral pallet as they desired pops of colors with their furnishings, The wall paint color acted as a canvas, and the furniture, painting and accessories as there focal point.
 TOC design & construction inc.
Have fun with your color choices by: Tania Scardellato - TOC design
Every unforgettable living room design begins with a fabulous paint color. The right color scheme can set the tone for any space, embodying whichever mood or style you wish, whether it be elegantly traditional or edgy and modern. As you stand in front of that daunting display filled with hundreds of tiny paint swatches, each color more perfect than the next, you may be asking yourself how to choose just one shade. Selecting living room color schemes can be an easy and enjoyable process if you have fabulous inspiration and the right design tools.
A beautiful color palette will instantly transform any drab and outdated living room into a trendy contemporary den found on the pages of your favorite designer magazines. The right shade can set the tone for the entire space, embodying whichever décor concept you desire. For this reason, when searching those isles for the perfect color scheme it is very important to choose wisely, understanding the particular look and style that each hue will evoke. Every great design will begin with fabulous inspiration.. Imagine your room in a rainbow of outstanding new hues, and then select the color that best reflects your home’s personality and individual décor style.
The importance to color is repeat, Don’t use too much of the same color in large amounts and always repeat a small touch of that color in your open concept.
For This young couple we went with a neutral pallet as they desired pops of colors with their furnishings, The wall paint color acted as a canvas, and the furniture, painting and accessories as there focal point.
 Design Studio West
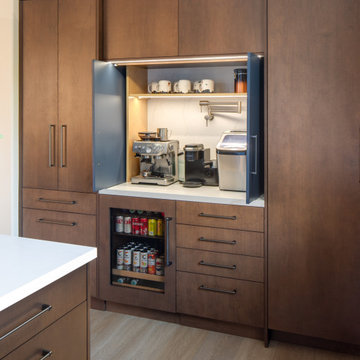
What began as a dated, constrained kitchen has been transformed into a warm, welcoming centerpiece of the home. At its core is a generous island—both a gathering spot and a hardworking culinary hub—featuring a Miele 48" range, a live-edge walnut bar top, and thoughtfully planned drawer and pull-out systems that keep everything within reach.
Custom alder cabinetry in a warm stain, paired with soft blue accents, creates a tailored palette that feels both inviting and distinctive. Smart storage is woven into every corner: a hidden coffee station, a recessed corner pantry with tall retractable doors, discreet appliance storage for everyday tools, dedicated wine and tray storage, pull-out spice organization, and wide drawers designed for pots, pans, and larger essentials.
In the evenings, toe-kick lighting and alabaster pendants cast a soft, ambient glow—making the kitchen not only functional, but an effortless place to gather and entertain.
 All Marble Tiles
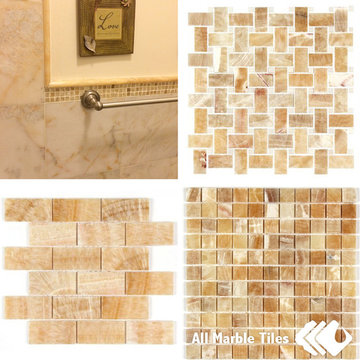
You and your bathroom – Honey Onyx wall and mosaic wall tiles
Your client wants you to re-design her bathroom walls. She’s tired of her current bathroom and wants something different. She doesn’t want a pattern or a shape or the same tiles. She wants it to look different, she demands the wow factor, but with a limited budget. You should definitely look at honey onyx wall or honey onyx mosaic wall tiles.
Formed in the gas openings of lava, onyx is found in various regions around the world, from Pakistan to Madagascar. This stone is extremely fragile and porous. So it absorbs moisture and is not stain or crack resistant. Very often a backing of some kind is placed behind the tile due to its fragile nature. Hence its usage as a wall tile although it can be used as a floor tile too. Hardly anyone honey onyx tile looks similar, which creates a fantastic non-patterned natural look. You need to unpack your crates first and blend and mix these tiles in order to get the proper look. Should you need to cut these tiles, ensure that you use a lot of water in the cutting process due to its fragility. Honey onyx wall tiles come in polished, sandblasted or rough finishes.
Honey onyx mosaic wall tiles usually come in honeycomb sheets. Choose sheets which look similar in pattern and color in order to get a natural, patterned look. Use these tiles with care as they crack easily. The last problem you want is blowing the budget because of improper use of tools and the sheets.
Water absorption is at 0.5%; porosity at 0.4% and grain per cubic centimeter density at 2.6. It also has a 1.1% degree in pores which indicates the fragile nature of this lava created tile. Edges come straight, beveled or serrated, depending on choice. Ensure your local tile merchandiser has the necessary knowledge and skills to ensure you get the right advice.
When using Honey Onyx, always be aware of its fragile nature. This natural tile will enhance your bathroom’s look by enhancing warmth and it will feel as if you are in a bathroom somewhere on a mountain. Your client will love the patterns that don’t match, the brown natural rock atmosphere it creates; yet the unique patterns will ensure the bathroom is unique and it will seem like a lot of thought has gone into creating the masterpiece.
http://allmarbletiles.com
Sponsored
Plain City, OH

The Creative Kitchen Company
Columbus Area Kitchen Remodeling and Refacing Professional

 Mack Allen
Comprehensive Pest Control Solutions for Your Peace of Mind
Pests can quickly turn your living or working space into an uncomfortable and unhygienic environment. At Pest Control - skadedyr-kontroll.no, we offer reliable and effective pest control services to protect your property and ensure your well-being.
Silverfish consuming poisonous bait/Photo skadedyrkontroll1
The skadedyr-kontroll.no Advantage
Choosing the right pest control service can make all the difference. With our years of expertise and commitment to excellence, we provide:
- Tailored Solutions: Each pest problem is unique, and so are our solutions.
- Eco-Friendly Methods: We prioritize methods that are safe for your family, pets, and the environment.
- Expert Team: Our professionals are trained to handle all types of pest issues with precision and care.
- Thorough Inspection: We identify the type and extent of the pest problem on your property.
- Customized Plan: A detailed plan is crafted to address your specific pest issue.
- Effective Execution: Using advanced tools and methods, we eliminate pests swiftly and safely.
- Preventive Guidance: Our team provides tips and solutions to prevent pests from returning.
 TOC design & construction inc.
Have fun with your color choices by Tania Scardellato - TOC design
Every unforgettable living room design begins with a fabulous paint color. The right color scheme can set the tone for any space, embodying whichever mood or style you wish, whether it be elegantly traditional or edgy and modern. As you stand in front of that daunting display filled with hundreds of tiny paint swatches, each color more perfect than the next, you may be asking yourself how to choose just one shade. Selecting living room color schemes can be an easy and enjoyable process if you have fabulous inspiration and the right design tools.
A beautiful color palette will instantly transform any drab and outdated living room into a trendy contemporary den found on the pages of your favorite designer magazines. The right shade can set the tone for the entire space, embodying whichever décor concept you desire. For this reason, when searching those isles for the perfect color scheme it is very important to choose wisely, understanding the particular look and style that each hue will evoke. Every great design will begin with fabulous inspiration.. Imagine your room in a rainbow of outstanding new hues, and then select the color that best reflects your home’s personality and individual décor style.
The importance to color is repeat, Don’t use too much of the same color in large amounts and always repeat a small touch of that color in your open concept.
For This young couple we went with a neutral pallet as they desired pops of colors with their furnishings, The wall paint color acted as a canvas, and the furniture, painting and accessories as there focal point.
 Rocky Tops Granite & Marble LLC
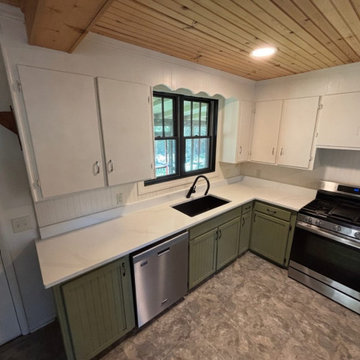
We put MSI Calacatta Elysio into a kitchen in Columbia, and it's one of those quartzes that just works in a room where people actually cook and live. Elysio's an engineered quartz manufactured right here in the great state of South Carolina. It features a bright clean background with soft gray and gold veining moving through it, the kind of look that reads calm from across the room but still gives you something to study up close at the counter.
Engineered quartz like this is consistent in a way natural stone just can't be. Every slab off the line looks close enough to the next that we're not fighting to match veining across seams or worrying about a wild vein hitting the sink cutout wrong. That consistency matters in a kitchen with multiple runs of counter, because the eye catches it immediately if the pattern jumps from one section to the next. Templating still has to be dead on, and we take the time at the seams to keep that veining looking like it keeps moving instead of stopping and starting over.
Day to day, Elysio holds up the way good quartz should. It doesn't need sealing, it resists stains from coffee, wine, and the everyday mess of a working kitchen, and it shrugs off scratches better than people expect. We still tell folks to use a trivet for hot pans straight off the stove, just good practice with any engineered surface. The edge is eased, clean and simple, the kind of detail you settle on at the end and then don't think about again because it just looks right.
Columbia kitchens see a lot of real use, families cooking, kids doing homework at the island, company gathered around while dinner's going. A quartz like Elysio fits that life. It's bright enough to open the room up, patterned enough to keep from looking flat, and tough enough that it's still going to look this good years from now. That's what we're after on every job in the Midlands, something that looks sharp walking in and keeps earning its keep long after we've packed up the tools.
63