
Search results for "Tried and tested algorithm" in Home Design Ideas

 Kasper Custom Home Remodeling
A freestanding soaker tub gets plenty of natural light from a large arched window. To the left, heated towel bars keep bath towels toasty and within reach. Glass shelves holding decor and bath necessities sit in a niche to the right. Michael Hunter Photography.

 Boyenga Team / Compass
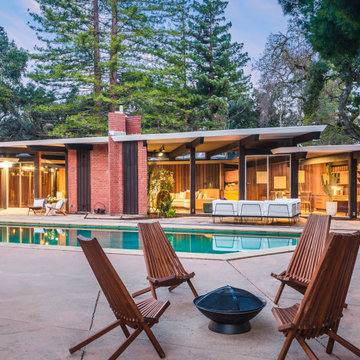
At 19 Irving Avenue, the pool reads less like an afterthought and more like a quiet declaration of Joseph Eichler’s design philosophy. From the moment you step into the backyard, it becomes clear that this isn’t a traditional rectangular basin—it’s a geometric composition, shaped in a polygonal form that mirrors the home’s angular, forward-thinking architecture.
5
The lines of the pool echo the home’s V-shaped layout and parallelogram motifs, creating a visual rhythm that feels intentional from every vantage point. Rather than being set apart, the pool is pulled into the architecture itself—surrounded by walls of glass and adjacent living spaces that dissolve the boundary between inside and out. Reflections of sky, structure, and surrounding greenery constantly shift across its surface, making it feel alive within the composition.
There’s a certain restraint to it, too. It doesn’t try to overpower the setting or compete with the architecture. Instead, it acts as a calm, sculptural centerpiece, anchoring the outdoor terrace while reinforcing the home’s modernist language. It’s easy to imagine Eichler himself using this space not just for leisure, but as part of a larger experiment—testing how geometry, light, and water could come together to shape a new way of living.
In that sense, the pool isn’t just a feature—it’s part of the origin story. A subtle but powerful expression of the indoor-outdoor lifestyle that would go on to define Eichler communities across California.
Find the right local pro for your project

 User
UserPhoto: Ten Ten Creative
Wet bar - transitional single-wall dark wood floor and brown floor wet bar idea in Dallas with shaker cabinets, black cabinets, black backsplash, subway tile backsplash and gray countertops
Wet bar - transitional single-wall dark wood floor and brown floor wet bar idea in Dallas with shaker cabinets, black cabinets, black backsplash, subway tile backsplash and gray countertops


 Tile Doctor Ltd
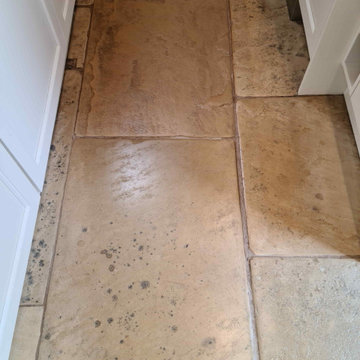
These pictures are of a beautiful Sandstone floor in Ilkley, the tiles were sourced from Lapicida of Harrogate and installed around twelve years prior. If you take a look at their website now you will see they are selling a similar London White Sandstone for nearly £100 per m2. This floor was 35 square metres so clearly this was a significant investment for the owner at the time.
After twelve years of use however the sealer had worn off the floor and dirt had become ingrained in the pores of the stone making it very difficult to keep clean. A good sealer takes a long time to wear off so the change to the appearance of the stone happens so slowly you don’t notice it. The floor was now looking permanently dirty, and the owner of the property had decided it was time to get it renovated.
Before quoting I paid a visit to the property to survey the floor and conduct an initial test clean which came out well. The test cleaning did not go as quickly as I had hoped it might however, due to traces of old satin sealer on some of the stone. It’s important to remove all the old sealer before applying new or you can end up with a patchy appearance. The remnants of old sealer proved challenging to remove as a result I had to try several products and methods before working out the right approach. In the end I resulted to using a product called Tile Doctor Wax Away. I had considered applying diamond burnishing pads which would have been a quicker option, but the flagstones had a riven finish, and the dirt was deeply pitted.
With a successful cleaning plan worked out I provided the client with a which was accepted, and a date agreed for my return.
The cleaning plan I had worked out was to apply a strong dilution of Tile Doctor Wax Away, leave it to soak into the stone for thirty minutes and then scrub it in with a rotary buffer fitted with a black scrubbing pad. The old sealer proved to be tough to remove and in total I used five litres of Tile Doctor Wax Away in the process, as I said it was a big floor!
On day three, I sealed the floor using three coats of Tile Doctor Seal and Go which gave the Sandstone a lovely satin finish that the client liked. This product is also water based so it doesn’t leave a smell as it dries.
Once done the floor was completely transformed, and my client very pleased with the floor which looked so much lighter and cleaner. For aftercare cleaning I recommended the use of Tile Doctor Neutral Tile Cleaner for maintenance, it is pH neutral so will ensure the newly applied seal is protected. It has a nice fresh smell and is gentle enough to use frequently keeping the newly renovated floor looking lovely.
Nigel Stoker
North West Yorkshire Tile Doctor


Sponsored
Columbus, OH

Trish Takacs Design
Award Winning & Highly Skilled Kitchen & Bath Designer in Columbus

 Tile Doctor Ltd
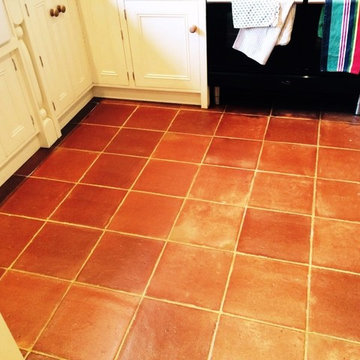
This customer in Henfield was contemplating digging up her Terracotta kitchen floor and replacing it, the tiles were ingrained with dirt which had proved impossible to remove and as a consequence were left looking flat, dull and very un-appealing. Additionally she had an elderly dog that had been ill several times in the corner area and she really struggled to make it look decent again. Following a quick test I was able to persuade her to try a clean and re-seal first.
The first step was to deep clean the floor to remove the ingrained dirt and any previous sealers. As well as the dog I had two rugby playing sons to deal with so to make it easier for the family I split the floor up into areas and worked on one area at a time.
The tiles were first soaked in a strong solution of Tile Doctor Pro-Clean before scrubbing it into the tile and grout with a black pad fitted to a buffing machine. The tiles were rinsed, the now dirty cleaning solution extracted and the process repeated until I was happy that the Pro-Clean had done its trick and the floor was as clean as it could be.
The Terracotta tiles now looked clean but completely washed out so I assured the customer that once the tiles had been sealed the colour would return and more. Unsealed Terracotta marks easily so given I left the customer dust sheets to walk on.
I returned after two days to ensure any moisture had left the tile and proceeded to seal with six coats of Tile Doctor Pro-Seal which is highly recommended for use in food preparation areas and gives a high gloss finish whilst providing maximum stain protection. As each coat takes 40 minutes to dry I took the opportunity to clean her slate front door step as well.
The customer was very happy with the finished floor and I’m glad to report she has decided to keep the floor.

 Cavalier Homes Inc
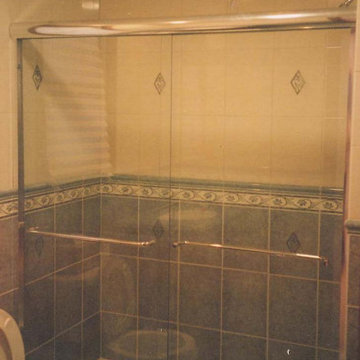
Do you have a bathroom that needs to be updated? The Home Remodeling services from Cavalier Homes offer a fantastic opportunity to update a bathroom that is already functional or completely renovate one that requires a makeover. We can help with an aesthetic upgrade, whether your bathroom requires a minor repair or a complete renovation.
There are various reasons why you might want to renovate your bathroom. Ultimately, there are three main reasons why most homeowners remodel their bathrooms.
Increasing comfort
Enhancing aesthetic
Increasing the resale value
There are a few things you should think about before beginning the bathroom renovation process if you want to create the bathroom of your dreams. Here are some of the important ones:
Budget:
Your budget should be taken into consideration first. You’ll be better able to make key choices during the renovation process if you’ve established a budget and know exactly how much you’re willing to spend on various products.
Space:
Since bathrooms are typically the smallest rooms in a home, it’s critical to make the most of every square inch that is available. There is nothing more annoying than buying fixtures that don’t fit, so take into account the layout of your bathroom and take precise measurements!
Design and style:
There are many styles and designs that can be achieved in the bathroom, regardless of whether you want it to blend in with the other rooms in your house or be completely different. Whatever style you’re trying to achieve—whether it’s something more traditional or more contemporary—we can assist you.
Accessories:
Small details can make a big difference, which is why you should carefully consider the style of each bathroom accessory you choose. With so many taps, showers, and other bathroom fixtures on the market today, making a decision isn’t as simple as you might think. Therefore, consider the style you want to achieve and make a decision accordingly.
Storage Needs:
If you’re short on space, try to be creative with your storage. Purchase furniture with lots of storage that doesn’t take up more floor space. For instance, vanity units are ideal because they are compact, offer excellent storage, and complement your preferred style.
Utilize your space wisely and creatively. All shampoos and shower gels will be able to be stored in shelving units. Remember to incorporate it in the initial layout.
Heating:
By adding a top-notch heating system, you can keep your bathroom cozy. You can use underfloor heating systems or a conventional radiator. This will raise the temperature in each bathroom, enhancing comfort and warmth.
This is not always a complete list. Many different delicate aspects that make your bathroom modern may require your consideration. The functionality of the bathroom has changed as a result of modern technology. Contact Cavalier Homes Inc. in West Islip, Long Island and one of our experts will walk you through your options.
For bathroom remodeling, we offer affordable and individualized design, fabrication, and installation services. Our cutting-edge tools, supplies, and procedures have stood the test of time. We can use your personal plans or ideas to design a stunning and useful bathroom.
Your home is your calling card, and your happiness is our greatest goal, as well as our greatest pleasure. Cavalier Homes will make your dream home a reality.

 The Rinfret Group
Example of a mid-sized transitional freestanding desk dark wood floor and brown floor study room design in New York with beige walls and no fireplace

 BJOID Inc.
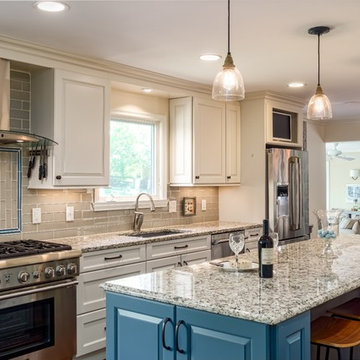
The original kitchen’s skinny island wasn’t functional, so we moved the cooking zone onto the opposite wall, the cleaning/prep onto the island, and left shallow pantries on the window wall to open up the space and improve the flow. With a much larger island, we were able to connect the entertaining aspect of this kitchen – no backs to the cook! The length of the island shows beautifully flowing ‘Fantasy Brown’ granite, with double thick chiseled end, on a dark charcoal cabinet. The perimeter painted in Willow comes across very fresh and bright, without being stark, and works beautifully with the rest of the features in the home. Cambria’s simple elegant Torquay design is used on the perimeter counters to let the island be the star. U-shaped drawers were used under the sink to create accessible storage in an unlikely place – the customer’s favourite part of the kitchen. This kitchen is simple and beautifully elegant, yet neutral enough to stand the test of time.

Sponsored
Sunbury, OH

J.Holderby - Renovations
Franklin County's Leading General Contractors - 2X Best of Houzz!
 Alan B. Cohen, Architect
David Wakely
Inspiration for an eclectic exterior home remodel in San Francisco
Inspiration for an eclectic exterior home remodel in San Francisco
 Alan B. Cohen, Architect
David Wakely
Inspiration for an eclectic home office remodel in San Francisco
Inspiration for an eclectic home office remodel in San Francisco


Sponsored
Sunbury, OH
J.Holderby - Renovations
Franklin County's Leading General Contractors - 2X Best of Houzz!
 Tile Doctor Ltd
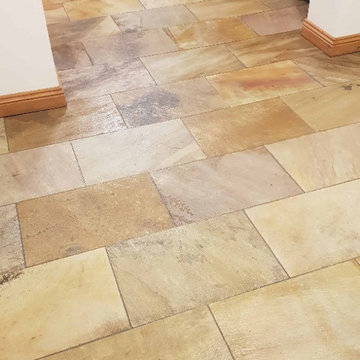
The photos on this page are of a Sandstone Kitchen floor at a house in the High Green suburb of Sheffield. The Sandstone tiles looked grubby and needed some love and attention. Our client was getting fed up trying to keep the stone clean, particularly around the kitchen area where cleaning didn’t seem to make much. You can see how dirty it had become on the before picture below, this is stark contrast to the middle of the of the kitchen where the portable kitchen island normally sits.
I went to the property to get a better look at the problem floor and carried out a small test clean to see which products and methods would have the best impact. The patch came up really clean without much difficulty, so I was confident on being able to restore its appearance.
It was clear to me the original protective sealer had worn off and dirt had become ingrained in the pores of the stone where it was proving difficult to remove. My client was very encouraged by the test clean initial result and agreed to go ahead with the quote. We arranged a suitable time to carry out the work on a day when the family would be out of the way.
I started by taping up the area to make sure the skirting and woodwork were protected from splashing. Once done a strong dilution of Tile Doctor Pro-Clean was sprayed onto Sandstone tile and grout. It was left to dwell for approximately ten minutes to help break down all the grime and dirt and was then worked into the stone using a rotary floor machine fitted with a stiff bristled brush.
This method totally transformed the dull sandstone, the stunning sandstone colours started to leap out and I could see the stone was well on its way to being transformed. The floor was then rinsed several times with water and the now soiled cleaning solution carefully removed with an industrial wet vacuum.
With the floor clean I inspected all the tiles and repeated the process until I was happy the floor was total clean. I should mention It’s not always this easy to clean a stone floor and quite often I find myself having to utilise all sorts of products and methods before I’m totally satisfied it’s as clean as it could possibly be.
With the cleaning done I left the floor to dry out overnight aided with heaters and air blowers.
I returned to seal the floor the next day checking first that the stone was dry with a damp meter. Leaving the blowers on overnight had helped and the readings I took from the floor confirmed it was now ready for sealing.
Earlier I had discussed the different types of sealer available with my clients and they had chosen to have the floor sealed with Tile Doctor Seal & Go. This works really well on Sandstone, enhancing its appearance, improving colour and of course adding protection to the stone to prevent grime and dirt stuck in the pores of the stone. Several coats were applied until I could see if was fully sealed and the right level of finish had been achieved. Sealing a floor can take some time as you need to allow each coat to dry before applying the next.
Once done the floor looked meticulously clean and the new sealer had added a lovely subtle sheen to the stone. My client was very please with the transformation and left the following feedback.
‘Very professional approach, friendly, and offered great advice throughout the job. Very pleased with the finish Cheers Matt we will see you again’
One of the problems we find with many homeowners is that for cleaning they use strong bleach-based cleaning product on their sealed tiles, and this actually strips off the sealer leaving the stone vulnerable to ingrained dirt. As a result, Tile Doctor has developed Tile Doctor Neutral Tile Cleaner, it is pH neutral and gentle enough for everyday use without affecting the sealer.
Matthew Lovett
South Yorkshire Tile Doctor

 Clopay
Lousiville based Eldridge Company selected Clopay's new Avante AX aluminum and glass garage doors for this new contemporary home built in 2019. Designed to capture natural light without compromising privacy, the house features large windows at every turn.

 Kraft Custom Construction
This remodel incorporated the client’s love of artwork and color into a cohesive design with elegant, custom details that will stand the test of time. The space was closed in, dark and dated. The walls at the island were the first thing you saw when entering the condo. So we removed the walls which really opened it up to a welcoming space. Storage was an issue too so we borrowed space from the main floor bedroom closet and created a ‘butler’s pantry’.
The client’s flair for the contemporary, original art, and love of bright colors is apparent in the materials, finishes and paint colors. Jewelry-like artisan pulls are repeated throughout the kitchen to pull it together. The Butler’s pantry provided extra storage for kitchen items and adds a little glam. The drawers are wrapped in leather with a Shagreen pattern (Asian sting ray). A creative mix of custom cabinetry materials includes gray washed white oak to complimented the new flooring and ground the mix of materials on the island, along with white gloss uppers and matte bright blue tall cabinets.
With the exception of the artisan pulls used on the integrated dishwasher drawers and blue cabinets, push and touch latches were used to keep it as clean looking as possible.
Kitchen details include a chef style sink, quartz counters, motorized assist for heavy drawers and various cabinetry organizers.
9