
Search results for "Videos cut" in Home Design Ideas
 Alexanian Carpet & Flooring
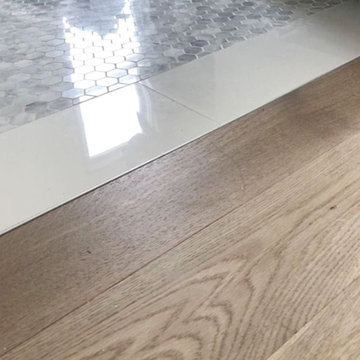
Transitions ... Cynthia Mclaughlin Design of London, ON beautifully executed this transition from “Signature by Shelley” wide plank, white oak hardwood to marble hexagon mosaic tile floor. Gorgeous work Cynthia and sales rep Crystal at our London location.
 Dura Supreme Cabinetry
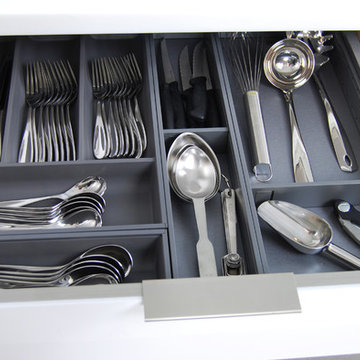
This contemporary kitchen features the NEW Stainless Steel Drawers and Roll-Out Shelves from Dura Supreme Cabinetry. The Bria (frameless) cabinets in Dura Supreme's "White" and Wired-Foil cabinets in Dura Supreme's "Wired-Mercury" are a great combination of cabinetry for creating the clean sleek look of this modern two-tone kitchen design.
Dura Supreme Cabinetry is excited to introduce NEW Stainless Steel Drawers and Roll-Out Shelves for their Bria Cabinetry (Frameless / Full-Access product line). For a limited time, this new metal drawer system is available exclusively from Dura Supreme as they partnered with Blum to be the first American manufacturer to bring it to market.
Dura Supreme’s Stainless Steel Drawers and Roll-Out Shelves are an attractive option for any kitchen design. Sleek, double-wall, stainless steel sides are only ½” thick and work with many of Dura Supreme’s wood drawer accessories, as well as the coordinating gray metal accessories designed specifically for Stainless Steel drawers. Concealed, undermount glides are integrated into the sides and are self-closing with a soft-close feature.
Our new Stainless Steel drawer option provides a contemporary alternative to our classic Maple dovetailed drawer. For homeowners that favor Transitional or Contemporary styling, this sleek, high-performance drawer system will be ideal!
Request a FREE Dura Supreme Brochure:
http://www.durasupreme.com/request-brochure
Find a Dura Supreme Showroom in your area:
http://www.durasupreme.com/dealer-locator
Want to become a Dura Supreme Dealer? Go to:
http://www.durasupreme.com/new-dealer-inquiry
To view a video and more info about this product go to: http://www.durasupreme.com/storage-solutions/stainless-steel-drawers-roll-outs
 C.E. Pontz Sons
Dream backyard
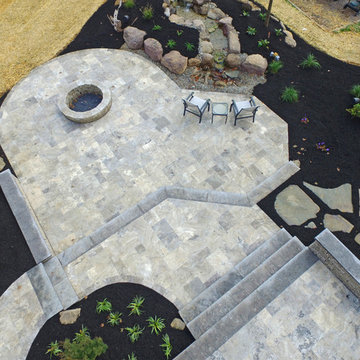
This Amazing Dream Backyard Project features just about all the options you have ever dreamed about having in your very own backyard. We just recently completed this project and as you can tell from the video and photos below it’s quite the dream backyard. But dreams can came true, and for these homeowners they certainly have. So proud of our team for coming together and installing another amazing backyard paradise. The outdoor living area features everything from fire to water and includes multiple travertine patio areas, flagstone and travertine walkways, stone steps, pondless waterfall, landscape lighting, outdoor audio, fire pit, and landscaping. To think were the project came from a decrepit old deck to this beautiful work of art is almost unreal!
Travertine Patio and Fire Pit
The dream backyard project included the installation of various hardscape items including travertine patio, Seating walls, Steps, and walkways. The patio material is silver travertine laid in French pattern. The patio area is approximately 1,012 sq ft with antiqued finish and natural edge. All walls and steps are constructed using natural stone Semco ‘Cedar Ridge’ sawn wall stone. Caps and stair treads are constructed of natural stone ‘Chateau Limestone’ 2″ thick and 14″ deep, thermal top and rock faced edges. Cap stone for grill wall is 18″ wide polished and sealed top. Under grill area the patio is outdoor ‘wood look’ porcelain tile. A Semco ‘Cedar Ridge’ 57″ Fire Pit with Large Zentro ‘Smokeless’ insert is installed on the lower patio area. As of these pictures and this video the fire pit insert has yet to be installed. Sealing of Travertine surfaces using GST stain blocking sealer will be completed once the project is entirely finished. Stepping stone pathway to the side of the home is full color Pa Flagstone irregular steppers.
Landscaping
Landscape beds, plants, trees, edging and mulching was done around the entire back and side yards of the home using triple cut bark mulch. Plant variety and size specifications were all chosen by our amazing designer Wes. The landscaping portion of this project also included the grading, lawn repair, and seeding of all the areas damaged and disturbed during construction.
Pondless Waterfall
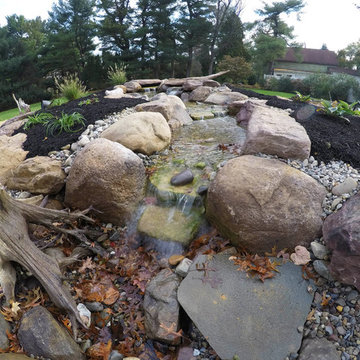
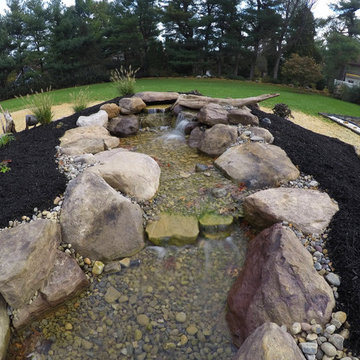
A 15′ pondless waterfall was installed into the new landscape to the side of the lower patio for maximum viewing. The waterfall features approximately 15 foot of stream with multiple waterfalls. Two side by side spillways merge into a wide stream with a small waterfall before turning and going into the final falls at the basin area. The Waterfall is outfitted with low voltage LED underwater landscape lighting throughout.
Outdoor Sound
The Outdoor Sound System installed was a TRU Audio 4 speaker system and 12″ outdoor hardscape subwoofer. This system also includes the amplifier which is located in the home owners basement as well as Apple Airport Express and Blue Tooth Connection.
Siding
Siding work to be completed is still unfinished as of the time this video and pictures were shot. Siding was removed and salvaged in areas need for the patio and electrical work. Siding in areas of new outdoor living space to include: new vinyl siding on entire rear kitchen/bathroom wall from top to bottom as well as Piecing in around lights and sliding door on adjacent wall and in back of garage.
Find the right local pro for your project
 RAJ Kitchen and Bath, LLC
 “Full apartment design”.
IF you have not yet seen this apartment conversion before, we strongly urge you to go to the bottom left of this page and click on the short 2-minutes video. It would put a lot of things into perspective when you come back and continue reading this.
It is true we were literally handed the keys and told a list of things that they wanted to have happen and we were to go into the apartment, look at the space and come up with a design that would satisfy all of that need. UNTIL we showed up! The unit had really seen some better days but we knew we had to look past that and come up with a concept that would work for them.
The immediate challenges were centered around 3 big ideas:
1. Adding a second bedroom to the already small footprint
2. Figuring out a way to make the kitchen bigger, better and brighter
3. Creating a master room walk in closet
It’s always difficult to add new rooms into existing footprint without expanding out or up and not incurring any opportunity cost. In this case, that was exactly what we had to do. Item one and two above had to be tackled as one. We went ahead and switched out the location of the dining room and eliminating an area where there was a “nook” type eat-in area. By doing so, we were able to cut right into that footprint and change the layout of the kitchen.
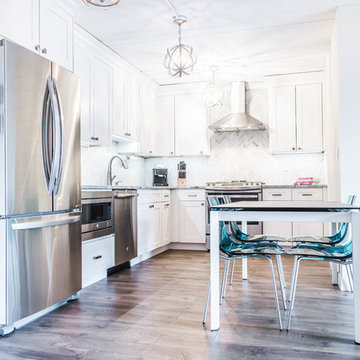
That one move allowed us to dig into the kitchen design because it was now the main focal point in the apartment. It was no longer an option to keep it in that tiny hole where it was, so we had to ensure that this design was functional and aesthetically pleasing at the same time. By adding the table into the space where an Island typically would go, we were able to both cut cost and still provide a dining experience. The Table serves as an Island as well when cooking.
We then proceeded to block in the existing doorway to the dining room. By doing this, we were able to create a full room which allowed us to put a door on the other side and called that room Bedroom #2. This was easier to do because all of the mechanicals were already in that space (light, heater and windows). By shifting things around, we also achieved a huge wall to wall closet from inside. PERFECT!
Then we moved into the Single bedroom. We thought it was a big room with a small closet, so by creatively adding an L shaped wall and steal some footprint into the bedroom side, we were able to put a door on that new room and design it for the walk-in closet. Even after this, the bedroom still holds a queen size bed with 2 night stands, a TV on the wall, a sitting chair and plenty of room to walk around. This was done by rethinking the location for the bed and night stands.
The bathroom was gutted to make sure there was no leaks and rebuild from the ground up. We kept all of the plumbing where it was, added a new vanity, medicine cabinet, tiles and lighting and it was done.
From there, the rest of the unit had new flooring all throughout, paint, and lighting. After completion and walk through, this project was handed over back to the clients.
Execution and collaboration between all the trades were: Reggie and his team from Premier Interiors and Rohan from RD Mechanical Services.
p.s. Please see our website to see the video.
 Fratantoni Interior Designers
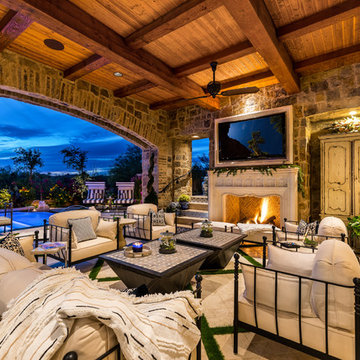
The French Villa’s custom patio features black iron sofas and chairs with creme cushions, styled with black and white throw pillows and a textured blanket. Double coffee tables sit at the center, while a console table behind the seating adds function and decor. A built-in exterior fireplace with an overmantel and decorative molding anchors the space, framed by rough-cut stone and integrated lighting. Set beneath a vaulted ceiling with exposed beams, the covered terrace opens to an arched stone loggia and overlooks the pool and spa. Natural stone flooring, brick and masonry, and a grass & pavers layout complete this elegant outdoor retreat.
 C.E. Pontz Sons
Dream backyard
This Amazing Dream Backyard Project features just about all the options you have ever dreamed about having in your very own backyard. We just recently completed this project and as you can tell from the video and photos below it’s quite the dream backyard. But dreams can came true, and for these homeowners they certainly have. So proud of our team for coming together and installing another amazing backyard paradise. The outdoor living area features everything from fire to water and includes multiple travertine patio areas, flagstone and travertine walkways, stone steps, pondless waterfall, landscape lighting, outdoor audio, fire pit, and landscaping. To think were the project came from a decrepit old deck to this beautiful work of art is almost unreal!
Travertine Patio and Fire Pit
The dream backyard project included the installation of various hardscape items including travertine patio, Seating walls, Steps, and walkways. The patio material is silver travertine laid in French pattern. The patio area is approximately 1,012 sq ft with antiqued finish and natural edge. All walls and steps are constructed using natural stone Semco ‘Cedar Ridge’ sawn wall stone. Caps and stair treads are constructed of natural stone ‘Chateau Limestone’ 2″ thick and 14″ deep, thermal top and rock faced edges. Cap stone for grill wall is 18″ wide polished and sealed top. Under grill area the patio is outdoor ‘wood look’ porcelain tile. A Semco ‘Cedar Ridge’ 57″ Fire Pit with Large Zentro ‘Smokeless’ insert is installed on the lower patio area. As of these pictures and this video the fire pit insert has yet to be installed. Sealing of Travertine surfaces using GST stain blocking sealer will be completed once the project is entirely finished. Stepping stone pathway to the side of the home is full color Pa Flagstone irregular steppers.
Landscaping
Landscape beds, plants, trees, edging and mulching was done around the entire back and side yards of the home using triple cut bark mulch. Plant variety and size specifications were all chosen by our amazing designer Wes. The landscaping portion of this project also included the grading, lawn repair, and seeding of all the areas damaged and disturbed during construction.
Pondless Waterfall
A 15′ pondless waterfall was installed into the new landscape to the side of the lower patio for maximum viewing. The waterfall features approximately 15 foot of stream with multiple waterfalls. Two side by side spillways merge into a wide stream with a small waterfall before turning and going into the final falls at the basin area. The Waterfall is outfitted with low voltage LED underwater landscape lighting throughout.
Outdoor Sound
The Outdoor Sound System installed was a TRU Audio 4 speaker system and 12″ outdoor hardscape subwoofer. This system also includes the amplifier which is located in the home owners basement as well as Apple Airport Express and Blue Tooth Connection.
Siding
Siding work to be completed is still unfinished as of the time this video and pictures were shot. Siding was removed and salvaged in areas need for the patio and electrical work. Siding in areas of new outdoor living space to include: new vinyl siding on entire rear kitchen/bathroom wall from top to bottom as well as Piecing in around lights and sliding door on adjacent wall and in back of garage.
 C.E. Pontz Sons
Dream backyard
This Amazing Dream Backyard Project features just about all the options you have ever dreamed about having in your very own backyard. We just recently completed this project and as you can tell from the video and photos below it’s quite the dream backyard. But dreams can came true, and for these homeowners they certainly have. So proud of our team for coming together and installing another amazing backyard paradise. The outdoor living area features everything from fire to water and includes multiple travertine patio areas, flagstone and travertine walkways, stone steps, pondless waterfall, landscape lighting, outdoor audio, fire pit, and landscaping. To think were the project came from a decrepit old deck to this beautiful work of art is almost unreal!
Travertine Patio and Fire Pit
The dream backyard project included the installation of various hardscape items including travertine patio, Seating walls, Steps, and walkways. The patio material is silver travertine laid in French pattern. The patio area is approximately 1,012 sq ft with antiqued finish and natural edge. All walls and steps are constructed using natural stone Semco ‘Cedar Ridge’ sawn wall stone. Caps and stair treads are constructed of natural stone ‘Chateau Limestone’ 2″ thick and 14″ deep, thermal top and rock faced edges. Cap stone for grill wall is 18″ wide polished and sealed top. Under grill area the patio is outdoor ‘wood look’ porcelain tile. A Semco ‘Cedar Ridge’ 57″ Fire Pit with Large Zentro ‘Smokeless’ insert is installed on the lower patio area. As of these pictures and this video the fire pit insert has yet to be installed. Sealing of Travertine surfaces using GST stain blocking sealer will be completed once the project is entirely finished. Stepping stone pathway to the side of the home is full color Pa Flagstone irregular steppers.
Landscaping
Landscape beds, plants, trees, edging and mulching was done around the entire back and side yards of the home using triple cut bark mulch. Plant variety and size specifications were all chosen by our amazing designer Wes. The landscaping portion of this project also included the grading, lawn repair, and seeding of all the areas damaged and disturbed during construction.
Pondless Waterfall
A 15′ pondless waterfall was installed into the new landscape to the side of the lower patio for maximum viewing. The waterfall features approximately 15 foot of stream with multiple waterfalls. Two side by side spillways merge into a wide stream with a small waterfall before turning and going into the final falls at the basin area. The Waterfall is outfitted with low voltage LED underwater landscape lighting throughout.
Outdoor Sound
The Outdoor Sound System installed was a TRU Audio 4 speaker system and 12″ outdoor hardscape subwoofer. This system also includes the amplifier which is located in the home owners basement as well as Apple Airport Express and Blue Tooth Connection.
Siding
Siding work to be completed is still unfinished as of the time this video and pictures were shot. Siding was removed and salvaged in areas need for the patio and electrical work. Siding in areas of new outdoor living space to include: new vinyl siding on entire rear kitchen/bathroom wall from top to bottom as well as Piecing in around lights and sliding door on adjacent wall and in back of garage.
Sponsored
Columbus, OH

Hope Restoration & General Contracting
Columbus Design-Build, Kitchen & Bath Remodeling, Historic Renovations
 Russell Landscape Construction
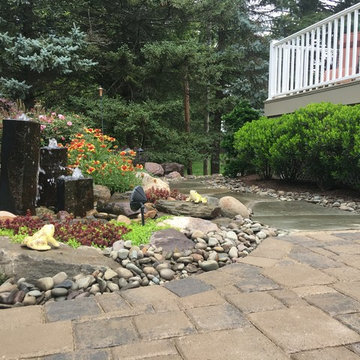
This project began in 2015 with a major renovation of the landscape on the side and backyard of this property. First we constructed a gravel driveway with edgestones around its perimeter and a naturalized planting. The driveway led into a gravel walkway that extended around to the back of the house where it became a gravel patio. We also installed a set of natural basalt columns and carried the same naturalized planting and boulder theme around to the backyard.
This year we built upon the original project by converting the gravel patio into a paver patio and installed flagstone steppers along the gravel walkway. More recently, we just finished up adding to the planting to create a shorter privacy screening using Black Dragon Cryptomeria. Watch Jay & Donna discuss working with RLC via the link to the video here: http://www.russelllandscapeconstruction.com/testimonials.html
 RAJ Kitchen and Bath, LLC
 “Full apartment design”.
IF you have not yet seen this apartment conversion before, we strongly urge you to go to the bottom left of this page and click on the short 2-minutes video. It would put a lot of things into perspective when you come back and continue reading this.
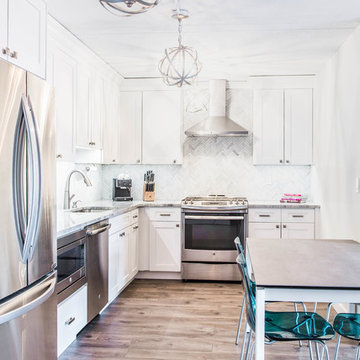
It is true we were literally handed the keys and told a list of things that they wanted to have happen and we were to go into the apartment, look at the space and come up with a design that would satisfy all of that need. UNTIL we showed up! The unit had really seen some better days but we knew we had to look past that and come up with a concept that would work for them.
The immediate challenges were centered around 3 big ideas:
1. Adding a second bedroom to the already small footprint
2. Figuring out a way to make the kitchen bigger, better and brighter
3. Creating a master room walk in closet
It’s always difficult to add new rooms into existing footprint without expanding out or up and not incurring any opportunity cost. In this case, that was exactly what we had to do. Item one and two above had to be tackled as one. We went ahead and switched out the location of the dining room and eliminating an area where there was a “nook” type eat-in area. By doing so, we were able to cut right into that footprint and change the layout of the kitchen.
That one move allowed us to dig into the kitchen design because it was now the main focal point in the apartment. It was no longer an option to keep it in that tiny hole where it was, so we had to ensure that this design was functional and aesthetically pleasing at the same time. By adding the table into the space where an Island typically would go, we were able to both cut cost and still provide a dining experience. The Table serves as an Island as well when cooking.
We then proceeded to block in the existing doorway to the dining room. By doing this, we were able to create a full room which allowed us to put a door on the other side and called that room Bedroom #2. This was easier to do because all of the mechanicals were already in that space (light, heater and windows). By shifting things around, we also achieved a huge wall to wall closet from inside. PERFECT!
Then we moved into the Single bedroom. We thought it was a big room with a small closet, so by creatively adding an L shaped wall and steal some footprint into the bedroom side, we were able to put a door on that new room and design it for the walk-in closet. Even after this, the bedroom still holds a queen size bed with 2 night stands, a TV on the wall, a sitting chair and plenty of room to walk around. This was done by rethinking the location for the bed and night stands.
The bathroom was gutted to make sure there was no leaks and rebuild from the ground up. We kept all of the plumbing where it was, added a new vanity, medicine cabinet, tiles and lighting and it was done.
From there, the rest of the unit had new flooring all throughout, paint, and lighting. After completion and walk through, this project was handed over back to the clients.
Execution and collaboration between all the trades were: Reggie and his team from Premier Interiors and Rohan from RD Mechanical Services.
p.s. Please see our website to see the video.
 C.E. Pontz Sons
Dream backyard
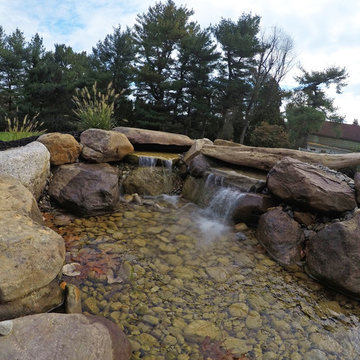
This Amazing Dream Backyard Project features just about all the options you have ever dreamed about having in your very own backyard. We just recently completed this project and as you can tell from the video and photos below it’s quite the dream backyard. But dreams can came true, and for these homeowners they certainly have. So proud of our team for coming together and installing another amazing backyard paradise. The outdoor living area features everything from fire to water and includes multiple travertine patio areas, flagstone and travertine walkways, stone steps, pondless waterfall, landscape lighting, outdoor audio, fire pit, and landscaping. To think were the project came from a decrepit old deck to this beautiful work of art is almost unreal!
Travertine Patio and Fire Pit
The dream backyard project included the installation of various hardscape items including travertine patio, Seating walls, Steps, and walkways. The patio material is silver travertine laid in French pattern. The patio area is approximately 1,012 sq ft with antiqued finish and natural edge. All walls and steps are constructed using natural stone Semco ‘Cedar Ridge’ sawn wall stone. Caps and stair treads are constructed of natural stone ‘Chateau Limestone’ 2″ thick and 14″ deep, thermal top and rock faced edges. Cap stone for grill wall is 18″ wide polished and sealed top. Under grill area the patio is outdoor ‘wood look’ porcelain tile. A Semco ‘Cedar Ridge’ 57″ Fire Pit with Large Zentro ‘Smokeless’ insert is installed on the lower patio area. As of these pictures and this video the fire pit insert has yet to be installed. Sealing of Travertine surfaces using GST stain blocking sealer will be completed once the project is entirely finished. Stepping stone pathway to the side of the home is full color Pa Flagstone irregular steppers.
Landscaping
Landscape beds, plants, trees, edging and mulching was done around the entire back and side yards of the home using triple cut bark mulch. Plant variety and size specifications were all chosen by our amazing designer Wes. The landscaping portion of this project also included the grading, lawn repair, and seeding of all the areas damaged and disturbed during construction.
Pondless Waterfall
A 15′ pondless waterfall was installed into the new landscape to the side of the lower patio for maximum viewing. The waterfall features approximately 15 foot of stream with multiple waterfalls. Two side by side spillways merge into a wide stream with a small waterfall before turning and going into the final falls at the basin area. The Waterfall is outfitted with low voltage LED underwater landscape lighting throughout.
Outdoor Sound
The Outdoor Sound System installed was a TRU Audio 4 speaker system and 12″ outdoor hardscape subwoofer. This system also includes the amplifier which is located in the home owners basement as well as Apple Airport Express and Blue Tooth Connection.
Siding
Siding work to be completed is still unfinished as of the time this video and pictures were shot. Siding was removed and salvaged in areas need for the patio and electrical work. Siding in areas of new outdoor living space to include: new vinyl siding on entire rear kitchen/bathroom wall from top to bottom as well as Piecing in around lights and sliding door on adjacent wall and in back of garage.
 Kate Roos Design LLC
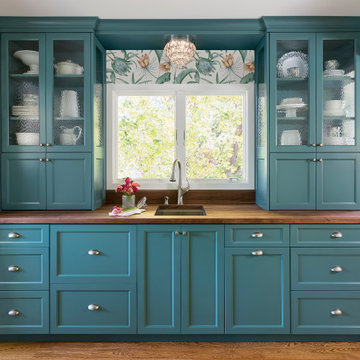
A modern take on a butler's pantry now fills the space that was formerly the kitchen. This colorful space not only provides a secondary prep area, complete with a bar sink and freezer drawers but it also includes airy, glass-doored cabinetry for displaying china.
 Dura Supreme Cabinetry
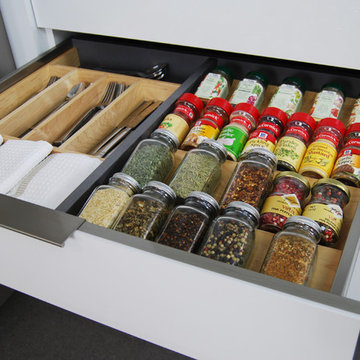
This contemporary kitchen features the NEW Stainless Steel Drawers and Roll-Out Shelves from Dura Supreme Cabinetry. The Bria (frameless) cabinets in Dura Supreme's "White" and Wired-Foil cabinets in Dura Supreme's "Wired-Mercury" are a great combination of cabinetry for creating the clean sleek look of this modern two-tone kitchen design.
Dura Supreme Cabinetry is excited to introduce NEW Stainless Steel Drawers and Roll-Out Shelves for their Bria Cabinetry (Frameless / Full-Access product line). For a limited time, this new metal drawer system is available exclusively from Dura Supreme as they partnered with Blum to be the first American manufacturer to bring it to market.
Dura Supreme’s Stainless Steel Drawers and Roll-Out Shelves are an attractive option for any kitchen design. Sleek, double-wall, stainless steel sides are only ½” thick and work with many of Dura Supreme’s wood drawer accessories, as well as the coordinating gray metal accessories designed specifically for Stainless Steel drawers. Concealed, undermount glides are integrated into the sides and are self-closing with a soft-close feature.
Our new Stainless Steel drawer option provides a contemporary alternative to our classic Maple dovetailed drawer. For homeowners that favor Transitional or Contemporary styling, this sleek, high-performance drawer system will be ideal!
Request a FREE Dura Supreme Brochure:
http://www.durasupreme.com/request-brochure
Find a Dura Supreme Showroom in your area:
http://www.durasupreme.com/dealer-locator
Want to become a Dura Supreme Dealer? Go to:
http://www.durasupreme.com/new-dealer-inquiry
To view a video and more info about this product go to: http://www.durasupreme.com/storage-solutions/stainless-steel-drawers-roll-outs
 RAJ Kitchen and Bath, LLC
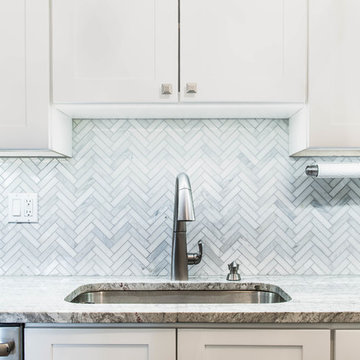
 “Full apartment design”.
IF you have not yet seen this apartment conversion before, we strongly urge you to go to the bottom left of this page and click on the short 2-minutes video. It would put a lot of things into perspective when you come back and continue reading this.
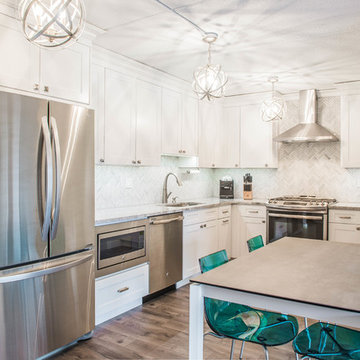
It is true we were literally handed the keys and told a list of things that they wanted to have happen and we were to go into the apartment, look at the space and come up with a design that would satisfy all of that need. UNTIL we showed up! The unit had really seen some better days but we knew we had to look past that and come up with a concept that would work for them.
The immediate challenges were centered around 3 big ideas:
1. Adding a second bedroom to the already small footprint
2. Figuring out a way to make the kitchen bigger, better and brighter
3. Creating a master room walk in closet
It’s always difficult to add new rooms into existing footprint without expanding out or up and not incurring any opportunity cost. In this case, that was exactly what we had to do. Item one and two above had to be tackled as one. We went ahead and switched out the location of the dining room and eliminating an area where there was a “nook” type eat-in area. By doing so, we were able to cut right into that footprint and change the layout of the kitchen.
That one move allowed us to dig into the kitchen design because it was now the main focal point in the apartment. It was no longer an option to keep it in that tiny hole where it was, so we had to ensure that this design was functional and aesthetically pleasing at the same time. By adding the table into the space where an Island typically would go, we were able to both cut cost and still provide a dining experience. The Table serves as an Island as well when cooking.
We then proceeded to block in the existing doorway to the dining room. By doing this, we were able to create a full room which allowed us to put a door on the other side and called that room Bedroom #2. This was easier to do because all of the mechanicals were already in that space (light, heater and windows). By shifting things around, we also achieved a huge wall to wall closet from inside. PERFECT!
Then we moved into the Single bedroom. We thought it was a big room with a small closet, so by creatively adding an L shaped wall and steal some footprint into the bedroom side, we were able to put a door on that new room and design it for the walk-in closet. Even after this, the bedroom still holds a queen size bed with 2 night stands, a TV on the wall, a sitting chair and plenty of room to walk around. This was done by rethinking the location for the bed and night stands.
The bathroom was gutted to make sure there was no leaks and rebuild from the ground up. We kept all of the plumbing where it was, added a new vanity, medicine cabinet, tiles and lighting and it was done.
From there, the rest of the unit had new flooring all throughout, paint, and lighting. After completion and walk through, this project was handed over back to the clients.
Execution and collaboration between all the trades were: Reggie and his team from Premier Interiors and Rohan from RD Mechanical Services.
p.s. Please see our website to see the video.
Sponsored
Columbus, OH
Hope Restoration & General Contracting
Columbus Design-Build, Kitchen & Bath Remodeling, Historic Renovations
 RAJ Kitchen and Bath, LLC
 “Full apartment design”.
IF you have not yet seen this apartment conversion before, we strongly urge you to go to the bottom left of this page and click on the short 2-minutes video. It would put a lot of things into perspective when you come back and continue reading this.
It is true we were literally handed the keys and told a list of things that they wanted to have happen and we were to go into the apartment, look at the space and come up with a design that would satisfy all of that need. UNTIL we showed up! The unit had really seen some better days but we knew we had to look past that and come up with a concept that would work for them.
The immediate challenges were centered around 3 big ideas:
1. Adding a second bedroom to the already small footprint
2. Figuring out a way to make the kitchen bigger, better and brighter
3. Creating a master room walk in closet
It’s always difficult to add new rooms into existing footprint without expanding out or up and not incurring any opportunity cost. In this case, that was exactly what we had to do. Item one and two above had to be tackled as one. We went ahead and switched out the location of the dining room and eliminating an area where there was a “nook” type eat-in area. By doing so, we were able to cut right into that footprint and change the layout of the kitchen.
That one move allowed us to dig into the kitchen design because it was now the main focal point in the apartment. It was no longer an option to keep it in that tiny hole where it was, so we had to ensure that this design was functional and aesthetically pleasing at the same time. By adding the table into the space where an Island typically would go, we were able to both cut cost and still provide a dining experience. The Table serves as an Island as well when cooking.
We then proceeded to block in the existing doorway to the dining room. By doing this, we were able to create a full room which allowed us to put a door on the other side and called that room Bedroom #2. This was easier to do because all of the mechanicals were already in that space (light, heater and windows). By shifting things around, we also achieved a huge wall to wall closet from inside. PERFECT!
Then we moved into the Single bedroom. We thought it was a big room with a small closet, so by creatively adding an L shaped wall and steal some footprint into the bedroom side, we were able to put a door on that new room and design it for the walk-in closet. Even after this, the bedroom still holds a queen size bed with 2 night stands, a TV on the wall, a sitting chair and plenty of room to walk around. This was done by rethinking the location for the bed and night stands.
The bathroom was gutted to make sure there was no leaks and rebuild from the ground up. We kept all of the plumbing where it was, added a new vanity, medicine cabinet, tiles and lighting and it was done.
From there, the rest of the unit had new flooring all throughout, paint, and lighting. After completion and walk through, this project was handed over back to the clients.
Execution and collaboration between all the trades were: Reggie and his team from Premier Interiors and Rohan from RD Mechanical Services.
p.s. Please see our website to see the video.
 RAJ Kitchen and Bath, LLC
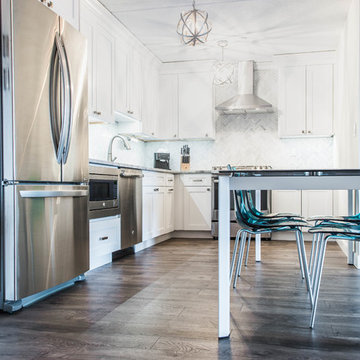
 “Full apartment design”.
IF you have not yet seen this apartment conversion before, we strongly urge you to go to the bottom left of this page and click on the short 2-minutes video. It would put a lot of things into perspective when you come back and continue reading this.
It is true we were literally handed the keys and told a list of things that they wanted to have happen and we were to go into the apartment, look at the space and come up with a design that would satisfy all of that need. UNTIL we showed up! The unit had really seen some better days but we knew we had to look past that and come up with a concept that would work for them.
The immediate challenges were centered around 3 big ideas:
1. Adding a second bedroom to the already small footprint
2. Figuring out a way to make the kitchen bigger, better and brighter
3. Creating a master room walk in closet
It’s always difficult to add new rooms into existing footprint without expanding out or up and not incurring any opportunity cost. In this case, that was exactly what we had to do. Item one and two above had to be tackled as one. We went ahead and switched out the location of the dining room and eliminating an area where there was a “nook” type eat-in area. By doing so, we were able to cut right into that footprint and change the layout of the kitchen.
That one move allowed us to dig into the kitchen design because it was now the main focal point in the apartment. It was no longer an option to keep it in that tiny hole where it was, so we had to ensure that this design was functional and aesthetically pleasing at the same time. By adding the table into the space where an Island typically would go, we were able to both cut cost and still provide a dining experience. The Table serves as an Island as well when cooking.
We then proceeded to block in the existing doorway to the dining room. By doing this, we were able to create a full room which allowed us to put a door on the other side and called that room Bedroom #2. This was easier to do because all of the mechanicals were already in that space (light, heater and windows). By shifting things around, we also achieved a huge wall to wall closet from inside. PERFECT!
Then we moved into the Single bedroom. We thought it was a big room with a small closet, so by creatively adding an L shaped wall and steal some footprint into the bedroom side, we were able to put a door on that new room and design it for the walk-in closet. Even after this, the bedroom still holds a queen size bed with 2 night stands, a TV on the wall, a sitting chair and plenty of room to walk around. This was done by rethinking the location for the bed and night stands.
The bathroom was gutted to make sure there was no leaks and rebuild from the ground up. We kept all of the plumbing where it was, added a new vanity, medicine cabinet, tiles and lighting and it was done.
From there, the rest of the unit had new flooring all throughout, paint, and lighting. After completion and walk through, this project was handed over back to the clients.
Execution and collaboration between all the trades were: Reggie and his team from Premier Interiors and Rohan from RD Mechanical Services.
p.s. Please see our website to see the video.
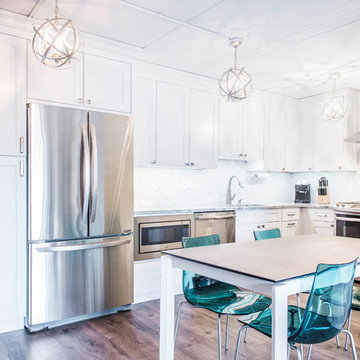 RAJ Kitchen and Bath, LLC
 “Full apartment design”.
IF you have not yet seen this apartment conversion before, we strongly urge you to go to the bottom left of this page and click on the short 2-minutes video. It would put a lot of things into perspective when you come back and continue reading this.
It is true we were literally handed the keys and told a list of things that they wanted to have happen and we were to go into the apartment, look at the space and come up with a design that would satisfy all of that need. UNTIL we showed up! The unit had really seen some better days but we knew we had to look past that and come up with a concept that would work for them.
The immediate challenges were centered around 3 big ideas:
1. Adding a second bedroom to the already small footprint
2. Figuring out a way to make the kitchen bigger, better and brighter
3. Creating a master room walk in closet
It’s always difficult to add new rooms into existing footprint without expanding out or up and not incurring any opportunity cost. In this case, that was exactly what we had to do. Item one and two above had to be tackled as one. We went ahead and switched out the location of the dining room and eliminating an area where there was a “nook” type eat-in area. By doing so, we were able to cut right into that footprint and change the layout of the kitchen.
That one move allowed us to dig into the kitchen design because it was now the main focal point in the apartment. It was no longer an option to keep it in that tiny hole where it was, so we had to ensure that this design was functional and aesthetically pleasing at the same time. By adding the table into the space where an Island typically would go, we were able to both cut cost and still provide a dining experience. The Table serves as an Island as well when cooking.
We then proceeded to block in the existing doorway to the dining room. By doing this, we were able to create a full room which allowed us to put a door on the other side and called that room Bedroom #2. This was easier to do because all of the mechanicals were already in that space (light, heater and windows). By shifting things around, we also achieved a huge wall to wall closet from inside. PERFECT!
Then we moved into the Single bedroom. We thought it was a big room with a small closet, so by creatively adding an L shaped wall and steal some footprint into the bedroom side, we were able to put a door on that new room and design it for the walk-in closet. Even after this, the bedroom still holds a queen size bed with 2 night stands, a TV on the wall, a sitting chair and plenty of room to walk around. This was done by rethinking the location for the bed and night stands.
The bathroom was gutted to make sure there was no leaks and rebuild from the ground up. We kept all of the plumbing where it was, added a new vanity, medicine cabinet, tiles and lighting and it was done.
From there, the rest of the unit had new flooring all throughout, paint, and lighting. After completion and walk through, this project was handed over back to the clients.
Execution and collaboration between all the trades were: Reggie and his team from Premier Interiors and Rohan from RD Mechanical Services.
p.s. Please see our website to see the video.
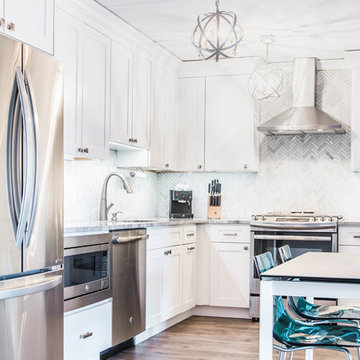 RAJ Kitchen and Bath, LLC
 “Full apartment design”.
IF you have not yet seen this apartment conversion before, we strongly urge you to go to the bottom left of this page and click on the short 2-minutes video. It would put a lot of things into perspective when you come back and continue reading this.
It is true we were literally handed the keys and told a list of things that they wanted to have happen and we were to go into the apartment, look at the space and come up with a design that would satisfy all of that need. UNTIL we showed up! The unit had really seen some better days but we knew we had to look past that and come up with a concept that would work for them.
The immediate challenges were centered around 3 big ideas:
1. Adding a second bedroom to the already small footprint
2. Figuring out a way to make the kitchen bigger, better and brighter
3. Creating a master room walk in closet
It’s always difficult to add new rooms into existing footprint without expanding out or up and not incurring any opportunity cost. In this case, that was exactly what we had to do. Item one and two above had to be tackled as one. We went ahead and switched out the location of the dining room and eliminating an area where there was a “nook” type eat-in area. By doing so, we were able to cut right into that footprint and change the layout of the kitchen.
That one move allowed us to dig into the kitchen design because it was now the main focal point in the apartment. It was no longer an option to keep it in that tiny hole where it was, so we had to ensure that this design was functional and aesthetically pleasing at the same time. By adding the table into the space where an Island typically would go, we were able to both cut cost and still provide a dining experience. The Table serves as an Island as well when cooking.
We then proceeded to block in the existing doorway to the dining room. By doing this, we were able to create a full room which allowed us to put a door on the other side and called that room Bedroom #2. This was easier to do because all of the mechanicals were already in that space (light, heater and windows). By shifting things around, we also achieved a huge wall to wall closet from inside. PERFECT!
Then we moved into the Single bedroom. We thought it was a big room with a small closet, so by creatively adding an L shaped wall and steal some footprint into the bedroom side, we were able to put a door on that new room and design it for the walk-in closet. Even after this, the bedroom still holds a queen size bed with 2 night stands, a TV on the wall, a sitting chair and plenty of room to walk around. This was done by rethinking the location for the bed and night stands.
The bathroom was gutted to make sure there was no leaks and rebuild from the ground up. We kept all of the plumbing where it was, added a new vanity, medicine cabinet, tiles and lighting and it was done.
From there, the rest of the unit had new flooring all throughout, paint, and lighting. After completion and walk through, this project was handed over back to the clients.
Execution and collaboration between all the trades were: Reggie and his team from Premier Interiors and Rohan from RD Mechanical Services.
p.s. Please see our website to see the video.
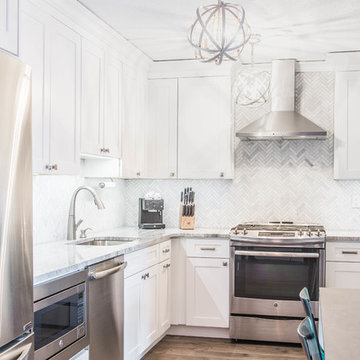 RAJ Kitchen and Bath, LLC
 “Full apartment design”.
IF you have not yet seen this apartment conversion before, we strongly urge you to go to the bottom left of this page and click on the short 2-minutes video. It would put a lot of things into perspective when you come back and continue reading this.
It is true we were literally handed the keys and told a list of things that they wanted to have happen and we were to go into the apartment, look at the space and come up with a design that would satisfy all of that need. UNTIL we showed up! The unit had really seen some better days but we knew we had to look past that and come up with a concept that would work for them.
The immediate challenges were centered around 3 big ideas:
1. Adding a second bedroom to the already small footprint
2. Figuring out a way to make the kitchen bigger, better and brighter
3. Creating a master room walk in closet
It’s always difficult to add new rooms into existing footprint without expanding out or up and not incurring any opportunity cost. In this case, that was exactly what we had to do. Item one and two above had to be tackled as one. We went ahead and switched out the location of the dining room and eliminating an area where there was a “nook” type eat-in area. By doing so, we were able to cut right into that footprint and change the layout of the kitchen.
That one move allowed us to dig into the kitchen design because it was now the main focal point in the apartment. It was no longer an option to keep it in that tiny hole where it was, so we had to ensure that this design was functional and aesthetically pleasing at the same time. By adding the table into the space where an Island typically would go, we were able to both cut cost and still provide a dining experience. The Table serves as an Island as well when cooking.
We then proceeded to block in the existing doorway to the dining room. By doing this, we were able to create a full room which allowed us to put a door on the other side and called that room Bedroom #2. This was easier to do because all of the mechanicals were already in that space (light, heater and windows). By shifting things around, we also achieved a huge wall to wall closet from inside. PERFECT!
Then we moved into the Single bedroom. We thought it was a big room with a small closet, so by creatively adding an L shaped wall and steal some footprint into the bedroom side, we were able to put a door on that new room and design it for the walk-in closet. Even after this, the bedroom still holds a queen size bed with 2 night stands, a TV on the wall, a sitting chair and plenty of room to walk around. This was done by rethinking the location for the bed and night stands.
The bathroom was gutted to make sure there was no leaks and rebuild from the ground up. We kept all of the plumbing where it was, added a new vanity, medicine cabinet, tiles and lighting and it was done.
From there, the rest of the unit had new flooring all throughout, paint, and lighting. After completion and walk through, this project was handed over back to the clients.
Execution and collaboration between all the trades were: Reggie and his team from Premier Interiors and Rohan from RD Mechanical Services.
p.s. Please see our website to see the video.
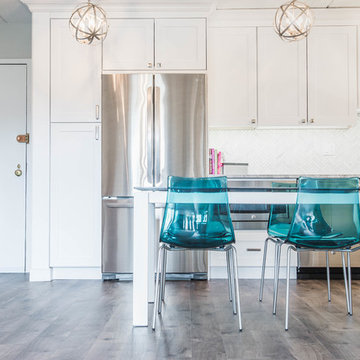 RAJ Kitchen and Bath, LLC
 “Full apartment design”.
IF you have not yet seen this apartment conversion before, we strongly urge you to go to the bottom left of this page and click on the short 2-minutes video. It would put a lot of things into perspective when you come back and continue reading this.
It is true we were literally handed the keys and told a list of things that they wanted to have happen and we were to go into the apartment, look at the space and come up with a design that would satisfy all of that need. UNTIL we showed up! The unit had really seen some better days but we knew we had to look past that and come up with a concept that would work for them.
The immediate challenges were centered around 3 big ideas:
1. Adding a second bedroom to the already small footprint
2. Figuring out a way to make the kitchen bigger, better and brighter
3. Creating a master room walk in closet
It’s always difficult to add new rooms into existing footprint without expanding out or up and not incurring any opportunity cost. In this case, that was exactly what we had to do. Item one and two above had to be tackled as one. We went ahead and switched out the location of the dining room and eliminating an area where there was a “nook” type eat-in area. By doing so, we were able to cut right into that footprint and change the layout of the kitchen.
That one move allowed us to dig into the kitchen design because it was now the main focal point in the apartment. It was no longer an option to keep it in that tiny hole where it was, so we had to ensure that this design was functional and aesthetically pleasing at the same time. By adding the table into the space where an Island typically would go, we were able to both cut cost and still provide a dining experience. The Table serves as an Island as well when cooking.
We then proceeded to block in the existing doorway to the dining room. By doing this, we were able to create a full room which allowed us to put a door on the other side and called that room Bedroom #2. This was easier to do because all of the mechanicals were already in that space (light, heater and windows). By shifting things around, we also achieved a huge wall to wall closet from inside. PERFECT!
Then we moved into the Single bedroom. We thought it was a big room with a small closet, so by creatively adding an L shaped wall and steal some footprint into the bedroom side, we were able to put a door on that new room and design it for the walk-in closet. Even after this, the bedroom still holds a queen size bed with 2 night stands, a TV on the wall, a sitting chair and plenty of room to walk around. This was done by rethinking the location for the bed and night stands.
The bathroom was gutted to make sure there was no leaks and rebuild from the ground up. We kept all of the plumbing where it was, added a new vanity, medicine cabinet, tiles and lighting and it was done.
From there, the rest of the unit had new flooring all throughout, paint, and lighting. After completion and walk through, this project was handed over back to the clients.
Execution and collaboration between all the trades were: Reggie and his team from Premier Interiors and Rohan from RD Mechanical Services.
p.s. Please see our website to see the video.
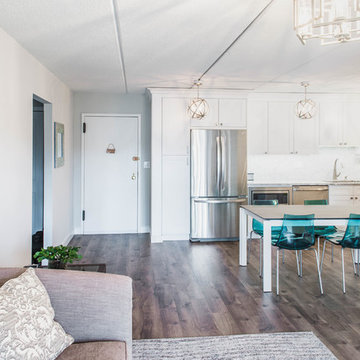 RAJ Kitchen and Bath, LLC
 “Full apartment design”.
IF you have not yet seen this apartment conversion before, we strongly urge you to go to the bottom left of this page and click on the short 2-minutes video. It would put a lot of things into perspective when you come back and continue reading this.
It is true we were literally handed the keys and told a list of things that they wanted to have happen and we were to go into the apartment, look at the space and come up with a design that would satisfy all of that need. UNTIL we showed up! The unit had really seen some better days but we knew we had to look past that and come up with a concept that would work for them.
The immediate challenges were centered around 3 big ideas:
1. Adding a second bedroom to the already small footprint
2. Figuring out a way to make the kitchen bigger, better and brighter
3. Creating a master room walk in closet
It’s always difficult to add new rooms into existing footprint without expanding out or up and not incurring any opportunity cost. In this case, that was exactly what we had to do. Item one and two above had to be tackled as one. We went ahead and switched out the location of the dining room and eliminating an area where there was a “nook” type eat-in area. By doing so, we were able to cut right into that footprint and change the layout of the kitchen.
That one move allowed us to dig into the kitchen design because it was now the main focal point in the apartment. It was no longer an option to keep it in that tiny hole where it was, so we had to ensure that this design was functional and aesthetically pleasing at the same time. By adding the table into the space where an Island typically would go, we were able to both cut cost and still provide a dining experience. The Table serves as an Island as well when cooking.
We then proceeded to block in the existing doorway to the dining room. By doing this, we were able to create a full room which allowed us to put a door on the other side and called that room Bedroom #2. This was easier to do because all of the mechanicals were already in that space (light, heater and windows). By shifting things around, we also achieved a huge wall to wall closet from inside. PERFECT!
Then we moved into the Single bedroom. We thought it was a big room with a small closet, so by creatively adding an L shaped wall and steal some footprint into the bedroom side, we were able to put a door on that new room and design it for the walk-in closet. Even after this, the bedroom still holds a queen size bed with 2 night stands, a TV on the wall, a sitting chair and plenty of room to walk around. This was done by rethinking the location for the bed and night stands.
The bathroom was gutted to make sure there was no leaks and rebuild from the ground up. We kept all of the plumbing where it was, added a new vanity, medicine cabinet, tiles and lighting and it was done.
From there, the rest of the unit had new flooring all throughout, paint, and lighting. After completion and walk through, this project was handed over back to the clients.
Execution and collaboration between all the trades were: Reggie and his team from Premier Interiors and Rohan from RD Mechanical Services.
p.s. Please see our website to see the video.
13