Software
Houzz Logo Print
renaissancekitchenandhome

How did you set the drain against the wall?

When you say to pack out the wall after the drain is set, do you mean to pack the wall out after you put in the liner. How do you pack out te wall on top of the liner? Can you show me a diagram?

Torry Manzo
Shower Picture · More Info

Comments (16)

  • PRO
    14 years ago
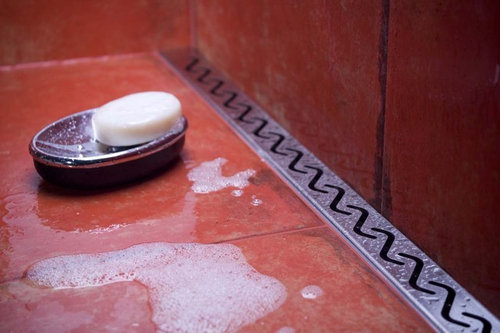
    Quick Drain is unique in that the channel IS ALSO THE DRAIN. Most other brands still drain into a standard round shower drain which sets the drain a couple of inches off the wall. Www.quickdrainusa.com
  • PRO
    14 years ago
    Plumbed Elegance - many of the linear drain out there are also primary drains. ACO, CeraLine and Schluter all make primary linear drains as well as Proline.

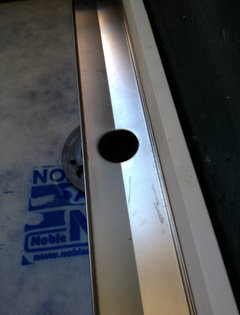
    Using a smaller clamping drain you can still achieve this look. Most times I use the "Baby Blue" drain by Watts as my primary shower drain and with this installed a hair off of the framing I can set the other 'Non-primary' lineaer drains in this same set up (drain on back wall).

    The key is getting and using a smaller clamping drain. This installation is a commercial project so below the plastic (PVC) top collar sits a cast iron drain body.

    The white board in this picture is a 5/8" baseboard and represents the thickness of the final tile installed.

    JW
  • PRO
    14 years ago
    My understanding is that ACO and ceraline still fit into a standard shower drain. Your installation certainly addresses this issue. The Quickdrain just fits into a 2" no hub. Am I off on my understanding? I am a retailer, not an installer so your input is very welcome.
  • PRO
    14 years ago
    last modified: 14 years ago
    Yes the Quick Drain connects to the home via a 2" no-hub fitting. The Quick Drain is the primary shower drain and does not require a second drain. The ACO drain shown above is what ACO calls a plain edge and requires the use of a primary shower drain (clamping drain).

    The linear channel body and strainer no more than a glorified strainer and grill. ACO does make a flanged version that is an approved primary drain. Personally I don't care for that design and prefer using the ACO plain edge with an approved primary clamping drain.

    CeraLine's linear drain from California Faucets can be installed as a primary if a liquid membrane like Hydro Ban is used to waterproof the shower and is tied into their textured flange (on their linear drain's perimeter). The installation instructions showed both versions last time I looked online for a client. This step can be skipped if the drain is installed over a primary clamping drain.

    Once the waterproofing is installed a flood or leak test needs to be preformed. When the test is over all water should drain away. Check for puddles near the drain and near the wall. These shallow spots can make those areas appear wet long after a shower floor has dried.

    A clamping drain needs it's weep holes keep clear of mortar. Using a weep hole protector, candle wick or pea gravel can ensure the drain preforms well.

    With a topical membrane system (Kerdi, Proline, Noble Company) it is important to remember that the weeping system is designed so that water travels down along the membrane towards the drain. Do not silicone or chaulk this after the tile & grout installation as this can dam the water trying to exit your shower.
  • PRO
    14 years ago
    Thanks for the explanation of the various drains on the market. I will go back to my manufacturers and have some samples sent to my showroom. You have obviously done your homework here.


    Thanks again


    Torry. Manzo
    Renaissance Kitchen and Hoome
  • PRO
    14 years ago
    I REALLY appreciate this thorough explanation. We sell all three and I am frequently asked installation questions. The more I know, the greater my value is. Again, tha k you for taking the time to be so thorough. I will read this again a few more times to make sure I understand completely. By the way, Quick Drain has a traveling trailer and it's going to be visiting our showroom in Santa Cruz, CA in late October when we will offer a Lunch and Learn for our local plumbers and tile setters. Perhaps it may be stopping in your neck of the woods?
  • PRO
    14 years ago
    I was at the showroom in Denver where the trailer was getting made. Last I saw it it was just a frame and some plywood. Josef tells me it will be coming to Vancouver - but I'm not sure when.
  • PRO
    14 years ago
    Neat!
  • 12 years ago
    Mr. Whipple, Why do you like Quick Drain USA, when compared to Schluter, or Noble linear tile drains and premade and preloped shower pans? What is the price and or ease of installation? Im a homeowner wanting the most straight forward install
  • PRO
    12 years ago
    The Proline was my top favourite for a few years. After installing so many of these linear drains I decided ACO was the best of the best - now I only sell these ACO drains. The Proline drain is a good one, so is the Schluter but they have a couple set backs and it's harder to find a skilled enough installer to put them in properly.

    The ACO linear drains (plain edge design) works with ANY waterproofing system. This and after a year of service is the nicest t look at and easiest to clean.
  • 12 years ago
    One of the things that has puzzled me about the install of a "plain edge" linear drain (ie not as a primary drain, but as a glorified strainer) is how to get the primary clamping drain close enough to the wall. I donated to John's site http://no-curb.blogspot.ca/ and had a very useful conversation with him that got me going in the right direction.

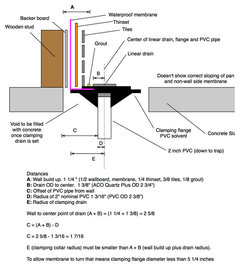
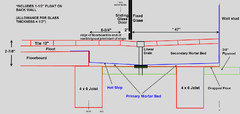
    I drew this up in the attached pic, showing the different distances. I can't see how it works with a clamping drain larger than 5 1/4 inches.

    John, above, mentions the Watts "Baby Blue" clamping drain:

    http://media.wattswater.com/ES-WD-WSD-SQ-NB-CAN.pdf

    but those are not available in the US. Watt's online documentation doesn't show the width of the top of the clamping drain, but it appears to be something like 4 1/2"? That is a lot smaller than the standard clamping drains which are something like 6 1/2 inches wide (e.g. the Sioux Chief sold at Home Depot). This makes them too large when trying to set the linear drain right against the wall.

    This is because you want the outside of the linear drain to rest up against the tile on the wall (or rather to have 1/8 flexible grout joint). The tile build up off the studs is something like 1 1/8 (1/2 board, membrane, 1/4 thinset, 3/8 tile), grout is 1/8, and the drain itself is something like 2 3/4 wide (using the ACO Quartz Plus as an example). Half the drain width is therefore 1 3/8, which means you want to place the center of the clamping drain 2 5/8 inches off the studs (1 1/8 wall build up, 1/8 grout joint and 1 3/8 of the linear drain). A standard clamping drain isn't going to fit (half of 6 1/2 being 3 1/4 which is greater than 2 5/8.)

    With John's suggestion I found the Zurn FD 2250 clamping drain which has a total width of 5". That should be able to be placed with its center at 2 5/8 from the wall. Given that the OD of 2" PVC is 2 3/8 that means leaving 1 7/16 inch between the pipe and the studs. Call it 1 1/2" :)

    http://www.zurn.com/Pages/ProductDetails.aspx?NodeKey=374195 Ferguson Pluming was able to order one in for me for $35 including shipping to my house. Ferguson's product code (for PVC to connect to 2" pipe) is ZFD2250PV2PB (it's not listed on their site, but they can order it). One should probably make up an example of the wall build up (John suggested cutting a tile into quarters then setting factory edges together to assessing crowning), to be sure of the size of the final wall build up.

    Hope that helps anyone struggling to figure out how to do a wall placement of a linear drain using a clamping drain.

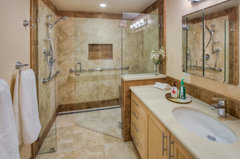
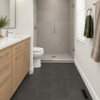
    Of course another option is not to set the damn thing right against the wall … and have a small tile between the wall and the linear drain, as in this pic:

    HOUSEWORKS Universal Design First Floor/Garage Remodel · More Info
  • PRO
    12 years ago
    The Baby Blue by watts is a two piece clamping drain. The drain base is cast iron so it's great for all multi family housing projects. The drain measures about 5.25" across the top.

    Perfect for a tight to wall application.

    Glad you worked it out. Glad I can help. Thank You so much for your donation!!! JW
  • 11 years ago

    Hello Mr. Whipple. Do you have any experience with the installation of the infinity drains, especially with the S-AG10048 against the wall on concrete slap (heating tubes 2 1/8 below the level concrete?) Any recommendations are truly appreciated, our contractors are hesitant and want to talk us into a curbed shower. Thank you so much, Gabriele

  • 11 years ago

    Hi, Thanks for all the helpful information! About building a drain along the wall, my contractor didn't make the outside edge of the linear drain to rest up against the tile on the wall, but left a 1/4 space between the drain edge and the tile. What would you recommend us to do with this gap? Thanks very much!

  • 8 years ago

    Hello John, I'm really struggling to find any site or way in which to contact you, hoping this thread is still living! I have spent countless hours researching the linear drains and am at my wits end! Bathroom floor is dropped in a 56-1/4" x 90" area ready for this project. I need to place the drain as a barrier by the entry way spanning the entire 90". Cannot go against back wall easily because of joist limitation.Tile will be sloped in from either 2" or 14" outside of the shower then up to the back wall, drawing NOT to scale! I will have wedge wire grate and two 2" ABS outlets in to a 3" ABS drain, so not overly concerned about the flooding the bathroom issue. My main dilemma is how to terminate the linear at each wall. I saw your photos in another forum and saw how you tiled in to the drain channel by cutting a 'tab' on the bottom of the tile. In order to do this could the entire floor and drain be finished first with channel extended about 3/4" past the intended area of finished wall? Silicone caulk the drain at each end. Then the walls could be floated in and the tab cut on the bottom of the two opposite tiles that would sit in the channel. Floor will be hot mopped (I'm in California), walls lath and mortar, and the floor also floated outside of shower area. I'm on a wooden sub floor obviously. Finally, I have narrowed my options down to site sizable QM Delmar or the DERA-Line. Both have pros and cons, do you have any advice as in 'stay away from' or pointers re these two drains? I realise the DERA is cheaper, 304 S/S as opposed to 316. The DERA is custom made to exact length or I may not even be asking the question about the walls. I'm leaning in the DERA direction because price is getting high and the wife is pushing to avoid linear, which would pain me after getting this close. The Dera is coming in around $1100 vs $1500.

    I thoroughly appreciate any advice or guidance you are willing to give, I'm sure you are a busy guy. Thanks very much in advance.