LESSON THREE: FINISHING YOUR BUTTERFLY PROJECT
Okay, now that youve sewn your redwork project and added a few embellishments, itÂs time to finish your project!
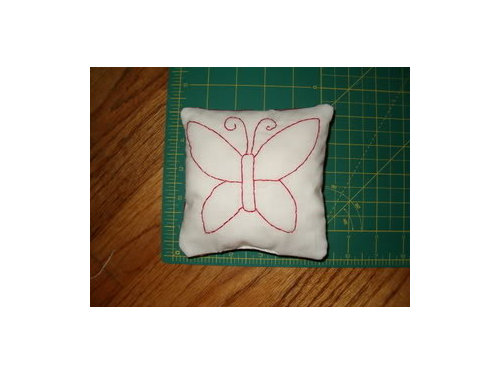
FINISHING AS A PIN CUSHION
STEP ONE: IRON YOUR QUILT BLOCK.
Gently iron the block face down on a towel. This will get rid of the hoop lines. If you have colored with crayon embellishments be sure to heat set the crayon by ironing over the design front and back, using a paper towel to absorb the wax.
STEP TWO: TRIM THE BLOCK
Trim the block to 6" square, centering the design. If you have used batting, cut the batting and block together. For those who have chosen a different design than the butterfly, be sure to leave at least half an inch seam allowance around the design when trimming.
STEP THREE: CUT THE BACKING
Choose a complementary backing fabric and cut a 6" square.
STEP FOUR: SEW THE BACKING AND BLOCK TOGETHER
Sew right sides together with a ½" seam, making sure to leave an opening at the bottom to turn right side out. Remember to lock stitches at beginning and end of sewing. Clip corners and turn right side out. Poke the corners with a chopstick or other tool to get the corners as square as possible. Iron to make the seams crisp. Fill with polyfil, crushed walnut shells (available at pet stores and some quilt shops), cotton balls, leftover batting, etc. Whip stitch the bottom opening shut.
STEP FIVE: ADMIRE YOUR FINISHED PIN CUSHION!
Great job!
ALTERNATE: FINISHING AS AN ORNAMENT
Follow Steps One through Five (you can still admire your work after adding the hanger!).
STEP SIX: ADDING THE HANGER
Cut a 12" length of 6 strands of embroidery floss in a complementary color. Thread through a needle and pull through both layers of top of ornament and tie off ends in a knot, trimming off any excess thread. Thin ribbon, yarn or cording can also be used, just be sure to have a needle with eye large enough to pull thread through. An alternate technique, cut a 24" thread. Tape one end to the table and twist and twist, holding onto the other end. Once the thread is twisted, let the end go, and the threads will double up and twist on themselves. Thread the twisted thread through a needle and pull through both layers at the top of the ornament. Tie in a knot and trim excess thread. This makes a pretty double twisty hanger.
An alternate technique is to catch a loop of cording into the seam as you sew the block and backing together in Step Four.
OTHER IDEAS FOR FINISHING
Now that youÂve completed your Redwork block, you can make the finished project your own, add piping or sashing fabrics rather than making the pin cushion/ornament as outlined. Or how about making a pillow by adding a larger border around the block? Or use the block as the focus block in a star or other larger design. Make extra Redwork blocks and sash them together in a small wall hanging. The butterfly website also provides an idea for a finished project.
CLASS DISMISSED!
I hope that you have enjoyed learning more about Redwork and that some of you have been inspired to try something new. Remember, any design with straight lines can be used for Redwork: appliqué designs, coloring books, rubber stamps, even a childÂs drawing. ItÂs a fun and fast way to make a beautiful project, and by combining a variety of stitches, embellishments and colors, you can make any project uniquely yours.
Please share your finished projects on the August Redwork Class Show and Tell thread.
Thanks for sewing along! --Amy








deannabsd
new2quiltingOriginal Author
Related Professionals
Fort Wayne Furniture & Accessories · San Bernardino Furniture & Accessories · Gainesville Interior Designers & Decorators · Athens Interior Designers & Decorators · Atlantic City Interior Designers & Decorators · Enid Interior Designers & Decorators · Norfolk Interior Designers & Decorators · Hot Springs Flooring Contractors · Salisbury Flooring Contractors · Oxford Flooring Contractors · Cincinnati Flooring Contractors · Williamsburg Flooring Contractors · Kankakee Flooring Contractors · Youngstown Flooring Contractors · Chico Flooring Contractorsfatquarters
fatquarters
new2quiltingOriginal Author