Software
Houzz Logo Print
buddyluv

Need help with furniture plan for small cabin

13 years ago
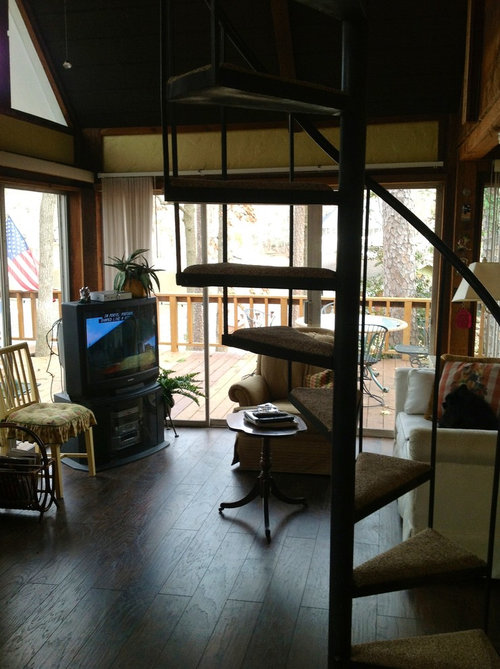
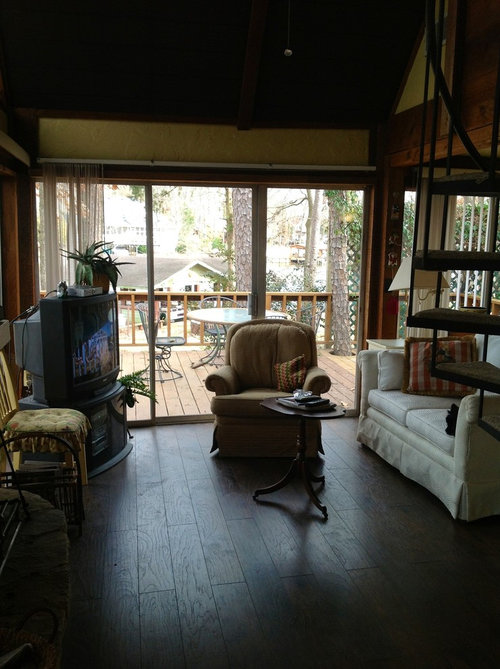
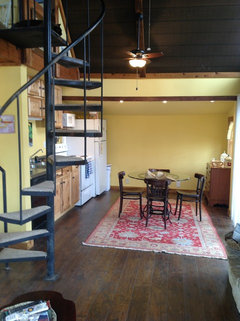
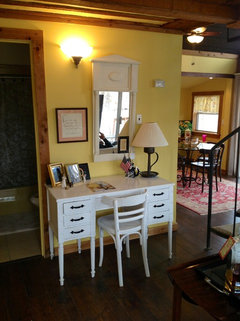
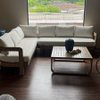
This is a small one bedroom cabin next to my home that is a guest house. I am in need of suggestions as to what I can do for seating in this small area. There is a circular staircase that handicaps the space. Thank you for any thoughts and ideas.

Comments (23)

  • 13 years ago
    Questions first... How many people do you need to accommodate? What does the other end of the room look like? Do you have a floor plan or sketch?
  • 13 years ago
    I might snug the chair and the table in the center up under the staircase somewhat, along with some potted plants. A large area rug to snug under the front feet of the sofa would look nice - pattern and color, please. Remove the dining chair and if you need more seating try a swivel armchair that can turn to watch tv or to converse with others. Without enough photos and proper lighting it is hard to advise.
  • 13 years ago
    I'll upload another photo, I have snugged the chair up there before, but it kinds of cuts off pathway between living area and kitchen . Thx
  • 13 years ago
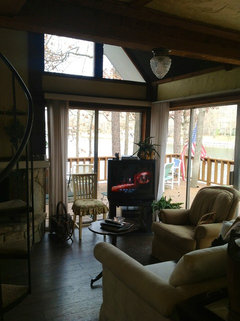
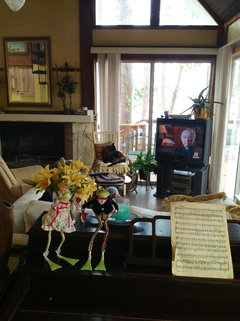
    I don't have a sketch, but maybe these other photos would help, I'd like to be able to accommodate around 4
  • 13 years ago
    great cabin and beautiful view!
  • 13 years ago
    More Picts of the room
  • PRO
    13 years ago
    My one and only comment: The asian rug is too big for the space. It would be better to have a circular or oval carpet. This one makes it look like the dining area is trying to steal into the living space!

    I would also remove the little chair beside the TV and replace it with a bench or ottoman. The space is very pretty and you have everything you need, it just needs a bit of regulation.
  • 13 years ago
    Thx and I see that now about the rug , and yes, I was trying to get an extra seat in there. Thanks for your suggestions!
  • 13 years ago
    You r amazing. I can't tell you how many times I have read read reread your thoughtful comments. I want to thank you for your input. I have already moved the rug over to the " seating area", which looks better, and moved the yellow chair to the bath, moved a black chair to the desk, which made the white desk pop. I had some friends over today and they loved the changes, too. And we are planning on painting the kitchen chairs soon. Thank so much, you are very inspiring!
  • PRO
    13 years ago
    I love my cabin and enjoy the relaxed feel you get being there. I would have a daybed where you can nap or use for extra sleeping area when guest over flow the house. I would also have 4 club chairs around a leather ottoman for comfortable conversation.
  • 13 years ago
    Glad to help. If you do not sew and budget is limited then for drapery panels you can go to a big box depot or lumber store and buy 1 - 1 1/2 inch dowels in longer lengths. (You can also screw them together to make them longer by getting a connection that has screw threads on each end.) You just use the double end screw to join the dowels together and voila! you have an extra long "drapery rod". Make sure you support the joint with a bracket. Paint them the same colour as your walls. Then hang them on "L" brackets or use drapery hardware. For end finials, if not on sale at a fabric store, then go to the lumber fencing dept. Pick up some, (smaller size) square or round 'caps' that sit on top of exterior fence posts. Screw them into the ends of each hanging dowel...but paint them the same colour as the dowels first. Now your drapery rods are up and the cost for ALL of your doors and windows should be less than $100. Except kitchen window should not have full length drapery panels.
    Now for the drapery panels. You want them to cover the louvre blinds when the blinds are pulled back and of course to have that 'finished' look to your wonderful guest house. If you or a friend has a sewing machine and can sew a straight line then it will be easier to make the drapery panels. If not, then we can improvise. Measure the distance from the top of your drapery rod to the floor then add 6" (for a 3" hem and 3" turn-under for around the drapery rod). Make sure material is not too heavy...you want fabric that will drape nicely, but economical. You will need two or three lengths (distance from the floor to rod +6") of material for each drapery panel placement.
    There are tons of options now. Since the drapery will be stationary, only your louvre blinds will open & close, you can get out the staple gun, the hot glue gun, duct tape, Velcro, pins, tacks, etc. to fasten the material to the dowel rods. To give some flow to the panels you need fullness. you can gather the material or use drapery header sewing notions. but the easiest for non sewers is to make small pleats. This is done by making small (1 to 2") pleats on the dowels. As you form a pleat you staple the material to the dowel. (Staple to back of dowel so you will not see the staples when finished) And continue until you have reached the width of your material. At this point you hang up the rod you are working with. Your partial panel is hanging from the dowel and the rest of the material is piled on the floor. Are your pulled back louvre blinds still showing? If so you now need to cut your fabric at the floor leaving 3" for a hem. Then repeat the process, ensuring this first new pleat overlaps the last pleat you already made. This will hide the fact you did not sew the panels together. Note; the smaller the pleat the fuller the panel will drape...but the more material you will need. That is why you may need two or three panels of material for each drapery. You can always practice using an old bed sheet cut to the width of the material you plan on buying. Then you will know if you need to buy two or three widths of material for each panel. Which reminds me... When the material was too expensive, I have used bed sheets that were on sale. Usually a variety of patterns and colours available. And maybe your floor to dowel measurement is close to the bed sheet length...just another option.
    I hope you are still with me!
    Now the hem. Again there are several alternatives. You can turn the material under 1/2" , then press with iron. Now fold up material until hem barely touches floor & pin in place. You can use iron-on hemming tape, sew, or hot glue hem in place. Double sided carpet tape also works. Place material on ironing board or table to do this.
    An even easier way to make a full length hem is to use "pinking" scissors and cut the material the panel length you need. Only pinking shears work, otherwise you will have the material fray, or need to treat the ends of the fabric...more work. The fuller the drape and/or the busier the pattern, the less likely anyone will notice a pinking shear hem. I hope I have help you tackle a DIY. I am waiting for you to ask what "painting a colour block" is... If you already know then you will certainly possess the skills for future DIY projects. Good luck. My email is mapeggy208@gmail.com. Peggy
  • 13 years ago
    Peggy, I am of that group that you have probably heard of, "if I did it myself, it looks like I did it myself"., oh and and what is "color blocking"? I thought you meant to paint that wall a different color! You are definitely inspiring me!
  • 13 years ago
    Yes, you can paint that wall (I suggest the same colour as the sofa cover) and since it is such a short wall it would work. But colour blocking is making a square, rectangle or any shape around an object or a group of objects. For example I was referring to painting the area around your mirror a different colour than the wall. You would measure out 6"- 10" around your mirror on all sides and paint that entire (rectangle in your case) a different colour than the wall. Colour blocking adds a punch of colour without having to paint the entire wall. It also highlights what is inside the painted area. After painting you put your mirror back up and all that shows is the boarder around the mirror. Doing it this way will allow you to change the wall with different objects without having to repaint or change your 'whole house' paint scheme of yellow. Of course, you can do colour blocking without having any objects to highlight. This is often done when you use 3 or more colours on a wall and you normally want to make a "graphic statement" done by paint. Since you are in the USA look up 'color blocking' on google and you will get many examples. And I forgot to mention... when you paint the kitchen chairs...DO NOT paint the legs of the table. Leave the legs dark. This will blend in with the floor colour and look visually less busy... Peggy
  • 13 years ago
    R u speaking of color blocking behind the white mirror? The sofa is actually white, it prob looked blue in one of the pictures. I've been looking for a slipcover for it. The table has black wrought iron legs. What color do u think I should paint the kitchen chairs? Thx, Dottie
  • 13 years ago
    When you pick out the drapery fabric you can take a colour from it for the chairs. Depends how much light the room gets. Too many bright Colours will make it look like a child's play room..too dark is dull. My choices are either barn red or soft white (not bright Snow White). Your appliances are quite noticeable, so more white in the room will actually lessen the visual impact of them. Or you can pick a classic barn red which will connect the red rug in the seating area to visually pull the rooms together. On Houzz, under ideabooks, Sarah Greenman posted the instructions for painting wood chairs. Take a read on how and what materials she used.

    The sofa cannot stay white, it needs a colour. I suggest blue...light beach to navy, or somewhere in between. Even blue and white (cream) stripes will work. Then your chair paint can compliment the sofa colour. (That's why you see people carrying swatches of fabric, paint chips, pillows, wood, floor tile with them at all times...when they find that perfect match they buy it, but not before).

    Yes, colour block around the mirror, painting the outside covering of all wall mechanics. If the wall is relatively small you can paint the whole wall. but be careful, we do not want the blue colour to be a focal point...just a spot of colour in the whole scheme. You need to spread colour around the whole area, to have a cohesive look.

    Another thought! Is there a patio door on the left side of the fireplace? Is there room for the TV to be located there with a box built around it, so you can not see the back side? Moving the TV would give better seating at the front windows, while enabling more people to sit and watch TV.

    If not, then consider making the main entrance at the side (kitchen patio doors) and the sliding door at the front (beside your piano) as the secondary entrance. This will stop main traffic thru your seating area. It will also function better for grilling, carrying food thru house and good traffic flow to reach washroom. Peggy
  • 13 years ago
    Dottie, look up www.surefit.net. The have reasonable prices and lots of slip cover choices. Peggy
  • 13 years ago
    I have looked at them, there are some waverly products, that looked good, one was moonstone, Nd one cardoman , ones on the blue side and one on the golden end. But the others were just plain.do u think that would be better?
  • 13 years ago
    The light in the room is strong due to the room is surrounded by sliding glass doors
  • 13 years ago
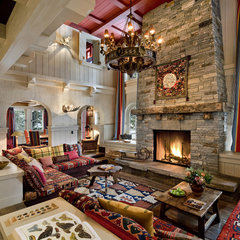
    Dottie. Examine this picture. Notice how colour is spread around. Tall ceiling is classic barn red. Done to tie ceiling and floor closer together in a tall room. Notice variety of patters. Notice stripes on drapery panels. Notice sleigh on hearth..could change for seasons. Notice wood coffee table ( easy for DIY). All fabric and patterns have similar "weight". No frilly things or sheers here. Few objects but each substantial in size. They use box etches at windows for sitting, display and storage. Also count the nimber of times yellow is used. Where is the blue? And red? Feel the balance of the Colours around the room, and into the adjoining spaces? This fireplace is a monster. But with enough variety of fabric Colours and patterns, on the other side, it "weights" visually to the eye and the room seems balanced. Hope this helps. Peggy

    Alpine Ski Chalet, Norden, California · More Info


    The Surefit patterns you picked are Scottish and old English design. Did you want to move away from the casual "water" theme? They are for English cottage. It will require lots of busy patterns (about 5) in each room. How comfortable will you be with these florals and birds sitting on the patterned rug? Then adding screen color in back of sofa, then having patterned drapes? The architecture of your guest house is not quite "English". But we can make anything work...you just have to make a decision what style and theme you want. If you decide that, then do not deviate from it. Otherwise every thing else including the colour of the kitchen chairs will need to change.. Do the surefit patterns say beachy, fun, and water to you? Let me know? Peggy
  • 13 years ago
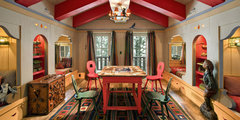
    Dottie last picture, I promise. I found this picture and it seems to be the dining area of the previous picture. Designer is john Malik from cA. Notice ceiling beam colour. Notice painted chairs. Always have 'unique' piece in every room..carved box on left side..great for built in bedding storage. Notice wood walls have been painted...Most men scream about this, but it makes huge differece to 'feeling' in rooms. Take care and good luck, Peggy

    Alpine Ski Chalet, Norden, California · More Info
  • PRO
    13 years ago
    If you love the sea and boating, why not bring your passion into your home with a nautical decor scheme?
  • 13 years ago
    Thank you!
Sponsored
Hope Restoration & General Contracting
Average rating: 4.7 out of 5 stars35 Reviews
Columbus Design-Build, Kitchen & Bath Remodeling, Historic Renovations