Software
Houzz Logo Print
mamaloukos

Please HELP: Nightmare Bookcase-Stain Project

11 years ago
last modified: 11 years ago

Hi we installed a bookcase that was custom made and unfinished. I got a quote from a pro that I felt was very high for finishing it (almost cost of bookcase) and so I decided to do it myself. It is in the dining room and has to match the china cabinet and other furniture. Originally I did lots of research and settled on a gel stain by General Finishes, but when I went to the store and asked the guy to stain a few samples of the wood so we can match the color, the water based stain by GF was the near exact match to our furniture and the guy said it is thick like a gel so I shouldn't have issues.

Oh boy did this not turn out the way I planned. OK so I read all of the instructions, watched videos etc, and I am an artist and know how to use brushes and all about strokes and paint. The wood was pretty smooth as it was but I sanded with 150 and then 220 grit paper, used the pre-stain conditioner and this is the first coat of stain but I am very unhappy about it.

I want to note at the outset that I am not a purist here. If I can use a product that will save me time and achieve the result I want, then so be it, I don't care if I didn't do it the way it should be done etc. I am expecting our 6th child in a few weeks AND we are having other workers in the house to finish the 1st floor bathroom and a closet and the backsplash so I don't have time for perfect processes and I am at my wits end with this. I was so excited and now my husband is not supportive for me to continue what he sees as a "waste of my time." I did read more about water stains and apparently they start to dry within a minute or two (I thought I had more time than that), but in my case the stuff starts to dry pretty much within 10 seconds or so. I HATE working with this water based stuff.

So here is the deal. I need an easy way out. I do not want the bookcase to look painted. I just need it to match and do not care so much about the grain of the wood showing, the color is the main thing. I plan to spray lacquer it after I am done getting it the right color. But my question is, what do I do now? I have a ROS and a vibrating sander (on an oscillating multi-tool) but I read that hand sanding is best (and what I did) but after all the sanding my hand is really sore. I do not want to sand the whole thing down by hand. I think I will cry just to think of it so please do not suggest that to me. I am a mother of five kids under the age of 7 and I work very hard just to bathe, feed and clothe everyone. This is my evening project after I have sung to all the kids, bathed them and put them to bed, which usually means I can start working around 8:30 pm.

Please again, this is a brand new unfinished piece that I started with. I sanded carefully for a few nights and just today attempted to stain but the product I think was not the right one for me. So do not accuse me of not sanding or of not reading the instructions. I did all of that. Also the wood species is Alder, for the wood experts out there and it is supposedly closed grain so I should not have such a hard time.

Is there a way to continue with the stain as it is now? Any technique to use or a different brand, or wait for moisture to dry and get a gel stain and use that in about a week?

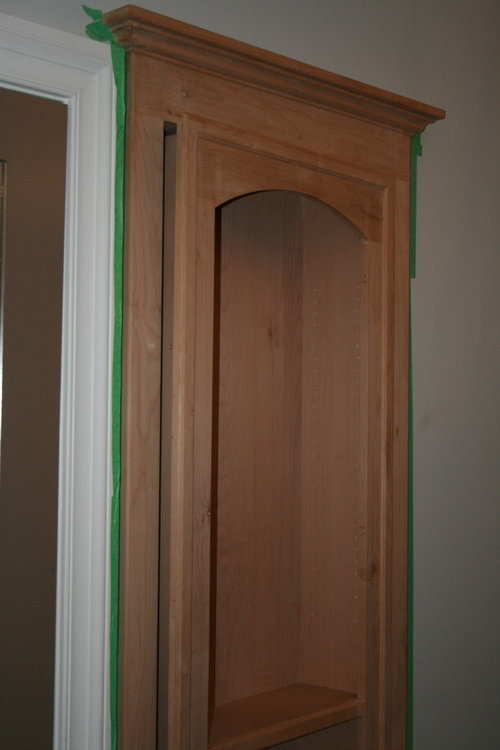
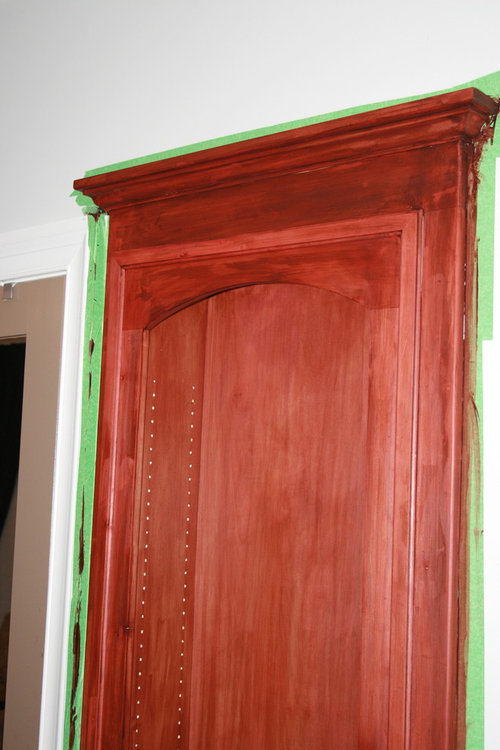
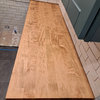
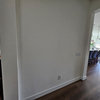
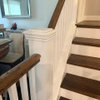
If anyone has worked with GF stains and can advise me please do so. I really appreciate your help. These are the before and after pics but the after pics look worse in person:


Left side is worse than the right side. Please help if you can. Thank you sooo much.

Comments (12)

  • 11 years ago

    Getting it professionally finished is the last resort, and obviously if I can't fix it I will do just that, maybe not now but at some point. But it sounds like you have never actually worked with the water based stuff. I tried taking it off but that didn't work, it instantly absorbs into the wood grain along with the pass of whatever stroke you used to apply it. I have painted with oil and water based paints and this is not like painting where you can wipe it off after a minute and just have a shadow. This basically just gets sucked up by the wood as soon as you apply it. No way to "take it off."

    I would like someone to give me a *technical opinion* about how to fix this. I have carpel tunnel related to pregnancy and it makes the sanding even more of a challenge. I just have a few weeks to go.

    For instance, may I: 1) wait a week, (2) use gel stain over it to even out the tone and use it with a (synthetic/foam brush) using small/large strokes only on the lighter sections and (3) then after waiting 24 hours for it to dry, go over it one last time to even the tone. Should I sand it between stain coats and with what grit? I need advice with specific details, sanding or not and how much what number grit, how long to wait, and whether I can use gel to salvage it, not just "give it to a pro." I don't need to take time to post this on Gardenweb to get that answer.


    Thank you for taking your time to answer this. You just have to understand that my husband works very hard and if I can save the money that the guy wanted for the finishing, I would like to.

  • 11 years ago

    Hi mamaloukos. I feel your pain, as I have stained projects only to realize the color was all wrong. My solution was to start with the ROS, usually back at 150 grit, and continue back up to 220. Then do a final hand-sanding with the 220 in the direction of the grain.

    So the pictures aren't showing the finish really well, and you didn't say exactly what the problem was. Is the color wrong? Is it too light or too dark? Is the texture wrong (i.e., is it 'fuzzy' to the touch)? Is it too blotchy? Or some combination of these problems?

    And you said you used a GF water-based gel stain? I wasn't aware that they made a water-based gel - if that's what you used, it might be a relatively new product that behaves differently from its oil-based cousins.

    I use oil-based GF gel stains regularly for easy-to-match colors and typically find them easy to use. For things that aren't so easy to match, I use water-based custom dyes (I mix the colors myself, but I don't recommend mixing water-based dyes for the novice).

    Here's how I apply the oil-based gel stain: First, use a rag or a sponge. Make sure the gel is stirred well with no separation of thicker and thinner parts. It should be the consistency of pudding. Dip the rag/sponge into the can and wipe the stain onto the wood, going with the grain of the wood. Just do a small area at a time. Then wipe again with a different, clean, dry rag. Not dark enough? Wait longer before wiping with the clean, dry rag. Each time you re-dip and apply to another area, overlap with the previous area. If you find yourself waiting a very long time between application and
    swiping, and you like the color, you may be able to apply stain to an
    entire surface (e.g., the inside of the cabinet) before wiping it off.

    Keep in mind that if you plan to put a clear coat over the stain, the topcoat will make it look slightly darker. With gel stains, it's pretty easy to make it darker (even a week later) but it's tough to make it lighter. However, while the stain is still fairly wet, you CAN lighten it a bit by wiping with a different rag dipped in mineral spirits (IF and ONLY IF it's the oil-based gel stain).

    One other consideration: If the problem is splotching, or blotchy appearance after staining, which is common with soft woods like pine and alder, I apply a very thin coat of dewaxed shellac (Sealcoat - NOT regular shellac - made by Zinsser) before staining. Wait until it's dry to the touch, give it another very light hand-sanding at 220-grit, and proceed with the stain.

    That's a ton of info - hope some of it is helpful. Good luck. That will be a gorgeous cabinet.

  • PRO
    11 years ago

    Even though Alder is considered a hardwood, it is a soft hardwood. Not much harder than White Pine, which is a softwood. Consequently since it is soft it absorbs stains quickly and unevenly, that is why it seemed to dry quickly. You would of had the same problem with an oil based stain. Sombreuil is correct. To fix it, it needs to be stripped, sanded (not skipping any grits, 120,150,180,220), sealed, stained, and finished. If all you are interested in doing is covering up the problem, paint it. Putting more gel stain on it will be just like painting it, only will require more coats.

  • 11 years ago

    Salex, thanks so much for your detailed methodology! I used a water based stain. I wanted to use the GF gel (which I believe is oil based as you mentioned). Sorry, the problem is blotchiness and paint stroke marks and also some light areas. I thought it was apparent because it was late and I was near tears looking at it.


    OK so you recommend (1) buying the Sealcoat made by Zinsser? Applying it with what? Rag/sponge/brush? (2) And then waiting until dry, light sanding at 220 grit and stain with gel? *Should I sand at all before applying the Sealcoat?* You mention that you have done that before when the color is wrong but my color is right just too light and blotchy (not uniform) in some areas. If the wood is a softwood as Al suggests then I do not think showing off the grain will make much of a difference, especially if it comes at such a high cost of stripping which I would rather not do. The color is pretty much an exact match, except where it is too light.


    I just want to clarify about your methodology about applying the stain. When you say to "overlap" with the previous section, how much of an overlap? Will the gel leave a mark where the overlap is (this is what happened with the water based stain)?


    This is actually a bookcase (not cabinet) that is a door (aka hidden door) to my office.


    My other furniture has a lot of what looks like glazing effects on it so I was thinking of using something over it to mimic this after it is uniform. Do you have experience with these glazes? Thanks so much, G-d bless you for your help!

  • 11 years ago

    Glad that helped! Al is right, alder is a very soft "hardwood", so it's not too surprising that it blotched, and its grain isn't very pronounced so as you said it probably won't show through the stain very much.

    Since you like the color, and it's more too light than too dark, I would re-apply the stain over what you have. (Don't worry about the Sealcoat or my steps for applying gel stain in this case - but for future reference, you can use a brush or a rag for the Sealcoat. Don't use much. And for the stain, the overlap is just a tiny bit, with a light touch - you just want to make sure you don't see lap marks, or "strips" like you would on a freshly mowed lawn.)

    So here's what I would recommend: don't try to remove the existing stain, just lightly sand it by hand with a 300-400-grit sanding sponge. Be careful to remove all sanding dust. Then re-apply your stain, just like you did before - but you might want to try a different type of brush. Did you use bristles before? If the instructions say that you can use a foam brush or rag, I'd try that (wear gloves if you use a rag).

    I have not used glazes. If you want to really know the proper steps for finishing your project and getting the look you want, go to the big hardware store, find a piece of alder, and experiment with that as a test piece. Do every single step - 1st coat of stain (with brush marks to duplicate the situation you have now), then light sanding, then 2nd coat of stain, then glaze/topcoat/whatever else, and finally, make sure the end result looks the way you want it. If it doesn't, sand your test piece of alder and start over. Don't do anything on your beautiful bookcase until you've figured out the process on your test piece... and once you do, go for it! And please post pictures!

  • 11 years ago

    And yes, that's the Sealcoat I was referring to. Alternatively, you could also use a wood conditioner if you can find some locally. But hopefully you won't need it for this project, fortunately :) - only if you decide to sand it all and start over.

  • 11 years ago

    It's funny but I did use the wood conditioner before I stained this piece (the water based one). Ok, what if it still looks off after I sand and reapply?


    I have sample pieces from the manufacturer so I will practice on them. Thanks!


    I will post pics as I go along, and I will try to show the final product if (I hope) it works out.

  • 11 years ago

    Salex, so I looked this up more and I watched a video by The wood whisperer.com that confirms what you suggested I do with the gel stain: https://www.youtube.com/watch?v=UjwgaADLr9w.


    Honestly, I don't think adding more of the water stain will help the blotchiness. I will just create more areas for potential blotch. Basically I think I will sand with 400, remove dust, and apply the Seal Coat. Wait 2 hours and then apply the gel stain in candlelite in the prescribed method (apply with foam brush, wipe off excess after a minute or two, and then use bristle brush to smooth out corners and moldings), then wipe down carefully changing to a clean cloth as needed.

    Actually I will do this...I will buy the Zinssers and do a test on my samples one with and one without. I will start with the water based stain I have, then one sample I will use the zinssers and one I will not (plus the gel stain on top of that) and I will see which comes out better.

  • 11 years ago

    I use a lot of water-borne stains and yes, they dry fast, very fast.

    From the photos I'm seeing, it looks like it was not applied correctly, more so than tendency to blotch, as it appears to be wipe/brush marks of heavy and light application.

    I find it most helpful to put it on heavy (don't scrimp, keep a very wet surface and "wet edges") and wipe off fast. Sometimes, I'll wipe on with one hand and off with the other. If you get unevenness, right away add more stain and wipe again. My supplier sells an extender (propylene glycol) to keep the open time longer.

    I think your best approach now is to strip and start over.


    I also agree with the others. Next (and all following) times

    1. When you are using a new process, material, or product ALWAYS TEST ON SCRAP OR AN INCONSPICUOUS PART. Better to mess up an area that won't be seen than to start front and center on your finished piece.

    2. "When you find yourself in a hole, the first thing is to stop digging." -- Will Rogers. If things are not going right, stop and find out the problem and solution rather than messing everything up.


  • 11 years ago

    HI, yes I feel your pain also. Involved in several home projects, testing on scrap wood and researching a lot. Its one thing to stain an important or valuable piece! more at stake.

    Since I'm working with General Finishes oil gel stain, the insructions on can say sand prep to 150, but others online and everywhere say go to 220. Its confusing to see different instructions. So I'm inclined to sand a 150 grit over my 220 alder dresser before I do wood conditioner and then stain.

Sponsored
Industry Leading Landscape Contractors in Franklin County, Ohio