

building raised beds
Hello again!
I see that my tilling post has drummed up some... enthusiasm... to say the least!
Nevertheless, I have decided on building (3) 3x10(ish) raised beds within my 15'x15' plot. Some folks in my previous post had discussed having to add more amendments to raised beds opposed to conventional crop beds. Can I ask why? I may be a little naive, but isn't a mix of topsoil and compost enough to fill these beds? Of course each crop has different nutrient needs but isn't this soil composition a good start at least? And if fertilizer is needed down the road, I can just add some fish emulsion? I do plan on using cover crops too every season as an additional way of adding nutrients. Also, note that these beds are being grown INSIDE of an already existing bed that has been tilled and grown in this year already. The roots will be able to extend down to the REAL soil and gain nutrients that way too, won't they?
Please tell me if I'm wrong!
thank you as always :)
Comments (39)
Lauren W. (z5b - CNY)
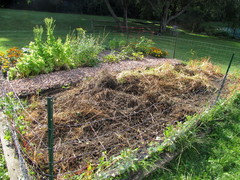
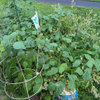
Original Author11 years agoHere is a picture, to give you an idea of what I'm working with.
Excuse the mess, this has since been cleaned up, it's the same picture I used in my cover crop epic fail post lol
 11 years ago
I did my raised beds two ways. One I did the "Mel's mix" of 1/3 peat, 1/3 vermiculite and 1/3 a blend of 5 types of compost. The other I double dug down and added compost and some peat to the soil. The double dug down with the compost is doing better than the one with the mix
Related Professionals
Sebring Landscape Architects & Landscape Designers · Elizabethtown Landscape Architects & Landscape Designers · Fort Wayne Landscape Architects & Landscape Designers · Brainerd Landscape Architects & Landscape Designers · Beatrice Landscape Architects & Landscape Designers · San Diego Landscape Architects & Landscape Designers · Idaho Falls Landscape Architects & Landscape Designers · London Landscape Architects & Landscape Designers · Ashland Landscape Contractors · Shreveport Landscape Contractors · Milwaukee Landscape Contractors · Bismarck Landscape Contractors · Hagerstown Accessory Dwelling Units · Mission Viejo Accessory Dwelling Units · Chatham Accessory Dwelling Units 11 years ago
<Some folks in my previous post had discussed having to add more amendments to raised beds opposed to conventional crop beds. Can I ask why? I may be a little naive, but isn't a mix of topsoil and compost enough to fill these beds?>
Soil amendments, not necessarily nutrient amendments. Compost continues to decompose so more has to be added regularly. So your existing soil + compost is ok to start and if your existing soil has a good, active soil food web already in it the compost will also provide the nutrients. Including some composted manure will help greatly. If your soil does not have a good soil herd it won't provide them and then you will have to use nutrient supplements. Compost only provides nutrients once it is digested by the soil residents.
My raised beds were all initially filled with 1/3 native soil, 1/3 manured compost, and 1/3 soil-less potting mix (contains peat and perlite) and for the first couple of years I supplemented them with organic nutrients. Over the years they have had some additions of all 3 (my used container mix gets dumped in them) but primarily it's manured compost at least 2x a year. They don't need any nutritional supplements now as the soil herd is well developed in them now.
Like with your tilling post the search here will pull up umpteen long discussions about how to build and fill your beds.
Dave
Lauren W. (z5b - CNY)
Original Author11 years agothank you, I think I have a decent soil herd - I know I find earthworms all the time. Will look into finding some manure too.
- 11 years agolast modified: 11 years ago
There are many reasons to use amendments.
The first is probably the most obvious and the most compelling... in response to a soil test. Personally, I don't build raised beds. I form my beds on the ground, build no 'walls', and use the native soil as my substrate. These 'raise' all on their own over time from additions of organic matter.
As Dave and Eterprincess point out, and you know already, compost and organic matter help to replenish nutrients and build a friable tilth. These amendments feed and attract worms, microorganisms, and beneficial bacteria and fungi.
Just like different crops will attract different insects above the soil, the types of crops you plant will effect the web of life found in soil. By amending with appropriate materials you can help encourage a diverse, healthy soil.
You asked if topsoil and compost were enough. Well, the simple answer is yes... and no lol.
Top soil is really too generic a term. That's why I build my beds from native soil amended with heavy additions of organic matter. I know that my soil is fairly decent. It's a loamy clay, and clay is often rich in minerals. The point is that nothing beats a soil test. Know what you are starting with, and let that guide you towards what you use as amendments.
Think about what real 'topsoil' is... it's self-explained as the top layer of soil resulting from eons of decomposing biology and rock and clay substrate.
Unfortunately, when you buy 'topsoil' there is no guarantee, or any knowledge, of the quality and true make-up of that topsoil.
I'm not saying don't buy it, but I'm saying that amendments are often necessary even before the idea of 'replenishing' is an issue. Only a soil test can provide surety. You could forego a test, but really, there's no good reason to skip it, and since you are bringing in a fairly large amount of soil, I would definitely recommend the test.
There's more to this discussion of course, but I can be long-winded.
Lauren W. (z5b - CNY)
Original Author11 years agogreen - I guess I am a little confused, pardon if I'm being a doof. So, what will an OFFICIAL soil test tell me? Because I did the "soil test in a jar" thing and that told me I definitely have clay soil. Then I dug a hole, filled with water, and waited for the water to drain. After 24 hours, the water was still not gone - this told me I MOST DEFINITELY have clay soil. What more do I need to know, other than that my soil needs more organic matter to become more loamy? Maybe this doesn't even matter... because the plan was to build raised beds with new soil. Should I add the new soil, then do a test on that?
- 11 years ago
Pro soil tests will tell you the pH of your soil - likely the most important component as if pH is heavily skewed nothing else works. It will also tell you the % of organic matter, the nutrient levels of the native soil, especially the P and K and the micro-nutrients levels (boron, copper, mag, zinc, iron, etc.) all important to healthy plants and good production. That way you know what is needed and what is not needed.
Look at some of the soil test discussions here as many have posted their test results and you can see the whole list of what is covered.
Dave
- 11 years ago
Yes, if you are definitely going to bring in soil, then do the test after these additions. Ideally, build your soil now (or this autumn) and let the soils and the compost/amendments rest and interact over the winter. Then, do the test a month or so (give the lab time to get the results back to you) before planting.
What you bring in will probably be worlds apart from what you have.
Really, I would even say a year of interaction with the natural substrate is good for a 'trucked-in' soil base measurement, but since the tests are not usually too expensive, the winter of rest will suffice temporarily. Then, I would do another in the fall of next year. That way, you can amend right after the test and any additions can incorporate into the soil and be ready by spring.  11 years ago
My garden (raised) is growing NUTS, I used something like 6/10 topsoil, 2/10 leaf hummus and 1/10 bark.
Lauren W. (z5b - CNY)
Original Author11 years agoInteresting, I didn't think leaf hummus had a good nutrient value?
- 11 years agolast modified: 11 years ago
Lauren - like you I placed my frames over my row garden and used that soil. So maybe they are just level beds not raised really, oh well.
I made my beds from cull lumber found at Home Depot so it was not at all costly - a full discussion can be found on the Square Foot Garden (SFG) Forum. I have beds made from untreated lumber that are more than 10y/o but that is another discussion.
I don't anchor my beds and have not had them move away on me. As for the flexiblity part - this year I rearranged my layout because a couple years ago the neighbor put up a fence that was limiting sunlight.
When I figured out how much it was going to cost me to fence in part of my garden I decided not to. That was another reason to move this 4x12 bed.
I also moved two compost bins so they would have been within this imagined fenced area. I wish I had done this years ago.
I had soil tests done many times before making the beds so I knew right where my soil was so went with that. Yes the plants roots will go down into your soil unless you have something that will prevent that.
While I respect Mel and his concept, his mix is more for those who are growing in closed beds - such as those made on a concrete patio or driveway, etc. His intention was to provide all the nutrients the plants would need to thrive.
In Mel's mix the peat moss and vermiculite provide no nutrient value so I did not add those to my soil - they are for water retention. IF you have clay soil I would also skip those two as you don't need it but do need the compost. He suggested 5 compost mix to make sure it is balanced and contained all of the nutrients.
Should you decide to buy compost I would suggest shopping around and getting a sample you can take to have it tested even if they say they had it tested. I don't know about NY but in CT we can get a FREE test from (Connecticut Agricultural Experiment Station) CAES (which I take advantage of) or we can send it to UConn for a fee.
I have read posts from folks who bought compost which had things in it that were not compostable. With that in mind I would shop and sample - IF they won't provide you a sample you can have tested independantly I have to think there is a reason.
I would avoid (or closely scrutinize) any FREE compost from the city or county for those reasons.
I don't know who said you will have to add more amendments to a raised bed than a row garden but I have not found that to be true IME. In that last 12yrs I have only used compost and rain water. I don't have trophies but I get more than I could possibly eat, in fact I give more away than I use myself.
HTH
PS. - a good winter time thing is to read & plan - I like Mel's first book (the 2nd book has many errors in it). Even IF you are not going to use his SFG methods I think it has some valuable info in it for gardeners. You can get his first book used cheaply on Half-Ebay, Amazon, or even your library may have it or can access it.
 PRO11 years ago
I'm going to throw my pennies in without reading anyones responses...
I use raised beds, lasagna beds, and straight into the dirt beds- and a bunch of container gardening as well. All of them have different applications and uses. And all of them always need work, always need amending. Might just need some top dressing and compost, might need an overhaul entirely..
But in my experience, raised beds need more amending because they get gardened more intensely. Weeds that get pulled out pull out some dirt too- and unlike lasagna beds or in ground beds, mother nature does not just fill in the gaps in a raised bed- in that regard it's more like container gardening. So you need to replenish what you pull out of the bed.And in general, folks seem to square foot grow raised beds in ways they do not do with lasagna or in ground beds. Those little walls make you very aware of how much space you have. Squeeze in a couple more bean plants, or push an extra row of lettuce- tighten up the planting pattern which of course sucks more nutes out of the soil- and no matter how well you shake off the roots means more dirt out of the bed and more holes in the bed when you pull the spent plants.
And even though a lot of raised beds can root down deeper below the box line- you are principally working with what soil is within the box. A lot of plants and the dirt itself do not necessarily suck up nutes from the base ground the box is set on. So in that way, you are dealing with container gardening with a very large container, and as such, you need to keep that container full of growing goodness of healthy, nute full soil. Thus extra amending.
Now for me personally.. When I build a new raised bed- and I build mine in the fall... I put down a thick layer of newspaper first- then I fill the bed full of dead stuff of mixed green and brown. Dead spent plants, grass clippings, straw, fallen leaves- plus a healthy dose of egg shells, coffee grounds, and wood ash. Heap the box full. Let it set for a couple weeks- depending on the weather, I either water it constantly or let it rain in- either way it's a compacting process. Then after a couple weeks. I heap the raised bed as full of composted manure as it can be heaped up. I let that sit for a couple weeks too to compact down.Then for me, I plant in garlic for a year or two before anything else. This year I have three beds that need to get rotated out of garlic and will get dressed with grass clippings, fall leaves, and a cleanout of an old chicken coop before they get planted in the spring.
And watering.. watering is much more necessary in a raised bed than in ground or lasagna. Those few inches of raised walls really make a difference. And along with that, nutes leech out of those few raised inches much more rapidly than with lasagna or in ground beds. It's akin to how container growing needs more water, leeches more nutes, and needs more replenishment than other gardening.
So why the amendments? Because you are using both the best and worst of two worlds between in ground planting and container planting. 11 years ago
I made a raised bed this spring, using topsoil and Nature's Care Raised Bed Soil, because it was cheap.
At this point the bed has a seeming rich food web, including abundant earthworms. The plants in it required no other fertilization (lettuce and carrots). The soil was full of not fully decomposed organic matter.
There was no separation to the soil beneath it.
- 11 years ago
beesneeds made some good points. What I do is to cut dead plants at the soil line leaving the roots in place as that is where the nutrients are. I may or may not compost the dead plant depending on if it has a disease; IF it does it get bagged and tossed - that goes for the SVB.
I had to prepare the soil for the move this year, a friend offered the use of his tiller, I declined and did some of what you mentioned. First for the 1st time for me I trench composted in the new bed with kitchen scraps and coffee grounds. Then layered with cardboard and newspapers.
I am a big user of leaves whether for compost or mulch. But I don't like to mulch with grass clippings - my grass is not grass at all but just a collection of weeds so the clippings will contain weed seeds so I like to hot compost them rather than use them directly. This way I have fewer weeds in the beds.
Using cardboard, newspapers, and/or mulch is the beds helps to keep the weeds down while helping with water retention. My soil is sandy loam so drains well and does not retain much water.
I was confused about the mention of roots but will say with the compost piles next to the beds what I have seen is the roots right up in the compost pile which is fine with me both for moisture and nutrients.
This year I also put down newspaper in the walkways and covered with wood chips to help suppress the weeds and it worked well. You just have to do this soon after the soil warms but before the weeds all germinate.
Early on I can water in the beds using my buckets of rain water but after the plants and roots grow I move the buckets to the walkways and water there. I am sure the roots are no longer in the frames, well not the parts they feed from anyway. And that is why I don't trench compost OR till the weeds in the walk ways.
The tomatoes I am getting this year are picture perfect - not a blemish on them.
- 11 years ago
IF you are or will be growing potatoes I would not add any manure and a soil test would be very helpful there too.
- PRO11 years ago
Lauren, FWIW, I use 50/50 blend of grade A top soil and organic compost and pretty much everything grows to a very full size. I only have raised beds. I have 12 4' x 8' beds and 14 4' x 4' beds and they are 12" deep. I also use the same mix in containers and I must have about 75 of those. I do add about 2" of organic compost to all the existing beds in the early spring. The only thing I have had to do that was much different than planting in the ground is I have to water more often.
- 11 years ago
Jim I'd be interested to hear more about how you water? Overhead? Soaker hoses? Something else?
- PRO11 years agoI actually hand water using a :gentle shower' mode on the hose. All watering is done on the ground and away from the plants. I have 6-8 tomato plants in the 4x8 bed depending on the size of the full grown plant. I will usually lay the hose down on the ground and soak, heavily, the ground in between the plants with the hope of causing the roots to reach outward to get the water. The goal is for a stronger root system. I'm not sure of the actual amount of water, but it soaks the bed down to the RCA base under the bed. Some of the plants I will build up small little mounds in the soil to prevent the water from running away too far from the root.
- 11 years ago
So how far apart are the plants a foot or two?
Did you know the roots on a tomato plant will grow away for the stem as much as 4ft (or more) in each direction and that is where plants feed - from the root tips. That is why I water the buckets in the walkways between my beds. This allows the water to soak down deeply. There may be some roots of other plants remaining inside the bed.
I can usually avoid the splitting tomatoes watering this way.
Check this link...
http://www.soilandhealth.org/01aglibrary/010137veg.roots/010137ch26.html - PRO11 years agoDepends on the tomato plant, the black krims I plant one to a 4'x4' box and usually combine it with a vine squash or melon. sometime I add radishes or small fast growing lettuces u til the plants are big. The plants that are not so bushy are closer together.
I have been surprised at how big some of the root systems have been I. various plants. When I clean them out late November it seems I end up with wheelbarrows full of roots.
Last season I tried the sq ft gardening method....never again. - 11 years agolast modified: 11 years ago
And that is why I cut the stems off at the soil using loppers and leave the roots behind :-)
Yea if you follow the SFG method strictly it calls for pruning the tomato plants quite a bit. I will break off an occasional sucker but don't prune heavily. And some of the spacings are a bit off when the plants are happy 'n healthy.
I don't follow the method so strictly but have learned a lot from reading Mel's book. Mainly I like his way of supporting vining crops and growing up. But then again I have modified that to suit my needs ;-)
- PRO11 years agoone thing I do that dramatically helps in space is trellis. I have honeydews, watermelon, butternut, cukes all growing up and down trellises. I made the mistake of not trellising all the butternut and the two I didn't are just everywhere right now making it very difficult to maneuver around that area of the garden.
I do prune all the tomato plants clean a foot off the ground for air circulation and limiting viral/fungal nastiness as much as I can. - 11 years agolast modified: 11 years ago
Yea anything that vines I grow up. Definitely helps at harvest time.
Here's link that describes how I used to water, now I have modified it to fit my gardening style starting in the beds with the seedlings but moving outside the beds as the plants grow. You can use larger buckets or make depression in the soil so the water doesn't run off.
- PRO11 years agoInteresting idea with burying a bucket. I think I going to try a pvc grid that will enclose, loosely, the plants in a 'grid', drill small holes in the bottom of the pvs piping with a periscope at one end about 2' high with a cap. When it comes watering time, I will fill the pvc up until it is near the top of the periscope, put the cap on it tight enough to allow a slow drip only and see how that goes. it would become costly to try to set up drip irrigation for my entire garden let alone time consuming.
- 11 years agolast modified: 11 years ago
< I think it would be good to get a test done on both the native, and new soils separately.>
I couldn't agree more. Always good to get a baseline. I would have also suggested it but didn't want to get into a debate over it.
Always know what you are starting with and what you are adding. Always keeping in mind what you plan to grow and what they like. Make 'em happy and get many happy returns.
btw - I would do all three beds but that is just the way I like to do things.
fwiw - Potatoes like a low Ph like 4.45-5.0 so don't add any lime or wood ash if you grow potatoes.
Lauren W. (z5b - CNY)
Original Author11 years agolast modified: 11 years agogumby - re: the manure and potatoes, I would be getting bags of composted manure and putting it in this year maybe. Still not safe to grow potatoes next season?
Re: the size, I'm trying to find 1x10x10s, I wouldn't fill the entire bed to the top, so maybe around 8" deep when all is said and done.
- 11 years ago
Feel free to research it more but I believe the manure will cause potato scab. Once scab is in the soil it is not easy to get rid off. I think potatoes will grow in poor soil and remember the Ph @4.5-5.
<I'm trying to find 1x10x10s> IF you are talking about lumber to frame the beds keep in mind that 1in will warp easily (esp if 10ft long) and will not last as long as 2x.
Also since beds will be sitting on the soil 10in high isn't really needed.
Lauren W. (z5b - CNY)
Original Author11 years agoya know, I was looking for 2" but I couldn't find any... I'll keep calling around. I guess the point in going a little deeper is so I could avoid having to work my clay soil as much. It'd be nice to have some easy soil to work in for once.
- PRO11 years ago
Lauren, if you use 2x10s, make sure you put in some sort of crossmember in the middle to keep from bowing outward. The winters uo there are fairly tough, so you will also want to get metal strapping and wrap each corner twice. This will prevent the corners from blowing out when snow and ice get in the bed. Honestly, your best bet up there is 4x4 or bigger. Just stack them up, that is how I do it here. I have all raised beds in RCA due to burrowing animals and other critters.

Enlarge pic and you can see how I applied the strapping. I also screwed all the timbers to an inside corner I made with 2x4s. In all honesty, a 1x is going to last you oneseason unless you drive stakes into the ground around the perimeter to hold the box together. I use 9 8' landscape timbers for one box, it is less than $40 and will last you many seasons. Make sure they are pressure treated, too, so they don't rot. Inside the box I use top soil and compost. If you are doing deep rooted tubers, just add a level of timbers, every three timbers will cost around $12 here from HD. In the spring they have a sale and them and I buy 50 for less than $100, in case you really wanted to build a bunch next season.
- 11 years agolast modified: 11 years ago
While there are many ways to fasten corners I did not find these Simpson Strongties until I already made my beds. Check this link for a pic and details. http://www.homedepot.com/p/Simpson-Strong-Tie-ZMAX-Galvanized-16-Gauge-2X-Rigid-Tie-Connector-RTA2Z/100375168
It's a model RTA2 but they also make connectors to fasten say 2- 5ft boards to make it 10ft. Also you could just make 2-4x5 beds placed together which may be easier should you need to move them later.
To make it deeper consider placing 2 5in wide frames on top of each other. Or use whatever width is available.
I understand not wanting to use 4x4s as it takes up more space when you don't have much. Or you may want to - certainly they are sturdier no doubt. I didn't want to use cinder blocks cuz they take up even more space.
While any 1x lumber will bend or warp esp at 10ft. I have gotten 4-5 yrs from 1x and considering I paid $.51 for each 4ft piece of cull lumber I think I got my moneys worth. I used sheet rock screws to fasten mine.
I won't even get into the treated lumber debate as that is up to each individual.
IF you really want something that won't decay AND money is no object - consider making the beds from Trex (used for making decks). Tho I wouldn't do that until I was absolutely certain of the garden layout and things do change once you see you plants in them.
Note: 1x lumber is also harder to screw together and splits easily. But very light and easy to move. So could have a place in testing your garden layout.
I used note paper, 4ft boards, strings, and ropes when planning my garden layout.
Note: When placing a bed up against something like a fence or a wall I would not go wider than 2ft unless you have unusually long arms and legs. When the plants grow and it is time to harvest you will understand why.
Lauren W. (z5b - CNY)
Original Author11 years agothanks gumby, good food for thought... this is definitely a tough call.
Most definitely am not going to be using treated wood, can I ask what cull lumber is? I was reading that pine and cedar are the most durable/long lasting - and from what I've seen thus far, it's not cheap. Having a tough time finding cheaper [but also durable] wood.
- 11 years agolast modified: 11 years ago
I used 2 inch thick pine boards (10" and 12" wide) cut to order from Home Depot. I treated them myself with raw linseed oil. They have lasted 4 years and I will get at least one more year and maybe two years before they have to be replaced.
- 11 years agolast modified: 11 years ago
Just for info purposes... if you live in a rural, or semi-rural area, look for someone who has a mobile saw mill. If that is not an option, try a small lumber mill. Ask them for Black Locust boards. They are VERY strong, EXTREMELY resilient, insect resistant, and last longer than most any other available wood. They do not need to be treated, and you will not be sorry.
If you have a black locust tree or 2 on your property, they may even exchange a few boards for you allowing them to harvest the rest of the tree.
- PRO11 years ago
I wish I could get rid of my locust trees here. Every spring when their flowers drop I end up with a zillion little trees growing everywhere and by the time I see them, it is usually very difficult to just rip them out and get the root. Locust is indestructible wood.
I use the outside strapping because fall and winters are very wet here. I am on the shore and we also get a fair amount of snow/rain/sleet. I had a wooden box that I used for basil was all separated from the ice expanding. I also decided to screw all of the timbers and strapping for more strength. That is a great idea using the linseed oil to treat the wood. I have a bunch of sheets of plywood that I can cut up for herb containers if I treat them with the linseed oil. Treated plywood will be much cheaper than buying new treated. I do have some planter boxes that I made with treated wood that I made when I built my house in 1999. They last a long time. The only mill near me is not open to the public, cannot even get inside the gate. I wish I could.
- 11 years agolast modified: 11 years ago
Jim's... more than likely those locusts are coming up as shoots from the roots of the mature trees. It is both a pro, and a con, of black locusts. Because they spread by roots, they will reclaim a cleared piece of land very quickly if that is the goal. On the other hand, they will reclaim a piece of land very quickly even if that is not the goal lol.
I should mention, that unlike other resilient trees and lumber, another pro of black locust wood is that it does not have negative allelopathic properties.
Edit: Oh, and as long as you have a positive ID, those flowers are edible. It's an old time delicacy to have fried black locust blossoms in the spring. Research it before you try it though. Best to be cautious when trying wild foods.
- PRO11 years ago
Every year there are more and more. I have a 6" baby tree that I've had to dig down almost two feet to clear out. They make great stilts and telephone poles but miserable backyard trees. I couldn't say they are the 'black' variety or not. I know I have killer thorns on them though.
- 11 years agolast modified: 11 years ago
Cull lumber is poor quality - something wrong with it- maybe cracked, chipped, warped, or otherwise not first quality wood. My thoughts were it's just going in the garden so didn't have to be perfect.
HD used to have a section for cull lumber that was marked down. Only problem was they always cut to 4ft lengths. Problem? It was almost perfect for 4x4 beds. I say almost cuz you were about 2in short on one side - but who cares? Not me.
Your produce dept. may also use the word "cull" for fruits & veggies that are no longer salable.
fwiw - I believe the HD's near me stopped this practice for some reason. Could be all their wood was warped?
I was not aware of locust trees (wood) but I imagine it is prob expensive too. I say take the least expensive way out until you figure just how much this works for you. Most Gardeners I know change something every year.
Tip - IF you don't have one start a garden notebook to list things you've done and want to do/grow. Make note of what worked well and what needs improvement when/as you think of it cuz when the time comes (if you are like me) you will forget the thought until it is too late. A list of seeds to order or what to plant - planting dates, etc is something else to make note of.






rgreen48