Software
Houzz Logo Print
erick_rawlings

Shimming studs for tub surround

13 years ago
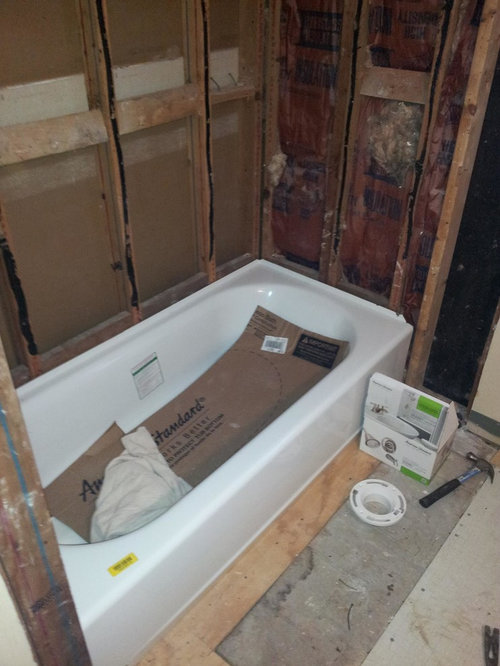
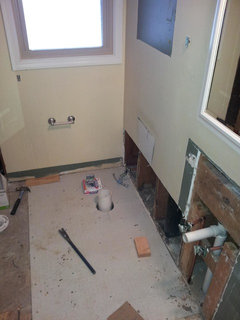
After placing and having my tub plumbed in, it was easiest just to hold the tub 1/2" off the rear wall due to the spacing of the joists in relation to where the drain and overflow needed to go (50 year old house, doubt I could find the framers to blame them). How can I shim in this 1/2" gap now before I install my hardiebacker? It was suggested that I sister in studs so I can assure that every one is plumb and flush. Is this a good idea?

Comments (22)

  • PRO
    13 years ago
    It may be difficult to sister in studs with the fire blocking in the way. How far out of plumb are the walls? If it is egregiously out of whack...there may be a bigger problem. If it is minor (1/4" overall or slightly more) there are two ways to fix it besides furring or sistering on. A traditional chicken wire reinforced mud bed (old school tile prep) takes care of it. If it is really minor, the problem can be addressed tile by tile with the thinset. Takes longer to set tile this way though, and chances for error increase.
  • PRO
    13 years ago
    @Ironwood...would it really be that hard to notch the studs out to sister them? Really, since the old ones are the load bearing ones, you don't even need full studs. You can just cut some 2x4s, or even 2x3s, and glue&screw them above and below the blocking. Even if they screw into the new "studs", the other ones will still be carrying the weight.

    Just a thought...
  • 13 years ago
    The walls are not terribly out of plumb. The main issue is accounting for the 1/2" gap that now exists between my studs and the face of the tub lip (about an additional 1/8"). Would it be sufficient to just rip 3/4" plywood in 1-1/2" strips and attach them to the face of the studs? Or I could just run the studs sistered to my existing studs and break at the blocking (which I think are 2x6, I haven't measured them yet). Really, I think the only goal I am trying to accomplish is having a flush fastening surface for attaching my hardiebacker @ 8" O.C., correct?
  • PRO
    13 years ago
    Erick...provided your prepped as S. Thomas suggested (which is wonderful advice), the 3/4" strips wouldn't give you enough width to keep the screws from blowing out. That is why I said you could even use 2/3s. They are actually 1.5" thick and would provide more room for error if you are left or right of center more than 1/8".
  • 13 years ago
    Mr. Kutch,

    The plumber did set a 2x4 support ledger around the perimeter of the tub. I have not checked my studs for plumb. That will be the next thing that I do. I am not trying to do things necessarily the easy way. This is my house and I have to live with the result, so I am trying to do them the right way.
  • 13 years ago
    Erick, when I said the easiest way to resolve the plumb issue and the 1/2" gap, I wasn't inferring that it wasn't the right way. As Ironwood pointed out there are other "right" ways to solve your problem. I was merely insinuating that sistering the studs was the quickest way to do it. I sister studs all the time.......that way I can adjust each sister stud as needed so that my finished plane is squared and plumb for my dry wall, durorock, or whatever finish I'm applying to the studs. Since you're leaving the load bearing studs in place, you could actually sister pieces of stud between your horizontal bracing to achieve the same thing.
  • PRO
    13 years ago
    last modified: 13 years ago
    Erick, yes to your suggestions regarding sistering or 3/4" rips. Or double up your 1/2 tile backer. If you use 3/4" rips, just be sure that the screws are long enough to account for the additional 3/4" and still get a good bite into the original studs. 2" screw. The 3/4" is just a furring strip. Don't depend on it to hold your tile backer. Tack it, top, bottom and middle. The 2" screws will be the actual fastner
  • PRO
    13 years ago
    Erick, these are all good answers! nFORMAL and STK, I think sistering is fine as well, just that leaving blocking in means string line or plumb/straight edge across in both vertical and horizontal axis. Not too hard, but was suggesting alternatives.

    But totally off subject...Erick, is that PVC toilet flange that I see next to the tub hooked up? It seems too close to the tub and too far from the wall for a code legal and standard commode depth installation. Code calls for 15" to center line of flange from side obstruction (including walls, vanities and tubs) and most US commodes call for a 12"- 13" distance off the wall. Maybe check that?
  • PRO
    13 years ago
    I think the flange is just lying there, not installed there. Wouldn't it be easier to just install a 1/2" treated or marine grade plywood over existing studs to flush out. It would help true out the exisitng studs and then the backer board could be mortared and screwed for extra adhesion strength.
  • PRO
    13 years ago
    Except 1/2" marine grade plywood would cost much more. Other than that, you should be able to do that, but who knows if the original studs are plumb and flush...

    Yes...the flange is just sitting there.
  • PRO
    13 years ago
    I would agree with Ironwood ... down south we call that a stucco brown coat. You can fix any imperfections in the substrate and end with an absolutely perfectly level/plumb/smooth backer for tile. I also love it because it accepts waterproofing like a breeze. Of course its only as good as your installer.
  • 13 years ago
    Ironwood, flange just happened to be sitting near the tub. Here is the rough-in location on the terlet:
  • PRO
    13 years ago
    I know it's more expensive, but if Erick was worried about moisture, best choice. Obviously you could use standard plywood as it is being covered with backerboard, sometimes homeowners want to over do for piece of mind. The studs should be checked for level, if not shims added before plywood, which then would true up or at very least take some of the irregularities out so the backerboard isn't conforming to original studs. Giving a better substrate for a better tile instal.
  • PRO
    13 years ago
    I would never put plywood behind shower walls ... if you ever had a water issue, the plywood could delaminate, swell, split, and truly damage the tile in front of it.
  • PRO
    13 years ago
    No different from installing plywood on the subfloor. Proper tile prep procedures will protect from this.
  • PRO
    13 years ago
    Erick, Great about the flange, was posting the other day with a houzzer that had a flange too far out from the wall...4" too far. Might as well have been a mile. Slab on grade..ouch.

    Re: plywood as wall backer...no. But easier and almost as rigid, approved as a tile direct backing board and as exterior sheathing on steel construction is Denshield. My tile setter prefers it over anything else, though he still does the old school mud bed on top of it for a perfectly flat and plumb wall. Cuts and installs like drywall, available in 1/2" or 5/8".
  • PRO
    13 years ago
    Erick, Once you have solved your substrate issue, I would suggest looking into using a product called Wedi for your underlayment. It is much more user friendly then conventional backerboard and has many added benefits. http://www.wedicorp.com/
  • PRO
    13 years ago
    I love the idea of using Denshield as tile backer ... never thought of it but awesome. I still think I would prefer the brown coat stucco because they can perfectly plumb out walls like nothing I have ever seen.
  • PRO
    13 years ago
    Redbud...totally right! We set Denshield for a substrate for waterproofing and stucco brown coat. More wall buildup but darn near perfect tile.
  • PRO
    13 years ago
    Only issue about DenShield is that you have to perfectly seal the edges and any penetrations or it will wick moisture...as the base is gypsum and the outer membrane is water resistant.
  • PRO
    13 years ago
    Also...as someone mentioned, you can combine the creative design with you doing all the legwork, demo, etc. That will save a lot of cost.