

Rooting Eastern Hemlock (Tsuga canadensis).
What are my chances of success? Been researching this and it sounds to be one of the more difficult and I don't want to try it if there's just a miniscule percent of this happening. Any tips or tricks to enhance success? I thought about doing softwood or semi hardwood cuttings middle of summer. That way I still have the warmth of summer still around for a while. Fall and winter it's just to cold here to try to keep some warmth on the cuttings for rooting. My basement stays about 60d during that time. Any chance of doing this or would I just be wasting my time?
Comments (50)

User
Original Author9 years agoI saw that article, and am trying to make sense of it all.
>"Stem cuttings are easily rooted but auxin treatments will enhance the response" = This says to me use the rooting compound?
But information from the NCSU ed dept. says:
>"Maximum rooting (56%) for eastern hemlock occurred at 0 mM NAA; then decreased with increasing auxin concentration."
Contradiction? Misprint? Do I need rooting compound at all?
>"Stem cuttings are easily rooted.... " = Softwood? Do I leave a bit of the old wood on the cutting?
Related Professionals
New Braunfels Landscape Architects & Landscape Designers · Natchitoches Landscape Contractors · Cambridge Landscape Contractors · Pittsfield Landscape Contractors · Green Bay Landscape Contractors · Lubbock Landscape Contractors · Ontario Landscape Contractors · Rome Home Builders · Terre Haute Home Builders · Dayton Home Builders · Parkersburg Home Builders · Gary Home Builders · Brattleboro Home Builders · Fort Collins Home Builders · Eugene Home Builders 9 years ago
This was asked several years ago and I answered this way...
In "The Cultivated Hemlocks" by John Swartley it says:
"The date of taking cuttings does not seem to be at all critical,
success being recorded from cuttings taken in Summer, Autumn and early
Spring. A fairly high level of auxin application is apparently of
advantage (2 or 3% of the active ingredient in a talc mix and similarly a
higher-than-average treatment in the case of a liquid quick dip)."It also talks about how Don Smith of Watnong Nursery got 80-100%
success using a Nearing Frame built deeper (20 inches deep) by taking
cuttings in late June to early July, "when the first early growth has
matured and darkened, and before the second annual growth begins."But it also talks of success with November cuttings, so go figure. It
also mentions its probably more difficult to grow them on than it is to
get them to root.You may want to contact Bob Fincham who knew John Swartley and helped assemble the book after John's passing. He likely would know the details.
tj
User thanked tsugajunkie z5 SE WI ♱User
Original Author9 years agolast modified: 9 years agoThanks! Guess I'll just have to try a few this summer and fall. I'm a small backyard operation :-) but being I have a T.c. with a root problem, thought it would be a way to get a new one. My tree is barely starting to break bud so didn't know if I'm too late but I took a cutting anyways and put in a small pot with cactus mix (sand, peat, perlite and sphagnum moss) watered and covered it with a plastic bag. If nothing is going on with it by end of June or so, I'll try a few more. Just starting to hit the 70's regularly.
- 9 years ago
Too early. Wait 6 weeks after strong growth starts in spring to take a softwood cutting. See mikesbackyard nursery video on this. A general rule for softwood cuttings. Better chance with younger healthier trees.
User thanked Stanton L z4 NE - 9 years ago
Also, it may take 2-3 months to root, so don't give up too soon.
tj
User thanked tsugajunkie z5 SE WI ♱ User
Original Author9 years agoI'm posting a link here that I found that is a treasure trove of information about rooting eastern hemlock cuttings. For anyone else searching. The cuttings were used in research for HWA which is included in this article but the sections on rooting cuttings are clear and quite informational. http://web.uri.edu/preisserlab/files/Caswell_et_al_2008.pdf
Thanks again!
User
Original Author9 years agoYes, it was nice how they even explained that maybe why the summer cuttings weren't as successful is because they didn't have as of good heat protection as they should have. Even showed pictures of what their cuttings looked like. And the recommended rooting compound. Just the kind of stuff I was looking for.
I'll try some softwood cuttings later this summer.
See if I can find some 'dip & grow' before then.
User
Original Author9 years agolast modified: 9 years agoHere it is. And no laughing! :-)
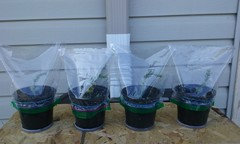
I was going to wait until next week but the growth looked about right and I'll have other things to do so took a few cuttings and placed them under the deck for now. They might get a smattering of sun through some of the cracks between the boards for part of the day but I don't think if will be enough to hurt them. Two are in coarse sand and two in top soil. Sterilized the pots, tools etc. and used some fungicide on the soil & 0.1% IBA rooting compound was all I could get. So we'll see. Very warm outside for now and I'll move them indoors this fall and put some bottom heat and light on them. My basement stays 60 to low 60's all winter. If I get one to root I'll be good and if nothing else, I learned something. Fun too! Here goes nothing. :-)
 9 years agolast modified: 9 years ago
Interesting. If they have stayed green this long, it's quite promising, but not a guarantee that roots have grown yet. As far as lighting -- I don't know.....
User thanked bengz6westmdUser
Original Author9 years ago'but not a guarantee that roots have grown yet.'
Agree, last fall I threw a pruned branch into the lilac hedge, it stayed green for weeks. lol.
User
Original Author8 years agolast modified: 8 years agoLink to good information on rooting Tsuga:
https://academic.oup.com/jof/article-pdf/50/2/126/23074778/jof0126.pdf
Re-linked this article. 1/5/18
- 8 years ago
That's a ton of good info, Bill. I was literally about to look up this thread when I got on and saw you'd updated it. I plan on trying some T. canadensis from cuttings as well. Based on all the information posted in this thread and elsewhere, what do you plan on trying next? I think I'll try taking cuttings this month or next, treating them, using bottom heat, and putting them in a small greenhouse (that I don't have yet, but it sounds like I need).
- 8 years ago
Thanks for the link Bill, very good article. I'm going to attempt some rooting as well.
I wonder why success rates from cuttings taken in January on different days varied so much. From table 3, results were 50%, 67%, 80%, and 88% using the same procedures (almost).
Is it best to take cuttings on warmer days above freezing as is the case when taking scion wood for grafting? I wonder what effect that has on rooting if any.
User
Original Author8 years agoHi Kyle,
I thought I'd take some cuttings off my T. c. around the end of the month or even the middle of Feb. We'll see how the weather is by then. I have a small table and my basement has been staying 58-60dF pretty consistently now that winter has set in. There's some curtained windows for diffused lighting and I plan on using a small horticultural heat mat that should add ~12dF according to the monitoring I've done so far. I'll be treating at planting time also. Wish I had some Hormodin3, that seems to have had the highest success rate other than NAA. My compound is only 0.1% IBA but I'll have to use it if I can't find 0.8% IBA by then.
Coniferbros,
This will be only my second time attempting rooting so I am just trying to do what I think will give me the highest success rate. There is a link earlier in this thread to the propagation forum, there windberry also suggested February to set cuttings. I don't know about the temperatures, it may be -10dF by the time I take mine and I might not have a choice.
GreenLarry,
According to all the articles I read, softwood is supposed to work too. Mine didn't. If I would have had more time last August, I would have used the 'toothpick method' posted on this board last August.
- 8 years ago
Stupidly, I did not. There's a specific tree that I found that the needles towards the ends of the branches are all a gold color. I meant to ask the man who's property it's on if I could do the toothpick method on it, but I got busy with school and didn't get around to it.
I've read that most Tsuga cultivars are from cuttings rather than grafting due to various incompatibility problems. Have you read anything similar, Bill?
User
Original Author8 years agoI did read about rooting for cultivars but I thought they meant they would root cuttings from the grafted cultivar. Does that make sense?
User
Original Author8 years agoThat last article on Vegetative propagation says that the hormone dip was 22-24 hours. Seems kind of a long time. The first article I linked to earlier in the thread says 'Dip n Grow' aqueous solution 1:1. The dip n grow web site recommends 1:5 parts water. Other articles I've read say rooting percentage went down with increased amounts of IBA/NAA. So a lot of inconsistencies in the different research that I've read.
Anyone know if it hurts Dip N Grow if it freezes?
I can order enough on line to do this project but it's cold out there and I'm thinking it could freeze in transit to my place. Could take a week to get here.
- 8 years ago
Okay, I see what you're saying Bill. Now I'm more confused than before lol. Apparently there's some compatibility issues even grafting T.c onto T. c.
User
Original Author8 years agoI know so little about grafting and cultivars I can say no more. :-)
But I have opportunity here by having the tree in the first place. So I'm just trying to get the best timing to start the cuttings, correct temperatures, planting media, hormones, bottom heat, as many of the basics as I can cover economically. If it doesn't work with all that, probably too difficult for me then.
The biggest draw back I see is that, even if successful, it will be a year before the cuttings will look like the picture in the last article I linked (small). How long they take to start growing after that is another question. I've estimated the tree I bought from Menards, 18" tall, 3/4" dia., in a gallon and a half pot, could very well have been 8 years old when I got it. That would maybe explain why old Dave said he wanted seedlings to grow into sales trees?
It's a slow time of year for me so it will be an interesting experiment and it's a low maintenance project once initiated.
User
Original Author8 years agoI called 'Dip n Grow' today and CS assured me that it wouldn't hurt then active ingredients if it froze during shipment to my area. But also said they doubt it would freeze in the first place because it has a high alcohol content in the formula.
So being it had the highest success percentage in the trials I first linked to earlier in the thread, I have a 2 oz. bottle ordered and on the way. ;)
- 8 years agolast modified: 8 years ago
I collected cuttings in January and used Dip n' Grow at the recommended ratio for hardwood cuttings, maybe a 10-30 second dip. I also made sure to create a pocket for the cutting before pushing them into the media to avoid having it all wiped off. 50/50 peat perlite, bottom heat ~70, with dome over top for humidity. Room temp was between 58-68.
I tried to root Tsuga chinensis, and Tsuga canadensis 'Gentsch White', about 5 of each. I had 0 takes on chinensis, but was able to get one 'Gentsch White' to root. When I tried chinensis, I think I made two mistakes 1. No bottom heat 2. cutting was way to small/narrow, there just wasn't enough thickness for it to properly callus and push roots. I don't think the cutting needs to be pencil thickness, like we use for rootstock, but it also can't be a toothpick , somewhere in the middle would be ideal. The one I did get to root took quite a while, I was pretty close to calling it a failure when it finally pushed roots. Maybe 3-4 months. Also, all of the cuttings were still green at that time, even though 5 of the 6 ultimately failed a few weeks later, so they can stay green for a really long time without roots if humidity is high and watered properly.
Keep us posted on your results!
-Shawn
User thanked sc77 (6b MA) User
Original Author8 years agoSure will Shawn.
I'm just getting things together and I don't want to get too anxious, thinking end of January may be the best time to start them. That would leave 4 months until 1st June. By then if I want to move them outside to a shaded area, they should be starting to root or near that and the temps will be such that they should like it.
but it also can't be a toothpick ....
Thank you for that information. That and what I read in that last link I posted, talked about how 1 year old wood did the best with 2 year coming in second. I'm thinking that my one year old wood is close to just under a 1/8" diameter, which would be larger than the cuttings that failed for me earlier in the thread. This will be 1-1/2 year old by the time I take the cuttings so hopefully I'll have the best of both worlds.
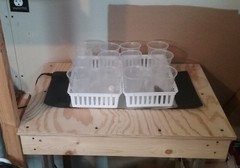
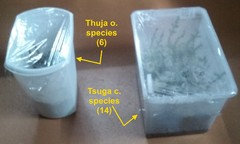
Here's what I have at this time. (14) 9oz. plastic cups on the mat. Each cup is perforated in the bottom with (5) 1/8" holes for drainage. I'm using thin plastic trays to contain possible leakage. I put a sheet of thin aluminum on top of the mat to dissipate the heat more evenly. I may have to get a thermostat too but that will depend on how hot the pad gets without it. I do have room for another mat but we'll see.
User
Original Author8 years agoUpdate:
Forecast next week for single digits below and single digits above zero so I thought I'd get to it before the weekend.
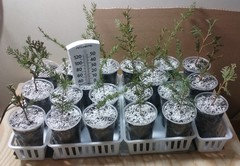
70% perlite, 30% peat rooting media (cups filled to 1/4" of top). Watered wet with distilled water mixed with a Tbsp. or two of 3% hydrogen peroxide per quart. Did this early today.
Cuttings taken ~11 AM (20's F outside temp). Immediately brought into house and cut to approx. 10"L. All pieces were part of a competing leader so top leader/branches were good size (> 1/8" dia.) with some of the lower shoots/branches a bit more spindly (<= 1/8" dia.). New growth reduced by clipping to uniform length.
Basal ends cut close to and containing a small slice of the parent leader/bark at sharp angle, stripped of green material for 1/3 up from the bottom, wounded along one side and dipped for 5 seconds in 1:1 Dip & Grow/distilled water solution. Planted in pre-formed planting holes approx. 3" deep.
Settled media around stem by finger pressing and watering with a small amount distilled water directly onto planting hole area.
Placed trays on 17w. horticultural heat mat. Will monitor temperatures but so far, after a couple of hours, thermometer in cup media barely making 68dF with ambient room temperature hovering around 60dF. Hoping for low 70's media but this is better than overheating which I thought might happen without a thermostat. But so far so good. :-)
- 8 years agolast modified: 8 years ago
Good luck to your efforts. Getting cuttings to root can be very frustrating for some species.
User thanked bengz6westmd User
Original Author8 years agoIt will be a toss up for which is more stubborn, me or the cuttings. ;o) I really don't know what to expect. Some of the documentations say 'low rooting percentage' and then, in the same doc, have charts that show success near 70%, even higher. At this point, I'd consider 25% a success.
There are six of the cups that contain Thuja o. species, which was another species I was shopping for. They are supposed to root easier than Tsuga but we'll see. It would 'up' my success rate if any of those root.
User
Original Author8 years agoFive weeks after sticking I made some final adjustments. It may be too late for this but I sealed my cups in zip lock freezer bags. To hopefully avert any pathogens or fungus, I watered the cups one last time with water laced with small amount of fungicide. Misted the inside of new bags with peroxide and water. Don't know if it will be enough but using a humidity tent proved to be just too much time involved trying to control temps and R.H. This low maintenance method should have been done from the beginning but hey, live and learn, right?
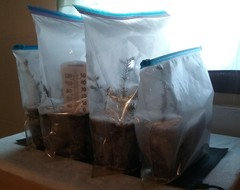
Also, temps were beginning to rise during the day at the south window so I moved the table to the east window. Morning sun only there so that should help.
And in an attempt to lower 59d ambient room temp even further, I put the table up against the cement block wall and enclosed the other 3 sides of the table with foam board. Hopefully the cool air emanating from the window will pool inside this area around the plants. Hoping for 50d or even a little lower (I'll crack the window if I have to). The top is open so heat from the mat can escape. Yes that's snow outside. :-\
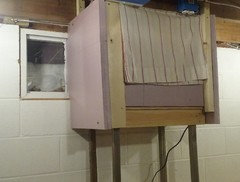
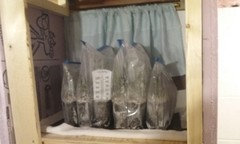
You just can't find anything more fun than doing this that's legal.
Win or lose, It will be my final configuration.
Place your bets ladies and gentlemen! :-)
- 8 years ago
A really big effort. I would think some of them would just HAVE to survive..... :)
User
Original Author8 years agohaha, yes, there's always HOPE.
Thermometer read 47d near the window with bottom heat down to 68d during the night. I don't know how long this free air conditioning will last but we usually get teens for nighttime temps on into April.
User
Original Author8 years agolast modified: 8 years ago12 weeks have elapsed since sticking. Cuttings are still green and healthy looking. I have no idea what's going on under the medium. Haven't seen any more mold on Thuja plants, since a week or so after I first bagged them. Never had mold on Tsuga.
Added some blue LED flood lights to raise light intensity. Also low angle morning sun is coming directly into the chamber for an hour or so in the early AM. Cool outside weather has enabled me to keep the ambient temps in the chamber down into the low 40's to mid 50's. But I'm sure that's going to change as more sun comes longer and outside temps rise.
Is there a point where I should just move these out to the garage?
I think it will no longer freeze in the garage from now on. It will be quit cool at night but warming during the day. Or would it be better to keep them lighted in the basement even though it warms up? And if I move them to the garage, should I still have lights?
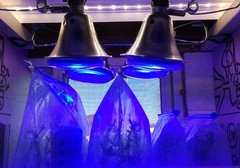
TIA.User
Original Author8 years agoFor now I'll try to keep them cool as I can. Lights on after midnight and out by 9 AM. Heat mat intermittent timer on mostly at night. Monitoring temps regularly so all this might change. :-)) Been opening window a bit during the day to get cool air flow through the chamber.
Once outside temps start dependably reaching mid 60's during the day with at least 40's at night, I'll move them onto a shelf in the garage. Averages for this will be around middle of May. I haven't seen any top growth on the Tsuga, so it's really hard to tell where they're at, so I'll try to keep temps steady until June 1st anyways. By then we're past frost danger and I can put them outside.
Any insights or questions welcome.
- 8 years ago
I haven't seen any top growth on the Tsuga
==>>> with questionable root mass .... this is a good thing .. i would SPECULATE ... this is where misting might be a plus... but i dont know ...
once they start growing.. and using water ... then the issue will become whether there are enough roots to supply the needed water ...
when they go outside ... they go in full bright shade .... for the rest of the year ... again ... to minimize water use ... especially in the heat of summer ..
hopefully.. by late fall .. you will be freaking out.. how to store them for winter.. lol ... and i will either tell you to just tip the pots on their sides.. and hopefully they get buried in snow ... OR .;... just plant them in september or so ... OR ... a couple each way ....
kenUser thanked ken_adrian Adrian MI cold Z5 User
Original Author8 years agolast modified: 8 years ago"once they start growing.. and using water ... then the issue will become whether there are enough roots to supply the needed water ..."
And why I'm concerned about the temps. I'm convinced that keeping the tops cool to cold helps keep early top growth down. And It's getting harder to keep my chamber cool with outside temps near 60d. I used to open the window during the day and the cold air would keep the chamber 40's to 50's.Now the air inside and outside is too close to the same. Nights are still okay. I found out those LED flood lights put some heat out, way more than CFL's.
I feel like I'm almost there so I'll just keep doing what I can.
Thanks again!
User
Original Author8 years agoWeek 13:
Getting hard to keep things cool by the east window with increasing AM sun intensity, heating up wall of the basement.
Also low 20's at night and mid 60's day is getting difficult to keep bottom heat in range (I don't have a thermostat and have been using timer to control heat on/off).
It appears too there are a few buds starting to break on the window side of some plants so I think it's time to do something.
Removed from bags and put the Hemlock cutting cups in a clear tote on a layer of very coarse gravel (crushed rock) and water. Not any reason for the gravel being this coarse, just all I could find on short notice. Washed gravel and tote with peroxide water before hand. Covered the top of tote with Saran wrap. Removed bottom heat.
(Didn't want the Thuja in the same tote bc there was a little mold on a few of them a while back. so left them in the bags).
It's 52d or so at basement floor level. The garage is 40d in the morning and 65d during the day with higher temps coming, so for now, I'll keep them on the basement floor where the temp is more consistent. Don't think I should use supplemental lighting. There is some ambient light from the 2 windows all day and it takes a lot of artificial light to make any difference anyways.

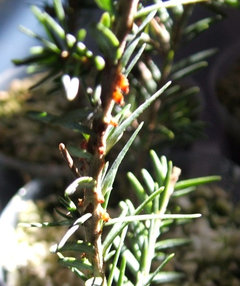
As an aside: One of the cuttings of Tsuga had something I'm unfamiliar with and can't identify. Looks almost like it is trying to layer. Producing some bumps about half way up the stem. They are pointing downward and growing longer the last several days. The top two look more pointed like a root starting idk. I posted this as a question in the separate thread. Not sure what it is. Sorry pic is not great.
Might be moving them outside in a few weeks if they don't fail. As long as the basement stays cool, I'll ride it out down there for now. :^)User
Original Author8 years agolast modified: 8 years agoJust for the record: I decided to keep the blue lights on the cuttings for another week or two. 12 hour on and 12 hour off. Raised them a few inches and the heat seems to be less of a problem. I got the lights so I could use them from the start next time around and they were on clearance at almost half off! lol, but as long as I have them, what the heck. :-)
just an FYI: I started using blue LED after reading an article on research using Blue LED and CO2 to reduce rooting time and increase percentages. I'm not a scientist but like to fiddle around trying things. I didn't start them until sometime during week 10 or 11 so don't know if they can still help. But jic they're doing more than what I can tell..... lol

oh, if anyone is looking for blue LED lights, don't be fooled by the cheap $7 ones that have the blue tinted lens. They're basically white LED and by filtering them to blue, you're reducing the total light output of the bulb. You're better off with plain white instead of those.
Mine are the true blue LED with a clear lens and silver looking diodes. You wouldn't know they're blue until you turn them on. They are intense. Every time I work around the cuttings then go to another room, all other lights look yellow/orange, even the sun beams coming into the room. :^)
User
Original Author8 years agoOkay, I'm done screwing around. Lights were making the tops warmer than ambient, close to 68df by evening last night. Took all night for things to cool back down into the mid 50's. I think cool is more important than lights by now. So back to ambient light from the windows. No heat, no lights. Moved the Thuja into their own tote and misted/watered everything until the water got almost to the top of the gravel. Floor level temperature around 53df last night. Mild night with no frost for the first time since Sept. Daytime temps rising, 70's by next week. See ya later this summer. ;o)
User
Original Author8 years agolast modified: 8 years agoUpdate:
June 17th, woke up to heavy, pouring rain in the night, wouldn't have been so bad if it hadn't came down at a 45d angle perfectly from the NE. Found the covering on my totes compromised. They were in a corner, up against the north side of the house and east side of cement front steps with a 2 foot overhang on the single story roof and a 6 ft. tall, fully branched/leafed sand cherry shrub protecting them on the North side. Nice bright area with a little evening sunset hitting the north wall of the house just above the totes.
So there I was at @ 2:00 in the morning putting things back to normal.
The pail with the Thuja was half full of water. Brought things into the garage. The cups were floating around at different angles with media mostly outside the cups. Checked for roots and found no sign of anything happening there so decided to discard the Thuja so that is finished.
Tsuga wasn't hit as hard, water was plenty high and a few of the cups partially tipped. They were tighter grouped and only one or two had the media partially disturbed. All of them were thoroughly soaked from the rain.
The Tsuga looked reasonably good, some have a few dead needles but there are a few, if not several, that are entirely green and some of them show what appears to be a small amount of new growth along the stem and branch tips. I can see no signs of mold or fungus. There is some algae evident but I assume this is because of the small amount of diffused sunlight the tote receives now that it is outside?
We'll know more in another month or so. I don't plan to do anything with them until at least the first week in August.
Picture of what things looked like before the storm: We (almost) never get rain at that angle. I had rubber binders around the top, holding the plastic on but the rain came so hard and fast that it stretched the plastic downward and filled up the sag in the plastic until it was so heavy that it pulled the plastic out from the binders allowing the water to pour in. Murphy's law?

User
Original Author8 years agoFinal update to this thread:
Had the chance to finally check for roots in my cups of cuttings from the Tsuga canadensis.
100% failure, Zero return, nada, nothing rooted not even a teeny, tiny bit.
I knew there was a few plants that had dead needles and or brown branch tips or were a little shriveled. So I looked at them first. That left me with about 8 that were almost totally green and some with new little branches beginning to shoot out from the stems. I really thought that 2 or 3 of these would just have to have roots when I checked them.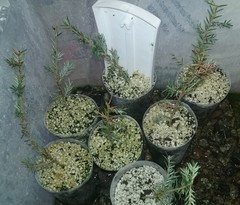
Well, no, even the nicest cutting didn't (notice several new branch tips forming).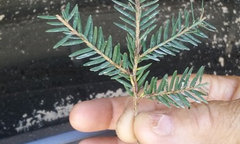
Even the one made famous by the adventitious root tips that started coming out the side of the stem back in the end of April (posted picture earlier in the thread) showed nothing. This was more of a heal cutting but you can still see the black dots on the stem where the adventitious root tips were last April. Most of these last 7 were very green and flexible shoots, almost like they were just cut recently!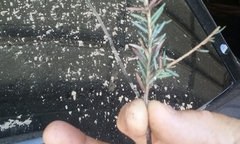
Well at least I'm done with them. 27 week since they were stuck.
So does this mean that even if you do everything right, you can still fail?Sure it does. lol T.c. has been determined as 'difficult to root'.
But I will say I started out with these cuttings in cups for the first few weeks,without them in high humidity bags. So maybe if they would've been in high humidity right from the start, they might have done better? dunno.
Anyways, it was a fun experiment and most of it done when winter kept me house bound.
I'm working on a new version of my cutting chamber for next winter.But for now, this is all she wrote for this project, I'm done.
Thanks for reading and all the fun comments with this.
- 8 years agolast modified: 8 years ago
Unfortunate, but as you note, some species simply won't root. In the case of hemlock then, best to grow from seed, transplant from somewhere, or buy. The fact that some were still flexible & green suggests they might have been absorbing water thru the stem.
User thanked bengz6westmd User
Original Author8 years agolast modified: 8 years ago" suggests they might have been absorbing water thru the stem. "
And the needles....
Like the commercial says: I was almost a genius! lol
 3 years ago
For a rooting hemlock story that was successful, see link below:
https://www.houzz.com/discussions/5505187/rooting-of-side-branches-on-hemlock?n=62
- 3 years ago
Bill, seems I recall for sale little "bags" filled with rooting media that you can tie over a suitable stem, and after some time (a year?), cut that off below the "bag", remove the bag and you have a stem with roots...
- 3 years ago
I can't say if I ever saw those on sale beng. I wonder if they work.
I've experimented rooting conifers and have had good success, the last two times. I used my 'Rooting Genie' (showcased in the link posted earlier above and, in the link, below).https://www.gardenweb.com/discussions/5819790/thinking-about-rooting-conifers-again#n=83


bengz6westmd