Software
Houzz Logo Print
terry_wysocki

Customizing width of a Coolaroo rolldown cordless shade

9 years ago

I have a gazebo and would like to install two Coolaroo rolldown cordless shades in its two "windows". The openings are 118" wide and unfortunately, the stock shades come in 122" or 98" wide. They do offer customized widths, but whereas a 122" is at Lowe's for $69, a custom 118" costs over $400! I decided that maybe I could modify it myself! So, does anyone have any experience modifying these that can offer some tips?

Comments (18)

  • 7 years ago

    Is is possible to trim the top rod also? Thank you for this post!

  • 6 years ago

    Thanks for this post. Couple of tips. Pull your shade apart first. Put all of your mounting brackets up. Take one of the top rod end caps off and hold in place and measure across to second bracket. This will give you the exact size to cut your top bar. once you have the exact size bar you can measure the groove in the top bar and get your exact material measurement. I used a pair of adjustable pliers to pull the cap off. Cut with a hacksaw. came out perfect. Saved a couple hundred dollars.

  • 6 years ago

    I just got the shades, after some difficulty with Home Depot's online system that doubled the order I had clearly entered (3 shades rather than 6) and did not allow changing or editing an order after an hour of its being placed. What a hassle, but the Home Depot executive escalation team finally figured it out and UPS is coming today to pick up the unwanted 3 shades.

    That said, I've been thinking over how to cut the three shades I have (8' w x 6' L) to the sizes I need. I could have ordered custom sizing, but that would have cost 4 to 5 times getting standard size 8' widths and cutting them down. Mostly I’ve been thinking about hack-sawing the top roller and bottom rod (using a grinder cut-off wheel actually) and putting the caps on back on the usable portion. A post here suggests just narrowing the fabric and leaving the rollers full length. I could do that and it would be much easier, but I'm also thinking the cut off pieces (2-4 foot) would be handy to shade some other locations, so I'll go with a through-cut that will leave rollers on the scraps as well.

    One different approach I’m taking than those suggested here and elsewhere is the treatment of the cut edges. Instead of sewing them, I'll be using a high-quality weatherproofing tape, like 'ProTape' and folding a 1" strip over the edge. The tape is very durable and weatherproof and sticks like crazy. For protecting the vulnerable edges, I think it will do a much better job than any sewing machine could do. It's very flexible and only a few mils thick so it should give no problem with rolling the shades up. In fact, I think using it on the uncut edges of shades is a good idea as well. I'm also using simple tie-down anchors of the type used on truck beds or roof-racks - inexpensive and just right for the job. Very short bungie cords are probably best for tying down the shades to the anchors, since they allow for a little give in a stiff wind. Less chance of ripping or stressing the shade.

    I do have one question to ask. I'm also thinking about giving the shades the rain and wind protection they really should have. I think most people want the shades that will protect from heavy rain and wind as well as sun, light breezes and such. the suggestion of Coolaroo to "roll them up" in more severe weather conditions is not really very useful at all. So I'm think about either backing them with some rip-stop fabric which will do the job, or perhaps surfacing the outside with a spray-on polymer of some sort. Both methods might work to add strength and waterproofing to the fabric. I Haven't researched the matter yet. Any suggestions?

  • 6 years ago

    Rust-Oleum NeverWet Outdoor Fabric Protector.

  • 6 years ago

    please post some pictures

  • 5 years ago

    Thank you so much for your question, and answering your own question, lol!!!


    Who would have thought 3 years later someone would have needed your expertise!!!

    I do sow, so (no pun intended☺️) I should have no problem stitching up what I need to trim!


    Once again thank you

  • 5 years ago

    Thanks for all this! I just bought shades that I want to mount inside my pergola beams. I just googled” can I cut Coolaroo blinds”

  • 4 years ago

    No need to sew the side of the blind, when cutting it down. Make a precision cut in-between the seams that edge will now be frayed and that's ok. Take a disposable lighter and Run a small flame along the frayed edge, it will seal up nicely.

  • 4 years ago

    Hello!! I read all the other comments about the Coolaroo shades. I have a shade that needs to be cut so it will fit into the opening. I have a 72" wide shade but I need it to be 68". I tried removing the end cap but stopped because I needed to research first on what to do so I don't ruin a new shade. I read someone used pliers to remove the end and used a hacksaw to cut the bar. Then cut the fabric in the middle of two seams. Can someone let me know if it's ok to shorten the width this way? Thanks so much.


  • 4 years ago

    To HU-878's question about further protecting the fabric from wind and rain. We had these shades up in on the deck in our former house for 12 years. They took a fierce beating from the sun and some rain and suffered no damage. I think it would be a make-work project to treat them.

  • 3 years ago


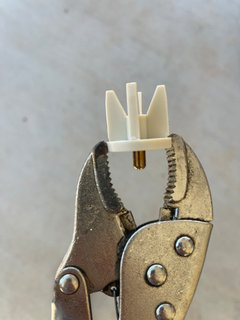
    This is the cap you pull off before shortening the rod with a hacksaw.

  • 3 years ago

    Thank you!

  • 3 years ago

    Great thread, thanks for taking the time to answer your own question. We are planning to build a corner ‘gazebo/pergola’ where our outdoor sectional sits. We were inspired by something we saw at Home Depot.
    The build is not the issue, it was the custom shade we would need…and ordering custom sizes is $$$ 🤯🤯.
    We have a Coolaroo shade for our main gazebo and love it…and it was under $100CAN.
    I think I’ll pick up 2 and try to modify them as you did…and either hem the edge or as someone pointed out maybe even use heat to seal the edge to protect from fraying.
    Thanks again for posting

  • 3 years ago

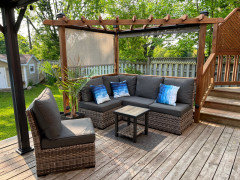
    I’m back…and while I know I’m mostly doing this for my own satisfaction, you never know who you might help. If it wasn’t for me having stumbled on the 6yr old post by Terry (and his own follow-up!), I likely wouldn’t have tried to pull this off.
    I’m so pleased with the results, I wanted to share. Thank you all - especially Terry - for the inspiration!
    I was able to modify 2 entire Coolaroo shades - including aluminum valences - to fit the gazebo I built. I used the ideas on this thread and it looks amazing and operates flawlessly.
    My shades were originally 8’ wide each. One is now 78”, the other around 60”.
    I cut the valence, and top & bottom rods with a hacksaw. Measured the fabric and trimmed it with a razor blade. Then it was easy to fold and stitch a new 1/2” seam on our cheap Singer machine.
    It all went back together without issues. One other mod I did that I think makes a difference is I filled the bottom rod with sand. This makes it MUCH heavier and the shade rolls and hangs better.
    Also, I cut some ‘retaining strips’ to make a track for the lower rod to travel in, which completely removes the need for any tie-downs or anchor brackets.
    One last thing I did was shorten the hand cranks to fit the installation. They work great too.

    The entire gazebo & shade project cost us about $400 including lumber. The gazebo we’d seen at Home Depot that inspired the idea was $2500 - which included a small couch. We got our little sectional couch on liquidation at HD for under $600 a couple years ago. The deck is 15 years old, and this project has given it new life…and new shade! Much better than the umbrella we’d been using for sure.

  • 3 years ago

    Beautiful!

  • 3 years ago

    Putting sand in the bottom rod is brilliant. Thanks!

  • 2 years ago

    Great suggestion, thank you. I'm doing t

    the same modification resizing the shade. I have had a couple of the bottom rail caps break off so decided to drill holes in the rod and thread the bungee cord through. The shade is now super secure.