Software
Houzz Logo Print
hzdeleted_46915684

Trimming corrugated tin ceilings

8 years ago
last modified: 8 years ago
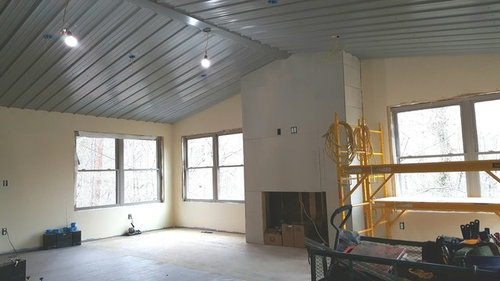
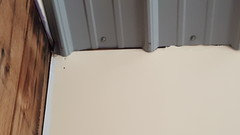
We have gutted and are renovating a home. My husband has installed corrugated tin ceilings in the living room and bed room. He is not happy with the finished product as there are gaps where the tin didn't fit flush all the way to the wall at times. We love the scalloped look but not happy with the rough gaps. Any suggestions. Photos attached.


Comments (29)

  • 8 years ago

    Rip that crapola down. It’s impossible to clean. It’s not a good look even in an actual barn.

  • PRO
    8 years ago

    I have no idea what you are trying to acheive but that ceiling looks like the inside of a steel building, theen you have some weird wood wall that looks like it was reclaimed and a door that works with neither the steel or the wood and of course you will have a odd edge with corrugated steel , this is one of those instances where nothing is thought through before starting.

  • 8 years ago
    Wow! Someone who's actually willing to do something outside the box. Kudos to you! I'm not exactly seeing the gaps you're worried about, but maybe you could run a simple moulding around the perimeter. Just a plain 1x3. Would that cover any gap? Then just paint it the same color as the walls, and it would look completely intentional.
  • 8 years ago
    How about some reclaimed wood trim where the tin meets the walls?.....long lengths so there will be only a couple of seams. The wall below the tin should be painted to match the wood trim before the trim is installed to hide any gaps caused by the uneven tin edge.
  • 8 years ago
    last modified: 8 years ago
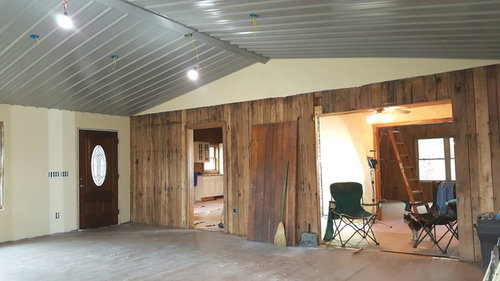
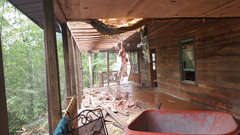
    Thank you Duane and felizlady for your help and encouragement. Installing a piece of trim would not hide the flaws. The trim would have to be notched at every scallop in edge of the trim. I need a closer photo that I will show later when I am there. This is a photo of what we were facing while starting this project.

  • PRO
    8 years ago

    I think I get the rustic/industrial/farmhouse vibe you're going for. I agree with Duane with trying to find a simple molding so the gaps won't show.

    What Patricia and Sophie were responding to, I think, is that these are two very strong elements and right now it seems like they're fighting each other. I'm super interested in seeing how this turns out though. My advice would keep a lot of the other elements very simple because even in a grand space like this you don't want to overwhelm it.

  • 8 years ago
    thank you and we do plan on keeping it simple. gray flooring and gray stack stone on the fireplace. the front door is really not what I had in mind but when it's a solid wood mahogany door for $350 we couldn't pass it up. we plan on using the old heavy barn doors on sliding tracs in other parts of the home.
  • 8 years ago
    Looks like you are in a beautiful area. I would love to see what you do.
  • 8 years ago
    We are in Gatlinburg Tennessee and I will try to remember to post pictures when we are finished. thank you for your comment
  • 8 years ago

    Here are the photos where it didn't go as planned, so now trying to come up with solution for hiding the flaws. Never hung tin before but a whole lot easier and less costly than sheet rock.


  • 8 years ago
    That's a tricky one! Perhaps a very neat caulking job, the same color as the roof. Have you looked to see if there are any flexible trim possibilities out there?
  • 8 years ago
    thank you humming Along 2. I have found online a product at Home Depot that is in 4-foot sections of vinyl J trim at 699 a piece in many different colors and do have the color we would need. looks like it could possibly work and I will show it to my husband later.
  • 8 years ago
    that is 6.99 for 4 foot section
  • 8 years ago

    Could you make a jig and use a router bit for the notches?

    User thanked D M PNW
  • 8 years ago
    We have metal like that on the ceiling in our shop. It has a piece of metal “J” channel to hide the ends. Typically you install that 1st, and slide the ends of the metal into it.
  • 8 years ago
    drbevdc, that's what I was afraid of. would be extra work but the screws could be taken out and then put back after installed
  • 8 years ago
    Angel, I just searched "corrugated metal and wood" on this site. You may find a solution there. I noticed a soaring post and beam kitchen with a metal ceiling. It appears that they applied a wide metal flashing around the edges. It's been bent into an angle so that it covers the gap and comes down onto the wall. If you can find a local metal worker, they have the tools to bend metal flashing perfectly. Otherwise, you can accept the rustic imperfections of what you have. And that's OK too! Your post has been so refreshing. I'm so sick of people agonizing over their backsplashes, gray paint and the exact number of pendants required for their island.
  • 8 years ago
    thank you Duane, you are refreshing and encouraging also.
  • 8 years ago
    last modified: 8 years ago

    If you didn’t put that over drywall, it ALL needs to come down and be sheetrocked first. Both for air sealing for energy efficiency and for fire resistance over the insulation. You did insulate this, right? With spray foam? Metal conducts heat way too easily! It MUST be insulated. And that insulation must be fully covered. Then you can use the standard J channel sold by the roofing company.

    Hillbilly style doesn’t need to mean death from an out of control fire burning insulation because of hack construction.

  • PRO
    8 years ago
    last modified: 8 years ago

    No comments on the looks or the code compliance, however that is R panel roofing. If you check with a local The Home Depot or metal roofing supplier, you should be able to source foam filler made for just that type of roof panel. There are two types: the inner filler that goes beneath overlapping R panel, and the outer filler that fits under overlapping flashing. Both types are about an inch or so wide. Since you've got everything upside down cattywonkers, you'll want the outer flashing filler. If you use some cut down L channel on the wall tucked up behind the end of the panels, you should have enough room to install self-tapping or roofing screws with an extended bit (and perhaps an angle adapter on a driver to get into the tight space) so that they are hidden and don't show. R panel is about an inch from peak to trough, but some manufacturers use 1-1/4 inches or more. Finally stuff the black foam filler into place to conceal the openings...sort of. With the angle of the walls to the ceiling, you may have to bend the L channel to more closely resemble a spreadeagle V channel. Once everything is place, you could come along again and drive some small self-tapping screws from underneath the L channel into the ridges of the R panel to secure the foam filler into place and minimize the chance for the L panel lip to droop over time.

    Some metal roof manufacturers make an overlapping flashing that conforms to their particular R panel, but unless you're extremely lucky finding the manufacturer of the original R panels, then the foam filler is probably your best bet.

    Make sure there is plenty of insulation behind the roofing panels. If you have a cold ceiling on one side or the other with a significant temperature difference, the condensation on the metal will be fierce.

  • 8 years ago

    Why doesn't the wood go all the way up to the ceiling? You're left with that goofy little triangle that has to have a different finish. It would have looked sooooo much better to have solid wood to the ceiling.

    And that ceiling, IMHO, is a disaster.

  • PRO
    8 years ago

    one of our clients built a distillery with a similar look. Agree w/ tatts, it would look 100x better if the wood extended to the peak.

    Definitely look into the insulation and safety issues Sophie raised. She knows what she's doing, and I personally like advice and corrections that are direct and to the point. That may be due to a background in the arts, including being a classically trained musician and having a dad who favored the Suzuki method of instruction though :)

  • 8 years ago
    last modified: 8 years ago

    There is no fire rating requiring a gypsum ceiling for this situation in the IRC. If there was a true fire rated assembly, like for stacked condos, you would not be allowed to install recessed cans in the manner that they are normally installed. The IRC mainly only requires drywall for fire protection between the house and garage, and the underside of floors and stairs in a single family dwelling.

    User thanked User
  • 8 years ago
    I love the look, perfect for a mountain home in the Smokies. I hope you find an easy solution.
  • 8 years ago
    I know this was months ago but how did it turn out?
  • 7 years ago

    Measure the width of the corrugation i.e the bump or high of the metal. Take a hole saw twice the width and drill a 1x4 down the center with the matching spacing. Rip the board in half and fit the trim along the wall . Any small deviations can be caulked. Paint to liking and call it a day.

  • 5 years ago

    I love it! I'd like to see finished photos. I want to do similar to my basement.

  • PRO
    5 years ago

    I am curious about your method for cutting the holes for the electrical boxes? Details would be appreciated. I am doing something very similar. Thanks.