Software
Houzz Logo Print
polypompholyx

rooting shrub cuttings

7 years ago

What is a good way to do this? I've not had much luck with it. I've been trying to root some Cercocarpus (mountain mahogany) cuttings by dipping them in rooting hormone, potting the cuttings, and putting the pots in a plastic bag with a small vent cut in the side. However, I expect my most recent attempt will fail like previous attempts. Seems like the trouble with Cercocarpus is that in their typical environment they like air movement, full sun, and minimal moisture- the opposite of placing cuttings in a plastic bag. Any ideas for how to root my cuttings? I don't have a proper greenhouse so I don't have a place for a misting bench. I do have a very large aquarium in the house. I could put a small fan, humidifier, and grow light in the aquarium. I haven't tried that already because I don't have a cover for the aquarium. Years ago I tried using a plastic sheet for a cover but that didn't work. If I put my mind to it I might be able to figure out some kind of cover for it that will work.

Comments (24)

  • 7 years ago

    This is an old, but valid post on the subject.


    https://www.houzz.com/discussions/2118697/it-s-august-and-time-for-the-toothpick-technique


    I can attest to it working. I managed to root a nice Southern Catalpa cutting on my first try a few years ago.

    Polypompholyx thanked treebarb Z5 Denver
  • 7 years ago

    I'll add another old thread with some info that might be helpful for you! Unfortunately David52, who posted this, isn't around anymore to answer questions for you, but he had a large property and rooted all kinds of things, and he eventually decided that doing it in pure perlite was the best way after trying many other methods over several years. It seems that over the years one of the pictures has disappeared from this thread, and it's the one where he had dumped out one of the pots of rooted clematis cuttings, showing all the roots that had developed--it was pretty amazing!

    In case it's not clear here, what he used for his "mini greenhouses" was produce containers, using one on the bottom and then inverting another one over the top of the plant/cuttings--which provided an "enclosed space" yet had good enough air circulation to prevent the cuttings from staying too wet. And using the perlite kept the bottoms of the cuttings wet, but never too wet since water runs straight thru perlite! I don't generally root hardwood cuttings, but if I were ever to try, this is the method I'd use since I knew--he posted a lot--what good success he had.

    It's not in this thread, but the issue of using dry perlite came up in another thread, and I would highly recommend that if you do ever decide to try the perlite method, wet the perlite down completely in it's original package before you open it, or wear a face mask until you have it completely soaked--unless you can hold your breath for a really, really long time! ;-) Perlite "dust" can really mess with the lungs!

    I also second trying air layering as suggested above, or using the method in the post that TreeBarb linked! Barb roots all kinds of things!

    Good luck with your project,

    Skybird

    P.S. I haven't seen you around here before! Are you in the Rocky Mountain area somewhere?

    https://www.houzz.com/discussions/2139430/clematis-rooting-update#n=5

    Polypompholyx thanked Skybird - z5, Denver, Colorado
  • 7 years ago

    Naive suggestion from a new gardener who has also had many propagation failures: try sticking the cuttings straight into the soil outside, in a spot that gets no direct sunlight, tends to stay moist, and gets a decent amount of indirect light and breeze - not a corner or a cave. And then just keep the soil moist.

    My ONLY successes with shrub cuttings have come from such conditions. I don't currently have the time, space, or gear for a real propagation setup, so I tried the plastic bag thing (without clean potting media, mind you) and never managed to find the balance between dehydration and rot. At least the outdoor method is basically free in terms of time and money, providing you have the space already.

    My guess is that the plants won't want full sun until they have healthy roots.

    Polypompholyx thanked teuth
  • 7 years ago

    I didn't know this plant so I Googled it. It's in the Rosaceae which are generally fairly amenable to cuttings. I'd try the pot and bag method again and also teuth's stick it in the ground and forget it method. How long are you leaving these before you give up on them? Leave them several months at least.

    This is is a long article but there's a picture of a rooted Cercocarpus so it can be done https://pdfs.semanticscholar.org/a1b7/0add113699c0db7eafb81ee243ef279b2ecb.pdf

    Polypompholyx thanked floral_uk z.8/9 SW UK
  • 7 years ago

    More info on propagation techniques: Simple layering and other approaches.

    Polypompholyx thanked Deb
  • 7 years ago

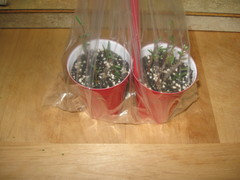
    Here's one of my bagged pot pairs.

    I have more but this is the C. intricatus. I didn't clean the cuttings before sticking them in the pots and then putting the pots in the bags. I should have done that. Last night I noticed some stuff growing on the cuttings in a few places so I mixed together some spray, took them out of the bags, and sprayed them in the garage. I guess I thought the stuff growing on them was fungus but now that I think about it I'm not sure if it was fungus or mold. So far today no sign of fungus/mold growth.

    The trouble with trying some different rooting techniques like air layering or the toothpick is I need to drive about 2 hours to get to the shrubs and do a short hike up a steep slippery hill to get to the Cercocarpus hybrid. Perhaps I'll try those techniques next time. I might go there again before winter.

    I think I tried the method of sticking the cuttings in the dirt outside but didn't have luck with that. Keeping the ground moist where I live is a challenge. I've also tried sticking the cuttings in a pot without the bags and keeping the pots moist and outside on the north side of the house. That didn't work for me. Part of the challenge is finding a method that works for the cuttings and is convenient enough for me that I follow through with it. I've let cuttings sit in a pot for several months but usually they are over run with mold or fungus after that time if kept in a bag.

    I'm on the west side of the Rockies in southeastern Idaho. Initially I came to Gardenweb/Houzz for the Cacti & Succulent forum but I've had an interest in the local plants (I guess those same plants are common in the Rockies) for a long time and recently started visiting more forums on Houzz.


  • 7 years ago
    last modified: 7 years ago

    Just a quick comment! With many things that you're trying to root from cuttings, the time of the year you do it can make a big difference in whether it works or not, and I believe that's even more true with hardwood cuttings. So if you continue to have trouble, I recommend trying at different times of the year.

    Since it's so far, maybe you could take a picnic lunch and a blanket and find somewhere on the way or coming back to stop and just sit for a while to enjoy Nature when you go to get more cuttings--make it a "fun trip" rather than a "task" to go get the cuttings!

    You're calling this a "hybrid." Are you sure it actually is a hybrid, as opposed to a straight species plant? If it's straight species you might fine it easier to just collect some seed and start some that way. Even if it is a hybrid, you might collect some seed to start--you just might wind up with a very interesting "new" form of the plant! If you do ever decide to try seeds, I suspect that cold stratification would be needed for something like that.

    David52, who wrote the "perlite" thread, lived in Dolores, CO, so he was very definitely in a high, dry place! If you do try more cuttings, I very much recommend you try some of them in perlite instead of soil. I suspect you'll have less trouble with mold/fungus with the perlite.

    If you ever get some to root, come back to let everyone know what finally worked for you!

    Skybird

    Polypompholyx thanked Skybird - z5, Denver, Colorado
  • 7 years ago

    The cuttings in the pic aren't hybrid to the best of my knowledge. However, I have more cuttings that weren't in the pic and I'm sure some of them are hybrids. The hybrids have leaves similar to C. montanus but a bit longer and thicker and they aren't C. ledifolius. I'm not 100% sure but I think the hybrids either keep their leaves all winter or at least keep their leaves longer than regular C. montanus. Driving 2 hours one way and hiking up a hill is enough trouble that I've thought of collecting seeds from the C. intricatus and C. montanus shrubs, grow non-hybrid shrubs, and try crossing them to make my own hybrid. However, that would take a long time. I collected some seed years ago but it's been so long I'm not sure what I did with it. I agree that my timing for taking cuttings has been a bit random so far. Finding a good time to go for a drive for a day isn't always easy.

  • 7 years ago

    So far I haven't seen any mold or fungus on the soil mix. It has only appeared on the cuttings. I cooked the soil mix in the oven for about 30 min at 180 F before using it.

  • 7 years ago

    Mold/fungus has appeared in a few more places on the cuttings. I've been spot-treating the places the mold/fungus appears with a touch of isopropyl alcohol on one end of a q-tip and concentrated fungicide on the other end.

  • 7 years ago

    you might benefit greatly... from getting a copy of dirrs manual on propagation of woody plants ... try a local library ... to review it.. before investing in it ....


    i suggest you hone in on TIMING ... many woody plants are done when in dormancy ... if this is one of them.. you are about 6 months out of phase ... the downside might be access to the plants in the proper season ...


    timing might also help you avoid the disease issues ..... i cant see how repeatedly spraying or wiping them with goo's is helping the greenery on plants with no roots ... if you damage those leaves ... there is no energy to releaf ... and the thing is.. if you damage them now.. it might be weeks or months.. before you know you did so ...


    and while you are at the library.. you ight ask the reference librarian .... if there is anywhere around.. that offer lectures on propagation ... you might be surprised ... though here in MI ... they are usually held in winter ...


    also.. if you are doing this indoors... i am wondering if you have proper light levels to maintain photosynthesis ....


    the key with dirr.. if you study it.. is that ALL the variables to success ... are covered ... and you have to perfect each of them .. within your capabilities ... to succeed ..


    and BTW ... you can not cut pieces off a plant.. with no roots.. and put them in wind ... they will dry out .. do not confuse a rooted established mature plant ... with some sprig with no roots ... presumptions such as that ... will lead to doom ... .lol .. a bit of drama ...


    ken


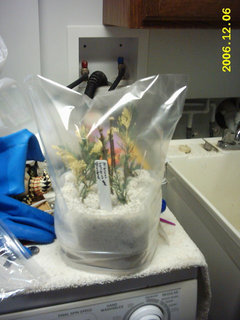
    ps: you might also benefit by going for hospital operating room sterile .... wash everything in 10% bleach ... and sterilize your media ... if you can start 'clean'... then you dont have to 'fix' it later ... all tools.. surfaces... pots.. etc ... even sterilize your media .. below is a pic of how i did it back in the day.. under indoor lights .. may have even gotten the idea of perlite from dave ... who knows ... i sterilized that also ...


    https://duckduckgo.com/?q=dirrs+manual+propagation+of+woddy+plants&t=ffcm&ia=shopping


    https://tipnut.com/sterilize-soil/


    and.. i presumed a brand new plastic bag from the box.. was sterile


    Polypompholyx thanked ken_adrian Adrian MI cold Z5
  • 7 years ago

    one other thought ... you might want to try more of a shotgun approach .. try various methods ... you might get luckier ... rather than hoping you will find that one method will work

    Polypompholyx thanked ken_adrian Adrian MI cold Z5
  • 6 years ago

    Update: looks like the Cercocarpus cuttings are dead. The leaves are dead and there is a lot of fuzz growing on the cuttings. I pulled up one cutting and broke the stick. There was no green inside. This isn't a surprise because I took the cuttings at a non-ideal time of the year and didn't clean them before putting them in bags. I'll keep them in bags a bit longer, I think, but seems like it is about time to give up on these.

    I made some shrubby Lonicera cuttings. I rinsed them off for about an hour and then used a bit of bleach on them to clean them before bagging. So far there's some fuzz growing and lost yellowing leaves but it isn't as bad as the first time I tried rooting cuttings from this plant. Again these cuttings were probably taken at the wrong time of the year but I was bored and wanted to see if there were any differences as a result of cleaning them.

  • 6 years ago

    Shrubby Loniceras are some of the easiest shrubs to root. You can just stick a bunch of pieces in the ground outdoors like Forsythia, Philadelphus etc.

    Polypompholyx thanked floral_uk z.8/9 SW UK
  • 6 years ago

    The use of bleach on the cuttings worries me. I don't see how they could have survived that treatment.


    Polypompholyx thanked tete_a_tete
  • 6 years ago
    last modified: 6 years ago

    I'm curious what your setup looks like. Are you using the aquarium that you mentioned early on, with the grow light? Are these being left outdoors in the shade while they root? What sort of temperatures are the cuttings being subjected to? What soil are you using? What concentration of what rooting hormone(s) did you use? I read through your posts and didn't see any of this mentioned.

    All the sterilization in the world won't get you any success if the rest of the necessary factors are being ignored.

    Also, it doesn't look like you picked an easy species to root from cuttings, although it should be possible:

    https://www.google.com/url?sa=t&source=web&rct=j&url=https://courses.washington.edu/esrm412/protocols/CELE3.pdf&ved=2ahUKEwiI9r6kq7PkAhUBi6wKHRKRDGMQFjABegQIAxAB&usg=AOvVaw1uLw7dGtDsGQo-pftJ-pDX

    (scroll down to the section for cutting propagation - it briefly discusses C. intricatus, including rooting hormone concentrations that have worked)

    Polypompholyx thanked User
  • 6 years ago

    tete_a_tete,

    I diluted the bleach to about 20% and rinsed the Lonicera cuttings in the bleach-water solution for about 5 minutes.

  • 6 years ago

    illsstep,

    I'm not using the aquarium. Making a lid for low cost is proving to not be as easy as I hoped. I found a guide for doing that but the tracks for the home cut glass lids aren't as easy to get as the guide suggests.

    I live in a desert. Sticking cuttings in the ground outside might work for some people in some places but I doubt that would work for me. Maybe I'll try that someday just to see what happens, possibly prove myself wrong, but for now I'm keeping cuttings in bags indoors.

    The temperatures are about 76 - 72 F day and night indoors. I think that is more or less the recommended temperature for rooting cuttings.

    The soil is a mix of potting soil, perlite, and grit that was cooked in the oven at 180 F for 30 min. However, looks like plain perlite is preferred over the mix I used.

    I'm using EZ-CLONE rooting gel that has IBA 3g/L (3000 ppm) concentration with some Vitamin B-1. Some success with rooting Cercocarpus using close to that concentration (2000 - 4000 ppm) was mentioned in the article. I don't know what is recommended for Lonicera.

    Yes, success with Cercocarpus seems to be hit and miss. I'm hoping the Lonicera will be easier.

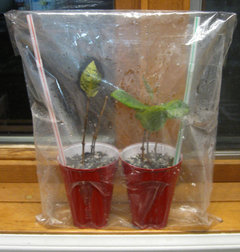
    Pic of Lonicera cuttings:

    I cut the bottom corners off the Solo cups for drainage. The cups in the bag are in a window that is south facing but the eaves of the house prevent direct sunlight from coming in the window at this time of the year.

  • 6 years ago

    Update: In the last picture above there are 6 Lonicera cuttings. Currently only two of those cuttings still have leaves. However, I am seeing new growth at the top of one of the leafless cuttings. There is a bit of mold/fungus on the cuttings but it is minimal. I haven't unpotted and checked for roots but I think at least some of the cuttings must have roots.

  • 6 years ago

    Update: Leaves started growing on all of the cuttings except the two that still had leaves. However, looks like 1 or 2 of the cuttings aren't going to survive but 4 survivors out of 6 cuttings isn't bad.

  • 6 years ago

    The growth of leaves does not necessarily indicate the growth of roots, so don't assume they're rooted yet. Stay patient.

    Polypompholyx thanked floral_uk z.8/9 SW UK
  • 6 years ago

    In the past I've taken a dormant cutting from a tree and stuck it in rooting mix and had the buds pop producing small leaves quickly. There were no roots in that case.


    In this case I thought the new growth did indicate the growth of roots and I already opened the bag about a week ago. The two cuttings that weren't looking so good were deteriorating before I opened the bag. The other 4 that seemed OK have continued to be OK and the mold problem ended. I have seen roots produced with no signs of new growth above the mix surface, too, but considering the mold problem I wanted to open the bag as soon as possible and opening the bag seemed possible.


    To clarify which cuttings are OK and which aren't: of the two that held on to their leaves the longest one of them just started growing leaves further down the stem and the other has lost all of its leaves. Of the other 4 that produced new leaves one of them only produced small superficial leaves which later died. The others produced larger leaves. All of this happened with the bag closed and the humidity kept high. I think the one that only produced small leaves may have begun to root or was close to rooting but failed for some reason.

  • 6 years ago

    Update: Of the two cuttings with no green leaves, one had some small leaves that died, and the other kept its original leaves for a long time but they eventually dropped. I was really curious about what was going on below the surface of the potting mix. I pulled up both cuttings. The one that had the tiny leaves that died had a single root that looked dead. The other with no leaves had some healthy roots that broke when I pulled it up plus had multiple healthy looking shorter roots. I threw away the dead one and replanted the one with good roots.

Sponsored
Bella Casa LLC
Average rating: 5 out of 5 stars17 Reviews
The Leading Interior Design Studio in Franklin County