Software
Houzz Logo Print
webuser_828217389

Undermount sink gap, normal?

6 years ago

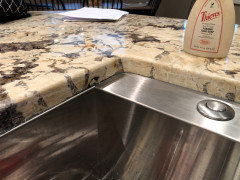
Our contractor installed a new sink but there‘s a gap in one corner. Unfortunately pretty visible because it’s on the far end of the sink (faucet side). He says the sink is bent and that’s why there’s a gap - says it’s normal and within spec (whatever that means). I have another new sink (same exact model) in my garage but he has no interested in switching it out. He says he’ll put a white silicone vs a clear one in a few days and it should look better. What do you think? Does it look “normal” (i.e. do gaps happen) or should I keep pushing for the reinstall? Thanks


Comments (15)

  • 6 years ago

    Can you please take a look under the sink and take an image that shows how he supported the sink?

  • 6 years ago
    last modified: 6 years ago

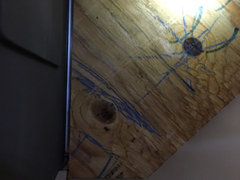
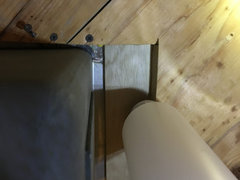
    Thanks for your reply! Sorry if the pics are not great, I can certainly take a few more if it helps. Best I can tell is that the sink is lying flat on the plywood that that he used as a base under the countertop. No brackets used or anything. Third pic is the corner in question


  • 6 years ago
    last modified: 6 years ago

    I’m not the expert, I’ve just read about this stuff, mostly here on Houzz, mostly in regard to mishaps, so I apologize if I’m giving you bad info. Joe and oldryder will both probably let you know for sure what’s going on.

    My understanding is that undermount sinks are held in place either by clips that attach to the counter material and the sink, or by a sink harness like the Hercules Universal Sink Harness. If your installer used neither, you could have issues. My guess is that proper support will have to be retrofitted somehow, if possible, and not by your current installer.

    Indications that I might be right include the fact that he says your sink isnt level but he thinks his plywood is, and the fact that he hasn’t tried to caulk anything.

    On the bright side, I could be wrong. Fingers crossed.


  • PRO
    6 years ago
    last modified: 6 years ago

    @Joseph Corlett, LLC < what this pro says.

    Except that out here in the Wild West we are now getting civilized ... but for occasional power outages.

    Matt thanked Jeffrey R. Grenz, General Contractor
  • 6 years ago

    Well, you’ve heard from Obi-wan... Good luck with the retrofit.

  • 6 years ago

    Thanks for the replies! In order to remove the plywood someone would need to cut it - should I be concerned about any potential damage to the stone?


    @Jeffrey R. Grenz, General Contractor Any chance you know someone in the Bay Area that could this kind of work?

  • PRO
    6 years ago


    Here's a close-up of the joint between the sink flange and the bottom of the stone on my last replacement. It looks like this all the way around. There's a few drops of water lying on the left reveal.


    I've had sinks that wouldn't lie flat, but they were custom, never a production sink.

  • PRO
    6 years ago
    last modified: 6 years ago

    "In order to remove the plywood someone would need to cut it - should I be concerned about any potential damage to the stone?"

    No, the stone won't be damaged, but that's a real PIA job because I just did it a while ago. It's gonna take at least an hour on your back with a multi-tool or a Rotozip with sawdust in your face. You'll ruin several bits/blades.

    Matt thanked Joseph Corlett, LLC
  • PRO
    6 years ago

    The plywood is to support the stone not just in the sink area but the entire span of it.


    Maybe it is well attached and is bent but the idea that they would leave it not caulked is an issue considering most installers us the caulk or adhesive as part of the mounting system.


    On Amazon they sell undercount sink brackets. The come in a pack of 2 or 4 and look almost like angled table legs. You push the bracket up pushing the sink flush and then you screw the bracket into the cabinet side. This will support the sink and hopefully with enough force close the gap. You could try with the plywood in place.


    Make a lever and can see if adding upward pressure will close gap. You can also fill sink and see if it widens which I suspect will happen here. Many people dont realize


    Get a 2x4 and cut off a 1' section and lay on cabinet bottom. Cut another 3' section. Then lay that one on the last one as a handle. Measure from that up to sink bottom and cut your last piece. You then lay that vertically from the handle one upward. You now have a simple lever to add pressure upward to test if the sink is loose or not.

    Matt thanked Brian Gannon
  • PRO
    6 years ago

    So close yet so far away. Usually this is done by the fabricator. There may be techs doing this as a profession and/or side job.

    Matt thanked Jeffrey R. Grenz, General Contractor
  • 6 years ago
    last modified: 6 years ago

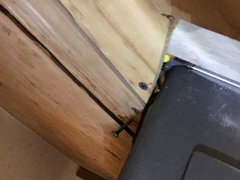
    Really appreciate all the responses. I took another look under the sink and I can see a couple of telling things in the corner that has the gap: 1) the plywood is split in that with one section lower than the other; 2) he screwed some nails in there and probably thought he could lift the sink like that.

    I ordered the following product off amazon and will try to lift the sink that way (under the plywood): https://www.amazon.com/Complete-Corner-Repair-System-corner/dp/B07KQKQ7GV/ref=mp_s_a_1_1?keywords=corner+sink+brace&qid=1574217253&sr=8-1


  • 6 years ago

    Impossible to find anyone willing to do this work. I received the brackets last night and will try to install them

  • 6 years ago

    It’s literally 10x more expensive than the HUSH, but it might be easier to use as a retrofit. Good luck!

  • PRO
    6 years ago

    The sink is supported cheap floppy plywood which is why the gap exists.