Software
Houzz Logo Print
destiny_c

Tiling over tongue and groove subfloor

6 years ago
last modified: 6 years ago
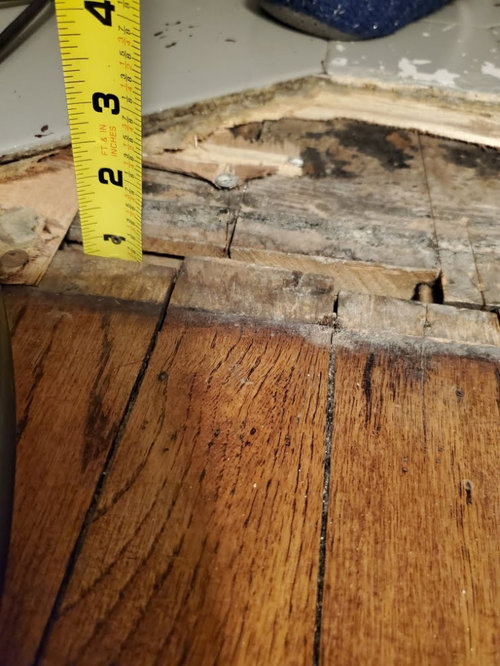
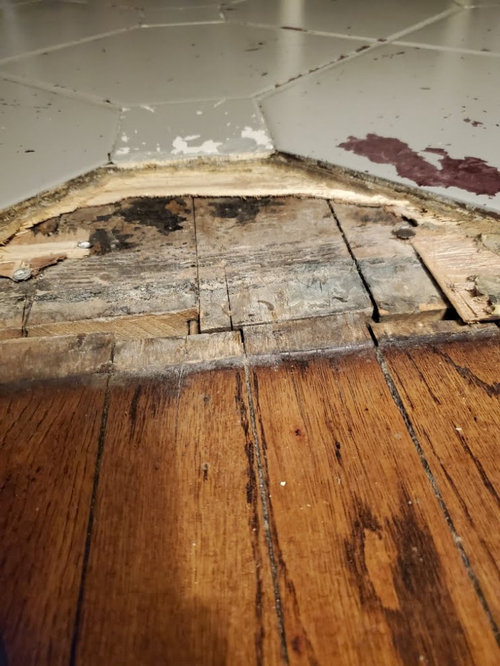
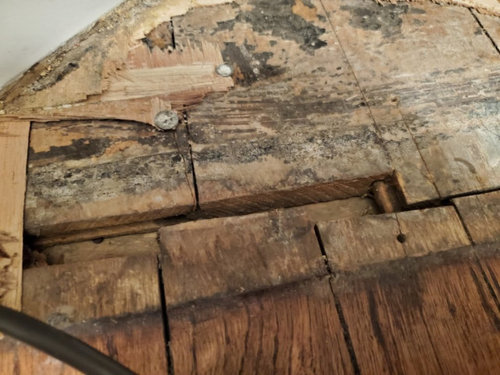
My husband and I are going to demo our kitchen in a week and are going to replace the tile floor that's there. I believe the existing tile is ceramic and has cracked in many places. Last night we removed some tiles, and it looks like there was a 1/4 plywood that sat over the tongue and groove subfloor.

How can we go about tiling so the porcelain doesn't crack? We saw that the t/g was basically flush with the living room hardwood, so we won't be able to avoid adding some height, though we'd like to keep it as low as possible without compromising strength.

Could we just replace the existing 1/4 plywood or should we maybe lay down 1/2 plywood, then tile? Would we absolutely need backboard? I'm afraid it will add way more height than we anticipate.


Comments (16)

  • 6 years ago

    You need a decoupling membrane once the plywood is figured out. Ditra or Schluter have one. It is possible this is DIY level...but it might not be.


    Personally I would throw down some 1/4" plywood and put in some updated sheet vinyl. The newest versions are stunning and can look like tile...without being tile.


    Installing sheet vinyl will require an installer to do it...but it still should be cheaper than a DIY tile install that goes wrong.


    Just a thought.

    Lynn thanked SJ McCarthy
  • 6 years ago
    last modified: 6 years ago
    Older homes were not built with plywood subfloor, they used 2 x 6's. My parents home ( and older homes I've seen) has this throughout. Also has oak floors except in kitchen and bathrooms on top of the 2x6. Treat it as if it was a plywood subfloor with thinner plywood underlayment and decoupling under tile.

    Lynn thanked Izzy Mn
  • 6 years ago

    Your subfloor will be under your hardwood. That isn't a T&G subfloor that is level with your hardwood, that is a tongue and groove wood floor of some sort that was tiled over.


    So a few things: first of all, tiling over a hardwood floor is just a bad idea. Even with a decoupling layer of plywood, there is no way to make sure there aren't big voids or uneven areas in the wood floor that will bounce and crack your tile.


    This is what I would do.


    Demo your tile. Demo that tongue and groove floor, and anything else until you are down to your original subfloor, which will probably also be planks.


    Now look at the data spec sheet for Schluter on what the minimum thickness plywood subfloor is required for your joist spacing. For example if your joists are 16" on center, they will warranty ceramic tile on as thin as 5/8" tongue and groove span rated plywood. Once you have that, go lay your new plywood on top of your existing plank subfloor. Screw 4" on center over the whole floor, and into the joists with stainless or coated deck screws. You are treating this new plywood as your subfloor, you aren't counting the plank subfloor for anything in terms of deflection resistance strength.


    Then DITRA over the top, and lay your tile. If your joists are 16" on center and you can use 5/8" plywood, you may end up as little as 1/4" higher than your hardwood.


    If you REALLY want to keep your height down, you can go all the way to the joists and lay new 3/4" tongue and groove sturd-i-floor throughout + DITRA. That will actually end up lower than your hardwood.

    Lynn thanked Super Lumen
  • 6 years ago

    Thank you @Super Lumen for providing that info. I kind of thought that could have been flooring, but hubby and I weren’t sure. From the basement, I believe our joists are wider apart. more like 20” or so. The house was built around 1917. Would it be wise to cut a piece of that t/g and see what’s beneath it exactly, or should I be able to see if that’s what’s lying on the joists if I look at it in the basement?

  • 6 years ago

    @Izzy Mn, is there a way for me to be absolutely certain that this is a sub floor and not not flooring above something else?

  • PRO
    6 years ago

    Your subfloor is below your hardwood. Anything at that height would be the original subfloor. Everything else is underlayment.


    You can drill a hole to see what's below.

    Lynn thanked G & S Floor Service
  • PRO
    6 years ago

    Please consider SJ McCarthy's advice.

    "Installing sheet vinyl will require an installer to do it...but it still should be cheaper than a DIY tile install that goes wrong." I would add solid vinyl tiles to that statement.

    Even as a Tile Setter I would suggest this option for your scenario. The most important and first thing you would need to do is verify deflection meets acceptable ratings for tile or stone. It won't matter what you put on top of subfloor if what is underneath is insufficient.

    Lynn thanked Creative Tile Eastern CT
  • 6 years ago

    Thank you @Creative Tile Eastern CT. I’ve lived with sheet vinyl previously and had this not been my forever home, I would have probably gone that route. However, I just really have my heart set on a particular tile after looking at lots of flooring choices and styles for the last year.


    Diy flooring isn’t something I‘d love to do, but where I am, contractors are so busy, anyone who comes out isn’t following up with a quote. Perhaps since it’s only about a 300 sq foot job, it’s not worth their time, or they’re not being realistic in letting me know they don’t have the capacity at the moment.

  • 6 years ago

    If you must have tile, then do it right. Remove everything down to the subfloor. You will need to know your joists distances. And then you have to BUILD UP the subfloor to ensure you have the right THICKNESS to achieve the right DEFLECTION RATING. In essence you will be learning and then applying the entire 'tiling business' do get this done.


    The cost of doing this could get you into the $4- $5/sf just to deal with the subfloor. That includes the rental of tools and purchase of multiple/thick high-end subfloor grade plywood (this is NOT the $1/sf stuff and you will need more than 3/4" for a proper deflection rating over 20" joists). And don't forget the sanding machine to knock down the seams. And you still self leveling compound (SLC) to get this smooth/flat. And don't forget the decoupling membrane.


    Whew! There's a reason why the contractors did NOT offer a quote. They knew all of this needed to be done and they KNEW (from past experience) that if they quote the $25/sf total-job cost (purchase of tile, thinset and grout to be added to that bill) would be WAY too much for a homeowner to accept. So they just walked away. It wasn't worth their time to quote it because they knew you wouldn't accept it.


    Please ensure you have purchased and read the TCNA handbook.


    https://www.tcnatile.com/products-and-services/publications/218-english-publications/188-handbook.html


    I would read it a few times. And pay close attention to the deflection rating. The very thing you hate about the current tile floor (cracking/lifting) is the very thing you are going to fix. And that begins at the subfloor. Of if you REALLY insist on being perfect, get down to the joists (yep...open gap in the kitchen where you can fall through to the basement) and then build up from there.


    Don't forget the section on 'shimming'.

    Lynn thanked SJ McCarthy
  • 6 years ago

    That's DEFINITELY a lot to take in! And it also makes a lot of sense as to why I've never gotten a follow up. Now I don't mind so much if I have a higher kitchen floor than the living and dining room. Would it be dumb to just take the floor down to the t/g, put plywood, add thinset, then a 1/4 hardieboard, then do the next layer of thinset followed by the tile. I understand it's going to need a transition piece between both rooms, but in the future, the two bedrooms and bathroom that are connected to the living room will be redone and I can then build up the floors so they are flush with the kitchen.


    I cannot begin to thank you all for all your advice and direction!

  • PRO
    6 years ago
    last modified: 6 years ago
    This link may help you get started. If other commenters are not familiar with this link they also may find it is worth checking out.

    https://www.johnbridge.com/vbulletin/deflecto.pl

    Lynn thanked Creative Tile Eastern CT
  • PRO
    6 years ago

    Don't remove the tongue and groove subfloor please. Add plywood subfloor over it to get the deflection low enough to not crack your tile.

    Lynn thanked Joseph Corlett, LLC
  • 6 years ago
    last modified: 6 years ago

    I was able to manage a look by a GC yesterday and he looked at the t/g and went to the basement and looked up and determined the t/g was the original flush floor previously, and is resting on wider boards on top of the joists. So I will have 1” depth to work with and he was honest in letting me know that even after the new tile is laid, the floors won‘t be 100% flush, and will require a transition piece. That makes me feel better in knowing what my options are.

  • 6 years ago

    And remember: cement backer board does NOT add structure. It does NOT help with deflection ratings. It is simply a nice smooth product to install tile/decoupling membrane on top of. The structure comes from plywood.


    Use the link above (provided by Eastern Tile) with the type of joists you have so carefully measured.You add the thickness of the joists and the LENGTH of the joists. And then click enter. You will come up with a basic suggestions.


    Lynn thanked SJ McCarthy
  • 6 years ago
    last modified: 6 years ago

    Thanks @SJ McCarthy! I’ll check out the link