Software
Houzz Logo Print
ewwmayo

Indoor Succulent Bottom Watering Setup

6 years ago
last modified: 6 years ago

These past weeks I've made some improvements to my bottom watering setup indoors for my succulents this winter. With so many trays of plants, it was a really long process and now I can say the improvements have worked! Thought it would be fun to share my process and see what others are doing too.

I am using six plastic ~47L (12 Gal) tubs which are just tall enough to allow for soaking of all my plants. These are the long shallow containers that are designed to slide under beds. I took a fun sampling of plants today and put them in an empty tray to give an idea of the size. My actual trays are packed fully with plants and each tray contains only pots of the same size.

Three trays are filled with water to let the plants soak and the other three trays are empty with stainless steel dish drying racks from Ikea. When I'm done bottom watering each tray, I transfer them from the watering tubs into the empty ones to drip dry. Tipping the tray at a 30 degree angle and an up-down shake gets rid of any excess water with my gritty mixes. (Side note: I do not bottom water my Conophytum. They are just in the photo for entertainment.)


The biggest challenge is that in my loft I only have a small sink with long extendable neck that I installed. It took hours to water my plants! Previously, I was using 3/8" ID vinyl tubing to drain the tubs into the sink and transfer the water around. It's kind of finicky and even though I used brass fittings on the ends to make it easier, filling them with water and siphoning was really slow. Before that, I tried a battery powered liquid transfer pump but that broke after a couple weeks.

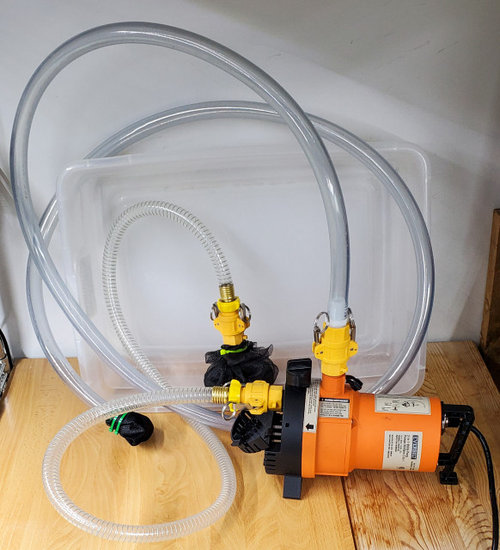
So now I am using a 120VAC 1/4hp utility pump to suck the water out of the tubs. The 3/4" ID intake tubing with the wire ribs came with the pump and is used with the round black head for suction. I purchased the 3/4" ID plain vinyl tubing, which drains the water into my sink. I zip-tied 4 layers of window screen mesh to break up the laminar flow and prevent it from splashing around. When the pump is fully primed, the water comes out with a lot of force!! (The first time I tried this I caused multiple messes with water all over the walls and floor.)


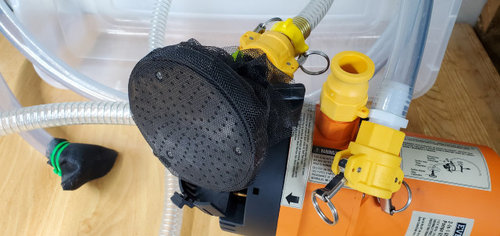
I put window screen to try and filter out bigger pieces of rock/pumice/sediment on the round black suction head in the middle of the photo. Currently waiting for some fine stainless steel mesh screen to arrive in the mail to do a better job and ensure the pump impeller lasts longer. You can also see the window screen I put over the outflow tube on the left.

Another big improvement is getting these quick cam-lock connectors from an auto parts store. You just mate the connectors and pull down the silver latches which lock into place easily. Threading and unthreading the tubing was very time consuming especially with slippery wet hands. I was also worried about the threads and seals getting damaged or worn out with weekly repeated disconnecting/reconnecting.


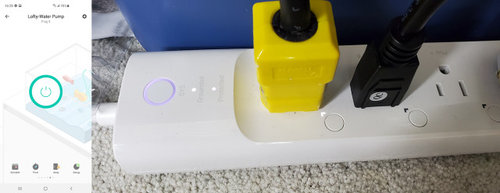
The pump is connected to a wifi smart plug, which is powered by a GFCI receptacle. This enables me to to use my waterproof phone to turn the pump on and off safely. (I am VERY glad my phone is waterproof because the first time I had water spraying everywhere, my phone dropped straight into the bottom of a tub of water.)


And that's it! Happy to answer any questions and if you have your own indoor watering setup (powered or not) I'd love to see it.

Comments (11)

  • 6 years ago

    Sure hope this works better for you....I can't imagine your previous stress on watering days.

  • 6 years ago

    It was just so tedious and time consuming. Plants flourished but I was too tired!

    Outdoors on my roof or like your greenhouse/basement is so much simpler.

  • 6 years ago

    That is a very ingenious set-up with the six tubs and the pump. How much time does it save you approximately? You mention that your plants flourish with the bottom watering, and that is obvious. I will see if I cannot find a smaller tub for my plants. I don't need a pump for the number of plants I have around in winter. How long to you leave them to soak?

  • 6 years ago

    Dinie - I timed myself today and it took 1 hour and 40 minutes. Took my usual time and wasn't rushing. My soaking is for around 5 minutes indoors. No particular reason for the duration, it seems enough for good absorption.

    It probably saves me an hour, plus it's a lot less lifting and dripping water? This time includes setting up and cleaning up. If I can get everything done in 1 hour 30 minutes I'll be pretty happy.

    Normally outside I'm enjoying my plants, the weather, view, and surfing on my phone so I don't time it!

  • 6 years ago

    Worth it if it saves you an hour! I have experimented with letting plants sit in water for a few hours. They seemed to like it, but I would only do it with actively growing, thirsty plants in purely inorganic mixes. The stapeliads, my haws and a few mesembs were the victims at different times. No casualties to date ;-).

  • 6 years ago

    Agreed - the less time I spend doing "work" the more time I can spend enjoying. =)

    It feels weird to admit that I soak and water around half my mesembs every week! Going to have to be careful with my new Edithcolea and Morgan's Beauty as things get colder/wetter for longer.

  • 6 years ago

    My Edithcolea is on winter rations now, as it goes down to 16°C inside, lower near the window. Just some water to the root zone, no full soaks for now. Maybe every 2 or 3 weeks.

    ewwmayo thanked gdinieontarioz5
  • 6 years ago

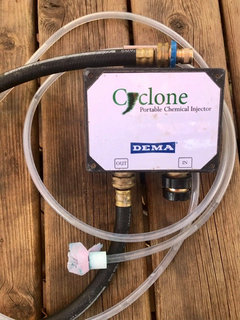
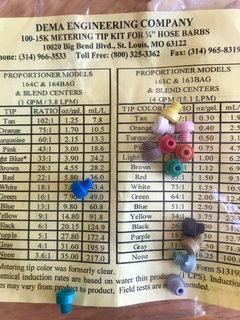
    While we’re on the subject of watering, just a note on how to fertilize lots of plants quickly. I used to use a 3 gallon pump sprayer and it took hours to fertilize everything. Even watering section on different days took forever (Kevin knows my setup). I got a Venturi watering device and now I water EVERYTHING in 20 minutes or less. There are several types of Venturi devices out there. This one was given to me by an orchid friend. ALL of them are based on water flow requiring a minimum of 2.5 gal/min. Some require even higher flow rates. This is definitely a downside, This device is significantly less costly than a commercial metered proportioning device. This particular device comes with various proportioning nozzles to adjust the fertilizer concentration. I mix a gallon of fertilizer concentrate, attach the device and I’m done in a short time. The other downside, of course, is the amount of waste and having a location appropriate to use such equipment.


  • 6 years ago

    Funny, Pagan. Love being weird. Thanks

  • 6 years ago

    The funny plant is on the ballot where I am, doc. Your chemical injector struck me as particularly funny lol

    But seriously, I think it would have taken a setup like this to keep my P. brevicaule seedlings alive since I had them growing in pumice. I lost the last surviving one this autumn. It most probably did need a regular acid wash.