Software
Houzz Logo Print
mjkelly66

What to do with tiled bathroom walls?

5 years ago
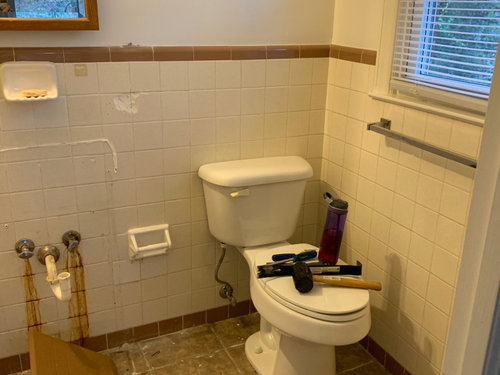
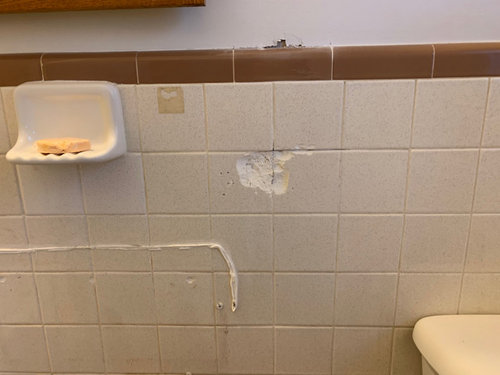
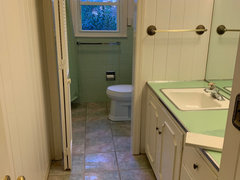
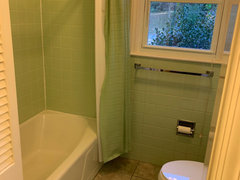
The problem is that I cannot afford to do a complete renovation of the bathroom right now. Just purchased a fixer-upper and am tackling the kitchen and floors now, but not doing a complete overhaul of the bathrooms. However, I am adding new vanities and that kind of throws things, especially the master bath. I don’t want to pick my countertop based on what is currently in there. So then my plan was to demo the floors and remove the tiles from the walls. I would then re-tile the floor and add new bullnose where the old bullnose was, re-mud what I messed up of the wall getting the tile off, paint it and be done. Problem is, there is no getting the tile off the wall. House was built 1960. Tile was not installed using mastic, my contractor called it a poured wall (?) and said that this is basically a "sledge hammer" situation now - that is what will need to be done if/when I decide to do a complete overhaul. Ugh!!


And in case it is not obvious from the pictures, the tile does not lay flat on the wall, there’s about an inch of additional poured wall behind the tile. In other words, if you could remove the tile, the wall underneath would not be flush with the wall above the brown bullnose. There’s an additional inch of material behind the tile.


I’m at a bit of a loss as to what to do now. I can’t just leave it, after the mess I made trying to get it off. I still can’t stand the color. I want to do something temporarily (for a couple of years potentially). Ideas I've heard so far are 1) put tile on top of the tile, 2) paint the tile. What do you think of those ideas? Anyone tried them? Do you have any other suggestions? I appreciate any input...


Comments (29)

  • 5 years ago

    You are in too deep to turn back. Bite the bullet. Take all of the tile off the wall. Drywall. And start over.

    Joanna thanked ptreckel
  • 5 years ago

    Yep my shower walls looked just like that and were on top of cement and chicken wire. It's really not the end of the world to remove it. Have a plan to keep the dust contained, get yourself a sledge hammer and pry bars, eye protection and gloves are an absolute must, and have at it. Be careful of electrical and water lines obviously. Once you're down to the studs, slap up some more drywall on the lower half and tape and mud the seam. Then you can have a nice blank slate to choose the vanity of your dreams.


    I've done two showers that had very similar tile. It's a mess, but while demo, and especially hauling out the heavy concrete and tile, is hard labor, it's not difficult. Re-building from the ground up and making sure everything is done well is what takes the finesse.

    Joanna thanked pricklypearcactus
  • 5 years ago
    last modified: 5 years ago

    Is that tile damage to the right of the soap holder the only damage that you did to the tile? Did you remove the floor yet?

    Joanna thanked tedbixby1981
  • 5 years ago

    Have the same exact bathroom with tile and took it all down. What a relief!! Bite the bullet and get rid of it while you can.

    Joanna thanked L J
  • 5 years ago

    Yes, tedbixby, the only damage I've done so far is to the right of the soap holder and a little right above it with the bullnose. That's why one thought was simply to mud the little damage I did, then tile over all of it. The floor has not been removed yet.


    It sounds like many of you are saying I should go in there and sledge hammer away. When I hear sledge hammer I hear knock out the wall and start over. Is that what y'all are saying? If so, I'm not ready for that - that is getting into total renovation land. The future plan with this bathroom is to remove the bathtub (which is just to the left of the sink plumbing) and cut into the wall behind it, which is currently a closet, and make a large shower (no tub). I'm not financially prepared to do all that now.


    I keep thinking there's got to be another decent option that can tied me over...


  • 5 years ago
    last modified: 5 years ago

    fill the hole with spackle and wallpaper over it. or paint it to match the tile. you're basically looking for a bandaid to hold you until you can redo the whole thing, and that's what's left to you.


    in future, nothing more than paint if you're planning a complete overhaul in a couple of years. I don't even understand bothering with a new vanity under these circumstances.

    Joanna thanked acm
  • 5 years ago

    Unfortunately the vanity (cabinet) was broken, the door was off, etc. As well, originally there was only a sink, a cabinet was added underneath at some point - the whole thing was maybe 16 inches wide - had to have something bigger :(

  • 5 years ago

    As you might have noticed, when the time comes to drywall....you might find it easier to take everything down to the studs, including the plaster above the tile. The line of demarcation between the plaster and drywall will be difficult to obscure. Then you can either just paint your walls or tile them. If you leave the upper portion alone (or can manage to NOT destroy it while removing the tile), then you might have to put on a double layer of drywall to bring the surface out to meet the remaining plaster. This is what had to be done in my 1930 era bathroom when the time came to remove the tile from the walls.

    Joanna thanked ptreckel
  • PRO
    5 years ago

    IMO get a sledge hammer tke out all the frustrations you have on getting that mess out of there . The bonus you will actully gain a bit of space.Ince it gets started it will be easier and even if you could remove them the easier way it is IMO easier to just go to the studs and start over.,,You do not tile over tile

    Joanna thanked Patricia Colwell Consulting
  • 5 years ago

    I had ugly tile in perfect condition in a shower and on a kitchen counter. I had it painted (porcelain paint) until I was ready to redo them. Paint on tile doesn’t last forever, it gets chips in it, but on a wall I think it would last longer.

    Joanna thanked socalgal_gw Zone USDA 10b Sunset 24
  • 5 years ago

    I follow a woman on Instagram that lives in a rental in NYC. @sweet_domicile used stickers to cover her tile! She did her bathroom floor and kitchen back splash with great success. In her bathroom she used Quadro Style Stickers on the floor. I can’t remember what brand she used in the kitchen. She is very responsive if you message her. She used something else on her kitchen backsplash and recently painted her kitchen tile floor. I took her lead and painted our tike kitchen counters in a vacation rental. We used a Rustoleum product as she did. Another designer I follow just put stickers on her kids bathroom floor. She and her husband have an extensive blog called Chris Loves Julia. This may be a viable solution until you are ready for renovation. Good luck!

    Joanna thanked Margaret Powers
  • 5 years ago

    If you can't bear to deal with removal, go to a service oriented paint store and ask for help to buy appropriate products. Try to patch your damage as smoothly as possible. Tile can be painted but you might not be happy with the surface where you fill in the damage. Test that area and see if it will be acceptable to you. Another alternative is tile stickers. You could paint and use the stickers on the courses where there is damage, otherwise it would be a large undertaking. I plan to use this on a bathroom floor that has to stay for a while. Here's one place Quadrostyle. Not all patterns are in all sizes. The bullnose tile could be painted to coordinate. Good luck, I feel for you!

    Joanna thanked TBL from CT
  • 5 years ago

    Sorry for the typos above and the lack of links to follow. I’m traveling, riding in a bad cell area and using an old iPhone. 😂 Notes on our painted tile counter tops: We love them! You lose the grout lines but we don’t care. Because we use sharp objects on the counter tops and drag things across them, they chip sometimes but I keep the can of paint close by and touch up with a tiny brush as needed. I don’t think you would have this issue with walls. This has been a great fix for us until we take the plunge for complete renovation. It’s a process: light sanding, priming and then top coat. Look around, lots of people paint tile. YouTube is full of videos but also check out the two women I mentioned that used stickers.

    Joanna thanked Margaret Powers
  • 5 years ago

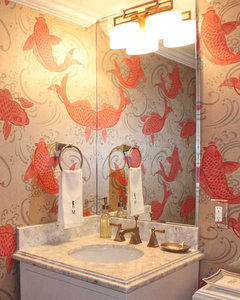
    Covering up the damaged area will allow you to postpone demolition until you are ready on your timescale of a couple years. Paint the tile, Put up some colorful wallpaper above the tile. No one will notice the painted tile if they are looking at your wallpaper.


    Here's a toothbrush holder that will cover the damaged area nicely:

    https://www.amazon.com/Mspan-Toothbrush-Razor-Holder-Shower/dp/B0819WT3HY


    Koi Fish Powder Room · More Info


  • 5 years ago
    last modified: 5 years ago

    I don't think it is worth your time to do anything with the tile such as painting it and I think if you attempt to tile over it you are just going to have a bigger issue and more work when you go to demo the room. I know you don't like the tile but let's see what we can do until your budget and time allows that will make it tolerable for you for the next couple of yrs. Have you purchased the vanity yet? If so, can you show us a photo of it? Regarding the damaged tile area, this is where your room story comes in. You patch it and paint it to match the tile as closely as possible. Yes, you will still see it but it will remind you that you learned about 1960 construction and if anyone ask, you can tell them that you were surprised to discover that construction back then was much better than today and proceed to tell them that you attempted to take the tile off and this is what happen. And then laugh about it. Believe me from my own experiences, this will some day bring a smile to your face when you think about it. If the patch drives you too crazy, perhaps you can put a towel ring above it and cover it up with the hanging towel. We've done a lot of these 1960's ranch bathrooms here on Houzz and either we can come up with a complimentary paint for the wall (not the tile) or wallpapering above the tile is also a good possibility. At this point, you want to focus on a clean and functional bathroom not so much how pretty it looks.

    Joanna thanked tedbixby1981
  • 5 years ago

    You guys are awesome!! I am so appreciative of the support. I have done so little in terms of DIY renovations. I added some mosaic tile to a bathroom once and that's about it. This is my first time buying a house. Such a good deal I couldn't pass it up. And yes it is a 1960s ranch house.


    My thought was that this tiled bathroom wall was a simple enough DIY project. Contractor is doing most everything else. Thought this would be fun to tackle - as you heard, not so much!


    The stickers are exactly the thing I was wondering about. I think I could totally cover the tile with the stickers and paint the bullnose. That was the fun-type project I was envisioning.


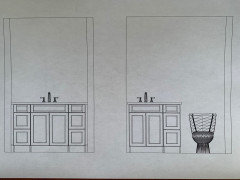
    I don't have a pix of the vanity because it's being built along with the kitchen cabinets (Medallion Silverline, Jackson door, white icing color), but I've attached a drawing of both bath vanities (bigger one is for guest).


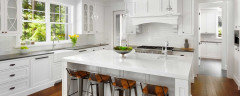
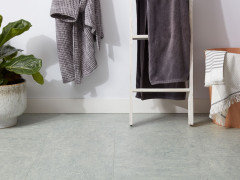
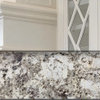
    And just for fun, since y'all are so helpful, I attached a pix of the lovely green guest bathroom. I picked Carrara Alaska Quartz from Prostone for my kitchen countertops (pix below is from Prostone catalog, not my kitchen :) and thought it would go well enough with the green guest (I could always add stickers there for now as well!). It's picking the floor in the guest that could be tricky. You see what is there now, cannot abide =O


  • 5 years ago

    I love that green wall tile. And I really mean it. It is a very versatile green. Are you keeping it? The floor is butt ugly though!

    Joanna thanked tedbixby1981
  • 5 years ago

    (thank you, tedbixby.....I’m liking the green, too!)

  • 5 years ago

    The green is really a pretty green. Lots of possibilities for new flooring.... White!

    Joanna thanked ptreckel
  • 5 years ago

    Circling back to your countertops. Make sure you see the slabs before the fabricator templates it, after it is templated ( they should be asking you to approve the templating that is done to the slabs) and before it is cut as the pattern may not look exactly what you envision by what was shown in the catalog. And make sure that you take a cabinet door with you as just because they both are white doesn't mean that the whites will compliment each other. There are a million whites. We don't want you to be one of the ones that show up here so disappointed with their unseen countertops before installation and also at that time find out that the color is "off" with the cabinets.


    Glad to hear that you are keeping the green 😁

    Joanna thanked tedbixby1981
  • 5 years ago
    last modified: 5 years ago

    I say paint it. if you think you will come back to it and do a proper reno in 2-3 years, paint is not such a bad idea. it's a terrible long term solution, but fine as a temporarily holdover, after your high priority rooms are done.

    note that there are a lot of people on Houzz who will insist on doing it the correct (expensive) way, and don't seem to understand that some of us here have time constraints and budgets. obviously the pros are going to hate temporary solutions. I'm fine with them as long as it really is going to be temporary.

  • 5 years ago

    Love the positive responses on the green bathroom! Yes, I'm keeping it, at least for now. And yes, I definitely took a sample of my cabinet colors to match with the actual slabs. So true about how the whites change colors beside each other and how one can make the other look dirty/dingy.


    Any suggestions you want to throw out about flooring for that green bath, I'm all ears. I'll be installing white (bit off-white) cabinets, with the white/gray countertops pictured above. Someone mentioned white, I'm a little concerned about keeping white clean. I'm not known for my housekeeping :) So maybe not pure white (like the countertop, it has a little something going on that could camouflage when necessary).

  • PRO
    5 years ago

    The green looks great! Nice eye ;)

  • 5 years ago
    last modified: 5 years ago

    oh, I didn't see the post with the green bathroom. I love it! I really wish my own 50s house still had that stuff. please tell me you're keeping the countertops too! if that was my bath, I'd paint the cabinets and swap out the hardware. it would look so cool!

    since you're keeping the green, I suggest some kind of white or very pale color lineloeum with a speckled texture. it will keep the spirit of that bathroom. there are nicer brands such as marmoleum (which is seamless). or a simple linoleum tile which is classic, very durable, and very budget friendly.


  • 5 years ago

    ILoveMod - I did not keep the vanity. The top was actually ruined somehow - maybe some type of iron - it had a rectangle "burn" like stain on it.


    I really like the linoleum you pictured here - it looks like it might have the green and the grey. I just looked up marmoleum and found this moonstone - I think that might be what you pictured - could be cool! Thanks for the idea!!


  • 5 years ago
    last modified: 5 years ago

    I cannot get the moonstone to post - I'm going to try again...


  • 5 years ago

    aww bummer about the countertop. yeah, it's hard to find those in good shape.

  • 5 years ago

    You can fill the broken tile and repaint it all or go on eBay and find replacement tile for the broken piece.