Software
Houzz Logo Print
alexandra_baishanski

Help, how to fix bad ceiling job?

5 years ago
last modified: 5 years ago

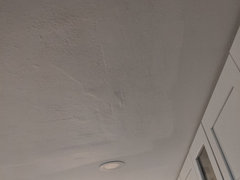
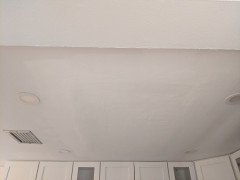
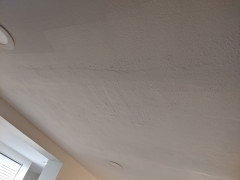
The ugly fluorescent light box in my kitchen was removed to be replaced with a nice smooth ceiling, as part of my kitchen remodel. The new paint and old paint does not match but my biggest concern is that the part of the ceiling that replaced the light box is not smooth, a few parts are spongy and a little bit of paint already cracking. They did not use a primer but the paint has primer in it. Has anyone seen this before? Why is it like this? What is the solution to making it smooth so it matches the rest of my ceiling? What are the options to fixing this? Ceiling was painted Friday and parts of the new ceiling are still mushy when you press.. Photos attached below in comment section- I posted the photos in the comments. Sorry I'm new at this, my first post

Comments (17)

  • 5 years ago
    last modified: 5 years ago

    It's hard to tell from the picks but here are some photos after they painted..


  • 5 years ago

    Your photos are not loading.

    Alex Bais thanked User
  • 5 years ago


  • 5 years ago


  • 5 years ago


  • 5 years ago
    last modified: 5 years ago

    Whoa that is bad. My parents removed the hanging cabinets over the kitchen peninsula. The repair job is so good that you can't tell at all, even with the sunlight coming in from the side and with high gloss white paint on the ceiling.

    I have no advice but hope you find a solution.

    Alex Bais thanked partim
  • 5 years ago


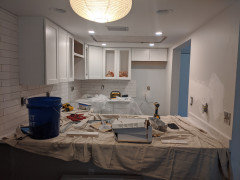
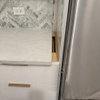
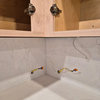
    prior to the mudding and painting, this was the drywall in the rectangle where the fluorescent box was

  • 5 years ago

    Thank you Partim, do you know if they used a sander to smooth out in your parents remodel? As in did they sand before painting it?

  • 5 years ago
    last modified: 5 years ago

    My parents can't remember (they're very old).

    For sure it was sanded, but I think a skim coat was done first, then sanding. The whole kitchen ceiling was repainted, not just that section. An experienced painter did the work.

    What I don't understand is why it would still be mushy.

    Alex Bais thanked partim
  • 5 years ago

    Thanks Flo Mac, that last photo shows the dry wall they put inside the rectangle, afterwards they put what I thought was mud, or spakle, I don't know. The next day, on Friday, they used a thing that looked like a hair dryer on it. I wonder if part of the reason it's spongy is that the hair dryer didn't dry it completely. They painted Friday night, initially thought the paint didn't match because it was drying.

  • 5 years ago

    New drywall should have been at same level as surrounding, not deeper. Then cracks should be taped. Then mudded (not everything, just where needed). Then sanded. Then primed (separate step! can't be a combo over compound). Then painted. It looks like they got literally every step of this wrong. Get your money back and have somebody competent redo it.

    Alex Bais thanked acm
  • 5 years ago

    Yep, I agree with acm. It appears they used compound/mud/putty to make the ceiling even. That was wrong and that is why it is mushy. The heat gun was used to speed up the drying process but it would have taken a long time to dry and it still would not have been right. I know your frustration, been there. But it is fixable.

    Alex Bais thanked Flo Mac
  • 5 years ago

    Agree... drywall was too deep, so they slapped on a thick layer of mud and then used a blow dryer / heat gun to 'speed' drying. Horrible idea! You currently have wet/uncured mud that's stuck inside with no place to allow moisture to escape. I expect it will start cracking soon. *IF* you need to lay on a lot of mud, you need to do it in thin layers and allow full drying time between each layer. sigh.


    Alex Bais thanked party_music50
  • 5 years ago

    Its a terrible job and should be completely removed and new drywall put up the same thickness as the older part, and taped and mud and sanded, and maybe skimcoated to match original ceiling, and then primed with a drywall primer, and the entire ceiling needs to be painted. I would not pay this crew, and would not have them back to redo. Find a good drywall person, to do it correctly.

    Alex Bais thanked cat_ky
  • 5 years ago

    So they didn't sand it because it was still wet? A simple Google search would have told them how to do this correctly. And more quickly and easily than the way they did it. Clueless.

  • 5 years ago

    Thank you all so much for the input, advice and recommendations, it really helps to know at least that this is not ok, this can fixed, and what needs to be done, and also how this happens. Contractor is to come by Wednesday at 1pm to see. I agree Cat_ky as to possibly finding someone new to take this on. I am so terrified at this point. I am dreading conversation with contractor, he initially wanted to send his employee to just paint over again and I insisted no he needs to actually see this. I am scared if there is no where for moisture to escape, and it's been three days and still sorta soft (seems like it is drying some) is there danger of mold building up in there? Partim, they were in a rush, the contractor personally told me he wanted his 2 employees to finish by Friday. I think they possibly sanded part of it as they brought a vacuum cleaner machine that doubles as a sander absorbing the dust. Or they maybe they just used the machine on the wall. Part of a wall had to be replaced after removal of tile. The wall at least seems ok, but they used grout between the countertop and backsplash, which I've read it's supposed be caulk where two planes meet. But when I asked the employee about it, he said "no we always use grout so it matches, and this is not a bathroom, where there is water contact". I do hope that is ok, and I need not worry about that issue too. So sorry for the long post, this has been an ordeal.

Sponsored
Whisler Home Improvement
Average rating: 5 out of 5 stars9 Reviews
Franklin County's Committed Home Improvement Professionals