Software
Houzz Logo Print
psyohe

Any problems about this roofing repair estimate?

5 years ago

I have two problems that I need to make sure are done correctly on my roof. I don't know if any part of the repairs have been left off the estimate. I need someone to see if the labor and materials are to code.


1. An old furnace pipe was never removed. It is leaking so it needs removed and the roof repaired.


2. A new pipe needs to be installed through the roof. We found a 2" sink waste pipe that went into the attic and stopped. That needs to vented out through the roof.


The estimate details...

  • Labor- remove old heater furnace (pipe only)
  • Install GAF Ice and Water (install where old furnace pipe is removed and around new pipe flashing that is to be cut into roof)
  • install 1x6x8, 1x8x8 decking to repair hole where heater is currently installed
  • Fasteners- 2.5" decking screws to install the new deck boards
  • Install 1.25" hand drive roofing nails (Grip-Rite 11-Gauge Electro-Galvanized Steel Roofing Nails (1-lb)
  • Labor- locate 2" pipe vent in attic and cut hole in decking to extend pipe and install pipe flashing
  • Install 2" pipe flashing neoprene
  • Labor install 2" PVC pipe (10')
  • Labor install 2" PVC pipe couplers
  • Labor PVC Pipe Cement and Primer 8-fl oz PVC Cement and Primer
  • Install Roofing clear sealant (reseal all existing pipe flashings and exposed fasteners.
  • Install Roofing cement sealant
  • Install GAF Timberline Lifetime Architectural Shingles High Definition (2 bundles of WW)
  • Remove Dispose of debris resulting from job

I know the company has a roofing license because I checked them out when they installed a new roof for me in 2013. I am a little hesitant to trust anyone after all of the problems I have had.


Does this look like everything was included? Does two bundles of shingles sound right for the two holes? It sounds like a lot of shingles to me. Does it have the right waterproofing? I am not concerned about the price, but I don't want surprises when it comes time to pay the company. This is Oklahoma so things are cheaper here, but I know many pros would not work for that amount ($993.00) in other states.


If there were any hidden surprises, what would they be? The leak is above the hall closet, but it has not dripped on the drywall ceiling yet. It must be a new leak even though the old heater was removed in 2012 before they put the new roof on. I guess no one noticed that it was not connected to anything when they installed the new roof.


Thanks for any advice.

Comments (14)

  • PRO
    5 years ago

    The proposal seems through enough. I'd examine the reputation of the roofer more than his proposal though. That is cheap.

    Peke thanked Joseph Corlett, LLC
  • 5 years ago

    Thanks, Joseph. In 2013, the company was the only one within 90 miles that even HAD a license. I checked out the company, but who knows what is and isn't true.. (Oklahoma is a lot cheaper than other states because of very low salaries and very low cost of living.) The roofing business has gotten a lot larger, and he has opened more locations and has a closer location to me. BBB still gives the company a good rating. Most people here don't have licenses even though they are supposed to. I believe Oklahoma began requiring licenses in 2011 or 2012, but not many bother because the state doesn't do anything about it. It's a Good-Old Boy state! People seem to only have good things to say about the company, but that happens on the internet. Can't believe what you read.


    He doesn't specify how he will repair the roof so I will have to trust him. Not much I can do about it since I can't climb on the roof with him. The only thing I can do is call the company if the repair fails.


    Joseph,

    I have a question for you about my Jetta soaking tub. The plumber refused to read the installation instructions. I stopped him when I heard him putting the screws into the flange. I knew concrete was supposed to go under the tub, and he had not mixed any concrete. He said he was going to put spray foam under the tub. The instructions specifically say, " To provide support and even weight distribution prepare a bed of moist mortar 1-2" deep in the tub installation area. Do not substitute mortar with expansion foam, sand or drywall mud. " I took him the instruction manual with the page opened to my specific tub. He said, "It won't matter because the company will not warranty anything anyway." I said, "It matters to me, and I need you to follow the instructions so the warranty will not be voided." As I left, he threw the instructions over his shoulder.


    He removed the screws and left since he had not brought any concrete with him. I doubt he tested the tub like the directions said. I never heard any water running. The plumber does have a license. The next day, he brought concrete, mixed it ON my marble floor in the bathroom, tracked wet mortar on my carpet, rugs, and wood floor that I cleaned up quickly. He set the tub, then put screws in the flange. A few days later the flange has three cracks in it where the 3 of the 5 screws are. Jetta says he installed it wrong! Of course he did, since he didn't read instructions.


    Now what do I do?

    Jetta Corp. said, "The screws are only intended to be a stabilizer so they don’t need to be screwed to where it pulls the flange back to the studs. – That looks like what happened here. In the pictures is does not look like there were furring strips put in between the studs and the flange either. One other thing it looks like wide coarse thread screws were used, non-tapered or galvanized screws, meaning long thin screws, are needed when drilling into the tile flange."


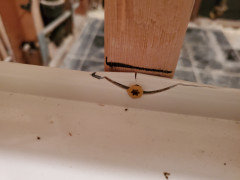
    One of the 3 cracks.


    Jetta instructions...

    INSTALLATION INSTRUCTIONS | JETTA CORPORATION PAGE | 6 SKIRTED TUB INSTALLATION INSTRUCTIONS PREPARATIONS Before installing a new Jetta bathtub, we strongly recommend following the installation check list and hiring a certified plumber to handle the installation. REQUIRED TOOLS

    o Levels o Goggles o Tape Measure o Caulking Gun o Conventional woodworking tools and materials o Drop cloth o 1/8” Spacers o Plastic film (optional)

    REQUIRED MATERIALS

    o Silicone bathroom caulking (mildew resistant) o Mortar cement o Visually inspect the bathtub to make sure it has not been damaged during transport. In case of damage, do not proceed with the installation.

    ROUGH-IN:

    o Make sure the bathtub is the model that you ordered, that its dimensions are correct, and that the location of the drain corresponds to the plans.

    INSTALLATION STEPS

    1. Refer to the specification sheet for tub measurements, Construct a plumb alcove out of studs. 2. Install the rough plumbing.

    3. Install the drain to the bath.

    4. To prevent water absorption, lay plastic film on wooded subfloors. (Optional)

    5. To provide support and even weight distribution prepare a bed of moist mortar 1-2" deep in the tub installation area*. Do not substitute mortar with expansion foam, sand or drywall mud. *If your tub is manufactured with high density foam feet attached to the tub base, the bed of mortar is not required.

    6. Apply a generous amount of construction adhesive to the bath feet or base.

    7. Lift the bath into place. Carefully level the unit, ensuring that uniform support is given to all areas of the base and that no portion of the lip is bearing weight.


    DO NOT SUPPORT THE WEIGHT OF THE BATH BY THE RIM! DO NOT REMOVE the 1” x 1” drain board attached to the bottom of the tub. © 2020 Jetta Corporation. All rights reserved. REV 07/2020 WWW.JETTACORP.COM 1(800) 288-7771


    SKIRTED TUB INSTALLATION INSTRUCTIONS

    8. Apply the weight evenly to the bath basin until the mortar sets. Once the mortar dries, all the weight will be carried through the floor of the tub, not suspended by its lip.

    9. Connect the bath drain to the drain pipe. Position a protective liner in the bath basin.

    10. Drill small holes through the flange at the studs. If there are gaps, fill them with a shim.

    11. Secure the flange to the studs with galvanized nails or screws.

    12. Secure ¼” furring strips to the studs to be flush with the bath flange.

    13. Install water-resistant wallboard over the framing.

    14. Apply a 1/8” bead of 100% silicone sealant along the seams.

    15. Install the finished wall and deck to within 1/16” of the bath rim.

    16. Apply 100% silicone sealant around the bath along the finished walls and deck.


    IMPORTANT: MANUFACTURER WILL NOT BE LIABLE FOR THE REMOVAL OR RE-INSTALLATION OF THE BATHTUB IF THERE IS A FAILURE TO FOLLOW THE MANU-FACTURERS RECOMMENDED PRE-INSTALLATION AND INSTALLATION PROCEDURES, FAILURE TO FOLLOW THE MANUFACTURERS RECOMMENDATIONS COULD RESULT IN THE WARRANTY BEING VOIDED.


    So, what do I do now? Can the tub still be used? What do I say to the plumber?


    The flange will be covered with either concrete backerboard, Kerdi board, or Wedi board, and then tiled. Or we could put a solid surface tub surround on the walls. I think we will need to learn how to DIY because I am sick of paying for work that is done wrong. I am so frustrated by the contractors here. I am ready to move from this state.


    Thanks. I am sorry this post is so long.

  • 5 years ago

    Jetta Corp responded to me email. They said that the tub can still be used. Thank goodness!

  • 5 years ago

    Not with the flange cracked like that it can’t. That’s a direct route for water into the walls.

  • 5 years ago

    They said to put concrete backerboard down over the flange to the deck, use silicone caulk to seal it, then tile. No mention of sealing the cracks.

  • 5 years ago

    Thanks, Celadon.


    So, if I can find a fiberglass fabricator, he could repair it? Would it be a place that makes cultured marble sinks?

  • 5 years ago

    Boat repair shop would be the place for fiberglass repairs.

    Peke thanked millworkman
  • 5 years ago

    Pete, your roofing bid looks fine, along with the price. About your tub, you don't need to try and repair the fiber glass on those screw flanges, just nail a piece of 2 X 4 on one side of the stud , drill a hole in the flange and screw in the correct screws. The Hack plumber used a backer board screw, similar to a sheet rock screw. I use stainless steel wood screws smaller then those backer board screws and countersink the flange for a flush fit.

    Because his screws stick out so far when the backer board is applied it's going to be a good 1/4" off the stud. Whatever, new screws or idiot plumber hack job screws, make sure the backer board is shimmed at the flange up a ways on the stud.

    Peke thanked outpaientzero
  • 5 years ago
    last modified: 5 years ago

    Follow TCNA standards. Always. That involves an intact tiling flange.

    Peke thanked User
  • PRO
    5 years ago

    The flange can be repaired easily enough. I can't see the point of any screws. Fire your plumber please.

    Peke thanked Joseph Corlett, LLC
  • 5 years ago

    If I fire him, I will have to learn how to do plumbing. It took me months to find this one. Since April, the plumbers that showed up did not want to do the concrete work, so they never called me back. I called about 27 plumbers! He is the only plumber to show up AND come back to do the work.


    Jetta Corp asked for pictures of the damage. They said he used the wrong kind of screws, too. I mentioned that their instructions were not clear about what kind of screws should be used. A week later, they called and said they would order a new tub for me. I really did NOT expect them to give me a new tub!


    So, I will need to learn how to disconnect the plumbing, remove the old tub, and call the plumber to connect the plumbing and install the new tub.


    I am NOT paying him again since he refused to read the directions. He screwed it up, so he can fix it.


    Thanks!


  • 5 years ago

    That was a nice thing Jetta did for you. I suggest watching a lot of youtube videos before attempting installation. I installed a shower stall in the basement and watched dozen's of videos and guess what? Half the people didn't know what they're doing so be cautious and don't just watching one or two hacks with a camera give you bad advice.

  • 5 years ago

    It really was nice of Jetta to do that. We have the new tub, but have not put it in place yet. Jetta directions said to put piles of wet concrete down, then a layer of plastic on top of the wet concrete. I insisted on the plastic, and I wasn't sure if he used it. Jetta said the new tub should fit right on top of the dried concrete and plastic.


    Hopefully, the plumber won't make me wait another two months before he installs it.


    Roofers did their repairs so all is well for the moment!