Software
Houzz Logo Print
may_g72

Wet saw turned my subway tiles gray- Eek!

5 years ago
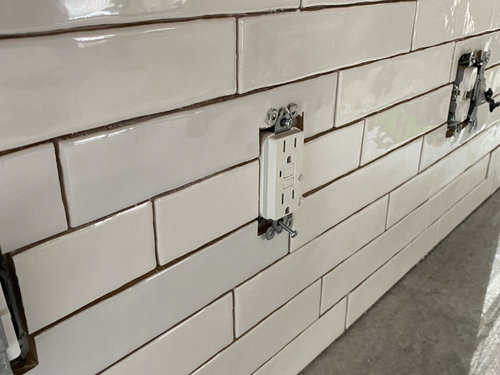
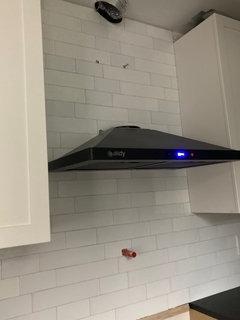
While installing white ceramic subway tile yesterday, all of the cuts that needed a wet saw (mostly the ones surrounding light switches/plugs) turned a SLIGHT grayish blue color. I know that this is from the water because as soon as we noticed it (this morning) we tested one and saw the water line turn the tile darker almost immediately.


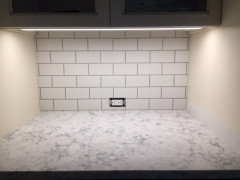
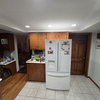
Also want to add that the tiles are set- we didn't notice the color variation until this morning and my husband grouted as "only we will be able to see the slight variation". Other info: We DIY'd this so we only have ourselves to blame. The tiles are from Lowe's 2x10 polished textured ceramic subway. We grouted white already. The attached picture isn't in the greatest lighting but if you look at the funky cuts you can tell the tile is different.


My question is this: Will the biscuit dry out in a few days and the enamel go back to white or are the tiles going to permanently stay gray? They're not in a bathroom and the tiles were literally wet for less than a minute so I can't believe that exposure to water so quickly will have permanently stained my tile...wishful thinking?!


Please save my marriage and say we don't need to replace all the tiles along the 7 outlet/switch-plates along the backsplash! Yes...7. GAH! ;)


Comments (42)

  • 5 years ago

    so as long as you didn't seal anything you should be able to get it out. Amazon and other online retailers will carry two things that will make short work of cleaning it up: a hot steam cleaner and/or a drill scrub attachment. the Grey is most likely a mixture of water and sediment from current or past projects and just needs to be loosened and cleaned. alternatively you can use very hot water, dishwasher gloves (to protect your hands), and a scrap brush. Optional is something like soft scrub which is a mildly abrasive cleaner like you use on glass stove tops.

    I have white ties and went from a splitting tile job to doing the backslash and mine has this oranish brown staining. but it wasn't stained. just a residue.

  • 5 years ago

    Thanks for the reply @Jesse Fay The thing is: the tiles were new, the saw was new, and there is nothing to scrub off. The ceramic biscuit of the tile got wet and that is what changed the color almost from the inside. There was no other sediment or anything that could've 'stained' the enamel other than water seepage. Unfortunately, I fear that adding more water would only exacerbate the problem.

  • 5 years ago

    Do you know the type of tile it is (porcelain, ceramic, etc.) it will usually be listed on the box.

  • 5 years ago
    last modified: 5 years ago

    Have you tried wiping down the entire backsplash with soap & water? I'm asking in case that would also change the tile color...I would at least check it to see.

    Maybe once it's grouted, etc., it would no longer be a risk (the "biscuit" no longer exposed)...

    May G thanked Buehl
  • 5 years ago

    @Jesse Fay it's ceramic.

    @Buehl Yeah, we grouted (white) and wiped it all down with damp sponge right after and then an hour later to remove more haze. Unfortunately, the white grout just highlights the discoloration. When the enamel part gets wet, it just acts like enamel and wipes clean. I think when the back biscuit part met the water while cutting it just absorbed all the water and it's holding it in. I'm tempted to take a blow dryer to it (to see if speeding up drying helps it fade back to white) but I don't want to ruin anything else. ugh!

  • 5 years ago

    @May G so that maybe the issue. Ceramic tile is porous and my guess is they went up before all the pieces had released its water. If this is the case, that would explain the difference in color as some piece might have fully dried, be semi-wet, and some wetter. If this was to happen suddenly to already existing tiles, it would be a sign of moisture behind the wall. But as these are new, that is my best guess. I am not an expert though on how to fix this issue so i don't want to give you advise that maybe wrong or cause further issues. But I am hoping someone here might know the answer. If not, you may want to consult a tile installer.

    May G thanked Jesse Fay
  • 5 years ago

    Uh, I hate to point out a problem. You did such a great job with the tile around the outlet. It is so neat and tidy. But I think it is an electrical hazard. (I might be wrong.) You should have installed electrical box extenders on the outlet box and then tiled up to them. Then everything would lie nice and flat and the outlets would be firmly attached to the boxes. They come in multiple depths.

    https://www.homedepot.com/p/ReceptXtenders-1-2-in-1-Gang-Electrical-Receptacle-Box-Extension-Ring-00004/100159668

    May G thanked mainenell
  • PRO
    5 years ago

    Give it a week- it’s going to be fine. I’m sure. I’m almost sure...

    May G thanked HALLETT & Co.
  • 5 years ago

    @mainenell I appreciate you pointing that out especially for safety sake! We did install electrical box extenders and the outlets are flush. Maybe we did it backwards but my father in-law is an electrician and said it was fine to pull them first and then add the extenders once the tile was cut. Seemed to have worked!


    @HALLETT & Co. thanks! Fingers crossed.... still looking off this morning.

  • PRO
    5 years ago

    IMO you grouted too soon so now it will be a long time before the tile ever dries out if at all.

  • 5 years ago

    We waited 24 hours.... I thought that was standard?

  • 5 years ago

    Okay. Must just be visually wrong looking like the tile is butted against the receptacle and that there isn’t enough height. Glad to hear electrician is on top of it.

  • PRO
    5 years ago

    Take a Bernz-O-Matic to the tiles please. They'll be fixed in minutes.

    May G thanked Joseph Corlett, LLC
  • 5 years ago

    If cutting the tiles changed the color, how come the 5 tiles with straight cuts didn't change? It looks like you have tiles from different dye lots.

    May G thanked catbuilder
  • 5 years ago
    last modified: 5 years ago

    Thanks for the reply @Joseph Corlett, LLC but I can't tell if you're telling me to blow torch my tiles as a joke because I screwed up so badly OR to heat/remove them and replace OR to heat them up to potentially dry them out? If you're serious, will that damage the white enamel (or better yet, the surrounding cabinets/house in general creating a fire hazard)? Going on day 3 and still grayish.


    @catbuilder the ones that are straight cuts we used a basic tile cutter (no water) so those remained intact.

  • 5 years ago

    My post is too late for you, but for other people who google "outlets in backsplash", you should have installed the outlets horizontally. That way, there would not be as many tile cuts.


  • 5 years ago

    Tiles are glazed at high heat so it won't ruin them. That is a pro comment and I am sure they are quite serious. I agree to take a heat gun, or perhaps fire, ect... to them to get them to dry. If there wasn't any dye in the water, as you said all was new, they should return to normal. It appears you grouted too soon, climate effects dry time for mortar, 24 hrs - 72 hrs depending on the moisture in the air. It probably will dry on its own over time even without help. Some things take time to resolve. I hope this helps.

    May G thanked Anne Reid
  • 5 years ago
    last modified: 5 years ago

    @Miranda33 I think for an experienced tile cutter, they can be done well. If mine were horizontal, it might drive me crazy.


    May G thanked Mich
  • 5 years ago

    @Miranda33 the cuts weren't the problem for us plus the outlets were wider than the tiles. Having 7 of them in the backsplash including half of which are 2 or 3-gang it would've looked WEIRD having some vertical and some horizontal. Tomayto Tomahto!

  • 5 years ago

    Tiles like that can takes days to dry out when they're not installed yet. Since they're installed, it will take even longer to dry out. What did you install them with? Thinset mortar or mastic? Be aware that premixed thinset is not actually thinset mortar, it's mastic.

    May G thanked catbuilder
  • 5 years ago

    May - this is so ODD! I have my fingers crossed for you! Your DIY tile job looks really nice! There are so many posts on here re: bad tile jobs - and I’ve been surprised about how many times people tell the OP that he/she simply “got what was paid for“ (always assuming that the person was a cheapskate). While I’m sure that there are people who will ALWAYS purchase the cheapest materials, and hire the lowest bidder, I don’t think that it’s fair to always assume that’s the case. The photo of your tile job (completed by a non-professional tradesman) confirms however, that even a low bid job should be capable of a nice result - especially when it’s a simpler tile/installation (definitely never glass mosaic tiles!!). Let us know if the heat works!

    May G thanked dani_m08
  • 5 years ago

    @catbuilder we used AcrylPro tile adhesive.


    @dani_m08 Thank you for the kind words. We tackled our backsplash in our previous house but learned some things along the way so this go around was much smoother- aside from the tile turning color! We definitely did not use top of the line tile (only $8/sqft) so I do have to wonder if we went with a different brand if we'd be having this problem but I totally hear you...I was waiting for someone to say that very thing on here to us. "You did this to yourselves for not hiring a professional" :/


    Just asked to borrow my sisters heat gun.... Going to grab it tonight- will keep you posted!

  • 5 years ago

    Oh my, I hate to say it but the only time I had trouble with a project was with that adhesive. There are some horror stories on line about it as well. I didn't know, until I had my own experience. It took so much longer to dry than they said. I even wrote to home depot to ask them to take it off the shelf, I was so mortified by the dry time. It is so not your fault!

    Versabond is a good product for next time. The acrylic is sealing in the moisture, and it won't breath to exhaust the moisture. hope the heat takes care of this:/

    May G thanked Anne Reid
  • PRO
    5 years ago

    I hope you get a resolve to this. In my monitor, all the tiles ( not just cut ones ) seem to be from different dye lots. Do you still have the boxes from the tile? any left over? that way you can check and see.

    I'm sure it will be ok at some point!

    May G thanked Debbi Washburn
  • 5 years ago

    Thanks @Anne Reid Ugh- I had no idea. We're having cold feet re: the heat gun because in theory, it's going to heat up the adhesive and loosen the tile. We're sitting here with the gun and gray tiles apprehensively trying to decide if we should go for it. I know the worse case is that the tile gets loose and we need to replace (we have plenty- that's not the issue) which my husband is nervous he's going to make the problem worse. UGHHHHH


    @Debbi Washburn I think it's the monitor. All of the boxes are from the same dye lot with the same dates/numbers and they do look the same in person...just not the ones that were handled with the wet saw unfortunately.

  • 5 years ago

    follow

  • 5 years ago

    So the heat gun didn't seem to do much. I'm not sure if it's because we were nervous to hold it to the tile for too long in fear of softening the adhesive or if it's just forever going to be discolored...whomp.whomp.

  • 5 years ago

    Perhaps do some research or people's solutions with Acrylic Pro, it is plastic based and sealing in the moisture for sure. Heat works for mortar and prob this too but you might need to be willing to dig out some grout:/

    May G thanked Anne Reid
  • PRO
    5 years ago

    Yay!!!

  • 5 years ago
    last modified: 5 years ago

    They look A LOT better!!! I was very worried for you - so happy to see that you won’t have to rip out all of your hard work and start from scratch! It looks great! What tile did you use? My sister is looking for something similar to your tiles for her kitchen.

    Wanna come install mine now ?????? ;)


    May G thanked dani_m08
  • 5 years ago

    I’m guessing some wrong colored tiles ended up in your box. That actually looks like a gray tile.

  • 5 years ago

    Haha! Did not see your latest pic before I posted. Looks great!!

  • 5 years ago

    Looks wonderful!

  • 5 years ago

    Thanks everyone! @dani_m08 my husband said he'd do it for $One Million Dollars$ ;o)

    We got our tiles from Lowes- Artmore Tile Newton 40-Pack White 2-in x 10-in Polished Ceramic Subway Wall Tile. They were inexpensive and you can find similar styles pretty much anywhere these days!

  • 5 years ago

    May - tell your husband that I’ll get back to him on his offer! LOL!

  • 5 years ago

    Looks great now. And wanted to add - I MUCH prefer vertical outlets. :-)

    May G thanked Chessie
  • 4 years ago

    I just wanted to say it looks wonderful. We have a box of very similar tile and I’m approaching it with trepidation. Also vertical outlets are best in a kitchen backsplash because many counter top appliances (I’m talking to you Cuisinart, Instant Pot, Blendtek) have heavy grounded power cords that are stiff and uncooperative and have a mind of their own, preferring to stick out sideways. I don’t have but 2 outlets on my GFI circuit at present so the family of labor saving devices just have to share. In our remodeled bathrooms there was a constant battle with curling irons, hair dryers, shaves and waterpiks. We put in two and did them horizontally and they look fine. I’m not sure how a single one would look but I’m happy with them that way. My moms house has a bar top with 6 outlets along it’s length and they were extremely useful. The ones with cabinets overhead are vertical. It never struck me as odd, either. They are barely visible in photo. We tore out bar top and put in granite. Four years later I’m still mourning those outlets…

  • 4 years ago

    ETA - there were four. One on either side of sink, one where counter bends and the last near the end by the post. Now there’s just one.

  • 3 years ago

    May, How far apart were those two pictures? How long did it take for your tile to dry out and return to white? We've run into the same issue.

  • 3 years ago

    So this very thing just happened to me and I’m freaking out, so this was extremely helpful to hear a great outcome. I’m going on day four, so hopefully soon the grey hue will go away! I’m hopeful now, thank you!!!!

  • 3 years ago

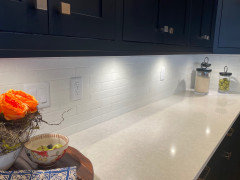
    We’re not done with kitchen, but here’s photo

Sponsored
Bella Casa LLC
Average rating: 5 out of 5 stars17 Reviews
The Leading Interior Design Studio in Franklin County