
Search results for "Accumulated" in Home Design Ideas
 MODIVO LIGHT
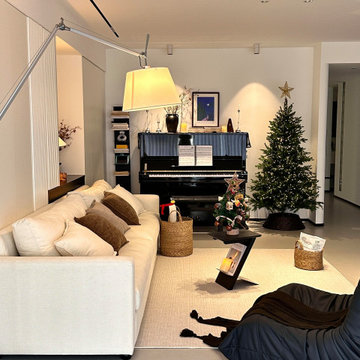
This is our first time decorating a house. Starting from knowing nothing at all to now having the hard decoration completed, we have experienced every emotion along the way—anxiety, doubt, tiredness, hesitation, joy, satisfaction, and touch. We learned and explored on our own, and bit by bit, we finished decorating our home. We’ve accumulated so much experience in this process, and now we want to share it, hoping it can be of a little help to all of you who are doing your own home decoration.
Preparations in Advance
1、Clarify your own ideas: Whether you are looking online, talking to designers, or copying ideas from friends' homes, you should have a clear vision of what your home should look like before designing—such as the style, color scheme, and elements to be used... It is crucial to avoid wanting to install everything that looks good in others' homes in your own. This way, you can clearly put forward your requirements during the design and decoration process, and also avoid frequent revisions to the plan, which may lead to unnecessary rework.
2、Understand your own needs: You need to first figure out the needs of your family, such as how many people live in the house permanently, how many rooms are needed, everyone's living habits, and daily preferences... A home is always for living in, so functionality is always the most important. It is best to list these needs and give priority to meeting them during the design and decoration. This way, you won't find out after decoration that many necessary things are missing, while a bunch of installed things are useless.
3、Determine your budget: There are ways to decorate with more money, and also ways to do it with less. No matter how much money you have, the decorated house can be both beautiful and practical. Therefore, it is essential to decide exactly how much you want to spend on decoration. In every link, such as designing the plan, making a budget table, selecting materials, and construction, you should act in accordance with your own budget.
4、Understand the advantages and disadvantages of your house: There is no perfect house in the world, and every house has its pros and cons. Your design plan should avoid its shortcomings and amplify its advantages. I once wrote an article about the drawbacks of my house ("My house is not perfect, but I still want to find ways to save it"), so we figured out solutions to these problems during the decoration.
5、Learn as much decoration knowledge as possible in advance: Although you can pick up this knowledge in the subsequent decoration process, it is better to learn more beforehand. This will make you much more calm when facing problems.
6、Know your strengths: Before decoration, you must be clear about what you are good at and what you are not. If you are good at design, do the design yourself; if you are skilled at bargaining, go buy building materials on your own; if you have strong hands-on ability, you can even do the decoration and repairs yourself... During the decoration process, you should focus on what you are good at, and leave what you are not good at to others.
 Talon Construction Inc.
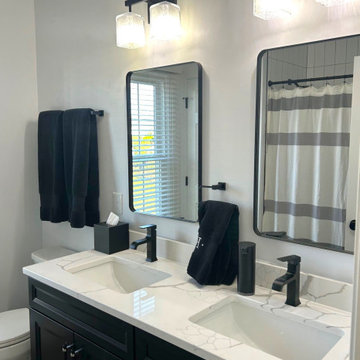
This primary bathroom remodel in Olney, Maryland, showcases a sophisticated transition from traditional architecture to a clean, modern aesthetic. The design centers on a high-contrast palette of crisp whites, deep blacks, and warm wood tones, creating a bright and functional sanctuary.
Design Highlights
Walk-In Shower: The curbless shower features large-format marble-veined wall tiles paired with a dark grey hexagonal mosaic floor. Matte black hardware, including a rain showerhead and a handheld wand, provides a bold, contemporary finish.
Vanity & Storage: Dual white shaker-style vanities are topped with white quartz counters featuring subtle grey veining. Minimalist matte black faucets and pulls tie the look together. A custom window bench with drawer storage sits beneath the large arched window, maximizing utility and seating.
Lighting & Fixtures: Modern four-light vanity fixtures with textured glass shades provide ample illumination. Rounded-corner black framed mirrors add a soft geometric touch to the workspace.
Flooring: Durable luxury vinyl plank (LVP) flooring in a multi-tonal wood finish adds warmth to the space and balances the cooler tones of the cabinetry and tile.
Architectural Features: The original arched window and vaulted ceiling were preserved and enhanced with custom plantation shutters, allowing for privacy without sacrificing the room's natural light.
Frequently Asked Questions
What are the benefits of using large-format tile in a shower?
Large-format tiles create a more seamless appearance by reducing the number of grout lines. This not only makes the space feel larger and more open but also significantly reduces the surface area where mold and mildew can accumulate, making the shower easier to clean.
Why choose matte black hardware over chrome or brushed nickel?
Matte black serves as a strong "anchor" in a white bathroom, providing a high-contrast, modern look that hides water spots and fingerprints more effectively than polished finishes. It pairs exceptionally well with various wood tones and stone patterns.
Is luxury vinyl plank (LVP) a good choice for a bathroom?
Yes, high-quality LVP is 100% waterproof, making it an ideal choice for bathrooms. It offers the aesthetic warmth of hardwood—which is susceptible to moisture damage—with the durability and slip resistance needed for a wet environment.
How does a custom window bench improve a bathroom layout?
Beyond providing a place to sit, a custom bench utilizes the often-underused space beneath a window for extra storage. It creates a cohesive, "built-in" look that ties the vanities together and adds a high-end, furniture-like quality to the room.
What is the advantage of a "design-build" approach for a remodel like this?
The design-build model integrates both the design and construction phases into a single contract. This ensures that the aesthetic vision stays within the established budget and allows for better communication between the designers and the craftsmen during the actual renovation.
 Talon Construction Inc.
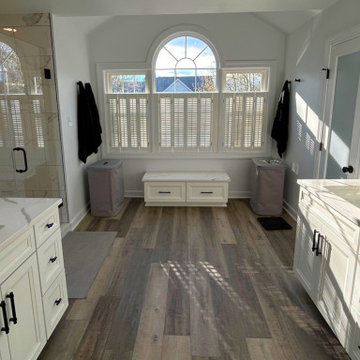
This primary bathroom remodel in Olney, Maryland, showcases a sophisticated transition from traditional architecture to a clean, modern aesthetic. The design centers on a high-contrast palette of crisp whites, deep blacks, and warm wood tones, creating a bright and functional sanctuary.
Design Highlights
Walk-In Shower: The curbless shower features large-format marble-veined wall tiles paired with a dark grey hexagonal mosaic floor. Matte black hardware, including a rain showerhead and a handheld wand, provides a bold, contemporary finish.
Vanity & Storage: Dual white shaker-style vanities are topped with white quartz counters featuring subtle grey veining. Minimalist matte black faucets and pulls tie the look together. A custom window bench with drawer storage sits beneath the large arched window, maximizing utility and seating.
Lighting & Fixtures: Modern four-light vanity fixtures with textured glass shades provide ample illumination. Rounded-corner black framed mirrors add a soft geometric touch to the workspace.
Flooring: Durable luxury vinyl plank (LVP) flooring in a multi-tonal wood finish adds warmth to the space and balances the cooler tones of the cabinetry and tile.
Architectural Features: The original arched window and vaulted ceiling were preserved and enhanced with custom plantation shutters, allowing for privacy without sacrificing the room's natural light.
Frequently Asked Questions
What are the benefits of using large-format tile in a shower?
Large-format tiles create a more seamless appearance by reducing the number of grout lines. This not only makes the space feel larger and more open but also significantly reduces the surface area where mold and mildew can accumulate, making the shower easier to clean.
Why choose matte black hardware over chrome or brushed nickel?
Matte black serves as a strong "anchor" in a white bathroom, providing a high-contrast, modern look that hides water spots and fingerprints more effectively than polished finishes. It pairs exceptionally well with various wood tones and stone patterns.
Is luxury vinyl plank (LVP) a good choice for a bathroom?
Yes, high-quality LVP is 100% waterproof, making it an ideal choice for bathrooms. It offers the aesthetic warmth of hardwood—which is susceptible to moisture damage—with the durability and slip resistance needed for a wet environment.
How does a custom window bench improve a bathroom layout?
Beyond providing a place to sit, a custom bench utilizes the often-underused space beneath a window for extra storage. It creates a cohesive, "built-in" look that ties the vanities together and adds a high-end, furniture-like quality to the room.
What is the advantage of a "design-build" approach for a remodel like this?
The design-build model integrates both the design and construction phases into a single contract. This ensures that the aesthetic vision stays within the established budget and allows for better communication between the designers and the craftsmen during the actual renovation.
Find the right local pro for your project
 transFORM Home
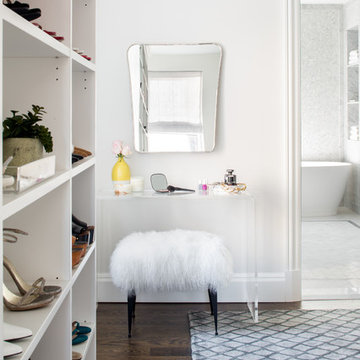
transFORM had the honor of designing, manufacturing and installing a crisp new walk-in closet at The Chatsworth - a historic Beaux Art building located in the heart of Manhattan's charming Upper West Side. Built in 1904, The Chatsworth was reintroduced in 2015 with expanded floor plans, incredible amenities and a private club-like atmosphere.
transFORM’s Senior Design Manager Rozalia Kiss, worked with the HFZ Capital Group to create a striking bedroom sized walk-in closet, which was recently featured in the New York Times article : Closets as Big as Some Apartments. The article identifies spacious closets as the latest must-have in some of the city’s most expensive condominiums.
Quickly becoming an essential part of the modern home, a walk-in closet adds style and convenience to your daily routine. Designed in a clean white finish and tastefully accented with complementing polished chrome hardware, this custom walk-in closet delivers tons of functional and accessible space.
All-white cabinetry offers a crisp look that allows your clothing to steal the spotlight. The high-contrast shaker style doors, create an elegant backdrop for your clothing. Light also pours through the big windows, drawing your eye to the iconic views of the Hudson River. It creates a feeling of brightness and positivity that energizes and enlivens. It’s a walk-in closet where you can look and feel your best as you begin your day.
For added visual appeal, the unit was accented with crown and base molding. The elegant detailing was inspired by the pre-war era building’s architectural features. The moldings add a retro geometric touch that matches the apartments beamed ceilings and traditional herringbone floors that were all the rage during the period and make a striking comeback in this beautiful renovation.
This unit was specifically designed with a variety of open shelves, hanging sections, and shoe storage. Hanging sections provide enough elevation to conveniently organize items based on size. From blazers and blouses to maxi skirts and evening gowns, all of your clothing is easily accessible. By using the same color hangers, your space will appear even more collected and composed. You can also arrange your clothing so that the colors compliment each other and appear as the favorable options they really are.
For the shoe enthusiast, we included numerous sets of shoe shelves and cubbies that attractively organize and showcase your finest footwear. This type of system allows you to identify and grab your favorite pair as you mix and match the perfect ensemble.
Shelving provides many of the same storage functions as drawers or baskets, but at a more economical price point. Items on open shelves are easier to recognize as a match for an outfit than items inside drawers. Top shelves are best for large, lightweight and seldomly-used items like your favorite floppy beach hat. Middle shelves, which tend to be the units focal point can be personalized with photos and home decor. Bottom shelves provide easy access to your most frequently used items like cozy sweaters and beloved slacks.
This custom closet also includes three tilt-out laundry hampers. No more dragging big clunky laundry baskets around the house. Tilt-out hampers are removable, lightweight nylon bags and easy to grab and go. They are stored behind cabinet faces that blend in with your space, removing unsightly and unpleasant-to-be-around dirty laundry from accumulating in piles on the floor. Installing 2 - 3 tilt-outs will make sorting laundry lightning fast. These hampers help keep your closet clean and tidy and increase space without losing functionality.
Let's face it, an organized custom closet just looks great. The side benefit is increased awareness and more pride in your clothing and your day-to-day appearance. With an organized system everything has its place and you can find the garments you need in the moment you need them, sans the ‘what to wear’ frustration.
 Talon Construction Inc.
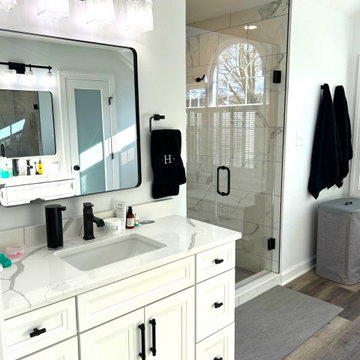
This primary bathroom remodel in Olney, Maryland, showcases a sophisticated transition from traditional architecture to a clean, modern aesthetic. The design centers on a high-contrast palette of crisp whites, deep blacks, and warm wood tones, creating a bright and functional sanctuary.
Design Highlights
Walk-In Shower: The curbless shower features large-format marble-veined wall tiles paired with a dark grey hexagonal mosaic floor. Matte black hardware, including a rain showerhead and a handheld wand, provides a bold, contemporary finish.
Vanity & Storage: Dual white shaker-style vanities are topped with white quartz counters featuring subtle grey veining. Minimalist matte black faucets and pulls tie the look together. A custom window bench with drawer storage sits beneath the large arched window, maximizing utility and seating.
Lighting & Fixtures: Modern four-light vanity fixtures with textured glass shades provide ample illumination. Rounded-corner black framed mirrors add a soft geometric touch to the workspace.
Flooring: Durable luxury vinyl plank (LVP) flooring in a multi-tonal wood finish adds warmth to the space and balances the cooler tones of the cabinetry and tile.
Architectural Features: The original arched window and vaulted ceiling were preserved and enhanced with custom plantation shutters, allowing for privacy without sacrificing the room's natural light.
Frequently Asked Questions
What are the benefits of using large-format tile in a shower?
Large-format tiles create a more seamless appearance by reducing the number of grout lines. This not only makes the space feel larger and more open but also significantly reduces the surface area where mold and mildew can accumulate, making the shower easier to clean.
Why choose matte black hardware over chrome or brushed nickel?
Matte black serves as a strong "anchor" in a white bathroom, providing a high-contrast, modern look that hides water spots and fingerprints more effectively than polished finishes. It pairs exceptionally well with various wood tones and stone patterns.
Is luxury vinyl plank (LVP) a good choice for a bathroom?
Yes, high-quality LVP is 100% waterproof, making it an ideal choice for bathrooms. It offers the aesthetic warmth of hardwood—which is susceptible to moisture damage—with the durability and slip resistance needed for a wet environment.
How does a custom window bench improve a bathroom layout?
Beyond providing a place to sit, a custom bench utilizes the often-underused space beneath a window for extra storage. It creates a cohesive, "built-in" look that ties the vanities together and adds a high-end, furniture-like quality to the room.
What is the advantage of a "design-build" approach for a remodel like this?
The design-build model integrates both the design and construction phases into a single contract. This ensures that the aesthetic vision stays within the established budget and allows for better communication between the designers and the craftsmen during the actual renovation.
 Dynamic Garage Door
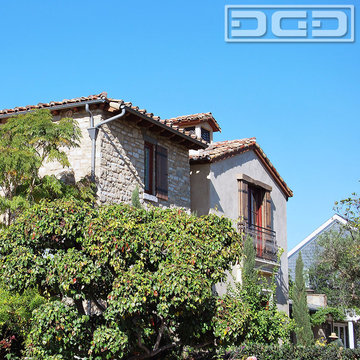
Dynamic Garage Door specializes in Tuscan Architectural beautification in the Newport Beach, CA through our custom designed and hand made architectural shutters, garden gates and garage doors. This Newport-Mesa Tuscan home was exquisitely decorated with a combination of custom gates, decorative shutters and balcony barn door style shutters all handcrafted out of authentic, century-old reclaimed barn wood specifically harvested for this custom project.
Beginning with the balcony shutters which actually slide from side to side like a real barn door we worked a charming rustic shutter design that would typically be seen in the Tuscan Riviera. We opted for sliding shutters as the balcony spacing limited the swing action of even bi-folding shutters. Incorporating real barn door hardware railing and crowing it behind the faux reclaimed wood beam made an excellent statement while adding functional shutters that can be shut close for comfort during the summer morning when the sun beats down into the master suite. The four shutter leafs are decorated with real hand forged dummy straps that were hammered and crafted by hand to achieve that gorgeous rustic charm typical of Tuscan architecture. The reclaimed barn wood from a century-old barn gives off a timeless appearance that increase in characters as the years go by. Because rustic barn wood has already aged beautifully over hundreds of years, the next century will only increase its authentically gorgeous appearance. The culmination of this project has been a meticulous collaborative input of our in-house head designer and the clients themselves. Although the completion of this project is lengthy and intricate, the results speak volumes and the wait simply justifies the outcome.
The rest of thew windows on this Tuscan home have been accessorized with rustic barn wood as well and accentuated with our custom designed and handmade dummy iron hinge straps. Our dummy hardware is so authentically done in the same tradition used for hundreds of years in Europe to create shutter hardware that looks authentic and functional although it is only decorative. The details of our custom shutters is evident in the slightest of details including the bolts used to hold the shutter straps in place. Each of the shutter also has a decorative ring pull with a hand-hammered back plate which enhances the appearance of true functional shutters and defining that authentic Tuscan look.
The beauty of this Tuscan home is visible throughout the entire property including the garden gates, garage doors and entry door. Again, for the garden gates, we went with rustic barn wood carefully crafted to preserve the original surface that has aged over hundreds of years but building the gates on galvanized steel frames that will ensure structural durability for the next few hundred years. The gates are highly secure, sound and can definitely hold back a crowd with authentic rustic charm. Don't be fooled with the simple-looking gate design. It is quite intricate with its 45 degree angle cuts around the perimeter of the trim which deviates water away from crevices that would otherwise make the gates vulnerable to the accumulation of moisture from the elements, sprinkler system or simply air humidity since the home is located near the ocean. Each one of the garden gates is equipped with European style mortise lock mechanisms and roller catches. Dynamic Garage Door gates are not your typical garden gates, they are truly made with quality and durability in mind as well as aesthetic attention to detail. Everything, from the hardware used, the core steel frame and overlay material used is hand selected and approved individually for maximum beauty and timeless appreciation.
At Dynamic Garage Door, we specialize in multiple facet projects that include garden gates, driveway gates as well as barn doors and shutters. It is very important because these are the accessories that can make or break the beauty and continuity of your home's architectural style and authenticity.
Increase your curb appeal and home value with Dynamic Garage Door's gates, shutters and automatic custom garage doors. Our in-house designers would love to speak with you today!
Design Consultation Center: (855) 343-3667
 keter
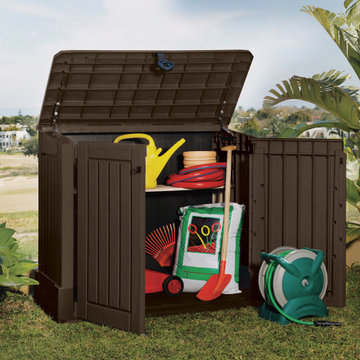
keterThis Keter Woodland shed is made of resin, which will not fade over time. Resin is weather resistant and low maintenance. Never worry about fading, rot, mildew, rust or unraveling. Cleanup is easy, and this makes it a perfect garbage can storage solution.
This unit works as a weather resistant garbage can storage container. It has a low maintenance design with powerful hydraulic pistons for an assisted lift. This space saving outdoor storage container is ideal for backyard use because it holds two 32-gallon outdoor trash cans. This Keter Woodland shed has a lockable assembly that is durable and vented for easy use.
 Progressive Design Build
Challenge
As part-time residents of this Bonita Springs home, our clients were looking to update their outdoor entertainment area. They also planned to be away for the summer during the remodel and needed their renovation project to be finished prior to their return for the winter.
Their needs included:
Changing the color pallet to a monochromatic scheme, removing the yellow brick pavers, adding an outdoor kitchen area, adding an outdoor fireplace, resurfacing the pool and updating the tile, installing a new screen enclosure, and creating privacy from the neighbors, particularly the main sitting areas, pool and outdoor kitchen.
Although there was already a 1,221 sq. ft. lanai under the roof, it lacked functionality needed by the homeowners. Most of its amenities were located at one end of the lanai, and lacked privacy that the homeowners valued.
Solution
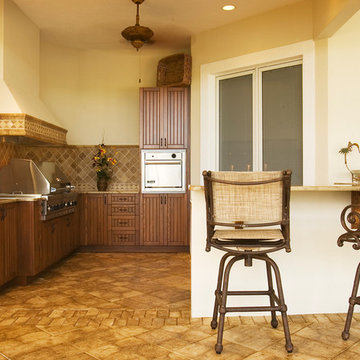
The final project design required two additions to the lanai area adding an accumulative 265 sq. ft. to the existing space expanding their sitting area and accommodating a much-needed outdoor kitchen. The new additions also needed to blend with the home’s existing style.
Addition #1—Sitting Area:
The first addition added approximately 145 sq. ft. to the end of the lanai. This allowed Progressive Design Build to tie into the existing gable room for the new space and create privacy from the neighbors.
Addition #2—Outdoor Kitchen:
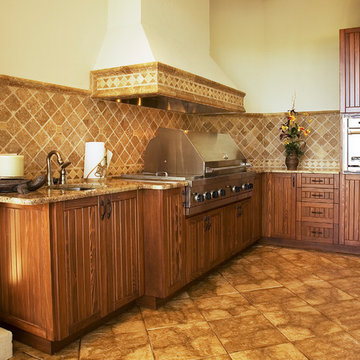
The second addition was a bump out that added approximately 120 sq. ft. to the end of the house close to the interior kitchen. This allowed the client to add an outdoor over and 52” Viking grill (with a side burner) to their outdoor living space. Other amenities included a new sink and under counter fridge, granite countertops, tumbled stone stile and Cypress cabinetry, custom-fabricated with marine grade plywood boxes and marine grade finishes to withstand moisture, common in the Bonita Bay community.
Special attention was given to the preparation area on either side of the stove, the landing area next to the oven and the serving counter behind the bar. Bar seating was added to the outdoor kitchen, allowing guests to visit with the cook comfortably and easily.
Brick Pavers
During the design phase, we discovered that the original brick pavers were set in sand, with no concrete pad below. Consequently, the retaining wall and several pavers were starting to fail, caused by the shifting sands. To remedy the problem, we installed a new concrete deck and laid new nonslip pavers on top of the deck—ideal for wet area applications.
Pool Renovations
To dramatically improve the enjoyment and ambiance of their pool, Progressive Design Build completely re-plumbed it, putting in additional lighting and new water features. New decorative pool tile, coping, and a paver deck were also installed around the pool. The pool finish chosen by our clients was a nice tropical blue color.
Screen Enclosure
A new screen enclosure was installed in compliance with new local building codes, making it more stable and solid than the existing one. The color change from white to bronze coordinated well with the homeowners’ new color scheme; and the location of the service door and stairs provided convenient access to the new pool equipment.
Results
This project was completed on time and within budget before these homeowners returned for their winter holiday. They were thrilled with the weekly communication, which included two-way phone calls and email photo sharing. They always knew where their project was in the construction process and what was happening at all times—providing security and peace of mind.
 Deck and Patio Company "Outdoor Living Experts"
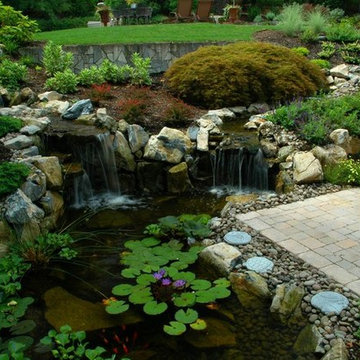
Installing a multi-faceted water feature that includes stream, waterfalls and pond, nestled in between multi-level patios, creates a restful and functional backyard oasis.
www.deckandpatio.com
 Progressive Design Build
Challenge
As part-time residents of this Bonita Springs home, our clients were looking to update their outdoor entertainment area. They also planned to be away for the summer during the remodel and needed their renovation project to be finished prior to their return for the winter.
Their needs included:
Changing the color pallet to a monochromatic scheme, removing the yellow brick pavers, adding an outdoor kitchen area, adding an outdoor fireplace, resurfacing the pool and updating the tile, installing a new screen enclosure, and creating privacy from the neighbors, particularly the main sitting areas, pool and outdoor kitchen.
Although there was already a 1,221 sq. ft. lanai under the roof, it lacked functionality needed by the homeowners. Most of its amenities were located at one end of the lanai, and lacked privacy that the homeowners valued.
Solution
The final project design required two additions to the lanai area adding an accumulative 265 sq. ft. to the existing space expanding their sitting area and accommodating a much-needed outdoor kitchen. The new additions also needed to blend with the home’s existing style.
Addition #1—Sitting Area:
The first addition added approximately 145 sq. ft. to the end of the lanai. This allowed Progressive Design Build to tie into the existing gable room for the new space and create privacy from the neighbors.
Addition #2—Outdoor Kitchen:
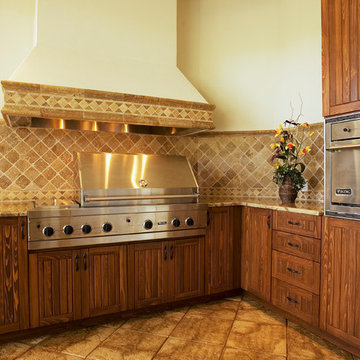
The second addition was a bump out that added approximately 120 sq. ft. to the end of the house close to the interior kitchen. This allowed the client to add an outdoor over and 52” Viking grill (with a side burner) to their outdoor living space. Other amenities included a new sink and under counter fridge, granite countertops, tumbled stone stile and Cypress cabinetry, custom-fabricated with marine grade plywood boxes and marine grade finishes to withstand moisture, common in the Bonita Bay community.
Special attention was given to the preparation area on either side of the stove, the landing area next to the oven and the serving counter behind the bar. Bar seating was added to the outdoor kitchen, allowing guests to visit with the cook comfortably and easily.
Brick Pavers
During the design phase, we discovered that the original brick pavers were set in sand, with no concrete pad below. Consequently, the retaining wall and several pavers were starting to fail, caused by the shifting sands. To remedy the problem, we installed a new concrete deck and laid new nonslip pavers on top of the deck—ideal for wet area applications.
Pool Renovations
To dramatically improve the enjoyment and ambiance of their pool, Progressive Design Build completely re-plumbed it, putting in additional lighting and new water features. New decorative pool tile, coping, and a paver deck were also installed around the pool. The pool finish chosen by our clients was a nice tropical blue color.
Screen Enclosure
A new screen enclosure was installed in compliance with new local building codes, making it more stable and solid than the existing one. The color change from white to bronze coordinated well with the homeowners’ new color scheme; and the location of the service door and stairs provided convenient access to the new pool equipment.
Results
This project was completed on time and within budget before these homeowners returned for their winter holiday. They were thrilled with the weekly communication, which included two-way phone calls and email photo sharing. They always knew where their project was in the construction process and what was happening at all times—providing security and peace of mind.
 Builder Boy
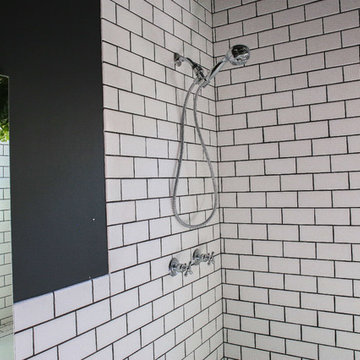
If you are a bold personality and want to incorporate the same essence into your bathrooms also, go for bold décor. And nothing can do this better than all-black tiles with not-so-jazzy prints on them. With such dark-toned bathroom tiles, incorporate stainless steel fixtures to make this space sleek and chic. You may also use some bold accents and furniture pieces such as black wooden window frames, bold dark mirror frame and a huge brass chandelier. If you like, you can also let a cute cactus stay in a corner, or hang a plant from a corner!
 Progressive Design Build
Challenge
As part-time residents of this Bonita Springs home, our clients were looking to update their outdoor entertainment area. They also planned to be away for the summer during the remodel and needed their renovation project to be finished prior to their return for the winter.
Their needs included:
Changing the color pallet to a monochromatic scheme, removing the yellow brick pavers, adding an outdoor kitchen area, adding an outdoor fireplace, resurfacing the pool and updating the tile, installing a new screen enclosure, and creating privacy from the neighbors, particularly the main sitting areas, pool and outdoor kitchen.
Although there was already a 1,221 sq. ft. lanai under the roof, it lacked functionality needed by the homeowners. Most of its amenities were located at one end of the lanai, and lacked privacy that the homeowners valued.
Solution
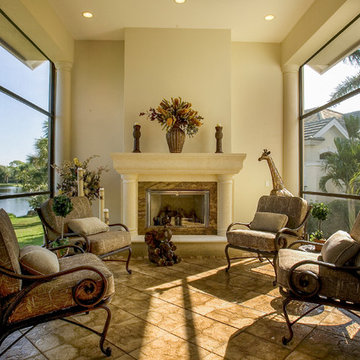
The final project design required two additions to the lanai area adding an accumulative 265 sq. ft. to the existing space expanding their sitting area and accommodating a much-needed outdoor kitchen. The new additions also needed to blend with the home’s existing style.
Addition #1—Sitting Area:
The first addition added approximately 145 sq. ft. to the end of the lanai. This allowed Progressive Design Build to tie into the existing gable room for the new space and create privacy from the neighbors.
Addition #2—Outdoor Kitchen:
The second addition was a bump out that added approximately 120 sq. ft. to the end of the house close to the interior kitchen. This allowed the client to add an outdoor over and 52” Viking grill (with a side burner) to their outdoor living space. Other amenities included a new sink and under counter fridge, granite countertops, tumbled stone stile and Cypress cabinetry, custom-fabricated with marine grade plywood boxes and marine grade finishes to withstand moisture, common in the Bonita Bay community.
Special attention was given to the preparation area on either side of the stove, the landing area next to the oven and the serving counter behind the bar. Bar seating was added to the outdoor kitchen, allowing guests to visit with the cook comfortably and easily.
Brick Pavers
During the design phase, we discovered that the original brick pavers were set in sand, with no concrete pad below. Consequently, the retaining wall and several pavers were starting to fail, caused by the shifting sands. To remedy the problem, we installed a new concrete deck and laid new nonslip pavers on top of the deck—ideal for wet area applications.
Pool Renovations
To dramatically improve the enjoyment and ambiance of their pool, Progressive Design Build completely re-plumbed it, putting in additional lighting and new water features. New decorative pool tile, coping, and a paver deck were also installed around the pool. The pool finish chosen by our clients was a nice tropical blue color.
Screen Enclosure
A new screen enclosure was installed in compliance with new local building codes, making it more stable and solid than the existing one. The color change from white to bronze coordinated well with the homeowners’ new color scheme; and the location of the service door and stairs provided convenient access to the new pool equipment.
Results
This project was completed on time and within budget before these homeowners returned for their winter holiday. They were thrilled with the weekly communication, which included two-way phone calls and email photo sharing. They always knew where their project was in the construction process and what was happening at all times—providing security and peace of mind.


 Tom Brzoskwinia
One of the most popular hardwood floor finishing which offers Tom & Peter Flooring is provided by WOCA. If you’ve decided that you want a natural looking wooden floor that is lacquer-free, then the likelihood is that you’ve chosen oil as your way of protecting your wood and making your floor look great at the same time. WOCA for wood flooring comes in various forms and is a great way of making sure that your wood is protected, but at the same time looks natural. A highly popular as well as effective way of treating wood floors, oils effectively penetrate into the wood and in some cases harden into the surface of the floor to stop damage and to maintain the wood in its optimum condition.
WOCA Oil finish hardwood flooring has taken the United States market by in 2014 and shows no signs of slowing down in 2016 and now. Here are some of the most common questions we have regarding this type of finish which we will I’m to answer in today’s my blog:
Is oil finish as durable as traditional factory urethane finishes with aluminum oxide?
When it comes to durability, oil finish flooring tackles the issue with a completely different method. The penetrating oil serves as protection from moisture and wear while allowing the user to feel the wood grains in their bare feet. If compared directly to factory finished aluminum oxide finish, the oil finish flooring will not perform as well to abrasion and impact. However, the beauty of this finish is the fact that it will camouflage any scratches which will inevitably accumulate over time.
Will this finish evaporate over time and will this be harmful for indoor air quality?
Another concern for oil finished floors its effect on indoor air quality. For on-site applications, some varieties suggest several coats which typically require the residents to be out of the home due to mild odors. However, there are factory finished UV-cured or single coat applications which lessen the downtime. Despite the odors produced during the drying process, oil finish floors rank amongst the lowest for VOC (volatile organic compound) emissions. Certain brands even boast true zero VOC. This fact alone makes oil finished floors one of the best options for green building solutions.
“WOCA products are certified by independent laboratories, the German Institute for Biological Building Materials, and are in accordance with DIN–Norm 53–160. WOCA WoodCare Denmark products meet or exceed the most stringent U.S. standards for volatile organic compounds.” –WOCA Oil Finish Manufacture
Does this type of finish require additional maintenance which I am not familiar with?
For weekly cleaning, oiled floors use a special cleaner which contains an oil and soap mixture. After a period of 12-18 months some oil may evaporate causing the wood grains to appear dry. An additional layer of oil can be reapplied to keep the floor looking fresh. Although oil finished floors require more involvement in periodic maintenance in high traffic areas, this maintenance can be done much easier than the equivalent of an onsite sand and refinish.
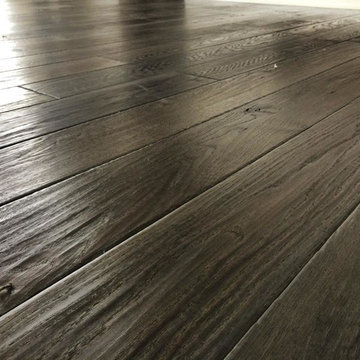
WOCA Master Color Oil contains pigment, which provides a single-step hardwood floor staining process. Laying down the stain and the finish in one step.
This product comes 14 different colors, from Black to Extra White, and you can mix them freely to create various color palettes that will meet the demands of any job.
Below are some pictures of the finished job…
 Progressive Design Build
Challenge
As part-time residents of this Bonita Springs home, our clients were looking to update their outdoor entertainment area. They also planned to be away for the summer during the remodel and needed their renovation project to be finished prior to their return for the winter.
Their needs included:
Changing the color pallet to a monochromatic scheme, removing the yellow brick pavers, adding an outdoor kitchen area, adding an outdoor fireplace, resurfacing the pool and updating the tile, installing a new screen enclosure, and creating privacy from the neighbors, particularly the main sitting areas, pool and outdoor kitchen.
Although there was already a 1,221 sq. ft. lanai under the roof, it lacked functionality needed by the homeowners. Most of its amenities were located at one end of the lanai, and lacked privacy that the homeowners valued.
Solution
The final project design required two additions to the lanai area adding an accumulative 265 sq. ft. to the existing space expanding their sitting area and accommodating a much-needed outdoor kitchen. The new additions also needed to blend with the home’s existing style.
Addition #1—Sitting Area:
The first addition added approximately 145 sq. ft. to the end of the lanai. This allowed Progressive Design Build to tie into the existing gable room for the new space and create privacy from the neighbors.
Addition #2—Outdoor Kitchen:
The second addition was a bump out that added approximately 120 sq. ft. to the end of the house close to the interior kitchen. This allowed the client to add an outdoor over and 52” Viking grill (with a side burner) to their outdoor living space. Other amenities included a new sink and under counter fridge, granite countertops, tumbled stone stile and Cypress cabinetry, custom-fabricated with marine grade plywood boxes and marine grade finishes to withstand moisture, common in the Bonita Bay community.
Special attention was given to the preparation area on either side of the stove, the landing area next to the oven and the serving counter behind the bar. Bar seating was added to the outdoor kitchen, allowing guests to visit with the cook comfortably and easily.
Brick Pavers
During the design phase, we discovered that the original brick pavers were set in sand, with no concrete pad below. Consequently, the retaining wall and several pavers were starting to fail, caused by the shifting sands. To remedy the problem, we installed a new concrete deck and laid new nonslip pavers on top of the deck—ideal for wet area applications.
Pool Renovations
To dramatically improve the enjoyment and ambiance of their pool, Progressive Design Build completely re-plumbed it, putting in additional lighting and new water features. New decorative pool tile, coping, and a paver deck were also installed around the pool. The pool finish chosen by our clients was a nice tropical blue color.
Screen Enclosure
A new screen enclosure was installed in compliance with new local building codes, making it more stable and solid than the existing one. The color change from white to bronze coordinated well with the homeowners’ new color scheme; and the location of the service door and stairs provided convenient access to the new pool equipment.
Results
This project was completed on time and within budget before these homeowners returned for their winter holiday. They were thrilled with the weekly communication, which included two-way phone calls and email photo sharing. They always knew where their project was in the construction process and what was happening at all times—providing security and peace of mind.
 SUPERIOR CHIMNEY SERVICES CORPORATION
The impact of temperature drop on the chimney can impact the structure and functionality of the chimney. As we have been experiencing in Chicago winters, temperatures have gone from 50 degrees down to 21 degrees during the day, with temperatures falling even further at night. What can you do as a homeowner to watch for, and when to bring in a certified technician from Superior Chimney.
External: Impact of Temperature Drop on the Chimney
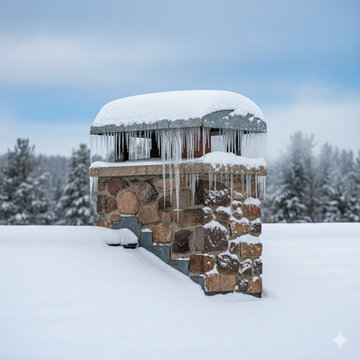
Anytime there is a rapid temperature change, it causes the bricks, stones and mortar to expand and contract. These durable materials are still susceptible to thermal shock, especially when it gets wet from ice, rain or melting snow. Because of the drastic change in temperatures, this can cause hairline cracks to begin, and if it goes unnoticed, larger cracks in the masonry will form.
External: Freeze-Thaw Damage
Mortar, bricks and stones are porous materials, meaning that air and water enter the materials. Sometimes, it leaves or dries out, and other times it stays longer. When the temperatures drop below 32 degrees, any of the trapped water freezes and then expands. This can cause small cracks to start, deterioration of the mortar or spalling which is the flaking of the bricks to occur.
External: Ice Build Up on the Chimney Cap or Chimney Crown
When temperatures are 50 degrees and it rains, water accumulates everywhere, including the highest point on your house, the chimney. The chimney cap and chimney crown are always exposed to the harshest elements. When it rains and temperatures drop during the day or night, freezing occurs and can create ice buildup. This can cause the chimney crown to crack or the chimney cap to loosen.
Internal: Chimney Flue Lining
The temperature swing also affects the chimney flue liner. Some chimney flue liners are made from clay. These are especially susceptible to crack forming from the swing in temperatures. But what also happens whether you have a gas or wood burning fireplace is the formation of condensation which can occur when there is fast cooling after the fire in the fireplace is put out or turned off.
Bring out the Sun!
Well, yes, the sunshine melts the ice and snow, but when temperatures go down at night, what remains wet, will refreeze again. The repeated process places stress on the masonry, bricks and stone.
Chimney Inspections Work
A chimney inspection can help with both safety and preserving the structure of the chimney. When a chimney technician conducts an inspection, they will search for cracks in the bricks and mortar, any spalling or deterioration from the thermal shock and freeze thaw cycle. These areas will be marked for repairs if it gets any worse and before it becomes too expensive to repair.
We can’t forget the biggest intruder in the home: water. The chimney technician will also be checking for water leaks from the chimney flashing, the chimney crown, chimney cap or the efflorescence which is the white material that shows up on the chimney or fireplace.
These are just a couple of key areas that a chimney inspection completes. There are numerous other areas, and this can be found on Superior Chimney’s 14-point inspection guide.
Contact us today, and we’ll set you up for a chimney inspection with photo evidence so you have peace of mind with the safety and security of your home.
 Tom Brzoskwinia
One of the most popular hardwood floor finishing which offers Tom & Peter Flooring is provided by WOCA. If you’ve decided that you want a natural looking wooden floor that is lacquer-free, then the likelihood is that you’ve chosen oil as your way of protecting your wood and making your floor look great at the same time. WOCA for wood flooring comes in various forms and is a great way of making sure that your wood is protected, but at the same time looks natural. A highly popular as well as effective way of treating wood floors, oils effectively penetrate into the wood and in some cases harden into the surface of the floor to stop damage and to maintain the wood in its optimum condition.
WOCA Oil finish hardwood flooring has taken the United States market by in 2014 and shows no signs of slowing down in 2016 and now. Here are some of the most common questions we have regarding this type of finish which we will I’m to answer in today’s my blog:
Is oil finish as durable as traditional factory urethane finishes with aluminum oxide?
When it comes to durability, oil finish flooring tackles the issue with a completely different method. The penetrating oil serves as protection from moisture and wear while allowing the user to feel the wood grains in their bare feet. If compared directly to factory finished aluminum oxide finish, the oil finish flooring will not perform as well to abrasion and impact. However, the beauty of this finish is the fact that it will camouflage any scratches which will inevitably accumulate over time.
Will this finish evaporate over time and will this be harmful for indoor air quality?
Another concern for oil finished floors its effect on indoor air quality. For on-site applications, some varieties suggest several coats which typically require the residents to be out of the home due to mild odors. However, there are factory finished UV-cured or single coat applications which lessen the downtime. Despite the odors produced during the drying process, oil finish floors rank amongst the lowest for VOC (volatile organic compound) emissions. Certain brands even boast true zero VOC. This fact alone makes oil finished floors one of the best options for green building solutions.
“WOCA products are certified by independent laboratories, the German Institute for Biological Building Materials, and are in accordance with DIN–Norm 53–160. WOCA WoodCare Denmark products meet or exceed the most stringent U.S. standards for volatile organic compounds.” –WOCA Oil Finish Manufacture
Does this type of finish require additional maintenance which I am not familiar with?
For weekly cleaning, oiled floors use a special cleaner which contains an oil and soap mixture. After a period of 12-18 months some oil may evaporate causing the wood grains to appear dry. An additional layer of oil can be reapplied to keep the floor looking fresh. Although oil finished floors require more involvement in periodic maintenance in high traffic areas, this maintenance can be done much easier than the equivalent of an onsite sand and refinish.
WOCA Master Color Oil contains pigment, which provides a single-step hardwood floor staining process. Laying down the stain and the finish in one step.
This product comes 14 different colors, from Black to Extra White, and you can mix them freely to create various color palettes that will meet the demands of any job.
Below are some pictures of the finished job…
 SUPERIOR CHIMNEY SERVICES CORPORATION
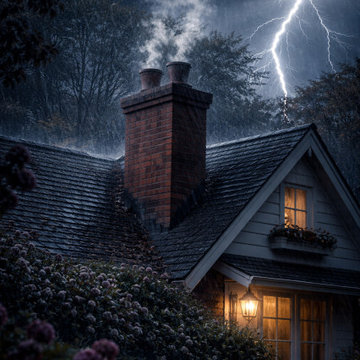
Winter is always tough on your home. This past winter was no picnic with the snow and cold. By the time spring (really) arrives, your chimney has put up with months of freezing temperatures, snow, ice, and the constant freeze-thaw cycle that quietly does damage you can't always see from the outside. That's why a spring chimney inspection isn't just a good idea, it’s essential to have your chimney checked before storm season begins. Here’s why:
Water Is Your Chimney's Worst Enemy
Here's something that most homeowners don’t know: chimney leaks cause more damage to masonry chimneys than fire does. Think about that a moment. While everyone worries about creosote and chimney fires — and rightfully so — water is silently doing just as much, if not more, damage.
Unlike the rest of your home, which is sheltered by your roof and eaves, your chimney stands fully exposed above the roofline. It takes on rain, wind, snow, and every freeze-thaw cycle winter throws at it, all while absorbing moisture into its porous masonry materials. That water expands and contracts, causing cracks, structural stress, and integrity loss that accumulates over time. The worst part? Chimney leaks are often subtle and slow-moving. By the time you notice water damage inside your home, the problem has usually become more serious, and expensive.
What a Spring Inspection Actually Catches
A professional spring chimney inspection, such as Superior Chimney’s, goes well beyond a quick visual check. A CSIA Certified Chimney Sweep technician will evaluate your entire system — inside and out — looking for the most common sources of chimney leaks and damage, including cracked chimney crowns, deteriorated brick and mortar joints, damaged or missing chimney caps, faulty chimney flashing and roof leaks, chimney slab gaps, and flue gas condensation from improperly sized chimney liners.
Any one of these issues left without a proper inspection, heads into spring storm season is an open invitation for water damage. And as Superior Chimney has discussed, masonry water damage is a progressive problem — the longer it goes unrepaired, the costlier the fix becomes.
What You Can Do Right Now
The good news is that most chimney water damage is preventable. The key steps are:
• have a professional-grade chimney cap installed if you don't already have one
• repair or replace a damaged chimney crown
• address any deteriorated brick and mortar
• fix leaky flashing and
• consider having your chimney professionally waterproofed. Waterproofing alone can save you significantly on future repair costs.
What’s Next?
Superior Chimney always includes a free 14-Point Certified Written Inspection with photo documentation via email with every chimney sweep. This helps you to know exactly what condition your chimney is in and what, if anything, needs attention.
Don't wait, have your chimney checked before storm season begins to reveal a problem that's been building all winter.
Schedule your inspection today at 877-244-6349.
 Madeen Architecture & Construction
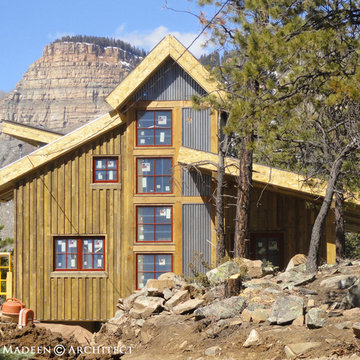
board and batten siding from local forests
Transitional exterior home idea in Albuquerque
Transitional exterior home idea in Albuquerque
 Progressive Design Build
Challenge
As part-time residents of this Bonita Springs home, our clients were looking to update their outdoor entertainment area. They also planned to be away for the summer during the remodel and needed their renovation project to be finished prior to their return for the winter.
Their needs included:
Changing the color pallet to a monochromatic scheme, removing the yellow brick pavers, adding an outdoor kitchen area, adding an outdoor fireplace, resurfacing the pool and updating the tile, installing a new screen enclosure, and creating privacy from the neighbors, particularly the main sitting areas, pool and outdoor kitchen.
Although there was already a 1,221 sq. ft. lanai under the roof, it lacked functionality needed by the homeowners. Most of its amenities were located at one end of the lanai, and lacked privacy that the homeowners valued.
Solution
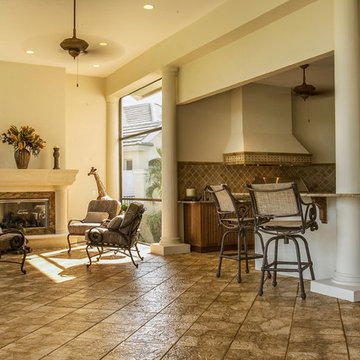
The final project design required two additions to the lanai area adding an accumulative 265 sq. ft. to the existing space expanding their sitting area and accommodating a much-needed outdoor kitchen. The new additions also needed to blend with the home’s existing style.
Addition #1—Sitting Area:
The first addition added approximately 145 sq. ft. to the end of the lanai. This allowed Progressive Design Build to tie into the existing gable room for the new space and create privacy from the neighbors.
Addition #2—Outdoor Kitchen:
The second addition was a bump out that added approximately 120 sq. ft. to the end of the house close to the interior kitchen. This allowed the client to add an outdoor over and 52” Viking grill (with a side burner) to their outdoor living space. Other amenities included a new sink and under counter fridge, granite countertops, tumbled stone stile and Cypress cabinetry, custom-fabricated with marine grade plywood boxes and marine grade finishes to withstand moisture, common in the Bonita Bay community.
Special attention was given to the preparation area on either side of the stove, the landing area next to the oven and the serving counter behind the bar. Bar seating was added to the outdoor kitchen, allowing guests to visit with the cook comfortably and easily.
Brick Pavers
During the design phase, we discovered that the original brick pavers were set in sand, with no concrete pad below. Consequently, the retaining wall and several pavers were starting to fail, caused by the shifting sands. To remedy the problem, we installed a new concrete deck and laid new nonslip pavers on top of the deck—ideal for wet area applications.
Pool Renovations
To dramatically improve the enjoyment and ambiance of their pool, Progressive Design Build completely re-plumbed it, putting in additional lighting and new water features. New decorative pool tile, coping, and a paver deck were also installed around the pool. The pool finish chosen by our clients was a nice tropical blue color.
Screen Enclosure
A new screen enclosure was installed in compliance with new local building codes, making it more stable and solid than the existing one. The color change from white to bronze coordinated well with the homeowners’ new color scheme; and the location of the service door and stairs provided convenient access to the new pool equipment.
Results
This project was completed on time and within budget before these homeowners returned for their winter holiday. They were thrilled with the weekly communication, which included two-way phone calls and email photo sharing. They always knew where their project was in the construction process and what was happening at all times—providing security and peace of mind.
33