
Search results for "Adding rings" in Home Design Ideas
 Sew Beautiful
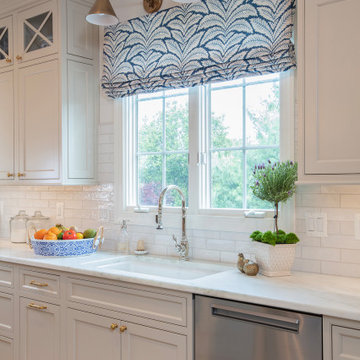
Custom window treatments balance beauty and function, softening the architecture, enhancing views, and creating a comfortable, polished environment perfect for everyday living — in this collaborative project with Barbara Galgano, of BB Interiors.
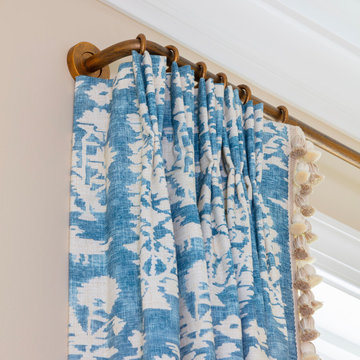
Floor-to-ceiling drapery in a soft blue and cream botanical print frames expansive windows, filling the living room with natural light while adding depth and sophistication. The tailored pleated panels, finished with a tassel trim detail and hung from custom French return rod and rings, bring a refined elegance to the space while remaining approachable and inviting.
In the inviting kitchen, custom-tailored Roman shades and seat cushions provide a refined yet welcoming layer of comfort and style. The Roman shades, feature a fabric that complements the room’s palette and coordinates with the adjacent living room draperies. Coordinating seat cushions on the barstools are expertly upholstered for both durability and comfort, adding softness to the sleek seating.
In the cheerful and highly functional laundry and mudroom, custom soft furnishings bring both comfort and personality. The built-in bench features a tailored cushion upholstered in a fresh blue geometric print, edged with piping for a polished finish—perfect for a quick seat while slipping on shoes or folding laundry. The window is dressed with a relaxed Roman shade in a lively coral-and-white pattern, framed with a crisp blue pleated tape trim. These pieces add a playful contrast to the whimsical dog-print wallpaper, creating a space that’s as stylish as it is practical.
Together, these custom elements elevate the home’s design, creating a cohesive, polished look that blends everyday function with a touch of luxury.
 Stebnitz Builders, Inc.
In every project we complete, design, form, function and safety are all important aspects to a successful space plan.
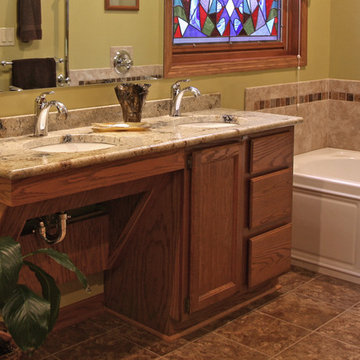
For these homeowners, it was an absolute must. The family had some unique needs that needed to be addressed. As physical abilities continued to change, the accessibility and safety in their master bathroom was a significant concern.
The layout of the bathroom was the first to change. We swapped places with the tub and vanity to give better access to both. A beautiful chrome grab bar was added along with matching towel bar and towel ring.
The vanity was changed out and now featured an angled cut-out for easy access for a wheelchair to pull completely up to the sink while protecting knees and legs from exposed plumbing and looking gorgeous doing it.
The toilet came out of the corner and we eliminated the privacy wall, giving it far easier access with a wheelchair. The original toilet was in great shape and we were able to reuse it. But now, it is equipped with much-needed chrome grab bars for added safety and convenience.
The shower was moved and reconstructed to allow for a larger walk-in tile shower with stylish chrome grab bars, an adjustable handheld showerhead and a comfortable fold-down shower bench – proving a bathroom can (and should) be functionally safe AND aesthetically beautiful at the same time.
 Solstice Kitchen and Bath
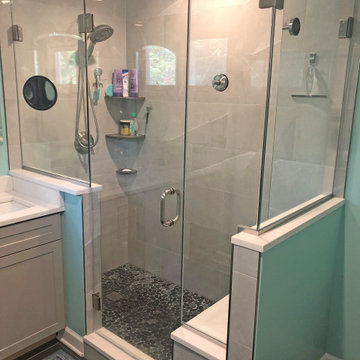
This Odenton, MD master bathroom design fits storage, style, and a highly functional layout into a compact space. The HomeCrest maple Sedona style vanity cabinet in a willow gray finish fits neatly into an alcove and offers ample storage and space for two people to get ready. The vanity is topped by a Calacatta Vicenza Q Quartz countertop with two Kohler Archer sinks, and Mirabelle Provincetown single hole sink faucets. The corner shower has a custom glass shower enclosure with a built in shower bench and three stainless shower shelves that provide storage for key toiletries. The shower has a Delta In2ition 2-in-1 multi-function wall-mounted handheld showerhead and Mirabelle shower valve and thermostatic valve. Tile creates a soothing setting in this shower design with Sande Gray 12 x 24 tile by MSI wall tile and shaved black stone sheet shower floor tile, adding to the soothing spa-style atmosphere in the bath design. The bathroom floor is Dimensions by MSI 12 x 24 graphite tile. Two Kohler Archer single door frameless mirrored medicine cabinets offer additional storage, and Mirabelle Provincetown towel rings provide space to hang up towels.
Find the right local pro for your project
 Sew Beautiful
Custom window treatments balance beauty and function, softening the architecture, enhancing views, and creating a comfortable, polished environment perfect for everyday living — in this collaborative project with Barbara Galgano, of BB Interiors.
Floor-to-ceiling drapery in a soft blue and cream botanical print frames expansive windows, filling the living room with natural light while adding depth and sophistication. The tailored pleated panels, finished with a tassel trim detail and hung from custom French return rod and rings, bring a refined elegance to the space while remaining approachable and inviting.
In the inviting kitchen, custom-tailored Roman shades and seat cushions provide a refined yet welcoming layer of comfort and style. The Roman shades, feature a fabric that complements the room’s palette and coordinates with the adjacent living room draperies. Coordinating seat cushions on the barstools are expertly upholstered for both durability and comfort, adding softness to the sleek seating.
In the cheerful and highly functional laundry and mudroom, custom soft furnishings bring both comfort and personality. The built-in bench features a tailored cushion upholstered in a fresh blue geometric print, edged with piping for a polished finish—perfect for a quick seat while slipping on shoes or folding laundry. The window is dressed with a relaxed Roman shade in a lively coral-and-white pattern, framed with a crisp blue pleated tape trim. These pieces add a playful contrast to the whimsical dog-print wallpaper, creating a space that’s as stylish as it is practical.
Together, these custom elements elevate the home’s design, creating a cohesive, polished look that blends everyday function with a touch of luxury.

 Industrial Projects
Creating a comfortable outdoor living space is a priority for many homeowners and DIY enthusiasts. With rising summer temperatures, installing a shade tarp in your backyard offers an affordable and effective solution for sun protection. We’ve developed this detailed, step-by-step guide to help you confidently install a shade tarp that not only shields you from the sun but also adds aesthetic appeal to your outdoor area.
Benefits of Installing a Backyard Shade Tarp
Before diving into the installation process, let’s explore the key benefits of having a backyard shade tarp:
Provides UV Protection: Keeps your family and guests safe from harmful sun exposure.
Reduces Outdoor Temperatures: Creates a cooler, more enjoyable outdoor space.
Protects Outdoor Furniture: Extends the life of patio furniture by reducing sun damage.
Enhances Outdoor Aesthetics: Adds a modern, stylish look to your yard.
Budget-Friendly: More affordable compared to permanent structures like pergolas.
Materials and Tools You’ll Need
To begin your DIY backyard shade project, gather the following materials and tools:
Materials:
Shade tarp (UV-resistant and breathable)
Sturdy posts or existing structures (trees, fences, walls)
Mounting hardware (eye bolts, D-rings, turnbuckles, snap hooks)
Nylon or polyester rope, or stainless-steel wire
Concrete (if installing new posts)
Tools:
Power drill
Measuring tape
Level
Ladder
Wrench or adjustable spanner
Post hole digger (if installing new posts)
Step 1: Plan Your Shade Tarp Layout
The first step in installing your backyard shade tarp is careful planning. Take time to assess your outdoor area and answer these key questions:
Where is the sun’s path throughout the day?
What size and shape of tarp best suits your space?
Will you anchor the tarp to existing structures or install new posts?
What height do you want the tarp to sit at for maximum shade and airflow?
Pro Tip: Use string or garden hoses to visualize the tarp layout on the ground before making permanent decisions.
Step 2: Measure and Mark Anchor Points
Once you’ve determined the tarp’s location and orientation:
Measure the tarp dimensions.
Mark the exact points where each corner of the tarp will be anchored.
Ensure that the anchor points are at least 5–10% longer than the tarp size to allow for tensioning and slight adjustments.
Consider slope angles for water runoff. Aim for at least a 20-degree angle to prevent water pooling on the tarp.
Step 3: Install Support Posts (If Necessary)
If your backyard lacks existing anchor points like trees or fences, you’ll need to install sturdy support posts:
Dig post holes at least 24 inches deep and 8-12 inches wide for stability.
Set posts in concrete, making sure they remain plumb and level.
Allow the concrete to cure for at least 24–48 hours before applying tension from the tarp.
We recommend using pressure-treated wood, galvanized steel poles, or aluminum posts for longevity and strength.
Step 4: Install Mounting Hardware
With your anchor points ready, it’s time to install the necessary hardware:
Attach eye bolts or pad eyes securely into walls, posts, or other fixed structures.
For added flexibility and adjustability, install turnbuckles or tensioners to fine-tune the tarp’s tightness.
Connect snap hooks, D-rings, or carabiners to make assembly and disassembly easier.
Make sure all hardware is rated for outdoor use to prevent rust and corrosion.
Step 5: Attach and Tension the Shade Tarp
Now it’s time for the most satisfying part—mounting the shade tarp:
Begin by attaching one corner of the tarp to an anchor point.
Gradually attach the remaining corners, moving diagonally for even tension.
Adjust each connection point using your turnbuckles, ropes, or cables.
Pull the tarp tight enough to avoid sagging, but not so tight that it risks tearing.
Check that the tarp maintains the desired slope for rainwater runoff and adjust tension as needed.
Step 6: Final Adjustments and Safety Check
Before enjoying your new shaded area:
Inspect all anchor points and hardware for stability.
Test the tarp’s tension and make adjustments for even distribution.
Ensure that no sharp edges or loose connections remain that could damage the tarp or pose a safety hazard.
Confirm that the tarp is secure in windy conditions by giving it a gentle tug.
If you live in an area with frequent high winds, consider removing the tarp during storms to prevent damage.
Step 7: Enjoy Your Shaded Backyard Oasis
Once installed, your backyard shade tarp provides a comfortable and protective space for outdoor gatherings, relaxation, or family activities. You can decorate underneath with outdoor furniture, string lights, or potted plants to create a personalized outdoor retreat.
Maintenance Tips for Long-Lasting Shade Tarp Performance
To extend the life of your shade tarp, follow these maintenance guidelines:
Regularly check for wear and tear, especially around anchor points and seams.
Clean the tarp periodically with mild soap and water to prevent mildew buildup.
Store the tarp indoors during harsh weather seasons if it's not designed for year-round use.
Tighten hardware as needed to maintain proper tension and avoid sagging.
By following these simple care steps, your shade tarp will continue to deliver years of sun protection and outdoor comfort.
Conclusion: Upgrade Your Outdoor Space with a DIY Shade Tarp
Installing a shade tarp in your backyard is a cost-effective and rewarding DIY project. With careful planning, quality materials, and proper installation techniques, you’ll enjoy cool, shaded outdoor living all season long. This step-by-step guide ensures your project goes smoothly from start to finish.
 Solstice Kitchen and Bath
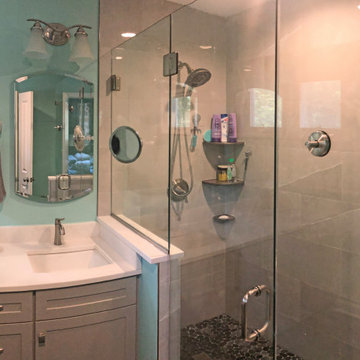
This Odenton, MD master bathroom design fits storage, style, and a highly functional layout into a compact space. The HomeCrest maple Sedona style vanity cabinet in a willow gray finish fits neatly into an alcove and offers ample storage and space for two people to get ready. The vanity is topped by a Calacatta Vicenza Q Quartz countertop with two Kohler Archer sinks, and Mirabelle Provincetown single hole sink faucets. The corner shower has a custom glass shower enclosure with a built in shower bench and three stainless shower shelves that provide storage for key toiletries. The shower has a Delta In2ition 2-in-1 multi-function wall-mounted handheld showerhead and Mirabelle shower valve and thermostatic valve. Tile creates a soothing setting in this shower design with Sande Gray 12 x 24 tile by MSI wall tile and shaved black stone sheet shower floor tile, adding to the soothing spa-style atmosphere in the bath design. The bathroom floor is Dimensions by MSI 12 x 24 graphite tile. Two Kohler Archer single door frameless mirrored medicine cabinets offer additional storage, and Mirabelle Provincetown towel rings provide space to hang up towels.
 Doran Designs
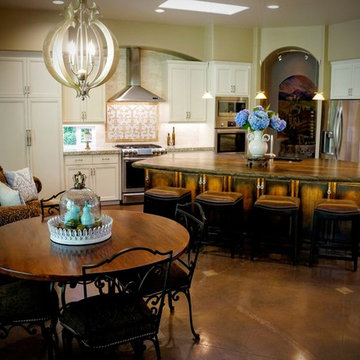
The island is a real stone (quartzite) that is called Sandalus. The decorative luxury mosiac back splash is is mother of pearl and travertine. The island is made to look like a piece of furniture by doing a different counter top and a wood stain and black oil rub finish, also adding feet to the base and using different hardware pulls than the rest of the kitchen. The other kitchen counter top is Hawaii granite with 3 x 12 subway travertine tiles for back splash. There is added space under the granite to add LED lighting for the phone desk and also LED lighting under the island top to wash light over the cabinetry.
The kitchen light over the table is by Cyan. Leather Counter Height Bar Stools. Concrete Floors

Sponsored
Columbus, OH

Hope Restoration & General Contracting
Columbus Design-Build, Kitchen & Bath Remodeling, Historic Renovations
 Doran Designs
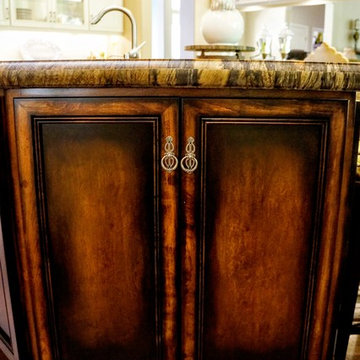
Top is Sandulus Quartzite, ring pulls in antique pewter, wood is a stain with a black oil rub finish and feet are added to make this island look like a piece of furniture. Concrete Floors
 Stebnitz Builders, Inc.
In every project we complete, design, form, function and safety are all important aspects to a successful space plan.
For these homeowners, it was an absolute must. The family had some unique needs that needed to be addressed. As physical abilities continued to change, the accessibility and safety in their master bathroom was a significant concern.
The layout of the bathroom was the first to change. We swapped places with the tub and vanity to give better access to both. A beautiful chrome grab bar was added along with matching towel bar and towel ring.
The vanity was changed out and now featured an angled cut-out for easy access for a wheelchair to pull completely up to the sink while protecting knees and legs from exposed plumbing and looking gorgeous doing it.
The toilet came out of the corner and we eliminated the privacy wall, giving it far easier access with a wheelchair. The original toilet was in great shape and we were able to reuse it. But now, it is equipped with much-needed chrome grab bars for added safety and convenience.
The shower was moved and reconstructed to allow for a larger walk-in tile shower with stylish chrome grab bars, an adjustable handheld showerhead and a comfortable fold-down shower bench – proving a bathroom can (and should) be functionally safe AND aesthetically beautiful at the same time.

 Talie Jane Interiors & Construction
Major remodel of entire first floor including the master bedroom. We added a double-sided gas fireplace (facing the master bedroom and master bathroom) with 3D stone surround, reclaimed wood mantel and built-in storage niches. Carpeting was replaced, new window treatments were installed, updated furniture, lighting, bedding and accessories were also added.
 Phoenix Home Remodeling
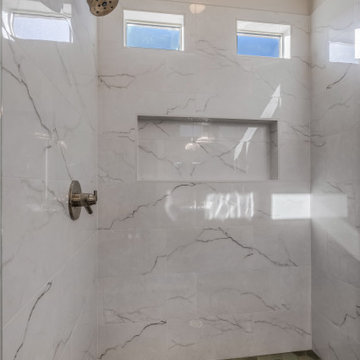
Meredith & Joe wanted a more functional and elegant master bathroom while focusing on updating the shower, vanity fixtures, and flooring and keeping the vanity cabinets and mirror.
The design focused on blending practical upgrades with a timeless aesthetic. Key upgrades included a custom shower, new bathroom flooring, and the installation of Delta Trinsic fixtures in an accenting champagne bronze finish.
A custom frameless glass enclosure with gold clips replaced the outdated shower, bringing a touch of elegance. Sage Bedrosians Celine hexagon tiles were used on the shower floor, creating a bold statement.
MSI Brighton tiles in grey adorned the walls. A new recessed wall niche was added, framed with matching tiles for a seamless design. The shower was completed with Delta Trinsic fixtures, ensuring functionality and style.
Two faucets were upgraded to Delta Trinsic single-hole models, paired with champagne bronze towel bars, towel rings, and a toilet paper holder.
The bathroom flooring was refreshed with Tilebar Ava hexagonal tiles in gray Sabbia matte, extending into the water closet for a cohesive look. New baseboards were added for a polished finish.
Sophistication and functionality define the master bathroom's update, reflecting personalized style preferences. A custom shower, modern fixtures, and refreshed flooring create a cohesive design that elevates daily living.
 Medina Exteriors & Remodeling
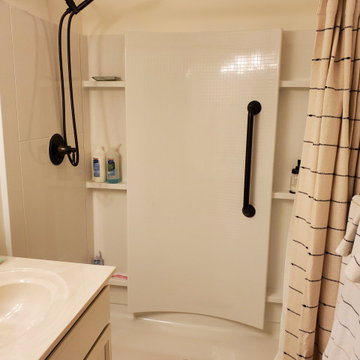
When Larry and Judy came to us, they were looking to update their master bathroom to function better for Larry. Their old shower was broken and was a hazard for him. We were able to achieve the look and functionality the Leuthaeuser’s were looking for with Sterling’s “Accord” fiberglass unit with backboards, so it was prepped for (2) grab bars from Moen. Also, we updated their amenities match the finish of their shower handheld selection, Moen Eco Performance. Lastly, Moen’s “Dartmoor” in oil rubbed bronze added the contrast they were wanting, which the collection was used for their vanity faucet, towel bar, robe hook, and towel ring.
 modGSI Furniture
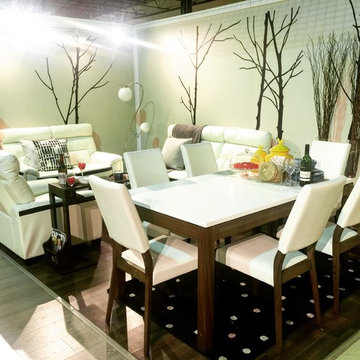
If white is your colour, but you don't want the ultra-modern look, try mixing it up with some wood accents and earth-toned decors. Adding an extra touch to your wall with wall decals, full size branches in this case, will surely make your home even more lively.

Sponsored
Columbus, OH
Hope Restoration & General Contracting
Columbus Design-Build, Kitchen & Bath Remodeling, Historic Renovations
 User
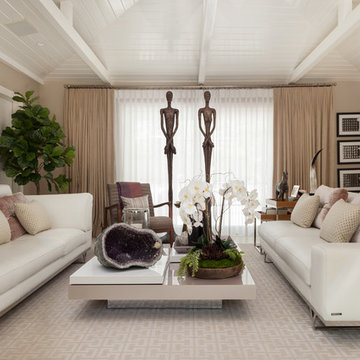
UserThis living room was sad. There was no rug. The massive leather sofa dominated the room. Furniture was strewn all over. There was no focal point or any interest.
First, we changed the wall color from a cold blue color to a warmer beige color to make the room feel more inviting.
We have a custom rug created from wall-to-wall carpet with a leather edge banding detail that was mitered at the corners.
The existing sectional and separated it. The pillows that came with the sofa were donated to charity and new pillows were handcrafted created of luxurious silk velvet and a metallic woven geometric.
A new midcentury style chair was added and styled with a cashmere through in a strawberry and magenta stria; a woven geometric pillow in neutral tones was added as an accent.
The existing cocktail was placed between the two sofas and we styled it with white orchids in an organic wood bowl with moss and other succulents draping the edge. The client had this beautiful piece of amethyst that provided an organic and colorful accent.
A local artist created the art above the sofa made with later cut aluminum that reads, "this would look great over your sofa", which I thought was clever.
Our client's dogs are very important to her. We had the photos from their photoshoot framed in black frames with white mats to showcase the family.
The luxury leather wrapped nesting tables with polished chrome bases were placed to the arm side of the sofa and accessories with finds from local specialty showrooms and mixed with the client's own collection of priceless treasures and memories.
With the corner of the room, we chose a fiddle leaf fig tree to provide some color and bring in a organic element.
The large window provide plenty of natural light in this space, so we diffused it with a soft white sheet and custom drapery on rings with a satin nickel rod specially crafted for this home in keeping with the style.
Finally, we purchased the seven foot tall male and female statues to take advantage of the vaulted ceiling and to give a sense of drama.
So, tell us, what do you think of our transformation?
 Cheery Curtains
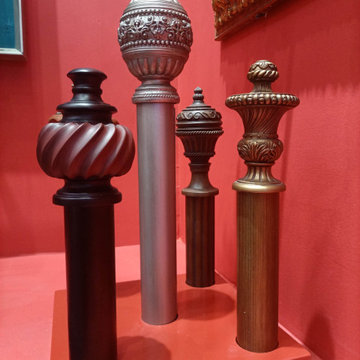
The two inches timber curtain rods from QYT68 at CheeryCurtains are a standout choice for your window decor. These handmade, big diameter rods are crafted from black or dark wood, adding a touch of sophistication to any space. The wood drapery hardware, including brackets and finials, enhances the overall look. The wooden curtain rings slide smoothly along the rods, ensuring a seamless operation.
 Xcel Fence
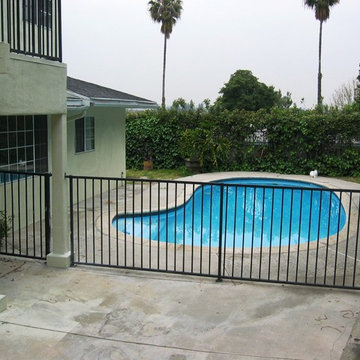
"Vail" Style is one of the most popular styles of steel fencing you will find in most retail stores and residential properties, Our 5'Hx6.5’W “Vail” Style is not only for adding a great look to your home, apartment complex and/or commercial property but it also meets all codes and regulations for enclosing swimming pools, Our components are easily customized. By just adding a rail or two and/or rings to the top and/or bottom you can change the look of your "Do it Yourself" fencing panels.
 Solstice Kitchen and Bath
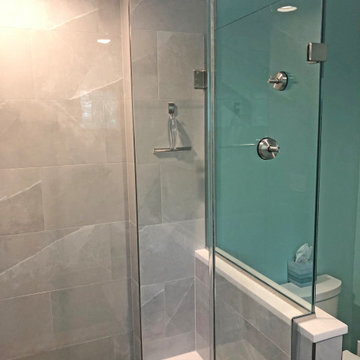
This Odenton, MD master bathroom design fits storage, style, and a highly functional layout into a compact space. The HomeCrest maple Sedona style vanity cabinet in a willow gray finish fits neatly into an alcove and offers ample storage and space for two people to get ready. The vanity is topped by a Calacatta Vicenza Q Quartz countertop with two Kohler Archer sinks, and Mirabelle Provincetown single hole sink faucets. The corner shower has a custom glass shower enclosure with a built in shower bench and three stainless shower shelves that provide storage for key toiletries. The shower has a Delta In2ition 2-in-1 multi-function wall-mounted handheld showerhead and Mirabelle shower valve and thermostatic valve. Tile creates a soothing setting in this shower design with Sande Gray 12 x 24 tile by MSI wall tile and shaved black stone sheet shower floor tile, adding to the soothing spa-style atmosphere in the bath design. The bathroom floor is Dimensions by MSI 12 x 24 graphite tile. Two Kohler Archer single door frameless mirrored medicine cabinets offer additional storage, and Mirabelle Provincetown towel rings provide space to hang up towels.
Sponsored
Columbus, OH
Hope Restoration & General Contracting
Columbus Design-Build, Kitchen & Bath Remodeling, Historic Renovations
 Stebnitz Builders, Inc.
In every project we complete, design, form, function and safety are all important aspects to a successful space plan.
For these homeowners, it was an absolute must. The family had some unique needs that needed to be addressed. As physical abilities continued to change, the accessibility and safety in their master bathroom was a significant concern.
The layout of the bathroom was the first to change. We swapped places with the tub and vanity to give better access to both. A beautiful chrome grab bar was added along with matching towel bar and towel ring.
The vanity was changed out and now featured an angled cut-out for easy access for a wheelchair to pull completely up to the sink while protecting knees and legs from exposed plumbing and looking gorgeous doing it.
The toilet came out of the corner and we eliminated the privacy wall, giving it far easier access with a wheelchair. The original toilet was in great shape and we were able to reuse it. But now, it is equipped with much-needed chrome grab bars for added safety and convenience.
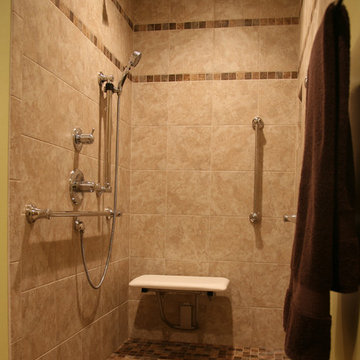
The shower was moved and reconstructed to allow for a larger walk-in tile shower with stylish chrome grab bars, an adjustable handheld showerhead and a comfortable fold-down shower bench – proving a bathroom can (and should) be functionally safe AND aesthetically beautiful at the same time.
 Solstice Kitchen and Bath
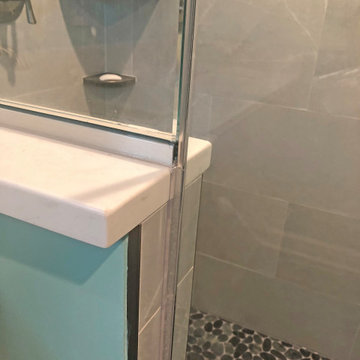
This Odenton, MD master bathroom design fits storage, style, and a highly functional layout into a compact space. The HomeCrest maple Sedona style vanity cabinet in a willow gray finish fits neatly into an alcove and offers ample storage and space for two people to get ready. The vanity is topped by a Calacatta Vicenza Q Quartz countertop with two Kohler Archer sinks, and Mirabelle Provincetown single hole sink faucets. The corner shower has a custom glass shower enclosure with a built in shower bench and three stainless shower shelves that provide storage for key toiletries. The shower has a Delta In2ition 2-in-1 multi-function wall-mounted handheld showerhead and Mirabelle shower valve and thermostatic valve. Tile creates a soothing setting in this shower design with Sande Gray 12 x 24 tile by MSI wall tile and shaved black stone sheet shower floor tile, adding to the soothing spa-style atmosphere in the bath design. The bathroom floor is Dimensions by MSI 12 x 24 graphite tile. Two Kohler Archer single door frameless mirrored medicine cabinets offer additional storage, and Mirabelle Provincetown towel rings provide space to hang up towels.
 Renovation Associates, Inc.
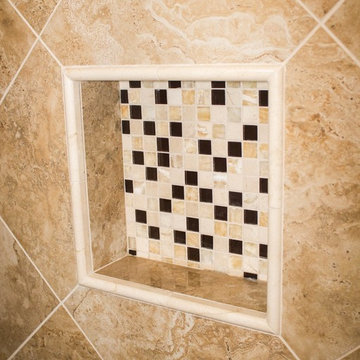
Custom brown and beige tile installed with an eccentric diagonal design. Smaller highlight tiles added in a custom design border. Marble bench top added to accent the shower design and to match the counters of the vanities outside the shower. Heather Cooper Photography (Marietta, GA)
21