
Search results for "Appears normal" in Home Design Ideas


 MidMod Decor
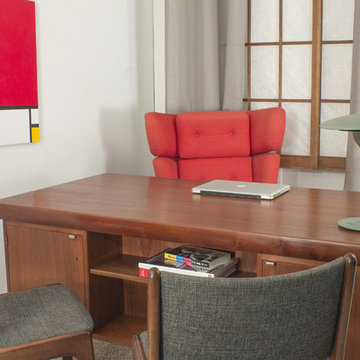
This Johannes Anderson Executive Desk is a beautiful piece. It has a full front and back, so in can sit out in the room, with 2 sets of drawers and pull outs on the inside, and a shelf and 2 cabinets on the front side. This would be perfect a statement piece for your office.
Designer: Johannes Anderson
Size: 65”l x 33.5”d x 28.25”h
Inside chair opening- 26.5”w x 25.5”h
Materials: Solid teak and teak ply
Condition: Excellent vintage condition, consistent with normal age and use.
The removable shelf on the front side is not original. Unfortunately there are No keys.
©MidMod-decor, 2015

 Deck and Patio Company "Outdoor Living Experts"
The clients chose elegant clean-lined pavers in a random pattern for the new patio areas surrounding the pool.
The clients love their new patio and pondless waterfall. Not only do they find themselves outside more often enjoying nature’s sights and sounds, they have room for parties and entertaining.
In fact, their perfect backyard was there all along -- it just needed a vision to bring it out.
This compacting process is not done by many contractors. The idea is that using compacted soil the base will not settle, so you don’t have to wait to install a patio around a new pool. Many contractors still install concrete slabs under their patio. In our experience we find this does not work well. Settling still occurs under the slab allowing the patio to crack or settle.
After the base materials were finished, we installed chestnut-hued durable pavers from Cambridge (Sahara). These particular pavers have little or no color fade and the random design pattern adds interest to the patio. The pavers’ protective coating means these clients will have a clean-lined modern look. Even after being subjected to snow plowing, de-icing salts and normal wear, they will keep their color and beautiful appearance.
Find the right local pro for your project

 Diana L. Frucci ASID
This room is the Media Room in the 2016 Junior League Shophouse. This space is intended for a family meeting space where a multi generation family could gather. The idea is that the kids could be playing video games while their grandparents are relaxing and reading the paper by the fire and their parents could be enjoying a cup of coffee while skimming their emails. This is a shot of the wall mounted tv screen, a ceiling mounted projector is connected to the internet and can stream anything online. Photo by Jared Kuzia.
 Deck and Patio Company "Outdoor Living Experts"
With the slope stabilized, our team addressed pool renovation. After draining the pool and removing the original liner, a poorly built concrete block wall was uncovered.
The solution was to straighten the wall and fill the block in with concrete and steel rebars for strength. New vinyl covered stairs were then added, as well as new pipes, returns, skimmers, pump, filter and new liner was installed.
After this, the pool was carefully backfilled and tamped. We compacted the soil back around the pool in three-inch lifts to allow for the immediate installation of new pavers around the pool.
This compacting process is not done by many contractors. The idea is that using compacted soil the base will not settle, so you don’t have to wait to install a patio around a new pool. Many contractors still install concrete slabs under their patio. In our experience we find this does not work well. Settling still occurs under the slab allowing the patio to crack or settle.
After the base materials were finished, we installed chestnut-hued durable pavers from Cambridge (Sahara). These particular pavers have little or no color fade and the random design pattern adds interest to the patio. The pavers’ protective coating means these clients will have a clean-lined modern look. Even after being subjected to snow plowing, de-icing salts and normal wear, they will keep their color and beautiful appearance.
 VISTA TILES
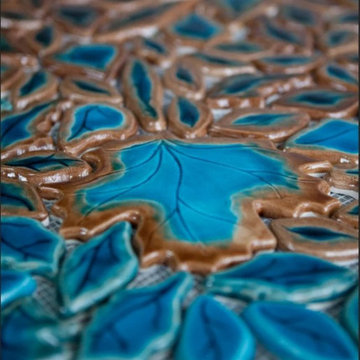
Made by VISTATILES
Ships from a small business in Pennsylvania
. Since Ottoman Arabesque Tile Tiles are produced by hand, it is normal to have color tones in the products.
. Our Arabesque Ceramic-based product is glazed.Preserves its appearance for many years. No loss of color and pattern
. Handmade tiles are fired (baked) at 1050 degrees. Therefore, the sun, wind, etc. weather resistant.
. The product surface is resistant to water and moisture thanks to its glossy polished finish. Therefore, it does not hold water on its surface and prevents the formation of bacteria and mold.
. Our tile products are preferred in your interior and exterior architectural decoration and designs and restoration projects.
. We do not recommend using Ottoman Arabesk tiles directly in water.
. You can easily use the products produced with special glaze crackle in wet places.
. In front of the bar, Spa decoration, behind the Turkish bath basin, tile panel or above the basin, as a decor in the bathroom shower cabin, Kitchen countertop and countertop, etc. used in the fields.
. Dimension:30X30 cm
. 1 m2: ~ 10 file
. 1 m2:~ 20 kg
. Production in desired color
Please note that international buyers are responsible for any duties/customs charges and import taxes associated with shipping to their respective countries. These fees are calculated and imposed by your country when the item arrives in the country.
 Tile Doctor Ltd
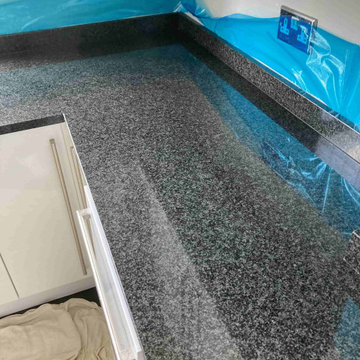
Although expensive Granite makes the most beautiful and practical stone worktop you can install in your kitchen. It gives real wow factor to a room and this kitchen in Folkestone was no different. Normally granite needs little maintenance however Folkestone has very hard water (often referred to as limescale) containing high levels of calcium and over time the calcium in the water gets deposited on nearby surfaces. According to the Affinity Water website the water in Folkestone contains 287.5 mg of calcium per litre which is classed as hard.
The owner of the property contacted us explaining that due to this problem the build-up of calcium deposits had overtaken her sink and countertop to a degree that she couldn`t deal with it through normal cleaning and a restoration was required. There are several household products on the market that can remove limescale however you need to be very careful when using these on natural stone as they use acids to break down the calcium and this can etch stone making the problem worse (always read the label). I went and had a look at the problem and gave her a quote for resolving the problem, which she was happy to accept.
Before starting the renovation, I protected the floor with dust sheets and the walls with a blue film that is easy to remove. Then to tackle the limescale I carefully went over each part of the Granite counter using a set of six-inch Tile Doctor Burnishing pads applying them in sequence from coarse to extra fine. To give extra cleaning power the coarser pads were applied with Tile Doctor Oxy-Gel which is an alkaline cleaning gel. The pads were fitted to a hand buffer and the soil generated by the abrasive pads was rinsed off between pads with water. For the finer detail such as the groves in the granite draining board, I used diamond encrusted handheld burnishing blocks of various grits. With the combination of diamond tooling and lots of elbow grease the job took around five hours to complete and the granite now has the polished look it deserves.
The granite worksurface does not require an actual sealer to be applied. However, maintenance is the key to keeping the stone in great condition so for aftercare I left the owner with a bottle of Tile Doctor Stone Patina Spray. This product is designed for cleaning stone worktops and contains a special ingredient that maintains the lustre. This should ensure the Limescale becomes manageable and can be cleaned more easily.
I made a striking difference to the appearance of the Granite Worktop and the owner was over the moon with the result.
Michael Conlon
South Kent Tile Doctor
 VISTA TILES
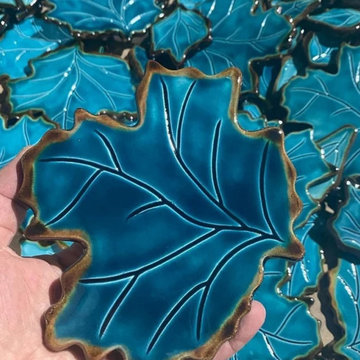
Made by VISTATILES
Ships from a small business in Pennsylvania
. Since Ottoman Arabesque Tile Tiles are produced by hand, it is normal to have color tones in the products.
. Our Arabesque Ceramic-based product is glazed.Preserves its appearance for many years. No loss of color and pattern
. Handmade tiles are fired (baked) at 1050 degrees. Therefore, the sun, wind, etc. weather resistant.
. The product surface is resistant to water and moisture thanks to its glossy polished finish. Therefore, it does not hold water on its surface and prevents the formation of bacteria and mold.
. Our tile products are preferred in your interior and exterior architectural decoration and designs and restoration projects.
. We do not recommend using Ottoman Arabesk tiles directly in water.
. You can easily use the products produced with special glaze crackle in wet places.
. In front of the bar, Spa decoration, behind the Turkish bath basin, tile panel or above the basin, as a decor in the bathroom shower cabin, Kitchen countertop and countertop, etc. used in the fields.
. Dimension:30X30 cm
. 1 m2: ~ 10 file
. 1 m2:~ 20 kg
. Production in desired color
Please note that international buyers are responsible for any duties/customs charges and import taxes associated with shipping to their respective countries. These fees are calculated and imposed by your country when the item arrives in the country.
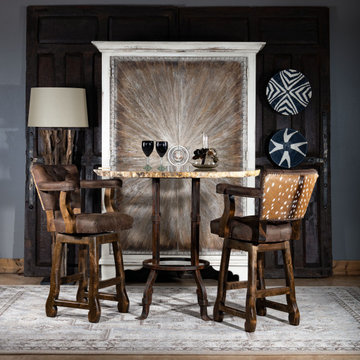
 Adobe Interiors
Bring a piece of nature into your entertaining area with our rustic elegant Chisum Axis Barstool. Let your retreat become an adventure in its own right. Featuring genuine axis deer hide, this 360 degree swivel stool brings an authenticity to your space that cannot be duplicated. The axis deer hide backing seamlessly transitions to a hand-tufted leather seat and back cushion, to create a unique experience that pairs the wild with the refined in this high-end leather barstool. Comfort, quality and tasteful design come together to create this fine leather barstool. 100% American Made to the highest standards of quality and craftsmanship.
Overall Barstool Dimensions: 43" H x 26" W x 22" D
Seat Height: 30"
Top of Arm Height: 40"
Overall Counter Stool Dimension: 38" H x 26" W x 22" D
Seat Height: 25"
Top of Arm Height: 35"
Leather Description: A fully drum dyed top grain cowhide on European raw material. This leather is lightly ironed and then milled extensively for a unique distressed appearance. This is a natural full grain leather. The hides have not been altered in any way during the tanning process. Shade variation is normal and areas of hides absorb dyes differently, so natural dye lot variations will occur. Remember that a swatch is a general representation of the leather's color and texture, not an exact match. Scars, marks, and branding are not flaws but rather are proof of authenticity, what we call "hallmarks of the trail". Leathers will fade if exposed to direct sunlight. This is a pull up leather which means color diffusion and "burst" will occur when worked by hand. If any of these characteristics is a problem please consider a "painted" leather. One that has been corrected and heavily pigmented.
100% top grain cowhide leather is characterized by variations in shade, texture, color and grain. Healed marks and scars are to be expected and enhance the natural beauty of the hides. These variations should not be considered defects as they are normal and unique features of genuine 100% top grain cowhide leather.
Frame Construction: Made with American Alder Wood, our frames are glued, screwed and dowelled at the joints. Two coats of high quality stain is hand rubbed on the wood finish and then sealed with industrial grade clear coat.

 Hudson + Bloum Design
Inspiration for a mid-sized rustic kids' white tile and ceramic tile ceramic tile and black floor sliding shower door remodel with flat-panel cabinets, dark wood cabinets, an undermount tub, white walls, a trough sink, quartz countertops and white countertops
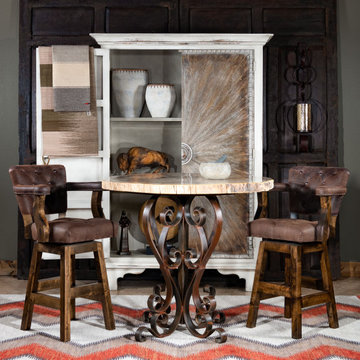 Adobe Interiors
Transform your space with our Chisum Mustang Tufted Barstool, the ultimate rustic and elegant addition to any occasion. Crafted from genuine, high-quality vintage distressed full-grain leather and supported by a classic hardwood frame, this barstool exudes timeless sophistication. With a dependable ball-bearing 360-degree swivel mechanism and premium high-density foam cushioning, the Chisum Mustang Tufted Barstool is both comfortable and durable. It's no wonder why many consider it the pinnacle of luxury barstools.
Whether you're hosting a celebration, welcoming guests to your business or restaurant, or enjoying a quiet night in, our high-quality barstool will take your experience to the next level. Every Chisum Mustang Tufted Barstool is 100% American made, ensuring unmatched durability and dependability.
Available in both bar and counter height, the Chisum Mustang Tufted Barstool is the perfect fit for any space. Upgrade your home or business with a full set of these stunning barstools.
Overall Barstool Dimensions: 43" H x 26" W x 22" D
Seat Height: 30"
Top of Arm Height: 40"
Overall Counter Stool Dimension: 38" H x 26" W x 22" D
Seat Height: 25"
Top of Arm Height: 35"
Leather Description: A fully drum dyed top grain cowhide on European raw material. This leather is lightly ironed and then milled extensively for a unique distressed appearance. This is a natural full grain leather. The hides have not been altered in any way during the tanning process. Shade variation is normal and areas of hides absorb dyes differently, so natural dye lot variations will occur. Remember that a swatch is a general representation of the leather's color and texture, not an exact match. Scars, marks, and branding are not flaws but rather are proof of authenticity, what we call "hallmarks of the trail". Leathers will fade if exposed to direct sunlight. This is a pull up leather which means color diffusion and "burst" will occur when worked by hand. If any of these characteristics is a problem please consider a "painted" leather. One that has been corrected and heavily pigmented. 100% top grain cowhide leather is characterized by variations in shade, texture, color and grain. Healed marks and scars are to be expected and enhance the natural beauty of the hides. These variations should not be considered defects as they are normal and unique features of genuine 100% top grain cowhide leather.
Frame Construction: Made with American Alder Wood, our frames are glued, screwed and dowelled at the joints. Two coats of high quality stain is hand rubbed on the wood finish and then sealed with industrial grade clear coat.

 Anything Wet Pools and Spas
Anything Wet Pools and Spas
Mid-sized minimalist backyard stone and custom-shaped natural pool house photo in Miami
Mid-sized minimalist backyard stone and custom-shaped natural pool house photo in Miami

 Denver Design Group
Timeless marble was added everywhere. To keep things from being boring, the designers played with tile size, material and pattern to create lots of style and character.
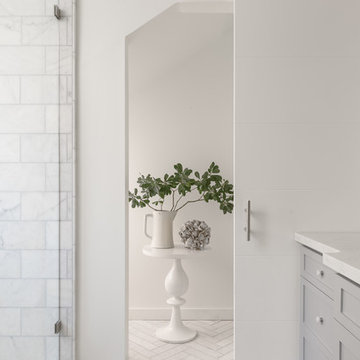
 Katie Denham Interiors
Home design - mid-sized victorian master stone slab marble floor and multicolored floor home design idea in Sacramento with shaker cabinets, gray cabinets, a one-piece toilet, white walls, an undermount sink and quartzite countertops
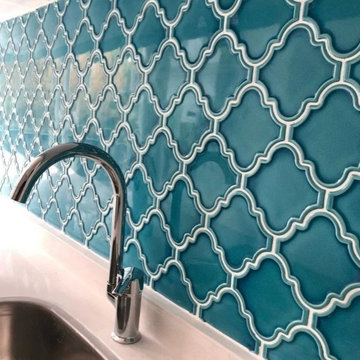 VISTA TILES
 Since Ottoman Arabesque Tile Tiles are produced by hand, it is normal to have color tones in the products.
. The back side of the tiles is serrated with a matte ceramic base, the front side is glazed and glossy polished.
. The infrastructure of our product in the picture is a mixture of ceramic tiles, and the upper structure is made with tile paint.
. Arabesk Ceramic-based tile glazed tile preserves its appearance for many years. No loss of color and pattern
. Handmade tiles are fired (baked) at 1050 degrees. Therefore, the sun, wind, etc. weather resistant.
. The product surface is resistant to water and moisture thanks to its glossy polished finish. Therefore, it does not hold water on its surface and prevents the formation of bacteria and mold.
. The upper structure of our product, which carries the colors of Iznik and Kütahya rumi tiles, is covered with a special tile glazed crackle and its surface is cracked. These cracks remain secret.
. Our tile products are preferred in your interior and exterior architectural decoration and designs and restoration projects.
. We do not recommend using Ottoman Arabesk tiles directly in water.
. You can easily use the products produced with special glaze crackle in wet places.
. In front of the bar, Spa decoration, behind the Turkish bath basin, tile panel or above the basin, as a decor in the bathroom shower cabin, Kitchen countertop and countertop, etc. used in the fields.
. Since the ceramic-based tile surface is relief (embossed), it cannot be laid on the floor as a floor tile.
. Width : 12 cm
. Height : 12 cm
. Thickness : 0.7 cm
. 1 m2 Weight: 15,50 kg.
. 1 m2 Quantity: 105 pcs.
 Tile Doctor Ltd
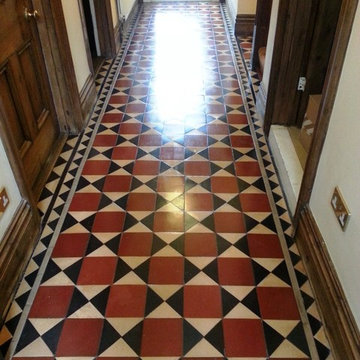
Recently I was contacted by a man in the town of Bedford who was worried that he had damaged his Victorian tiled hallway as a result of dragging a piano across the floor. I went round to the property to get a better look at the problem and, on closer inspection, realised that the tiles were actually fine; however, the piano had torn through the old surface seal.
The 150-year old tiles, dating back – as the name suggests – to the reign of Queen Victoria, had been poorly sealed and additionally had not been maintained correctly with the appropriate cleaning products. I was commissioned to remove the old sealer, clean and re-seal in order to restore this fantastic floor to its former glory.
My first task was to mix a solution of Tile Doctor Pro-Clean and water, which was then spread across the floor. Pro-Clean is a high alkaline cleaner which also contains stripping properties and this helped to break down the old, damaged sealer. The solution was left to dwell for approximately 20 minutes, giving it time to seep into the stone to get underneath, and lift out, any ingrained dirt. Pro-Clean was worked into the tiles using a heavy low speed rotary machine fitted with a black pad.
Once cleaned and stripped, we rinsed the floor using plain, clean water to neutralise the high alkaline Pro-Clean and the removed the resulting slurry using a wet-vac machine.
At this point I noticed that the white/magnolia tiles were particularly well worn and still very dirty and in need of further cleaning. Around this time Tile Doctor had also been discussing the successful use of Burnishing Pads (normally used on polished stone) on Victorian Tiles so I hand burnished the most stained tiles with a small 6 inch diamond encrusted burnishing pad with a little water to help lubricate the process. Following this, I rinsed the entire floor once again.
After leaving the floor to dry for four days, I returned to the house to seal the tiles opting to apply a single coat of Tile Doctor Colour Grow impregnating sealer first followed up with four coats of Tile Doctor Seal & Go. This combination of sealers provides a durable internal and surface stain protection whilst lifting the colours and adding a nice subtle sheen finish.
Once dried and cured, the floor was buffed using micro-fibre clothes to further enhance the appearance of the tiles further. My client was very pleased with the results, and couldn’t believe it was possible to get a floor that was so old appear brand new! The floor will dull with wear so I advised my client on the benefits of a regular maintenance plan going forward to ensure this great flooring feature remains in top condition.
Andrew Evans
Bedfordshire Tile Doctor
 Tile Doctor Ltd
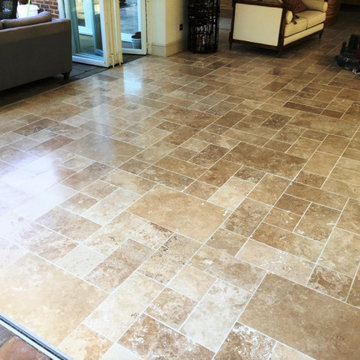
This property in Godalming had the whole downstairs floor tiled with Fired Earth Limestone tiles nine years prior and had never had it cleaned or maintained professionally. The once beautiful stone was now looking dull and the grout had turned black with dirt leaving the floor looking uninviting.
This is quite normal for stone floors as it is the sealer that protects the stone from dirt and enhances its look. Most sealers wear off after three to four years sealer and in this case after nine years it was well overdue a deep clean and reseal.
I visited the property to survey the floor. It was indeed looking in need of some attention and the kitchen was particularly bad. To restore the appearance of the Limestone tile and grout the floor would need to be stripped of what remains of the old sealer, then deep cleaned with attention to the grout, polished with burnishing pads and then finally resealed. I was confident I could get it restored to a nearly new finish and to prove it I completed a small demonstration clean which the homeowner was very happy with. They agreed to my quote and we scheduled in a couple of days to carry out the work.
On day one I started by cleaning the grout using a strong dilution of Tile Doctor Pro-Clean. its run along the grout line and then left to soak in for about ten minutes so it can get to work breaking down dirt and old sealer. The grout is then scrubbed using a grout brush which is then scrubbed backwards and forwards along the grout line until clean. The area is then rinsed with water and all the waste removed with a wet vacuum cleaner.
Next, I turned my attention to the Limestone tiles which needed stripping of any remaining sealer, cleaned and polished. I find the best way to do this is by apply a set of diamond encrusted Burnishing pads in sequence starting with a coarse 400-grit followed by 800, 1500 and finally finishing with an extra fine 3000 grit. Water is used to lubricate the burnishing process and the slurry is rinsed and extracted off the floor between pads. Each pad is run over the tiles three times, and it was a large floor so as you can imagine this process took most of the day.
I left the floor to dry out overnight and returned the next day to seal the Limestone. Before doing that, I reviewed my previous day’s work and I cleaned up any areas that needed further attention. Next step was to ensure the floor was dry as I don’t recommend applying a sealer to damp tile as you won’t get an even appearance, so before sealing a floor I tested for moisture using a damp meter.
To seal the floor, I applied two coats of Tile Doctor Ultra Seal which is an impregnating sealer that works by occupying the small pores in the stone to prevent dirt becoming ingrained there. Limestone is a light stone and most customers like that appearance so I find it best not to use a colour enhancing sealer as it can darken the stone. Ultra-Seal doesn’t contain any colour enhancer and leaves the floor with a natural finish whilst allowing the stone variations and patterns to show through.
Once the sealer was dry, I gave it a further polish with the 3000-grit pad which further brought out the natural beauty of the stone. My client was very happy with the floor, it really lifted the who area and the Kitchen in particular.
Rupert Mcleod
West Surrey Tile Doctor
 Tile Doctor Ltd
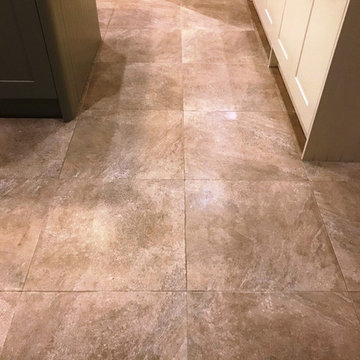
This request came from a client who lives in the Newcastle district of Jesmond who was unhappy with the appearance of their Textured Porcelain floor tiles. The problem was that the Porcelain Tiles were grouted in whilst the underfloor heating was switched on. This resulted in the grout drying out quicker than expected and the tiler struggled to get the excess grout off the tiles. To rectify the problem, the tiler tried to get the dried grout off with acid, but it didn’t work, and the floor was left looking dark and dull. Unable to rectify the problem the client was left with a disappointing pale floor and had searched around the internet for a solution.
Normally grout smears like these (aka Grout Haze) can be removed with an acidic product and Tile Doctor sell Grout Clean-up specially for this purpose. However, some grouts contain acid resistant polymers which need to broken down first. Fortunately, we have a solution for everything tile related and the system we use does not affect the main grout lines only the excess grout. I called in to do a site visit and having surveyed the problem I was confident it could resolved, I gave them a price for the work and agreed a date to return to do the job.
My first task was to spray the tiles with Tile Doctor Remove and Go, this was left to soak into the tile for around ten minutes before being scrubbed in. Remove and Go is a coatings remover that is safe to use on tile and grout; normally we use it to remove old sealers but in this case I applied it to break down the polymers. To work the product into the tile I use a buffing machine fitted with a black scrubbing pad, the mechanical advantage this gives makes the job a lot quicker. Then the slurry generated is rinsed off with water and removed with a wet vacuum. The floor was then left to dry for 30 minutes.
We were then able to remove the excess grout which was done by applying Tile Doctor Grout Clean-Up which I mentioned earlier. The process was the same, i.e. using the buffing machine and a wet vacuum to scrub the floor and extract the soil. The floor was rinsed with water to remove any trace of the products used and dried as much as possible using the wet vacuum. The underfloor heating really helped at this point to dry out the floor.
Once the floor was fully dry including the grout lines a single thin coat of Tile Doctor Colour Grow sealer was applied. The tiles were textured porcelain, so the dirt gets trapped into the textured surface if it is not sealed. We usually find one coat of Tile Doctor Colour Grow is more than enough for this, anything that hadn’t soaked in after three to five minutes was then polished off with clean dry cloths.
The client was very happy with the floor and pleased that the excess grout had been cleaned up and the floor looked as it should. Before leaving I recommended the use a pH Neutral tile cleaner for general cleaning such as Tile Doctor Neutral Tile Cleaner. There is no point sealing the tiles only to have it stripped off later with the use of a bleach based cleaner.
Raf Barrett
Tyneside Tile Doctor

 Everything Home
This elegant home is a modern medley of design with metal accents, pastel hues, bright upholstery, wood flooring, and sleek lighting.
Project completed by Wendy Langston's Everything Home interior design firm, which serves Carmel, Zionsville, Fishers, Westfield, Noblesville, and Indianapolis.
To learn more about this project, click here:
https://everythinghomedesigns.com/portfolio/mid-west-living-project/

 Alcon Lighting
1. Safety
Light is an amazing thing. It illuminates everything around us and allows us to see. Unfortunately, every night the sun removes itself along with its full spectrum of light. Now those things that we would normally see like steps, trees, or pools become difficult to see. Climbing stairs without lighting is a great way to fall. Even worse is if you miss the stairs and run face first into a tree. Worse than that is if you fall into the pool. You can see where this is going. Lighting up a landscape is important for safety. Any family or friends who aren’t familiar with the property could be endangered without a properly lit environment.
2. Security
I promise these aren’t scare tactics, but security is a valid concern. Thieves prospecting a property will look in from the street. A well-lit building will have a better chance of scaring off a potential burglar compared to a non-lit darker front-yard. It is much easier to sneak around in the dark than in a well-lit beautiful landscape.
3. Beauty and Value
LED Directional Landscape Flood Lights are experiences with several tactics to create a beautiful, safe, and secure landscape. Through up lights, down lights, accents, and path lights there are several great ways to improve a yard. Lights can provide, shadows, highlights, silhouettes, wall-washes, and a moonlight effect. Those are plenty of options for a great designer to make something beautiful. Beyond that, crafted fixtures with specific textures can change the environment substantially. Alcon Lighting provides the widest expanse of great products to set the mood for your landscape. Not only does great lighting make a great experience, it also adds value to the property. A beautiful property with a well-lit architecture and landscape can completely change the outer appearance of a property. This kind of value can provide a great return on your investment.
4. You’ve been doing it for years
You’ve probably been managing lighting design and landscape lighting for years. If you celebrate Christmas, you can appreciate the hard work and the resulting beauty of a well-lit or elegantly glowing property. Every year, it becomes a competition to light the most extravagant lights and get the biggest luminous trees. Landscape lighting is like a tasteful and all year Christmas experience. If you’ve already been lighting up your house once a year, why not make it a full-time experience?
8