
Search results for "Base fail" in Home Design Ideas
 Provost Companies, Inc.
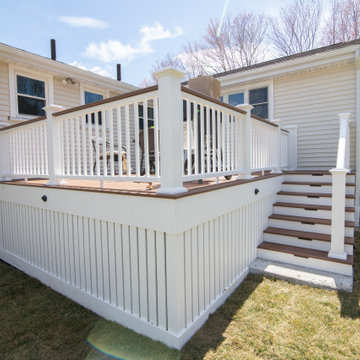
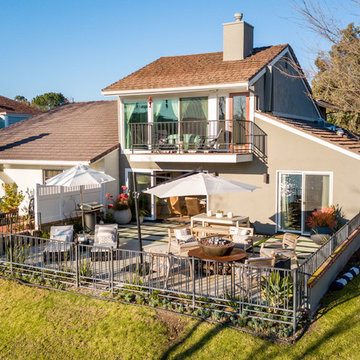
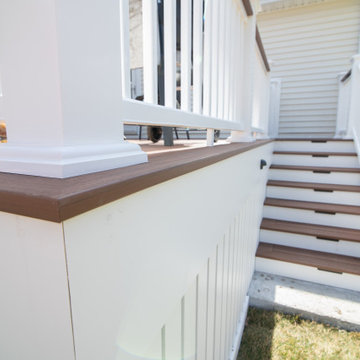
This project involved removing a failing deck and drainage system. Our construction crew installed a brand new deck with Azek Timbertech mahogany decking and their composite railing system with mahogany drink rail. This deck also included a hidden door system and slat detail around the base. We also plumbed a quick connect gas line to eliminate the client having to worry about filling grill tanks. Our landscape construction teams also installed a brand new drainage system around the entire property that will manage roof, gutter, and downspout water in conjunction with surface water. The system will collect all of the aforementioned and direct it to a recharge system located below grade.
Provost Companies is a fully licensed and insured general contractor serving Canton, MA.
 Progressive Design Build
Challenge
After living in their home for ten years, these Bonita Bay homeowners were ready to embark on a complete home makeover. They were not only ready to update the look and feel, but also the flow of the house.
Having lived in their house for an extended period of time, this couple had a clear idea of how they use their space, the shortcomings of their current layout and how they would like to improve it.
After interviewing four different contractors, they chose to retain Progressive Design Build’s design services. Already familiar with the design/build process having finished a renovation on a lakefront home in Canada, the couple chose Progressive Design Build wisely.
Progressive Design Build invested a lot of time during the design process to ensure the design concept was thorough and reflected the couple’s vision. Options were presented, giving these homeowners several alternatives and good ideas on how to realize their vision, while working within their budget. Progressive Design Build guided the couple all the way—through selections and finishes, saving valuable time and money.
Solution
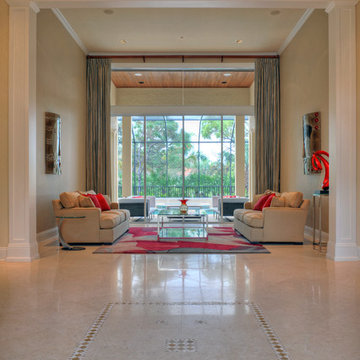
The interior remodel included a beautiful contemporary master bathroom with a stunning barrel-ceiling accent. The freestanding bathtub overlooks a private courtyard and a separate stone shower is visible through a beautiful frameless shower enclosure. Interior walls and ceilings in the common areas were designed to expose as much of the Southwest Florida view as possible, allowing natural light to spill through the house from front to back.
Progressive created a separate area for their Baby Grand Piano overlooking the front garden area. The kitchen was also remodeled as part of the project, complete with cherry cabinets and granite countertops. Both guest bathrooms and the pool bathroom were also renovated. A light limestone tile floor was installed throughout the house. All of the interior doors, crown mouldings and base mouldings were changed out to create a fresh, new look. Every surface of the interior of the house was repainted.
This whole house remodel also included a small addition and a stunning outdoor living area, which features a dining area, outdoor fireplace with a floor-to-ceiling slate finish, exterior grade cabinetry finished in a natural cypress wood stain, a stainless steel appliance package, and a black leather finish granite countertop. The grilling area includes a 54" multi-burner DCS and rotisserie grill surrounded by natural stone mosaic tile and stainless steel inserts.
This whole house renovation also included the pool and pool deck. In addition to procuring all new pool equipment, Progressive Design Build built the pool deck using natural gold travertine. The ceiling was designed with a select grade cypress in a dark rich finish and termination mouldings with wood accents on the fireplace wall to match.
During construction, Progressive Design Build identified areas of water intrusion and a failing roof system. The homeowners decided to install a new concrete tile roof under the management of Progressive Design Build. The entire exterior was also repainted as part of the project.
Results
Due to some permitting complications, the project took thirty days longer than expected. However, in the end, the project finished in eight months instead of seven, but still on budget.
This homeowner was so pleased with the work performed on this initial project that he hired Progressive Design Build four more times – to complete four additional remodeling projects in 4 years.
 Nautilus Architects
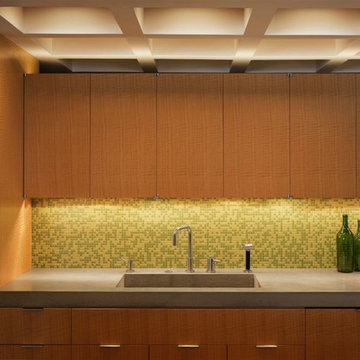
Details take this kitchen from good to great. Mortised chrome edge pulls leave the anigre drawer and door faces unblemished. These are contrasted with integral pulls carved into mahogany cabinetry. Clunky European hinges are replaced by elegant, smooth-working offset pivot hinges with invisible magnet catches embedded in the doors. Outside cabinet corners are mitered so there is no evidence of a door or drawer edge from any angle. A small reveal at wall bases, achieved using matte black plastic laminate, eliminates the need for applied baseboard, and indeed the interior is entirely “trimless.”
Cathedral ceilings and seamless cabinetry complement this home’s river view.
The low ceilings in this ’70s contemporary were a nagging issue for the 6-foot-8 homeowner. Plus, drab interiors failed to do justice to the home’s Connecticut River view. By raising ceilings and removing non-load-bearing partitions, architect Christopher Arelt was able to create a cathedral-within-a-cathedral structure in the kitchen, dining and living area. Decorative mahogany rafters open the space’s height, introduce a warmer palette and create a welcoming framework for light.
The homeowner, a Frank Lloyd Wright fan, wanted to emulate the famed architect’s use of reddish-brown concrete floors, and the result further warmed the interior. “Concrete has a connotation of cold and industrial but can be just the opposite,” explains Arelt. Clunky European hardware was replaced by hidden pivot hinges, and outside cabinet corners were mitered so there is no evidence of a drawer or door from any angle.
Photo Credit: Read McKendree
Find the right local pro for your project
 McCabe By Design LLC
Failing appliances, poor quality cabinetry, poor lighting and less than ergonomic storage is what precipitated the remodel of this kitchen for a petite chef.
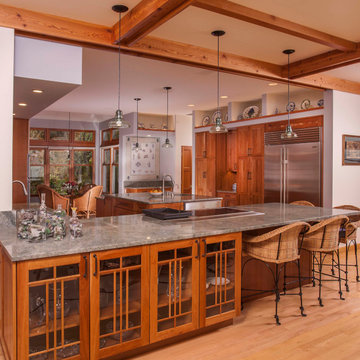
The appliances were selected based on the features that would provide maximum accessibility, safety and ergonomics, with a focus on health and wellness. This includes an induction cooktop, electric grill/griddle, side hinged wall oven, side hinged steam oven, warming drawer and counter depth refrigeration.
The cabinetry layout with internal convenience hardware (mixer lift, pull-out knife block, pull-out cutting board storage, tray dividers, roll-outs, tandem trash and recycling, and pull-out base pantry) along with a dropped counter on the end of the island with an electrical power strip ensures that the chef can cook and bake with ease with a minimum of bending or need of a step stool, especially when the kids and grandchildren are helping in the kitchen. The new coffee station, tall pantries and relocated island sink allow non-cooks to be in the kitchen without being underfoot.
Extending the open shelf soffits provides additional illuminated space to showcase the chef’s extensive collection of M.A. Hadley pottery as well as much needed targeted down lighting over the perimeter countertops. Under cabinet lights provide much needed task lighting.
The remodeled kitchen checks a lot of boxes for the chef. There is no doubt who will be hosting family holiday gatherings!
 JRP Design & Remodel
Our client had been living in her beautiful lakeside retreat for about 3 years. All around were stunning views of the lake and mountains, but the view from inside was minimal. It felt dark and closed off from the gorgeous waterfront mere feet away. She desired a bigger kitchen, natural light, and a contemporary look. Referred to JRP by a subcontractor our client walked into the showroom one day, took one look at the modern kitchen in our design center, and was inspired!
After talking about the frustrations of dark spaces and limitations when entertaining groups of friends, the homeowner and the JRP design team emerged with a new vision. Two walls between the living room and kitchen would be eliminated and structural revisions were needed for a common wall shared a wall with a neighbor. With the wall removals and the addition of multiple slider doors, the main level now has an open layout.
Everything in the home went from dark to luminous as sunlight could now bounce off white walls to illuminate both spaces. Our aim was to create a beautiful modern kitchen which fused the necessities of a functional space with the elegant form of the contemporary aesthetic. The kitchen playfully mixes frameless white upper with horizontal grain oak lower cabinets and a fun diagonal white tile backsplash. Gorgeous grey Cambria quartz with white veining meets them both in the middle. The large island with integrated barstool area makes it functional and a great entertaining space.
The master bedroom received a mini facelift as well. White never fails to give your bedroom a timeless look. The beautiful, bright marble shower shows what's possible when mixing tile shape, size, and color. The marble mosaic tiles in the shower pan are especially bold paired with black matte plumbing fixtures and gives the shower a striking visual.
Layers, light, consistent intention, and fun! - paired with beautiful, unique designs and a personal touch created this beautiful home that does not go unnoticed.
PROJECT DETAILS:
• Style: Contemporary
• Colors: Neutrals
• Countertops: Cambria Quartz, Luxury Series, Queen Anne
• Kitchen Cabinets: Slab, Overlay Frameless
Uppers: Blanco
Base: Horizontal Grain Oak
• Hardware/Plumbing Fixture Finish: Kitchen – Stainless Steel
• Lighting Fixtures:
• Flooring:
Hardwood: Siberian Oak with Fossil Stone finish
• Tile/Backsplash:
Kitchen Backsplash: White/Clear Glass
Master Bath Floor: Ann Sacks Benton Mosaics Marble
Master Bath Surround: Ann Sacks White Thassos Marble
Photographer: Andrew – Open House VC
 Allman Remodeling Contractors
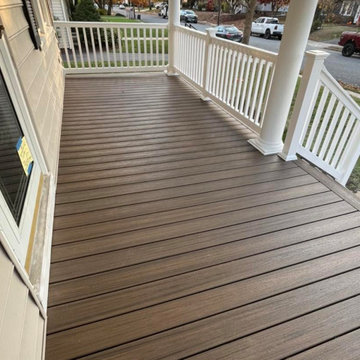
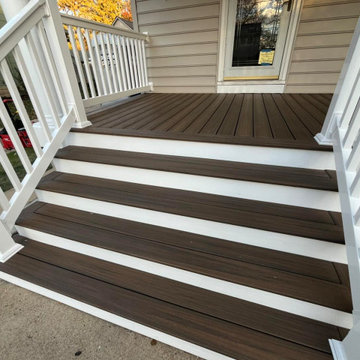
Front Porch Transformation – From Failing Wood to Full Composite Upgrade ✨
This porch had years of peeling paint, rot, water damage, and structural wear. We rebuilt it from the framing up and gave this home a clean, modern, low-maintenance upgrade that will last for decades.
What we did:
✔️ Removed all failing decking, treads, and trim
✔️ Repaired and reinforced the existing framing
✔️ Installed new composite decking in a beautiful wood-tone finish
✔️ Rebuilt the stair system with composite treads & white risers
✔️ Installed new vinyl railings and posts
✔️ Wrapped all exposed structure in PVC for a clean, maintenance-free finish
✔️ Sealed, repaired, and refinished column bases
✔️ Added all new fasteners, blocking, and waterproofing where needed
The result? A porch that’s safer, stronger, and absolutely elevates the curb appeal of this home.
If your porch or deck is showing signs of age — peeling paint, soft spots, loose rails, or rot — we can rebuild it the right way.
 Tom Curren Companies
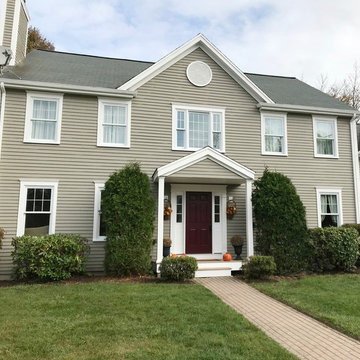
This Newton Center home was first washed and scrubbed by hand. The siding and trim were prepped by scraping all failing paint, feather sanding rough areas, spot priming all bare wood with oil-based primer and caulking for proper seal. Two finish coats were applied to the siding, trim, bulkheads and porch ceiling. The back deck was prepped and painted with a solid stain. Our new clients will enjoy their newly painted home for years to come!

 TTC Enterprises, LLC
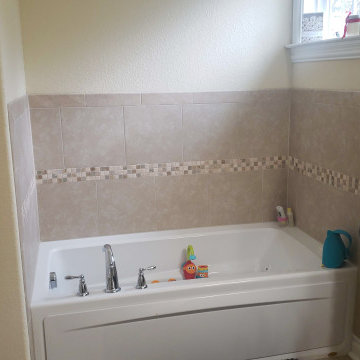
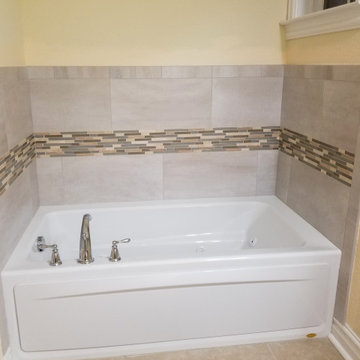
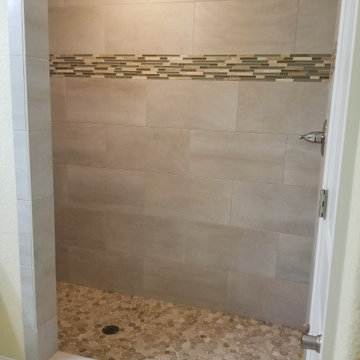
The client had a shower space without a visual showing of damage until you looked at the ceiling in the kitchen. The project was exploratory after all other measures failed to find the leak. The client went with a new look after discovering the problems in the construction of the existing shower base and waterproofing process.
 Rocky Tops Granite & Marble LLC
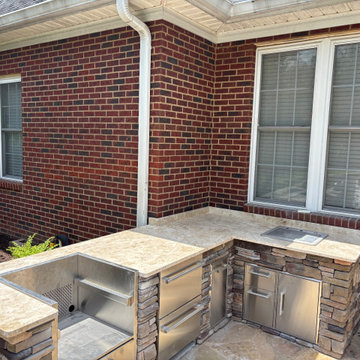
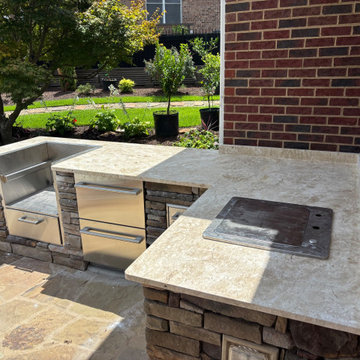
This outdoor kitchen in Lexington is built around 3cm unfilled travertine, and that's a material choice that says a lot about what this space is meant to do. Unfilled travertine keeps its natural pits and texture instead of having them smoothed over with resin, which means the surface reads as raw and organic rather than polished. Out here, under open sky and full sun, that texture works in the stone's favor. It doesn't glare back at you at midday and it doesn't get slick when a hose or a rain shower hits it.
The layout is an L-shaped countertop set over a stacked stone veneer base, with stainless steel drawers and cabinets tucked underneath and a built-in grill anchoring one leg of the L. There's a cutout in the counter for a sink or a cooler, which is the kind of detail that takes real planning at the template stage. You can't cut that opening freehand on site and expect clean lines. We measure twice, dry-fit the appliance or basin, and cut the stone to match before it ever leaves the shop.
Travertine outdoors is a practical call as much as a good-looking one. It handles heat well, which matters right next to a grill, and it won't crack or discolor the way some engineered materials can when they take direct sun for years. Unfilled travertine in particular breathes a little more than the filled version, so it doesn't trap moisture the way a sealed slab might. We finished the edges eased, which keeps the whole thing feeling soft and unfussy, no sharp lines to bang a hip on when you're moving between the grill and the prep space.
Outdoor kitchens take a beating that indoor ones never see: pollen, humidity, the occasional hard freeze here in the Midlands, direct sun for months at a stretch. Travertine's been used outdoors for centuries for exactly that reason, it ages instead of failing. Sealing it now and then keeps water from sitting in the pits, but even bare it holds up. This one in Lexington is set up to be used hard, grilled on, gathered around, and to look better for the wear rather than worse.
 TTC Enterprises, LLC
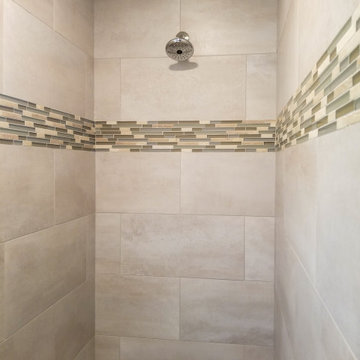
The client had a shower space without a visual showing of damage until you looked at the ceiling in the kitchen. The project was exploratory after all other measures failed to find the leak. The client went with a new look after discovering the problems in the construction of the existing shower base and waterproofing process.
 Solid Base Construction
Concrete Patio & Under-Deck Storage Upgrade
Removed severely cracked and failing concrete and installed a new reinforced concrete slab beneath the elevated deck to create a clean, functional storage area. The project also included a concrete retaining wall beneath the staircase to help manage water runoff and prevent erosion around the new slab. The completed installation transformed an unusable space into a durable, attractive extension of the property while improving drainage, accessibility, and long-term performance.
 Allman Remodeling Contractors
Front Porch Transformation – From Failing Wood to Full Composite Upgrade ✨
This porch had years of peeling paint, rot, water damage, and structural wear. We rebuilt it from the framing up and gave this home a clean, modern, low-maintenance upgrade that will last for decades.
What we did:
✔️ Removed all failing decking, treads, and trim
✔️ Repaired and reinforced the existing framing
✔️ Installed new composite decking in a beautiful wood-tone finish
✔️ Rebuilt the stair system with composite treads & white risers
✔️ Installed new vinyl railings and posts
✔️ Wrapped all exposed structure in PVC for a clean, maintenance-free finish
✔️ Sealed, repaired, and refinished column bases
✔️ Added all new fasteners, blocking, and waterproofing where needed
The result? A porch that’s safer, stronger, and absolutely elevates the curb appeal of this home.
If your porch or deck is showing signs of age — peeling paint, soft spots, loose rails, or rot — we can rebuild it the right way.
 TTC Enterprises, LLC
The client had a shower space without a visual showing of damage until you looked at the ceiling in the kitchen. The project was exploratory after all other measures failed to find the leak. The client went with a new look after discovering the problems in the construction of the existing shower base and waterproofing process.
 Windy City Painters
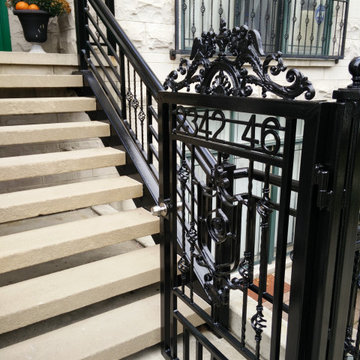
Ever notice how your iron fence looks more rust than paint after another brutal Chicago winter? That is usually the moment homeowners start searching for a painting contractor who actually understands metal - not just someone who will brush a coat of black paint over active corrosion and call it done. At Windy City Painters, iron fence restoration is one of our most requested services on the North Side and Near West Side, and for good reason. These fences are old, they are beautiful, and they deserve a proper finish system.
PROJECT OVERVIEW
This project involved a full ornamental iron fence on a North Side greystone property. The fence was original to the building - likely installed in the 1910s or 1920s - and had gone through multiple paint cycles without any rust conversion work. By the time Windy City Painters arrived, the horizontal rails showed active pitting, the vertical spindles had surface rust under lifting paint, and two corner posts had minor joint separation. The homeowner wanted the fence restored to a sharp satin black finish that would hold through multiple Chicago winters.
MATERIALS AND PRODUCTS
Ospho Rust Converter - phosphoric acid formula that chemically neutralizes iron oxide and converts it to iron phosphate, a stable paintable surface. Used on all pitted and actively corroded areas before primer application.
Rust-Oleum DTM Rust-Inhibitive Primer - direct-to-metal primer that bonds to both converted rust zones and bare metal, blocking moisture intrusion at the substrate level.
Sherwin-Williams DTM Acrylic Topcoat - flexible, moisture-resistant finish formulated to expand and contract with metal through temperature cycling. Applied in two finish coats in satin black.
For cases with deeper rust penetration, Corroseal Water-Based Rust Converter and Metal Primer is an alternative that combines conversion and priming in a single product, useful on complex ornamental profiles where two-product systems are harder to apply.
THE PROCESS
Step 1 - Mechanical Preparation. Windy City Painters wire-wheels all loose rust, flaking paint, and scale using angle grinders fitted with wire wheel attachments. On heavily pitted sections, needle gun descaling is used to reach rust in tight ornamental grooves. This step is non-negotiable. No coating bonds reliably to iron oxide, and skipping this step is the single most common reason iron fence paint fails within a year.
Step 2 - Rust Conversion. Ospho is brushed into all pitted and bare metal areas and allowed to fully react. The surface shifts from orange to a grayish-black iron phosphate layer. This stable base accepts primer without the risk of rust migrating upward through the paint film over time.
Step 3 - Primer Coat. Rust-Oleum DTM rust-inhibitive primer is applied full coverage over the entire fence surface, including areas that appeared clean but showed minor surface oxidation. DTM primer acts as a moisture barrier and mechanical adhesion layer for the finish coats.
Step 4 - Finish Coats. Two coats of Sherwin-Williams DTM acrylic topcoat are applied in satin black, with adequate dry time between coats. The DTM formula remains flexible after cure, allowing the iron to expand and contract through Chicago temperature swings without the topcoat cracking or peeling at joints.
CHICAGO-SPECIFIC CHALLENGES
Ornamental iron on Chicago greystones, two-flats, and Victorian brownstones was almost never hot-dip galvanized. It was painted from installation and has relied on continuous paint maintenance ever since. Chicago winters add specific stress: freeze-thaw cycles force water into any paint film crack, expanding it; road salt spray elevates corrosive chloride exposure; and humidity during spring thaw keeps metal surfaces wet for extended periods. This combination accelerates rust spread beneath paint films that appear intact on the surface.
WHAT TO EXPECT LONG-TERM
A properly prepped and primed iron fence finished with a DTM topcoat system should hold 5-8 years in Chicago conditions before any touch-up is warranted. Annual inspection of joints, welds, and areas near grade level will catch early moisture entry before it becomes a larger rust issue. Windy City Painters recommends scheduling touch-up earlier rather than waiting for full paint failure to protect the prep investment.
PRO TIPS
Tip 1 - Address joint separation before painting. If fence rails have separated at welds or mechanical joints, water will enter and rust will restart from inside the connection point regardless of the exterior coating. Flag any separated joints for welding before any paint system is applied.
Tip 2 - Never use latex house paint on iron fences. Standard exterior latex lacks the adhesion and flexibility for bare metal. Always use a product labeled DTM or specify a rust-inhibitive primer underneath any finish coat applied to iron.
Tip 3 - Paint in late spring or early fall. Iron fences exposed to full sun in peak summer heat can reach surface temperatures that cause solvent-based coatings to blister during application. Ideal application conditions are 50-85 degrees Fahrenheit with low humidity and no direct intense sun on the metal surface.
Learn more about iron fence painting cost in Chicago and schedule your free estimate at windypainters.com
FAQ
Q: What does iron fence painting cost in Chicago?
A: Windy City Painters typically prices residential iron fence painting at $8-$18 per linear foot. Variables include rust severity, spindle density, ornamental profile complexity, and whether rust conversion products like Ospho or Corroseal are required before priming.
Q: Can you paint over rust without grinding it off first?
A: No. Windy City Painters always performs mechanical prep before any coating. Wire wheel grinding removes loose scale and flaking paint. Rust converters handle residual oxidation chemically. Skipping this step means the new paint film will delaminate within one season.
Q: How do I know if my iron fence needs a welder before painting?
A: Windy City Painters inspects all joints and rail connections during the estimate. Rail separation, cracked welds, or sections that flex when pressed indicate structural issues that should be welded before any paint system is applied to avoid reopening at stress points.
Q: What is the difference between Ospho and Corroseal?
A: Both are rust converters. Ospho is a phosphoric acid solution applied as a separate step before priming, giving maximum control over conversion and primer selection. Corroseal combines conversion and primer in one product, which works well on complex ornamental profiles where a two-step system is harder to apply evenly.
Q: How long does the paint last on an iron fence in Chicago?
A: With full mechanical prep, rust conversion, DTM primer, and two DTM topcoats, Windy City Painters clients typically see 5-8 years of performance before touch-up is needed, even through Chicago freeze-thaw cycling and road salt exposure.
Q: Do you paint iron fences that are still structurally sound but heavily rusted on the surface?
A: Yes. Surface rust, even heavy pitting, does not necessarily indicate structural failure. Windy City Painters evaluates each fence individually. As long as the metal is sound under the rust, proper mechanical prep and a rust converter restore the surface to a paintable condition.
 Provost Companies, Inc.
This project involved removing a failing deck and drainage system. Our construction crew installed a brand new deck with Azek Timbertech mahogany decking and their composite railing system with mahogany drink rail. This deck also included a hidden door system and slat detail around the base. We also plumbed a quick connect gas line to eliminate the client having to worry about filling grill tanks. Our landscape construction teams also installed a brand new drainage system around the entire property that will manage roof, gutter, and downspout water in conjunction with surface water. The system will collect all of the aforementioned and direct it to a recharge system located below grade.
Provost Companies is a fully licensed and insured general contractor serving Canton, MA.
 TTC Enterprises, LLC
The client had a shower space without a visual showing of damage until you looked at the ceiling in the kitchen. The project was exploratory after all other measures failed to find the leak. The client went with a new look after discovering the problems in the construction of the existing shower base and waterproofing process.
 Rocky Tops Granite & Marble LLC
This outdoor kitchen in Lexington is built around 3cm unfilled travertine, and that's a material choice that says a lot about what this space is meant to do. Unfilled travertine keeps its natural pits and texture instead of having them smoothed over with resin, which means the surface reads as raw and organic rather than polished. Out here, under open sky and full sun, that texture works in the stone's favor. It doesn't glare back at you at midday and it doesn't get slick when a hose or a rain shower hits it.
The layout is an L-shaped countertop set over a stacked stone veneer base, with stainless steel drawers and cabinets tucked underneath and a built-in grill anchoring one leg of the L. There's a cutout in the counter for a sink or a cooler, which is the kind of detail that takes real planning at the template stage. You can't cut that opening freehand on site and expect clean lines. We measure twice, dry-fit the appliance or basin, and cut the stone to match before it ever leaves the shop.
Travertine outdoors is a practical call as much as a good-looking one. It handles heat well, which matters right next to a grill, and it won't crack or discolor the way some engineered materials can when they take direct sun for years. Unfilled travertine in particular breathes a little more than the filled version, so it doesn't trap moisture the way a sealed slab might. We finished the edges eased, which keeps the whole thing feeling soft and unfussy, no sharp lines to bang a hip on when you're moving between the grill and the prep space.
Outdoor kitchens take a beating that indoor ones never see: pollen, humidity, the occasional hard freeze here in the Midlands, direct sun for months at a stretch. Travertine's been used outdoors for centuries for exactly that reason, it ages instead of failing. Sealing it now and then keeps water from sitting in the pits, but even bare it holds up. This one in Lexington is set up to be used hard, grilled on, gathered around, and to look better for the wear rather than worse.
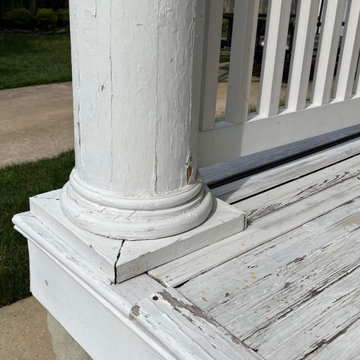 Allman Remodeling Contractors
Front Porch Transformation – From Failing Wood to Full Composite Upgrade ✨
This porch had years of peeling paint, rot, water damage, and structural wear. We rebuilt it from the framing up and gave this home a clean, modern, low-maintenance upgrade that will last for decades.
What we did:
✔️ Removed all failing decking, treads, and trim
✔️ Repaired and reinforced the existing framing
✔️ Installed new composite decking in a beautiful wood-tone finish
✔️ Rebuilt the stair system with composite treads & white risers
✔️ Installed new vinyl railings and posts
✔️ Wrapped all exposed structure in PVC for a clean, maintenance-free finish
✔️ Sealed, repaired, and refinished column bases
✔️ Added all new fasteners, blocking, and waterproofing where needed
The result? A porch that’s safer, stronger, and absolutely elevates the curb appeal of this home.
If your porch or deck is showing signs of age — peeling paint, soft spots, loose rails, or rot — we can rebuild it the right way.
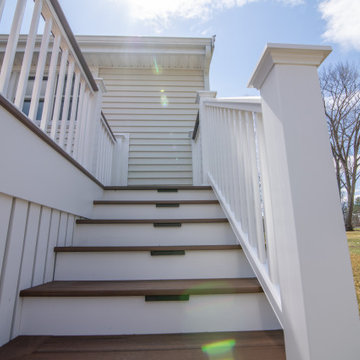 Provost Companies, Inc.
This project involved removing a failing deck and drainage system. Our construction crew installed a brand new deck with Azek Timbertech mahogany decking and their composite railing system with mahogany drink rail. This deck also included a hidden door system and slat detail around the base. We also plumbed a quick connect gas line to eliminate the client having to worry about filling grill tanks. Our landscape construction teams also installed a brand new drainage system around the entire property that will manage roof, gutter, and downspout water in conjunction with surface water. The system will collect all of the aforementioned and direct it to a recharge system located below grade.
Provost Companies is a fully licensed and insured general contractor serving Canton, MA.
 Windy City Painters
Metal Porch Stairs Painting in Lakeview, Chicago | Windy City Painters
Lakeview is one of Chicago's most architecturally diverse neighborhoods — vintage courtyard buildings, rooftop-deck condos, newly converted three-flats, and classic brick two-flats all line the same block. What they share is this: exposed metal. Back porch stairs, handrails, balconies, and exterior landings define the rear streetscape of nearly every building in the neighborhood. And in Chicago, exposed metal without proper protective coatings doesn't last.
Windy City Painters recently completed a full metal porch stairs painting project in Lakeview that illustrates exactly what professional metal refinishing looks like — and why preparation is everything.
The Problem: Years of Chicago Weather Had Done Their Damage
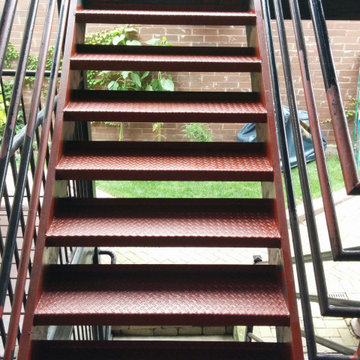
The client's back porch stairs were structurally sound — the diamond-plate steel treads were solid underfoot and the handrails were stable. However, the original paint system had long since failed. Surface rust had spread across the treads and risers. The old coating was peeling at every seam, edge, and weld point. Meanwhile, the black handrails were chalky and beginning to show rust at the bases.
Notably, this is a pattern Windy City Painters sees constantly in Lakeview. The neighborhood's diverse housing stock — ranging from pre-war courtyard buildings to 1990s condo conversions — often features original metal porch work that has never received a proper professional refinish. Homeowners and property managers patch-paint over rust for years, which ultimately accelerates the problem rather than solving it.
The solution isn't more paint. It's a complete system: mechanical rust removal, chemical treatment, primer, and a durable topcoat engineered for exterior metal.
The Windy City Painters Process for Metal Porch Stairs Painting
Windy City Painters approaches every metal porch stairs painting project with the same disciplined sequence. Consequently, our finishes outlast the competition by years.
Step 1 — Mechanical Preparation Our crew wire-brushes all loose rust, flaking paint, and surface contamination from every tread, riser, stringer, and handrail section. For heavier rust accumulation, we use grinding discs to cut down to clean, bare metal. This step is non-negotiable. Additionally, we pay particular attention to weld seams, bolt plates, and edge returns — the spots where moisture consistently hides and rust reliably starts.
Step 2 — Chemical Rust Treatment After mechanical prep, we apply a rust-converting primer to any remaining rust residue. This chemically neutralizes active rust and converts it into a stable, paintable surface. Moreover, the converter bonds to the metal and creates an additional barrier against future oxidation.
Step 3 — Rust-Inhibiting Primer Windy City Painters then applies a full coat of oil-based, rust-inhibiting primer to all prepared metal surfaces. This primer penetrates bare metal and creates the critical bond layer that everything else depends on. Skipping this step — or substituting a latex primer — is the single biggest reason DIY metal paint jobs fail within one season.
Step 4 — Two Topcoats of Industrial Enamel We apply two full coats of oil-based industrial enamel in the client's chosen color. For this Lakeview project, the stairs received a deep red finish and the handrails received gloss black — a classic combination that reads beautifully against the surrounding brick. Each coat is allowed to cure fully before the next is applied. Furthermore, we back-roll every surface to eliminate lap marks and ensure consistent film build.
Step 5 — Final Inspection and Cleanup Windy City Painters inspects every inch of the completed work before calling a project done. We remove all masking, clean up the work area completely, and walk the client through the finished result. In addition, we advise on a maintenance schedule to maximize the life of the coating system.
Why Metal Porch Stairs Painting Matters for Lakeview Properties
Metal porch stairs are among the most visible exterior features of Chicago residential buildings. Therefore, their condition directly affects curb appeal, property value, and — most importantly — structural safety. Rust that penetrates deeply enough will compromise the structural integrity of stairs and railings. Meanwhile, peeling paint signals to buyers, renters, and neighbors that a property is deferred.
In contrast, freshly refinished metal porch stairs signal exactly the opposite. They say the property is maintained, the owner takes pride in the building, and the structure is safe. For Lakeview landlords and homeowners alike, metal porch stair refinishing delivers an exceptional return on investment.
Professional Advice for Lakeview Homeowners
Before starting a metal porch stairs painting project, Windy City Painters recommends the following:
Don't paint over rust. Any rust left beneath a topcoat will continue to spread and will lift the new paint within months. Mechanical removal is essential.
Choose oil-based products for exterior metal. Latex paints don't adhere to metal as reliably and lack the film hardness needed to withstand foot traffic and freeze-thaw cycles.
Time your project right. Ideal conditions for metal painting are 50°F–90°F with low humidity. Chicago's spring and early fall are perfect windows.
Don't skip the primer. A properly applied rust-inhibiting primer is what separates a seven-year finish from a one-year failure.
Budget for full prep. Preparation typically represents 60–70% of the labor on a metal refinishing project. That's where the money is well spent.
Windy City Painters: Lakeview's Trusted Metal Refinishing Contractor
Windy City Painters has refined the process of exterior metal painting and refinishing across Chicago's North Side and Near West Side. We work in Lakeview regularly — on courtyard buildings, two-flats, coach houses, and commercial properties — and we understand the unique demands that Chicago's climate places on exterior metal. As a result, our coating systems are selected and applied for maximum longevity in this specific environment.
See more of our work and request a free estimate at www.windypainters.com.
Ready to transform your Lakeview home? Contact Windy City Painters for a free estimate — visit www.windypainters.com today. Proudly serving Wicker Park, West Town, Lincoln Park, Roscoe Village, Lakeview, Ukrainian Village, River North, and all of Chicago.
6