
Search results for "Blocked drains" in Home Design Ideas
 Phoenix Home Remodeling
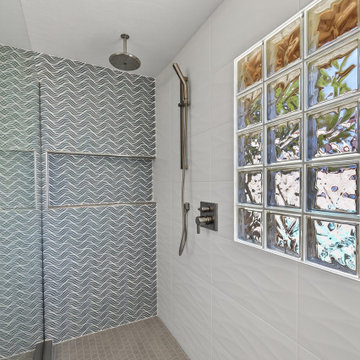
David wanted to remove his outdated shower design and replace it with a cleaner, more open look that matched the rest of his home’s style.
A bulky glass block wall and dark tile made the space feel closed off and dated. The old materials were removed to the studs, and new plumbing was added for a rain shower, handheld fixture, and diverter for better comfort.
Custom-built shower, featuring a dry-off area and recessed wall niche for convenience, was installed. Durable waterproofing and backer board were added to prepare the space for new tile installation.
The new shower features Wave Blanco 13x24 Matte tile, installed in a horizontal straight stack pattern with Arctic White grout and Schluter Jolly Bright White trim. On the accent wall, Anthology Euphoria Crave Serenity Glass tile adds depth and subtle texture, tying the design together beautifully.
For the floor, Walker Zanger Continuum Grey 2x2 Anti-Slip mosaic tile provides both safety and modern appeal. A brushed nickel tile-in drain by Ebbe Legacy complements the new Delta Pivotal fixtures in Lumicoat Stainless, creating a sleek, cohesive finish throughout.
The existing vanity, toilet, flooring, and block window were kept in place to balance function and budget. The updated frameless glass enclosure without a door gives the shower a spacious, spa-like feel while maintaining easy access.
This remodel completely transformed David’s bathroom from dark and dated to bright, refined, and inviting. The new shower brings a sense of calm and usability, turning his daily routine into a comfortable and enjoyable experience.

 SJ&J Design
Custom Spaces
Claw-foot bathtub - small traditional master white tile and ceramic tile mosaic tile floor claw-foot bathtub idea in San Francisco with a pedestal sink, a two-piece toilet and white walls
Claw-foot bathtub - small traditional master white tile and ceramic tile mosaic tile floor claw-foot bathtub idea in San Francisco with a pedestal sink, a two-piece toilet and white walls
 Twelve Stones Designs, LLC
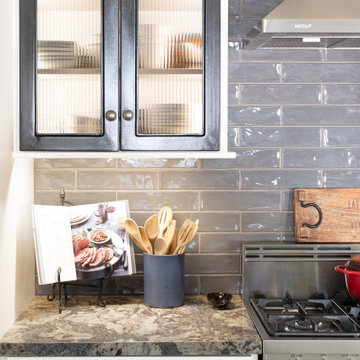
The owners of this kitchen had spent the money to upgrade the finishes in their kitchen upon building the home 12 years ago, but after living in the space for several years they realized how nonfunctional the layout really was. The (then) two preschool aged children had grown into busy, hungry teenagers with many friends who also liked to hang out at the house. So the family needed a more functional kitchen with better traffic flow, space for daily activities revolving around the kitchen at different times of day, and a kitchen that could accommodate cooking for and serving large groups. Furthermore, the dark, traditional finishes no longer reflected the homeowners’ style. They requested a brighter, more relaxed, coastal style that reflected their love of the seaside cities they like to visit.
Originally, the kitchen was U-shaped with a narrow island in the middle. The island created narrow aisles that bottle-necked at the dishwasher, refrigerator, and cooktop areas. There was a pass-through from the foyer into the kitchen, but the owners never liked that the pass-through was also located so close to the powder room. The awkward proximity was unappealing and made guests feel uncomfortable.
The kitchen’s storage was made up of lots of narrow cabinets, apothecary drawers, clipped corner units, and very few drawers. It lacked useful storage for the larger items the family used on a daily basis. And the kitchen’s only pantry was small closet that had only builder-grade, narrow shelving with no illumination to be able to see the contents inside.
Overall, the kitchen’s lighting plan was poorly executed. Only six recessed cans illuminated the entire kitchen and nook areas. The under cabinet lighting was not evenly distributed either. In fact, the builder had mis-placed the under cabinet lighting around the decorative pilasters which made for choppy, dark cubbies. Further, the builder didn’t include any lighting over the sink or the bar area, which meant whoever was doing the dishes was always in their own shadow. That, coupled with the steep overhang of the game room above made the bar area feel like a dim, cavernous space that wasn’t inviting or task oriented. The kitchen looked out into the main living space, but the raised bar and a narrow wall (which held the only large cabinet in the kitchen) created more of a barrier than a relationship to the living room or breakfast nook. In fact, one couldn’t even see the breakfast nook from the cooktop or sink areas due to its orientation. The raised bar top was too narrow to comfortably sit to either dine at or chat from due to the lack of knee space. The the homeowners confided that the kitchen felt more like a dark, dirty prison than place where the family, or their guests, wanted to gather and commune.
The clients' needs and desires were:
➢ to create a kitchen that would be a space the family loved to be in; to relate to the adjacent spaces all around, and to have better flow for entertaining large groups
➢ to remove the walls between the breakfast nook and living area and to be able to utilize the natural light from the windows in both those areas
➢ to incorporate a functional chopping block for prepping fresh food for home cooked meals, an island with a large sink and drain board, 2 pull out trash cans, and seating for at least the 2 teens to eat or do homework
➢ to design a kitchen and breakfast nook with an airy, coastal, relaxed vibe that blended with the rest of the house's coastal theme
➢ to integrate a layered lighting plan which would include ample general illumination, specific task lighting, decorative lighting, and lots of illuminated storage
➢ to design a kitchen with not only more storage for all the husband’s kitchen gadgets and collection of oils and spices, but smart storage, including a coffee/breakfast bar and a place to store and conceal the toaster oven and microwave
➢ to find a way to utilize the large open space between the kitchen, pantry area, and breakfast nook
Twelve Stones Designs achieved the owner's goals by:
➢ removing the walls between the kitchen and living room to allow the natural light to filter in from the adjacent rooms and to create a connection between the kitchen, nook, and living spaces for a sense of unity and communion
➢ removing the existing pantry and designing 3 large pantry style cabinets with LED tape lights and rollout drawers to house lots of kitchen appliances, gadgets, and tons of groceries. We also took the cabinets all the way up to the 9’ ceiling for additional storage for seasonal items and bulk storage.
➢ designing 2 islands - 1 with a gorgeous black walnut chopping block that houses a drawer for chopping and carving knives and a custom double pull out trash unit for point of use utilization - and 1 that houses the dishwasher, a large Blanco Gourmet sink with integrated drain board, woven baskets for fresh root vegetables and kitchen towels, plenty of drawer storage for kitchen items, and bar seating for up to 4 diners.
➢ closing off the space between the kitchen and the powder room to create a beautiful new private alcove for the powder room as well as adding some decorative storage. This also gave us space to include more tall storage near the new range for precision placement of the husband’s extensive oil and spice collection as well as a location for a combo-steam oven the wife wanted for baking and cooking healthy meals.
The project is enhanced functionally by:
➢ incorporated USB and standard receptacles for the kids’ laptops and phone charging in the large island
➢ designing the small island to include additional open shelving for items used on a daily basis such as a variety of bowls, plates, and colanders. This set up also works well for the husband who prefers to “plate” his dinners in restaurant-style fashion before presenting them to the table.
➢ the integration of specific storage units, such as double stacked cutlery drawers, a custom spice pull-out, a Kuerig coffee and tea pod drawer, and custom double stacked utensil drawers
➢ moving the refrigerator to the old oven location - this eliminated the bottle neck as well as created a better relationship to the eating table. It also utilizes the floor space between the pantry, nook, and kitchen
➢ creating a banquet style breakfast nook - this banquette seating not only doubles the amount of seating for large gatherings but it better utilizes the odd space between the kitchen and the previous nook area. It also helps to create a distinct pathway from the mudroom room through the pantry area, kitchen, nook, and living room.
➢ the coffee/breakfast bar area which includes the perfect location for the concealed microwave and toaster oven, convenient storage for the coffee pods and tea accoutrements. Roll-out drawers below also house the smoothie maker, hot water kettle, and a plethora of smoothie-making ingredients such as protein powders, smoothie additives, etc. Furthermore, the drawers below the Keurig house measuring utensil, cutlery, baking supplies and tupperware storage.
➢ incorporating lots of wide drawers and pullouts to accommodate large cookware.
➢ utilizing as much vertical space as possible by building storage to the ceiling which accommodates the family’s abundant amount of serving platters, baking sheets, bakeware, casserole dishes, and additional cutting boards.
The project is enhanced aesthetically by:
➢ new 5-piece Versailles pattern porcelain tile that now seamlessly joins the entire down stairs area together creating a bright, cohesiveness feeling instead of choppy separated spaces - it also adds a coastal feeling
➢ designing a cabinet to conceal the microwave and toaster oven
➢ the coastal influenced light fixtures over the nook table and island
➢ the sandy colors of the Langdon Cambria countertops. The swirling pattern and sparkling quartz pieces remind the homeowner of black-and-tan sandy beaches
➢ the striped banquet seating whose creamy white background and blue-green stripes were the inspiration for the cabinet and wall colors.
➢ All the interior doors were painted black to coordinate with the blacks and grays in the backsplash tile and countertop. This also adds a hint of tailored formality to an otherwise casual space.
➢ the use of WAC's Oculux small aperture LED units for the overhead lighting complimented with Diode LED strips for task lighting under the cabinets and inside the pantry and glass wall cabinets. All of the lighting applications are on separate dimmer switches.
Innovative uses of materials or construction methods by Realty Restoration LLC:
➢ Each 1-1/2” x 3” block of reclaimed end-grain black walnut that makes up the center island chopping block was hand milled and built in the shop. It was designed to look substantial and proportional to the surrounding elements, executed by creating the 4 inch tall top with a solid wood chamfered edge band.
➢ The metal doors on either side of the vent hood were also custom designed for this project and built in the Realty Restoration LLC shop. They are made 1x2, 11-gauge mild steel with ribbed glass. Weighing 60 lbs a piece, heavy duty cabinet hinges were added to support the weight of the door and keep them from sagging.
➢ Under-cabinet receptacles were added along the range wall in order to have a clean, uninterrupted backsplash.
Design obstacles to overcome:
➢ Because we were removing the demising walls between the kitchen and living room, we had to find a way to plumb and vent the new island. We did this by tunneling through the slab (the slab had post tension cables which prevented us from just trenching) to run a new wet vent through a nearby structural wall. We pulled the existing hot and cold lines between upper floor joists and ran them down the structural wall as well and up through a conduit in the tunnel.
➢ Since we were converting from wall overs to a gas range it allowed us to utilize the 220 feed for the wall ovens to provide a new sub panel for all the new kitchen circuits
➢ Due to framing deficiencies inherited from the original build there was a 1-1/2” differential in the floor-to-ceiling height over a 20 foot span; by utilizing the process of cutting and furring coupled with the crown moulding details on the cabinet elevations we were able to mask the problem and provide seamless transitions between the cabinet components.
Evidence of superior craftsmanship:
➢ uniquely designed, one-of-a-kind metal “X” end panels on the large island. The end panels were custom made in the Realty Restoration LLC shop and fitted to the exact dimensions of the island. The welding seams are completely indistinguishable - the posts look like they are cut from a single sheet of metal
➢ square metal posts on the small island were also custom made and designed to compliment and carry through the metal element s throughout the kitchen
➢ the beautiful, oversized end panels on the pantry cabinets which give the breakfast nook a tailored look
➢ integrating a large format 5 piece Versailles tile pattern to seamlessly flow from the existing spaces into the new kitchen space
➢ By constructing a custom cabinet that jogged around a corner we could not remodel (housing the entry way coat closet) we were able to camouflage the adjacent wall offset within the upper and lower cabinets. By designing around the existing jog in the structural walls we accomplished a few things: we were able to find the space to house, and hide, the microwave and toaster oven yet still have a clean cohesive appearance from the kitchen side. Additionally, the owners were able to keep their much needed coat closet and we didn’t have to increase the budget with unnecessary structural work.
Find the right local pro for your project
 Che Bella Interiors Design + Remodeling
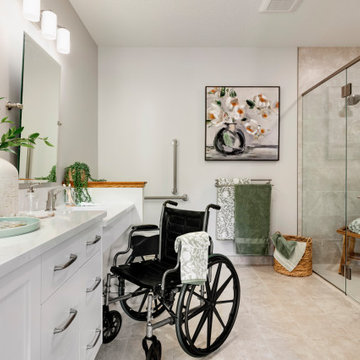
With an eye toward accessibility, this bathroom is designed to ease the everyday routines of a homeowner who often uses a wheelchair. Universal design strategies guided the project structurally with ADA-compatible elements incorporated throughout. One side of the vanity is set lower and left intentionally open underneath to accommodate the wheelchair when needed.
Visually, the project shines just as bright with white shaker-style cabinetry balanced by warm tones found elsewhere. Oversized warm gray porcelain wall tile partners beautifully with a diminutive square tile on the shower floor, while brushed nickel hardware and quartz countertops complete a timeless, classic appeal.
Photos by Spacecrafting Photography

 Bellingham Bay Builders
After many years of careful consideration and planning, these clients came to us with the goal of restoring this home’s original Victorian charm while also increasing its livability and efficiency. From preserving the original built-in cabinetry and fir flooring, to adding a new dormer for the contemporary master bathroom, careful measures were taken to strike this balance between historic preservation and modern upgrading. Behind the home’s new exterior claddings, meticulously designed to preserve its Victorian aesthetic, the shell was air sealed and fitted with a vented rainscreen to increase energy efficiency and durability. With careful attention paid to the relationship between natural light and finished surfaces, the once dark kitchen was re-imagined into a cheerful space that welcomes morning conversation shared over pots of coffee.
Every inch of this historical home was thoughtfully considered, prompting countless shared discussions between the home owners and ourselves. The stunning result is a testament to their clear vision and the collaborative nature of this project.
Photography by Radley Muller Photography
Design by Deborah Todd Building Design Services
 Lundin Architects LLC
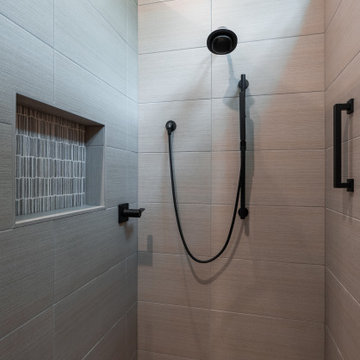
An under used whirlpool tub and inefficient layout were rectified by removing the tub and outdated glass block shower to create a generous walk-in shower area and dual vanity with built ins for storage. Woods and textured materials add warmth and sophistication to the space.

 Deck and Patio Company "Outdoor Living Experts"
With the slope stabilized, our team addressed pool renovation. After draining the pool and removing the original liner, a poorly built concrete block wall was uncovered.
The solution was to straighten the wall and fill the block in with concrete and steel rebars for strength. New vinyl covered stairs were then added, as well as new pipes, returns, skimmers, pump, filter and new liner was installed.
After this, the pool was carefully backfilled and tamped. We compacted the soil back around the pool in three-inch lifts to allow for the immediate installation of new pavers around the pool.
This compacting process is not done by many contractors. The idea is that using compacted soil the base will not settle, so you don’t have to wait to install a patio around a new pool. Many contractors still install concrete slabs under their patio. In our experience we find this does not work well. Settling still occurs under the slab allowing the patio to crack or settle.
After the base materials were finished, we installed chestnut-hued durable pavers from Cambridge (Sahara). These particular pavers have little or no color fade and the random design pattern adds interest to the patio. The pavers’ protective coating means these clients will have a clean-lined modern look. Even after being subjected to snow plowing, de-icing salts and normal wear, they will keep their color and beautiful appearance.
Sponsored
Columbus, OH

Hope Restoration & General Contracting
Columbus Design-Build, Kitchen & Bath Remodeling, Historic Renovations

 CairnsCraft Design & Remodel
Our client requested a design that reflected their need to renovate their dated bathroom into a transitional floor plan that would provide accessibility and function. The new shower design consists of a pony wall with a glass enclosure that has beautiful details of brushed nickel square glass clamps.
The interior shower fittings entail geometric lines that lend a contemporary finish. A curbless shower and linear drain added an extra dimension of accessibility to the plan. In addition, a balance bar above the accessory niche was affixed to the wall for extra stability.
The shower area also includes a folding teak wood bench seat that also adds to the comfort of the bathroom as well as to the accessibility factors. Improved lighting was created with LED Damp-location rated recessed lighting. LED sconces were also used to flank the Robern medicine cabinet which created realistic and flattering light.
Designer: Marie Cairns
Contractor: Charles Cairns
Photographer: Michael Andrew
 Design Set Match
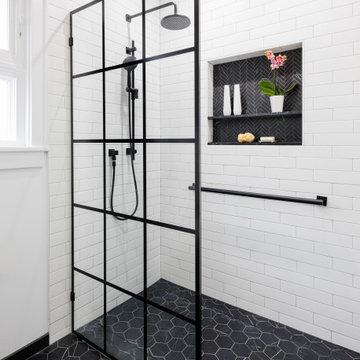
This remodel addressed issues including peeling vinyl flooring, outdated fixtures, and safety hazards due to deferred maintenance.
Challenges included: sourcing budget-sensitive materials with a high-end feel; slip-resistant hexagon floor tiles; a new pedestal sink; a water-saving toilet; and a larger medicine cabinet, while correcting code violations.
Universal Design created an open floor plan, low-maintenance finishes, zero-threshold entries into the bathroom and shower, in addition to highly-contrasting materials, grab bars with blocking, accessible towel bars for user convenience, and dimmable lighting with anti-glare trim.
We combined modern materials for a noir style and universal functionality for our aging-in-place clients and their forever home.

 C&R Remodeling
It all started with an unwelcome surprise for these homeowners: stray Lego down the shower drain. Without any other reasonable way to access second-story plumbing, the fiberglass shower had to be removed to make repairs. At that point, the owners figured they might as well take advantage of the opportunity to update their bathroom.
 Phoenix Home Remodeling
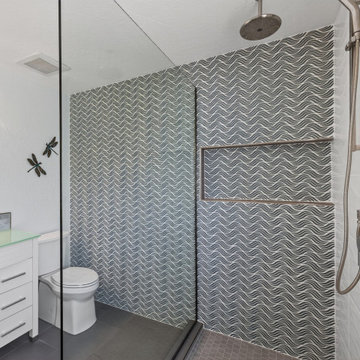
David wanted to remove his outdated shower design and replace it with a cleaner, more open look that matched the rest of his home’s style.
A bulky glass block wall and dark tile made the space feel closed off and dated. The old materials were removed to the studs, and new plumbing was added for a rain shower, handheld fixture, and diverter for better comfort.
Custom-built shower, featuring a dry-off area and recessed wall niche for convenience, was installed. Durable waterproofing and backer board were added to prepare the space for new tile installation.
The new shower features Wave Blanco 13x24 Matte tile, installed in a horizontal straight stack pattern with Arctic White grout and Schluter Jolly Bright White trim. On the accent wall, Anthology Euphoria Crave Serenity Glass tile adds depth and subtle texture, tying the design together beautifully.
For the floor, Walker Zanger Continuum Grey 2x2 Anti-Slip mosaic tile provides both safety and modern appeal. A brushed nickel tile-in drain by Ebbe Legacy complements the new Delta Pivotal fixtures in Lumicoat Stainless, creating a sleek, cohesive finish throughout.
The existing vanity, toilet, flooring, and block window were kept in place to balance function and budget. The updated frameless glass enclosure without a door gives the shower a spacious, spa-like feel while maintaining easy access.
This remodel completely transformed David’s bathroom from dark and dated to bright, refined, and inviting. The new shower brings a sense of calm and usability, turning his daily routine into a comfortable and enjoyable experience.
 Phoenix Home Remodeling
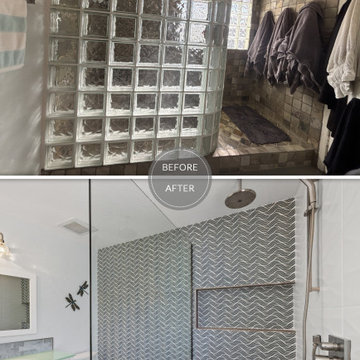
David wanted to remove his outdated shower design and replace it with a cleaner, more open look that matched the rest of his home’s style.
A bulky glass block wall and dark tile made the space feel closed off and dated. The old materials were removed to the studs, and new plumbing was added for a rain shower, handheld fixture, and diverter for better comfort.
Custom-built shower, featuring a dry-off area and recessed wall niche for convenience, was installed. Durable waterproofing and backer board were added to prepare the space for new tile installation.
The new shower features Wave Blanco 13x24 Matte tile, installed in a horizontal straight stack pattern with Arctic White grout and Schluter Jolly Bright White trim. On the accent wall, Anthology Euphoria Crave Serenity Glass tile adds depth and subtle texture, tying the design together beautifully.
For the floor, Walker Zanger Continuum Grey 2x2 Anti-Slip mosaic tile provides both safety and modern appeal. A brushed nickel tile-in drain by Ebbe Legacy complements the new Delta Pivotal fixtures in Lumicoat Stainless, creating a sleek, cohesive finish throughout.
The existing vanity, toilet, flooring, and block window were kept in place to balance function and budget. The updated frameless glass enclosure without a door gives the shower a spacious, spa-like feel while maintaining easy access.
This remodel completely transformed David’s bathroom from dark and dated to bright, refined, and inviting. The new shower brings a sense of calm and usability, turning his daily routine into a comfortable and enjoyable experience.

 Arbordale Landscaping Ltd
Stepping stones in a minimal gravel paved area lead past two lounge chairs to the intimate dining area. The herringbone-patterned limestone patio dissipates into a lush planting bed filled with loose swaths of shade-loving perennials and seasonal bulbs. Beech hedging, and formal clipped evergreens, surround the space and provide privacy, structure and winter interest to the garden. On axis to the main interior living space of the home, the fountain, is the focal point of the garden. A limestone water wall featuring an engraved pattern of fallen Honey Locust leaves nods to the centrally located mature Honey Locust tree that anchors the garden. Water, flowing down the wall, falls a short distance into a pool with a submerged limestone panel. The light noise of the falling water helps soften the sounds of the bustling downtown neighbourhood, creating a tranquil back drop for living and entertaining.
Sponsored
Plain City, OH

Kuhns Contracting, Inc.
Central Ohio's Trusted Home Remodeler Specializing in Kitchens & Baths

 User
Oblong Natural stone vessel sink COCOON SUNNY - 19-2/3" x 15" x 6" - genuine interior decoration beige sunny yellow marble. The "Exceptional" cut in the block without any comparison with plastic and other chemical resin market often unaffordable. You will definitely not let anyone feel indifferent with this 100% natural stone unique in the US and exclusively available on Living'ROC.net.
Reference: BB503YE-US
Model: COCOON SUNNY
Color: Beige
Shape: Oval - oblong
Finish: honed inside and outside
US Dimensions: 19-2/3" x 15" x 6"
US Drain size: standard hole size (1.5")
Material: marble grade A (sunny yellow)

 E_ Designs
Tired of doing laundry in an unfinished rugged basement? These homeowner's were as well! They contacted Castle to help them with their basement planning and build for a finished laundry space and new bathroom with shower.
After the designer and client walked through ideas to improve flow of space, we decided to eliminate the existing 1/2 bath in the family room, and move the new bathroom into the existing laundry room. The full laundry room was finished to include new walls, ceilings, new plumbing, new Adura luxury vinyl tile flooring, beautiful shaker style cabinetry with beadboard panel, Glossy white Cultured marble countertops, a new Blanco composite sink, and Kohler Bellera faucet.
In the new bathroom space, we continued the Adura luxury vinyl flooring. Finishes in the bathroom include Kohler Memoirs pedestal sink, Kohler Archer faucet, custom hex tile shower floor, subway tile walls, and custom frameless glass shower enclosure.
Additional improvements were made to improve the health of the home including asbestos tile abatement, new drain tile and sump pump, new spray foam insulation, new glass block window, and a new Panasonic bathroom fan. We also decided to save and restore some original pieces in the home like their existing 5-panel doors and repurposing one salvaged door into a pocket door for the new bathroom.
The homeowner completed the basement finish with new carpeting in the family room. The whole basement feels fresh, new, and has a great flow. They will enjoy their happy and healthy home for years to come.
 Pennsylvania Landscape & Nursery Association
Plantique, INC http://www.plantique.com
Entry Name: Classic Fireside Getaway
2014 PLNA Awards for Landscape Excellence Winner
Category: Hardscaping-Residential $30,000-$60,000
Award Level: Bronze
Photo Description:
The initial call from these homeowners was about a drainage issue. After having installed new roofing, siding, and a new porch enclosure, it was discovered that the original piping for the downspouts had failed. A few recent rainstorms had left a large pool of water behind the house. The new gutters and downspouts were now properly channeling water into a sub-surface piping system that no longer functioned. Obviously this had to be fixed, but after some further discussions, it was suggested that if a cost-effective solution could be found, perhaps a patio could be created along with the drainage solution. This would make the space between the porch and the pool more useful. The surfaces would have to be as kid-friendly as possible, as the homeowners foresaw frequent visits by their grandchildren. The flow of the spaces would have to be such that small bikes would be able to easily maneuver around chairs and tables.
After a site study was conducted, several issues were discovered. Pertaining to the drainage issue, it was determined that the grade sloped directly toward the porch from the pool. This not only channeled water toward the house and porch, but created a dam in an already shallow drainage swale that trapped water off to the side of the porch. Since the soil in this area is predominantly clay, water could sit in that area for days until it drained away. On the aesthetic side, a good part of the house’s façade was brick, the porch floor was brick, the small patio and walkways were brick, and the seating wall next to the pool was brick; there was a lot of brick. The challenge would be to find a cost-effective material that would contrast will with the brick, while creating a functional patio space that also facilitated water drainage.
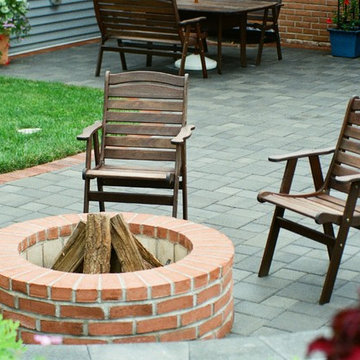
The solution involved a significant re-grading of the area between the pool and the house, along with the installation of a completely new drain system to channel roof water away from the area. Working with the fixed points of the porch and foundation levels of the home, the slope that pitched toward the house was cut into to create a positive pitch away from the house. This created 20 in. high cut at the furthest point from the porch. To retain this, a segmental retaining wall block was used to form a curved seating wall around a mortared brick fire ring, perfect for evening campfires and marshmallow roasting with the grandchildren. Prior to the patio construction, new subsurface PVC piping was installed to channel water away from the house, under the patio, and to daylight about 100 ft. further into the side yard where it could properly drain. To construct the patio, the existing dry laid brick walks and patio were recycled as a border around a gray colored concrete paver that mimics the look of more expensive PA Bluestone, an often used companion to brick. The smooth surface texture and tight joint provide a barefoot friendly walking surface that stays cooler in the hot summer sun. The patio itself is also pitched so as to drain runoff to the lower end of the yard in case of a failure in the drain piping.
Along with providing several clear pathways between the porch, pool, and driveway the new patio includes an open air dining area, a fire pit area, and a seating/lounging area (not yet furnished at the time of the photo) for larger family gatherings or more intimate dinners and fire-side relaxation.
Photo Credit: Plantique, Mike Wimmer

 Castle Building & Remodeling
Tired of doing laundry in an unfinished rugged basement? The owners of this 1922 Seward Minneapolis home were as well! They contacted Castle to help them with their basement planning and build for a finished laundry space and new bathroom with shower.
Changes were first made to improve the health of the home. Asbestos tile flooring/glue was abated and the following items were added: a sump pump and drain tile, spray foam insulation, a glass block window, and a Panasonic bathroom fan.
After the designer and client walked through ideas to improve flow of the space, we decided to eliminate the existing 1/2 bath in the family room and build the new 3/4 bathroom within the existing laundry room. This allowed the family room to be enlarged.
Plumbing fixtures in the bathroom include a Kohler, Memoirs® Stately 24″ pedestal bathroom sink, Kohler, Archer® sink faucet and showerhead in polished chrome, and a Kohler, Highline® Comfort Height® toilet with Class Five® flush technology.
American Olean 1″ hex tile was installed in the shower’s floor, and subway tile on shower walls all the way up to the ceiling. A custom frameless glass shower enclosure finishes the sleek, open design.
Highly wear-resistant Adura luxury vinyl tile flooring runs throughout the entire bathroom and laundry room areas.
The full laundry room was finished to include new walls and ceilings. Beautiful shaker-style cabinetry with beadboard panels in white linen was chosen, along with glossy white cultured marble countertops from Central Marble, a Blanco, Precis 27″ single bowl granite composite sink in cafe brown, and a Kohler, Bellera® sink faucet.
We also decided to save and restore some original pieces in the home, like their existing 5-panel doors; one of which was repurposed into a pocket door for the new bathroom.
The homeowners completed the basement finish with new carpeting in the family room. The whole basement feels fresh, new, and has a great flow. They will enjoy their healthy, happy home for years to come.
Designed by: Emily Blonigen
See full details, including before photos at https://www.castlebri.com/basements/project-3378-1/
Sponsored
Columbus, OH
Hope Restoration & General Contracting
Columbus Design-Build, Kitchen & Bath Remodeling, Historic Renovations

 Simply Baths & Kitchens
A long & narrow master bathroom & closet gets a stylish, sophisticated upgrade from designer Rachel Peterson of Simply Baths, Inc. The former bathroom & closet combination was dark and cluttered, lacking in personality and in great need of a refresh. Combining the homeowner's vision and Peterson's creative expertise, Simply Baths transformed the bathroom into a soothing transitional space that is both wonderfully luxurious and perfectly restrained.

 Paradise Found Construction
Karen and Jeff wanted to convert their original 1980’s bathroom into a modern looking fully wheelchair accessible bathroom with a barrier-free entry into the shower and separate water closet. They liked the design technique of combining a shower and tub into one “wet area” while keeping the accessibility features.
We got to work designing a bathroom layout that would work with the existing main drain system in the home. We wanted to bring in as much daylight into the bathroom without compromising daylight in the shower and tub area.
Our solution was to incorporate interior acrylic “glass block” awning windows in the design of the shower and tub area to bring in daylight without compromising privacy. The modern stand alone tub with floor mounted tub filler, shower head/sprayer on a slide bar, shower caddy for soap and shampoo, and bench seat combined to create a wonderfully accessible and functional bathing area.
 Phoenix Home Remodeling
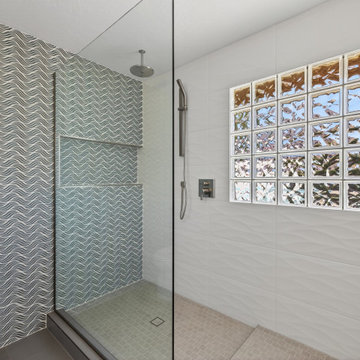
David wanted to remove his outdated shower design and replace it with a cleaner, more open look that matched the rest of his home’s style.
A bulky glass block wall and dark tile made the space feel closed off and dated. The old materials were removed to the studs, and new plumbing was added for a rain shower, handheld fixture, and diverter for better comfort.
Custom-built shower, featuring a dry-off area and recessed wall niche for convenience, was installed. Durable waterproofing and backer board were added to prepare the space for new tile installation.
The new shower features Wave Blanco 13x24 Matte tile, installed in a horizontal straight stack pattern with Arctic White grout and Schluter Jolly Bright White trim. On the accent wall, Anthology Euphoria Crave Serenity Glass tile adds depth and subtle texture, tying the design together beautifully.
For the floor, Walker Zanger Continuum Grey 2x2 Anti-Slip mosaic tile provides both safety and modern appeal. A brushed nickel tile-in drain by Ebbe Legacy complements the new Delta Pivotal fixtures in Lumicoat Stainless, creating a sleek, cohesive finish throughout.
The existing vanity, toilet, flooring, and block window were kept in place to balance function and budget. The updated frameless glass enclosure without a door gives the shower a spacious, spa-like feel while maintaining easy access.
This remodel completely transformed David’s bathroom from dark and dated to bright, refined, and inviting. The new shower brings a sense of calm and usability, turning his daily routine into a comfortable and enjoyable experience.
60