
Search results for "Blocked drains" in Home Design Ideas

 E.L. Designs
Needing a tranquil getaway? This bathroom is just that - with matte glass mosaics in the best beachy blue tones, fresh white cabinetry, wood plank tile, flat pebble tile for the shower floor, and amazing amenities including heated floors, a heated towel rack and natural light galore, why would you ever leave? What’s a great master bath without plenty of storage? In addition to the great cabinets, we have handy niches everywhere you could possibly need one, and with all of these great details, could you even tell that this bathroom is fully accessible? That’s right, we’ve got a barrier free shower, grab bars, and plenty of floor space to maneuver, around it all!

 MK Remodeling & Design
For this modern master bathroom, we worked extensively with the client to capture his vision of the bathroom and brought our expertise and finishing touches to bear. The master bathroom features floating SOLLiD Cabinetry Frameless Series – Elegante II Satin X cabinets. We added the central stacked cabinet for additional storage since there was minimal space in the bathroom and existing closet. The cabinet pulls are Key West Jeffrey Alexander by Hardware Resources and the countertops are Pental Quartz Misterio. The modern effect is finished off with motion activated under cabinet lighting
For the rest of the space, we removed the water closet to open the space and bring in more natural light from the existing window. We also removed the existing glass block and added a larger bathroom window for more natural lighting and a larger feel for the space. We replaced the tub deck and bathtub with a Whitehaus free standing tub and used two framed columns in the shower to add separation without closing off the space for the dual shower heads the client wanted. The clear frameless glass finishes off the shower enclosure while still maintaining sightlines through to the back of the space. Finally, a barn door was added to lend privacy to the space without sacrificing active areas.
The finishes are all geared toward a modern aesthetic with Alfi Brand plumbing fixtures (we love the large square rain head!), LED Recessed lights, subway tile and grey wood plank tile. The barn door is a Rustica Hardware 5 Panel door with a stainless steel Industric handle and a stainless steel Bent Strap track painted to match the cabinets.
Shane Baker Studios

 The Boutique Real Estate Group
WOW WOW WOW, A flat piece of property in La Habra Heights! Owner just finished making many improvements including but not limited to new dual pane energy efficient windows, new granite counter tops, new stainless appliances and new fascia and rain gutters. This home is ready for you and your large family. Three of the four bedrooms are masters with their own bathrooms. Every room is extremely large and hardwood floors run throughout the whole home. The yard has just been seeded so grass will be filling in shortly. New sprinkler systems all around the property. Block walls wrap all the way around keeping your pets and children safe and making sure all the LHH critters stay out. 4 car garage, easy RV Parking with hookups and tons of parking. Make sure to check out the floor plan in the pictures. Come see this one before it's gone.
Find the right local pro for your project
 MK Remodeling & Design
For this modern master bathroom, we worked extensively with the client to capture his vision of the bathroom and brought our expertise and finishing touches to bear. The master bathroom features floating SOLLiD Cabinetry Frameless Series – Elegante II Satin X cabinets. We added the central stacked cabinet for additional storage since there was minimal space in the bathroom and existing closet. The cabinet pulls are Key West Jeffrey Alexander by Hardware Resources and the countertops are Pental Quartz Misterio. The modern effect is finished off with motion activated under cabinet lighting
For the rest of the space, we removed the water closet to open the space and bring in more natural light from the existing window. We also removed the existing glass block and added a larger bathroom window for more natural lighting and a larger feel for the space. We replaced the tub deck and bathtub with a Whitehaus free standing tub and used two framed columns in the shower to add separation without closing off the space for the dual shower heads the client wanted. The clear frameless glass finishes off the shower enclosure while still maintaining sightlines through to the back of the space. Finally, a barn door was added to lend privacy to the space without sacrificing active areas.
The finishes are all geared toward a modern aesthetic with Alfi Brand plumbing fixtures (we love the large square rain head!), LED Recessed lights, subway tile and grey wood plank tile. The barn door is a Rustica Hardware 5 Panel door with a stainless steel Industric handle and a stainless steel Bent Strap track painted to match the cabinets.
Shane Baker Studios

 Angela Todd Studios | Portland, OR
Although our empty nester clients were still enjoying their custom home they had lived in for nearly 30 years, they had outgrown their once state-of-the-art 1980s master bathroom.
Our master bathroom facelift transformed a bathroom with carpet, wallpaper, glass block tiles, and a 30 year old Jacuzzi. It transformed into a clean lined, yet warm and inviting space that still worked with the home’s contemporary architecture. Our selections started with a natural stone for the vanity, and selecting Sapele wood cabinetry for both it’s textured lines and color qualities. Our next step was our hardware and fittings – knowing we wanted both function and visual appeal.
We relocated the double vanities at the center of the room, and installed the shower on the other side of the wall creating a circular passage for flow. The integrated sinks make a statement at the vanity – as well as the large apron of stone surrounding the face of the cabinetry. Wall mount faucets, and matte textured tile running vertically complete the look.
The free-standing vessel tub leaves a lasting impression against the windows. Corner cabinetry and shelves add both storage and visual appeal. Tucked in the corner an upholstered bench, yet more storage and built in jewelry organization.
Large format porcelain floor tiles were installed with a smooth skimstone application on the shower floor. Amenities and special touches in the bathroom include radiant heating, LED lighting under the cabinets and behind the vanity mirrors, a large format thermostat controlled towel bar, a linear drain in the shower, and a wall mounted energy efficient toilet.
For more about Angela Todd Studios, click here: https://www.angelatoddstudios.com/
To learn more about this project, click here: https://www.angelatoddstudios.com/portfolio/cedar-hills-master-suite/

 Ancient Surfaces
Wall Cladding Stone by 'Ancient Surfaces'
Product: Antique 'Umbria' Wall Cladding Stone
Contacts: (212) 461-0245
Email: Sales@ancientsurfaces.com
Website: www.AncientSurfaces.com
The Antique Reclaimed 'Umbria' Limestone Wall Cladding selection is unique in its blend and authenticity, rare in it's hardness and beauty.
Draping your inside and outside walls with the 'Umbria' Stone, gives you a feel of timelessness allowing you to travel back in time into the untouched North Mediterranean domains of fallen Empires and ancient bustling coastal trading villages, where a mercantile class have built some of the most luxurious estates out of the breath taking local stone blocks all along the shoreline of Southern Europe.
This exclusive 'Ancient Surfaces' stone wall cladding blend might just be the missing link needed to transform your home from a logging space to your dream space...

 C.E. Pontz Sons
The fall has snuck up on us rather quick but not before we had a final summer day to show off this amazing outdoor living project we just recently completed. This outdoor living project included pricing to excavation and installation of a ledge rock retaining wall around the perimeter of the property. The wall included the step area, large retaining walls, proper drainage behind the wall, and wall caps. After the wall was installed we constructed the sitting wall and natural stone ‘dive rock’. the sitting wall was constructed on concrete footings, with concrete block core, faced with natural stone veneer matching stone used on pool, and capped with 2″ natural flagstone. The dive rock was set on existing pool beam and concrete slab poured behind pool beam. Installation of the landscape, grading, seeding, sodding, and landscape lighting was completed around the pool area. All plants and trees were installed in new landscape beds with mulch, decorative river stone was installed between the fence and wall across back of pool area, and all disturbed areas outside of fence were graded and seeded. All lawn areas inside of the fence were sodded. A broken flagstone path was installed from concrete patio to steps in wall, and a low natural limestone boulder wall for raised planter at egress window was also installed. A low voltage LED lighting system (FX Luxor Zoning/Dimming/Color) was installed with under cap lights installed in sitting wall (Zoning/Dimming/Color) and in existing stair treads (Zoning/Dimming) to screen porch, up lights/wash lights installed on select trees (Zoning/Dimming/Color), and path lights (Zoning) installed at concrete steps, along back of patio, and wall steps. Additional drainage including adding a drain box for the Sump pump outlet pipe and adding an underground pipe to the downspout near the pool equipment and fence gate was also installed.

 C.E. Pontz Sons
The fall has snuck up on us rather quick but not before we had a final summer day to show off this amazing outdoor living project we just recently completed. This outdoor living project included pricing to excavation and installation of a ledge rock retaining wall around the perimeter of the property. The wall included the step area, large retaining walls, proper drainage behind the wall, and wall caps. After the wall was installed we constructed the sitting wall and natural stone ‘dive rock’. the sitting wall was constructed on concrete footings, with concrete block core, faced with natural stone veneer matching stone used on pool, and capped with 2″ natural flagstone. The dive rock was set on existing pool beam and concrete slab poured behind pool beam. Installation of the landscape, grading, seeding, sodding, and landscape lighting was completed around the pool area. All plants and trees were installed in new landscape beds with mulch, decorative river stone was installed between the fence and wall across back of pool area, and all disturbed areas outside of fence were graded and seeded. All lawn areas inside of the fence were sodded. A broken flagstone path was installed from concrete patio to steps in wall, and a low natural limestone boulder wall for raised planter at egress window was also installed. A low voltage LED lighting system (FX Luxor Zoning/Dimming/Color) was installed with under cap lights installed in sitting wall (Zoning/Dimming/Color) and in existing stair treads (Zoning/Dimming) to screen porch, up lights/wash lights installed on select trees (Zoning/Dimming/Color), and path lights (Zoning) installed at concrete steps, along back of patio, and wall steps. Additional drainage including adding a drain box for the Sump pump outlet pipe and adding an underground pipe to the downspout near the pool equipment and fence gate was also installed.
 MK Remodeling & Design
For this modern master bathroom, we worked extensively with the client to capture his vision of the bathroom and brought our expertise and finishing touches to bear. The master bathroom features floating SOLLiD Cabinetry Frameless Series – Elegante II Satin X cabinets. We added the central stacked cabinet for additional storage since there was minimal space in the bathroom and existing closet. The cabinet pulls are Key West Jeffrey Alexander by Hardware Resources and the countertops are Pental Quartz Misterio. The modern effect is finished off with motion activated under cabinet lighting
For the rest of the space, we removed the water closet to open the space and bring in more natural light from the existing window. We also removed the existing glass block and added a larger bathroom window for more natural lighting and a larger feel for the space. We replaced the tub deck and bathtub with a Whitehaus free standing tub and used two framed columns in the shower to add separation without closing off the space for the dual shower heads the client wanted. The clear frameless glass finishes off the shower enclosure while still maintaining sightlines through to the back of the space. Finally, a barn door was added to lend privacy to the space without sacrificing active areas.
The finishes are all geared toward a modern aesthetic with Alfi Brand plumbing fixtures (we love the large square rain head!), LED Recessed lights, subway tile and grey wood plank tile. The barn door is a Rustica Hardware 5 Panel door with a stainless steel Industric handle and a stainless steel Bent Strap track painted to match the cabinets.
Shane Baker Studios

 John
Coco coir is a versatile and sustainable growing medium that is gaining popularity among gardeners. Made from the fibrous husk of coconuts, it’s an eco-friendly alternative to peat moss and can greatly enhance the quality of your soil. In gardening, it is often utilized in systems like Coco Coir Hydroponic, where it helps create an efficient water and nutrient delivery system.
What is Coco Coir?
Coco coir is a natural fiber extracted from coconut husks. It has a neutral pH, excellent water retention, and is reusable, making it a favorite among gardeners who prefer organic and sustainable practices. It is available in different forms such as blocks, bricks, or loose coir, each requiring some preparation before use in gardening.
Benefits of Using Coco Coir in Gardening
Coco coir offers several advantages for gardening. Here are the benefits of using coco coir in gardening:
Holds up to 10 times its weight in water, ensuring plants have consistent moisture.
Promotes oxygen flow to plant roots, leading to healthier root systems.
Coco coir is a renewable and eco-friendly alternative to peat moss.
It can be washed, rehydrated, and reused, reducing waste.
Naturally pH neutral, making it suitable for various plants without major adjustments.
Enhances the texture and moisture retention of garden soil.
How to Prepare Coco Coir for Planting
Preparing coco coir for planting involves a few essential steps. First, you need to hydrate the coir block, as it typically comes in a compressed form. Place the block in a large container and add warm water, allowing the block to expand and absorb the water. Once fully expanded, the coir should be fluffed up by breaking it apart with your hands or a tool to ensure it becomes loose and airy. After the coir has been fluffed, it is important to drain any excess water, as overly wet coir can lead to root suffocation. Finally, since coco coir is inert and does not contain nutrients, it’s a good idea to add organic compost or liquid fertilizer to enrich the coir before planting.
Do You Need to Soak Coco Coir Before Planting?
Yes, soaking coco coir before planting is necessary. Since it comes in a compressed form, it needs to be broken down and hydrated for proper use. The soaking process allows the coir to expand and release the fibers, making it usable as a growing medium. After soaking, the coir should be fluffed to ensure the water is evenly distributed. Draining any excess water is crucial because overly wet coir may impede plant root health.
How to Prepare Coco Peat for Planting
Coco peat, a fine, powdery form of coco coir, is highly beneficial for seed starting and improving water retention in soil. To prepare coco peat, it first needs to be hydrated, similar to how you prepare coir blocks. Slowly add water to the peat in a container and allow it to absorb and fluff up. Once hydrated, coco peat can be used on its own or mixed with other growing media such as perlite or vermiculite for added aeration and drainage. It is advisable to check the pH level of your final mix, as coco peat generally has a neutral pH, but adjustments may be necessary depending on the plants being grown.
Can You Use Just Coco Coir for Plants?
Yes, coco coir can be used by itself to grow plants, especially in hydroponic systems or as a seed-starting medium. However, because coco coir does not naturally contain nutrients, you will need to provide regular fertilizer to support plant growth. This makes it particularly suitable for plants grown in controlled environments, such as hydroponics, where nutrient solutions can be carefully managed. In traditional soil-based gardening, mixing coco coir with other organic materials like compost is recommended to provide essential nutrients and improve the overall soil structure.
How to Use Coco Coir in Hydroponics
Coco coir is widely used in hydroponic systems due to its water retention and aeration properties. To use coco coir in hydroponics, it first needs to be soaked and hydrated, as discussed earlier. Once the coir is fully prepared, it can be placed in the hydroponic system. Since coco coir does not contain natural nutrients, you will need to supply a balanced nutrient solution tailored for hydroponic plants. Regular monitoring of water and nutrient levels is essential to prevent nutrient imbalances or root rot. One of the benefits of coco coir in hydroponics is its reusability. After completing a growing cycle, the coir can be washed, rehydrated, and used again in future plantings.
Using Coco Coir as a Soil Amendment
Coco coir is also an excellent soil amendment, as it improves the texture and moisture retention of garden soil. To use coco coir in this way, mix loose coir with your existing garden soil at a ratio of one part coco coir to two parts soil. This will help retain moisture without compacting the soil, improving both water drainage and root growth. For optimal results, you can also add organic compost to the mix, ensuring that the nutrient levels are sufficient for plant growth. Coco coir works particularly well in raised beds, where it helps maintain proper soil structure over time.
Advantages of Using Coco Coir Over Peat Moss
While peat moss has been traditionally used as a growing medium, coco coir offers several advantages over it. Coco coir is a renewable resource, as it is a byproduct of coconut processing, while peat moss is harvested from peat bogs that take centuries to regenerate. Coco coir is also more durable, as it can be reused multiple times without breaking down, while peat moss disintegrates after a single use. Another key benefit is its neutral pH, whereas peat moss is more acidic and may require balancing to meet the needs of specific plants.
Conclusion
Coco coir is a highly versatile and sustainable growing medium that benefits both novice and experienced gardeners alike. Whether you are using it for hydroponics, as a soil amendment, or as a standalone medium for growing plants, knowing how to properly prepare and use it is key to maximizing its benefits. By following the steps detailed above, you can improve water retention, aeration, and overall plant health in your garden, all while contributing to eco-friendly gardening practices.

 brooksBerry & Associates Kitchens and Baths
Photography by Alise O'Brien
Kitchen - rustic kitchen idea in St Louis
Kitchen - rustic kitchen idea in St Louis

 DreamMaker Bath & Kitchen
Glass tiled walls and charcoal grey ceramic floor tile contrast beautifully in this mid-century modern master bath!
1960s green tile ceramic tile walk-in shower photo in Detroit with green walls
1960s green tile ceramic tile walk-in shower photo in Detroit with green walls

 Kitchen Design Concepts
KITCHEN
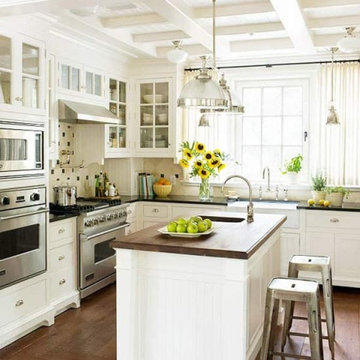
Cabinets: The kitchen perimeter features Elmwood Full Access all wood cabinetry with the perimeter in Coventry 3" Rail 3/8" Panel door style, Paint Grade cabinets, and a finish of Dove White Matte paint. The island is a Malpensa 3" Rail Raised Panel door style, Maplewood, and a finish of Dove White Matte paint.
Countertop: The 3cm countertops on the perimeter is a 2 cm Caesarstone Calacatta Nuvo, with the island in a 1-1/2” Teak Butcher Block.
Backsplash: The main backsplash tile is a Renaissance Tile, 6x6 Mercer Bead Board, White finish, in straight lay. Above the range we have Renaissance Tile, PTMT-66XE 6x6, in a custom color. The border is a Renaissance tile PTDC-VDot rail.
Fixtures and Fittings: From Blanco, we have 30” Cerana Fireclay apron front single bowl sink in White. From Newport Brass, a Chesterfield Kitchen Faucet with Side Spray 943 15S in Satin Nickel, Chesterfield Pot Filler- wall mount 9482 15S in Satin Nickel, and a Chesterfield Hot & Cold Water Dispenser 108 15S in Satin Nickel.
MASTER BATH
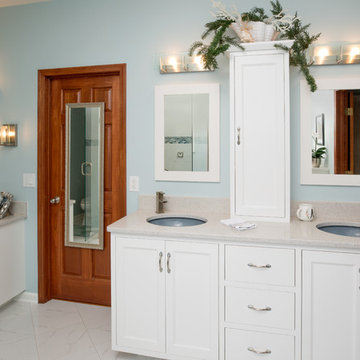
Cabinets: The cabinets feature Elmwood Full Access All Wood, Chamberlain door style, Paint Grade cabinets, with a finish of Dove White matte paint.
Countertop: The 3cm countertops are a 2 cm Caesarstone Calacatta Nuvo.
Tile: The bath and vanity area floor features Arizona Tile Manhattan Marble 12-1/4"x12-1/4" Polished Cordoba Pattern mesh in a straight lay. The walls feature Arizona Tile Manhattan Marble 12x12 Polished tile cut to 6 x12 tile in a brick lay pattern, and a Arizona Tile Manhattan Marble 2x12 ogee molding as chair rail.
Fixtures and Fittings: From Kohler, Iron Plains Dual-mount bath sinks K-5400-0 in White. From Newport brass, Jacobean Widespread Lavatory Faucets 2470 15S in Satin Nickel, Jacobean Exposed Tub & Hand Shower Set - Wall Mount 2400-4283 15S in Satin Nickel, Fairfield Floor Riser Kit for Exposed Tub & Hand Shower Set 3-196 in Satin Nickel, Fairfield Stabilizer 2-734 15S- Satin Nickel; 3/4" Shut off valves for 3-196 and 3-226 (1 pair) 3-192 15S in Satin Nickel, and Brass Tank Lever/Faucet Handle 2-645 15S in Satin Nickel. From Victoria and Albert, a Shropshire Tub with Brushed nickel feet SHR-N-SW and Brushed Nickel Drain STD-UNIBN. Lastly, from TOTO, Eco Promenade® Two-Piece Toilet, 1.28 GPF, Elongated Bowl CST424EFG#01 in Cotton, and a SoftClose® Toilet Seat - Elongated SS114#01 in Cotton
Sponsored
Plain City, OH

Kuhns Contracting, Inc.
Central Ohio's Trusted Home Remodeler Specializing in Kitchens & Baths

 Wilson AC & Appliance
Revolutionary in function and design; the Galley Sink will become the most useful space in your kitchen - in fact, the smaller the kitchen, the more important the Galley Sink work station becomes!
The Galley Sink is engineered with 16 gauge stainless steel, double sound insulated, with an angel hair finish (best for clean up and resistant to water spots!). The two tiered design allows the custom accessories on the bottom tier to maneuver out of the way, without having to be removed from the sink. You can even create more counter space by placing the cutting boards completely across the upper tier.
Fill the entire sink with ice (or use the in sink divider) for use as an ice buffet to serve drinks, chilled food and condiments. Imagine food preparation, serving, and clean up all in one convenient space.
 C.E. Pontz Sons
The fall has snuck up on us rather quick but not before we had a final summer day to show off this amazing outdoor living project we just recently completed. This outdoor living project included pricing to excavation and installation of a ledge rock retaining wall around the perimeter of the property. The wall included the step area, large retaining walls, proper drainage behind the wall, and wall caps. After the wall was installed we constructed the sitting wall and natural stone ‘dive rock’. the sitting wall was constructed on concrete footings, with concrete block core, faced with natural stone veneer matching stone used on pool, and capped with 2″ natural flagstone. The dive rock was set on existing pool beam and concrete slab poured behind pool beam. Installation of the landscape, grading, seeding, sodding, and landscape lighting was completed around the pool area. All plants and trees were installed in new landscape beds with mulch, decorative river stone was installed between the fence and wall across back of pool area, and all disturbed areas outside of fence were graded and seeded. All lawn areas inside of the fence were sodded. A broken flagstone path was installed from concrete patio to steps in wall, and a low natural limestone boulder wall for raised planter at egress window was also installed. A low voltage LED lighting system (FX Luxor Zoning/Dimming/Color) was installed with under cap lights installed in sitting wall (Zoning/Dimming/Color) and in existing stair treads (Zoning/Dimming) to screen porch, up lights/wash lights installed on select trees (Zoning/Dimming/Color), and path lights (Zoning) installed at concrete steps, along back of patio, and wall steps. Additional drainage including adding a drain box for the Sump pump outlet pipe and adding an underground pipe to the downspout near the pool equipment and fence gate was also installed.
 MK Remodeling & Design
For this modern master bathroom, we worked extensively with the client to capture his vision of the bathroom and brought our expertise and finishing touches to bear. The master bathroom features floating SOLLiD Cabinetry Frameless Series – Elegante II Satin X cabinets. We added the central stacked cabinet for additional storage since there was minimal space in the bathroom and existing closet. The cabinet pulls are Key West Jeffrey Alexander by Hardware Resources and the countertops are Pental Quartz Misterio. The modern effect is finished off with motion activated under cabinet lighting
For the rest of the space, we removed the water closet to open the space and bring in more natural light from the existing window. We also removed the existing glass block and added a larger bathroom window for more natural lighting and a larger feel for the space. We replaced the tub deck and bathtub with a Whitehaus free standing tub and used two framed columns in the shower to add separation without closing off the space for the dual shower heads the client wanted. The clear frameless glass finishes off the shower enclosure while still maintaining sightlines through to the back of the space. Finally, a barn door was added to lend privacy to the space without sacrificing active areas.
The finishes are all geared toward a modern aesthetic with Alfi Brand plumbing fixtures (we love the large square rain head!), LED Recessed lights, subway tile and grey wood plank tile. The barn door is a Rustica Hardware 5 Panel door with a stainless steel Industric handle and a stainless steel Bent Strap track painted to match the cabinets.
Shane Baker Studios
 Ulrich Inc
Ulrich designer: Julia Kleyman
Photography by: ozzie(rvoiiiphoto.com)
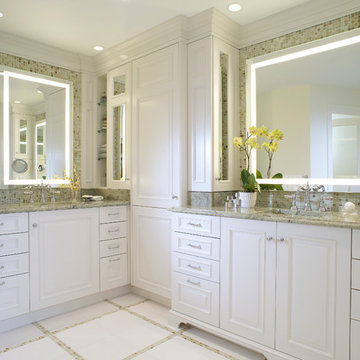
A “his” and “hers” area were a priority. We created a separate toilet room and two vanity areas using beautiful cabinetry - designed with interiors that addressed their individual storage needs – makeup, toiletries, and a hamper and shared linen storage. The tall linen closet provides the perfect separation between the lady’s and gentleman’s areas. Two slender wall cabinets resting on marble bases atop the vanities and alongside the linen closet soften the transition from one area to another while providing discrete storage. The gentleman’s area had a little more space allowing for an open shelf area – perfect for display of small objects. Thasos tile was perfect for the client’s desire to have a crisp white look. We used it on the floor and combined it with glass glazed porcelain tile in the shower. Polished green onyx mosaic was used as a border accent on the shower wall, around the vanity mirrors and on the electric heated floor. Together they create a soft and harmonious statement.
Electric mirrors with built-in lighting create a pattern of rectangles along the perimeter of the room. This strong rectangular design element flows from the frosted glass of the door to private toilet room opposite the vanities, to the existing window, moving to “his” mirror, “her” mirror, to the clear glass shower panel, and finishes dramatically at the shower wall mural. Green Surf granite was chosen for the countertops. The onyx backsplash, a mosaic composition of beautiful green, white and cream, was the connecting design element bringing the drams of the countertop color vertically to the walls. The floating shower seat and shower jambs in Caesar Stone add a distinctive but soft transition from the main bath area to the shower. This seamless flow passes in to the shower through an open doorway and a clear glass panel. A linear drain gives a clean, architectural look and blocking for the future grab bar installation has been located in the shower wall. Crisp bright painted cabinetry and polished chrome hardware complete this bright, sophisticated and highly functional bathroom.
Sponsored
Columbus, OH

Hope Restoration & General Contracting
Columbus Design-Build, Kitchen & Bath Remodeling, Historic Renovations

 BSIIG/Options Online
San Diego Historical 1910 craftman home
Inspiration for a small craftsman bathroom remodel in San Diego
Inspiration for a small craftsman bathroom remodel in San Diego
 MK Remodeling & Design
For this modern master bathroom, we worked extensively with the client to capture his vision of the bathroom and brought our expertise and finishing touches to bear. The master bathroom features floating SOLLiD Cabinetry Frameless Series – Elegante II Satin X cabinets. We added the central stacked cabinet for additional storage since there was minimal space in the bathroom and existing closet. The cabinet pulls are Key West Jeffrey Alexander by Hardware Resources and the countertops are Pental Quartz Misterio. The modern effect is finished off with motion activated under cabinet lighting
For the rest of the space, we removed the water closet to open the space and bring in more natural light from the existing window. We also removed the existing glass block and added a larger bathroom window for more natural lighting and a larger feel for the space. We replaced the tub deck and bathtub with a Whitehaus free standing tub and used two framed columns in the shower to add separation without closing off the space for the dual shower heads the client wanted. The clear frameless glass finishes off the shower enclosure while still maintaining sightlines through to the back of the space. Finally, a barn door was added to lend privacy to the space without sacrificing active areas.
The finishes are all geared toward a modern aesthetic with Alfi Brand plumbing fixtures (we love the large square rain head!), LED Recessed lights, subway tile and grey wood plank tile. The barn door is a Rustica Hardware 5 Panel door with a stainless steel Industric handle and a stainless steel Bent Strap track painted to match the cabinets.
Shane Baker Studios
 C.E. Pontz Sons
The fall has snuck up on us rather quick but not before we had a final summer day to show off this amazing outdoor living project we just recently completed. This outdoor living project included pricing to excavation and installation of a ledge rock retaining wall around the perimeter of the property. The wall included the step area, large retaining walls, proper drainage behind the wall, and wall caps. After the wall was installed we constructed the sitting wall and natural stone ‘dive rock’. the sitting wall was constructed on concrete footings, with concrete block core, faced with natural stone veneer matching stone used on pool, and capped with 2″ natural flagstone. The dive rock was set on existing pool beam and concrete slab poured behind pool beam. Installation of the landscape, grading, seeding, sodding, and landscape lighting was completed around the pool area. All plants and trees were installed in new landscape beds with mulch, decorative river stone was installed between the fence and wall across back of pool area, and all disturbed areas outside of fence were graded and seeded. All lawn areas inside of the fence were sodded. A broken flagstone path was installed from concrete patio to steps in wall, and a low natural limestone boulder wall for raised planter at egress window was also installed. A low voltage LED lighting system (FX Luxor Zoning/Dimming/Color) was installed with under cap lights installed in sitting wall (Zoning/Dimming/Color) and in existing stair treads (Zoning/Dimming) to screen porch, up lights/wash lights installed on select trees (Zoning/Dimming/Color), and path lights (Zoning) installed at concrete steps, along back of patio, and wall steps. Additional drainage including adding a drain box for the Sump pump outlet pipe and adding an underground pipe to the downspout near the pool equipment and fence gate was also installed.
71