
Search results for "Breathable" in Home Design Ideas

 RST Brands
The versatility of the Portofino Comfort Collection is enhanced by this pair of armless chairs that can easily expand the width of a single sofa, or extend the length of a corner seating sectional. The durable aluminum frame features a hand-woven polyethylene wicker that will withstand the elements, providing you with years of comfort in your outdoor space. Sink in and relax with true deep seating featuring 6-inch thick Sunbrella® fabrics wrapped over high density cushions with accent toss pillows.
Features:
Set includes two armless chairs with cushions and four accent pillows.
Constructed from durable SolarFast® all-weather resin wicker engineered for outdoor use, hand-woven over a strong and lightweight powder-coated aluminum frame
Luxurious 5-inch thick outdoor cushions are wrapped in Sunbrella® fabric.
Engineered high density foam cushions feature a breathable mesh bottom and integrated Velcro strap system to hold cushions securely in place.
UV, weather and color fast fade resistant.
Designed for use in both hot and cold climates.
Easy to clean with mild soap and water.
Designed to coordinate with the pieces in the Portofino Comfort Collection in Taupe Mist.
 RST Brands
Gather outside on the new 7-piece Modular Sofa Sectional offering superior style, quality and value in outdoor living. Personalize your space by arranging the components as a wrap-around U and create comfortable conversation space for your guests, or rearrange the lightweight components to fit your personal needs. Sink into true deep seating with plush 6-inch thick Sunbrella wrapped cushions and accent toss pillows with rich contrast piping. New stone top veneer conversation table provides plenty of space for refreshments and libations to entertain your guests.
Features:
Set includes two 48-inch sofa ends, two corner chairs, two armless chairs, and a stone top coffee table.
Durable, all-weather SolarFast® resin wicker is engineered for outdoor use, and hand-woven over a strong and lightweight powder-coated aluminum frame.
High density, quick drying foam cushions in Sunbrella® fabric ensure comfort and convenience.
Cushions feature breathable mesh bottom with integrated Velcro® strap system to hold cushions securely in place.
Easy to clean with mild soap and water.
Designed to coordinate with the pieces in the Portofino Comfort Collection in Heather Beige.
 RST Brands
The versatility of the Portofino Comfort Collection is enhanced by this pair of armless chairs that can easily expand the width of a single sofa, or extend the length of a corner seating sectional. The durable aluminum frame features a hand-woven polyethylene wicker that will withstand the elements, providing you with years of comfort in your outdoor space. Sink in and relax with true deep seating featuring 6-inch thick Sunbrella® fabrics wrapped over high density cushions with accent toss pillows.
Features:
Set includes two armless chairs with cushions and four accent pillows.
Constructed from durable SolarFast® all-weather resin wicker engineered for outdoor use, hand-woven over a strong and lightweight powder-coated aluminum frame
Luxurious 5-inch thick outdoor cushions are wrapped in Sunbrella® fabric.
Engineered high density foam cushions feature a breathable mesh bottom and integrated Velcro strap system to hold cushions securely in place.
UV, weather and color fast fade resistant.
Designed for use in both hot and cold climates.
Easy to clean with mild soap and water.
Designed to coordinate with the pieces in the Portofino Comfort Collection in Taupe Mist.
Find the right local pro for your project
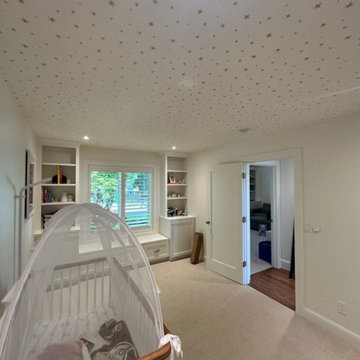
 One Pro Wallpaper Hangers Team
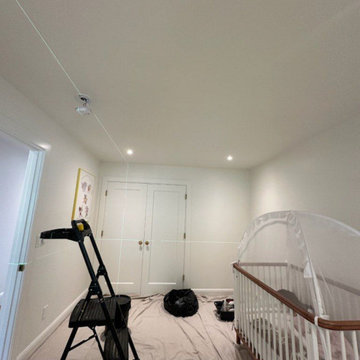
Create a dreamy retreat for your little one with custom nursery wallpaper installation from Fresno County’s trusted wallpaper installer. Specializing in wallpapering that blends Central Valley charm with safe, soothing designs—perfect for Selma’s growing families.
Nursery-Specific Services:
✔ Non-toxic wallpaper install (GREENGUARD certified materials)
✔ Peel and stick wallpaper (safe for rentals, easy to update)
✔ Whimsical accent walls (woodland animals, celestial themes)
✔ Custom murals (fruit orchard scenes, storybook characters)
✔ Soft-textured wallpapers (tactile learning surfaces)
✔ Glow-in-the-dark constellations
Why Selma Parents Choose Us:
✓ 10+ years creating nurseries in the Valley
✓ Expertise in safe, breathable materials
✓ Special rounded-corner installations
✓ Quick, low-odor installations for sensitive babies
Serving Selma & Surrounding Areas:
Downtown • North Selma • Northside • Floral • East Selma
 One Pro Wallpaper Hangers Team
Create a dreamy retreat for your little one with custom nursery wallpaper installation from Fresno County’s trusted wallpaper installer. Specializing in wallpapering that blends Central Valley charm with safe, soothing designs—perfect for Selma’s growing families.
Nursery-Specific Services:
✔ Non-toxic wallpaper install (GREENGUARD certified materials)
✔ Peel and stick wallpaper (safe for rentals, easy to update)
✔ Whimsical accent walls (woodland animals, celestial themes)
✔ Custom murals (fruit orchard scenes, storybook characters)
✔ Soft-textured wallpapers (tactile learning surfaces)
✔ Glow-in-the-dark constellations
Why Selma Parents Choose Us:
✓ 10+ years creating nurseries in the Valley
✓ Expertise in safe, breathable materials
✓ Special rounded-corner installations
✓ Quick, low-odor installations for sensitive babies
Serving Selma & Surrounding Areas:
Downtown • North Selma • Northside • Floral • East Selma
 Country Floors
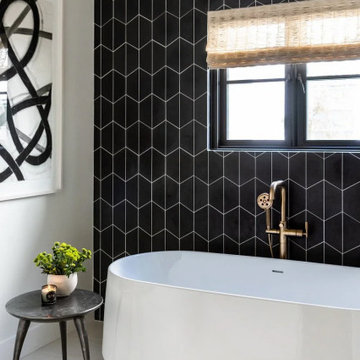
This stunning modern bathroom corner illustrates the power of high-contrast minimalist design. The focal point is a floor-to-ceiling geometric tile wall in a deep matte charcoal, featuring a unique elongated hex pattern that adds architectural rhythm and texture to the space.
Perfectly balanced against the dark verticality of the black tile, a sleek freestanding tub offers a clean, white sculptural silhouette. The inclusion of champagne bronze or brass floor-mounted fixtures introduces a warm, matte black finish alternative, lending a touch of contemporary opulence to the scene.
To soften the bold geometry, we integrated organic elements: a natural woven window shade that filters light beautifully, and a minimalist side table topped with natural stone. This curated mix of materials—from the crisp lines of the abstract art to the soft curves of the porcelain—defines a truly high-end luxury bathroom experience. It’s a retreat designed for the design-conscious homeowner who values a contemporary interior that is both bold and breathable.
 RST Brands
Create a beautiful outdoor living space with the complete Portofino Comfort 17-piece Estate Dining Set. Gather outside, relax and entertain with everything you need to sit, lounge and dine outdoors. Sink into true deep seating with plush and thick Sunbrella® wrapped cushions with coordinating accent toss pillows. Kick back on the cushioned chaise loungers with side table, chat among the 7-piece deep seating group, or enjoy the perfect outdoor meal on the stone top 7-piece dining table.
Features:
Set includes 7-piece Deep Seating Set with a one-piece sofa, club chairs, coordinated accent toss pillows, ottomans, coffee and side table, 3-piece deluxe woven contour wave lounges with cushions and side table, and a 7-piece dining group with cushions.
Durable, all-weather SolarFast® resin wicker is engineered for outdoor use, and hand-woven over a strong and lightweight powder-coated aluminum frame.
Designed to sit deep with ample back support.
Engineered cushions feature breathable mesh bottom with integrated Velcro® strap system to hold cushions securely in place.
Designed for both hot and cold climates.
Easy to clean with mild soap and water.
 Hastens & American Mattress
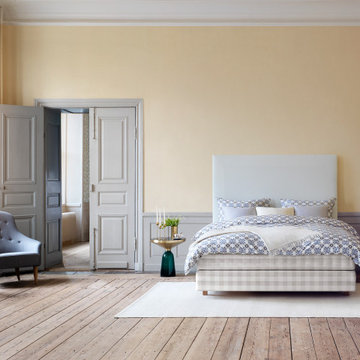
The Tamerlan Headboard by celebrated Swedish designer Yvonne Börjesson is a striking fusion of classic sophistication and modern refinement. Handcrafted with the same uncompromising attention to detail as every Hästens bed, the Tamerlan adds architectural elegance and a sense of serenity to any sleep sanctuary.
Featuring a gently arched silhouette and refined vertical channels, the Tamerlan is designed to complement both traditional and contemporary interiors. It is fully upholstered in your choice of Hästens’ exclusive natural fabrics, ensuring the headboard breathes and supports the same wellness philosophy as the bed itself.
Key Features:
Designed exclusively for Hästens by Yvonne Börjesson
Soft, curved profile with timeless vertical channeling
Hand-upholstered in Hästens’ natural, breathable fabrics
Available in a variety of heights, fabrics, and finishes
Pairs seamlessly with all Hästens bed models
Elevate your bedroom with a statement of elegance and harmony.

 Chicology
 Roman Shades create an elegant backdrop enhancing the appeal of any room. Letting in just the right amount of light, the natural woven fabric is soft to the touch, presenting a breathable, airy look.
Naturally woven with a unique texture, these shades provide added beauty and depth to any room. Designed to be light filtering during the day and privacy at night, the neutral color is sure to complement virtually any decor. With soft and elegant folds when rolled up, it’s beautifully stylish - standalone or with curtains.
Installation is very easy as the valance and shade come pre-assembled. Just install the brackets and insert the shade. Capable of either inside or outside mount, this shade is durable and ideal for living room, kitchen, bedroom, dining room, sun porch, powder room, family room, and more.
Measurement: Pre-Cut The width includes a half inch deduction

 Studio Munroe
Photography by Thomas Kuoh
Inspiration for a contemporary home design remodel in San Francisco
Inspiration for a contemporary home design remodel in San Francisco
 New Explode Construction
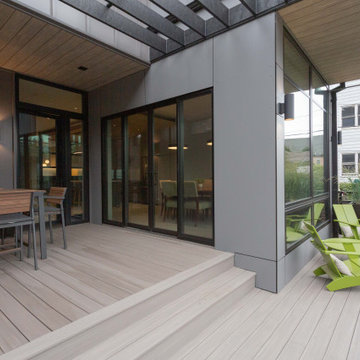
This outdoor space at Chicago Contemporary Home 22 was designed with versatility and elevated comfort in mind. A true extension of the home's modern interior, this multi-zone deck invites connection, conversation, and calm—no matter the season.
Wrapped in natural-toned composite decking, the space is thoughtfully split into distinct functions: a shaded dining area, a central lounge for quiet moments, and playful seating for laid-back evenings with friends. Slatted ceiling details offer structured protection from sun and rain, while recessed lighting and wall sconces provide evening ambiance without overwhelming the simplicity of the space.
What sets this space apart is its intentionality—every line, texture, and material was chosen to flow seamlessly with the home's interior design, while still feeling distinctly outdoors. It's livable, breathable, and completely custom—built for moments that matter.
New Explode Construction believes in building spaces that aren't just beautiful—they're usable, personal, and memorable. This is outdoor living done right.

 Hold It Contemporary Home
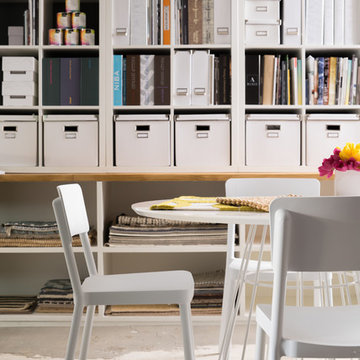
Lam is an extending table characterized by distinctive lines and metal details merging with a wooden frame. The characteristics of both these materials are enhanced and perfectly integrated in this piece of furniture: metal is used for the structural components, while wood is used for the top thanks to its sensory properties and the comfortable feeling that it provides. This table features a perfectly integrated system concealed in the frame: the legs slide to one side allowing the extension leaf, in the same color as the top, to be positioned into place. In this way the legs always remain at the corners and their aesthetic value, given by their diagonal position and the coated metal profile, is highlighted.
The Lam Dining Table is accompanied by the Ms4 Polypropylene Dining Chair, also by Calligaris.

 Advance Design Studio, Ltd.
Jennifer and Dan have lived in their Deer Park Illinois home for 15 years, slowly making minor fixes like painting and decorating; but they had a new plan for their kitchen the entire time. An awkwardly placed garage door, and an island cooktop with a terrible downdraft made a full-scale kitchen remodel an absolute must. Jennifer had many ideas in mind and wanted to work with a company that could provide high-end work, while partnering with a designer that would tailor the kitchen to her ideas.
She was intrigued by the phrase “Common Sense Remodeling” in Advance Design’s feature she discovered while perusing an issue of the community’s Quintessential Barrington Magazine. Doing further research on the company’s website, as she looked through project profiles and read about Advance Design’s “Common Sense Remodeling” philosophy, she promptly scheduled an appointment to see if the people and ideas she read about were truly who they said they were. The more she read, the more she knew that the “Common Sense” approach to remodeling they described was exactly the type of company she was looking for.
The partnership was sealed after an initial consultation with Owner Todd Jurs and Project Designer Michelle Lecinski. They displayed a combination of friendliness, professionalism and respect that was unmatched by any of the other companies Jennifer talked to. She knew that with Advance Design, she would be able to retain the vision that she had in mind with high-quality craftsmanship.
“I reached out to Advance Design because of the ‘Common Sense Remodeling’ tagline,” Jennifer said. “That’s what lingered for me”. “Advance Design was the most respectful- of the house and of my design ideas, and the most professional of the handful of companies that looked at my project”.
Soon after the meeting Jennifer began working with Michelle on the project design. They quickly developed chemistry. Jennifer loved how Michelle researched and located every detail that Jennifer wanted for the kitchen. Between the two of them, every concept and idea was worked through and perfected. “Jennifer had definite ideas about what she wanted the new kitchen to look like, she just didn’t know how to bring it all together. We worked together really well to make her ideas into the practical reality necessary for a well-functioning kitchen, with the look and feel that she had envisioned”, says Michelle.
“Michelle was wonderful in using the CAD system she would show me new drawings every time we changed the layout while working through the design,” Jennifer said. “She was a really wonderful partner in execution, she made sure everything happened quickly and easily.”
The finished design drew out elements of Jennifer’s style and personality. The pair call the look “sophisticated farmhouse” to describe the kitchen renovation to family and friends. The result was a beautifully crafted, authentic-feeling space that satisfied Jennifer’s dreams 15 years in the making. The whole project consisted of a kitchen remodel, mudroom upgrade with powder room, and garage entry relocation. “The projects I personally like the best, are the ones that put the client’s dreams on display,” Project Designer Michelle said. “And this is one of those projects.”
The main focal point of the kitchen is custom zinc and brass ventilation hood with a vintage sheen, which was hand made to order by a small company in Indiana named Vogler Metalworking. “It’s like sculpture, a true work of art”, says Jennifer. Your eye is immediately drawn towards this elegant yet practical hood that eliminated the home’s downdraft problem and added a striking conversation piece at the same time. The carpenters had to use special gloves when transporting and installing it, so they didn’t smudge it with fingerprints. The beautiful hood centers proudly over the stunning black enamel and brass LaCornue Range. “I had a friend who had a LaCornue range and after learning how easy it was to cook perfect meals, I was convinced I wanted to have one”, says Jennifer. This unique, breathtaking combination anchors the entire kitchen and is apparent immediately as you walk into the great room the surrounds the space.
DuraSupreme Crestwood cabinets with a Kendall Panel add function and sophistication. A custom gray paint color paired with a storm blue was developed so that the new kitchen looked like it belonged to the existing space. Unlacquered brass faucets and hardware were important to Jennifer because she wanted the living finishes to age over time. Remarkable brass diamond mesh cabinet door inserts imported from the UK continue to add this one-of-a-kind kitchen renovation; giving it a “you won’t see this everywhere” quality. The use of old railcar flooring for the coffee bar countertop and reclaimed oak for the open shelving gives an authenticity to the space uncommon in kitchens today.
Jennifer and Michelle fell in love with the Limestone Grey Stone while they were investigating unique island countertop ideas. They liked the fact that the limestone as a living finish will age and change over time. Calcutta Miel Quartz countertops made for an excellent pairing around the perimeter, as it’s durable and perfect for cooking preparations. A textured white subway tile backsplash that runs to the ceiling keeps your eye moving towards the open shelving, and to the main focal point of the stunning range hood combination.
“The kitchen functions beautifully, and it’s gorgeous,” beams Jennifer as she gestures with both hands while smiling ear to ear. “The most important thing was I wanted a kitchen that had a wonderful flow, cooked beautiful meals and was a great gathering place for family and friends, and this space does that perfectly! Beauty wise, it turned out exactly how I had envisioned. I felt the function part was the hardest part, and that was nailed”!
Relocating the garage entry to the new mudroom was a huge priority and has finally separated the family’s arriving home functions from their kitchen. Now coats and shoes and bags have their own area for dropping once members arrive home. Matching gray DuraSupreme cabinetry helped create gorgeous, purposeful lockers for the family. A reclaimed vintage sink and custom wall paper were added to the tiny powder room to beautify the once previously only functional space. Advance Design was even able to create a custom space for their dog to sleep while the family is away.
“It was unbelievable that a project of this size was completed in such a short time, and I think that’s because of the large amount of planning and preparation that went into it,” Jennifer marveled, “When we started, we were ready, and everything was prepared”.
When it came to execution, Project Manager Justin Davis and his crew were quick, accessible, and organized. Projects like this kitchen are typically completed in as little as 8-10 weeks. Jennifer’s kitchen however despite the relocation of some challenging HVAC in a soffit and moving of an exterior door was completed remarkably fast in part because the team was working with an existing tile floor that ran throughout the first floor that the client really loved.
“You get to know these people really well because they’re living in your house while you’re living in your house. They were so fast and really good, it didn’t take as long as even planned” reported Jennifer. “I would text Justin and he always responded almost immediately. I got to know all the guys who were working in our house and they were all wonderful people”.
Details in a customized kitchen like this one require skill and care from the people who install it. “All the guys on the job were skilled at what the did. I wanted small details like little feet to look like furniture, that is where their carpentry skill came in to make these all perfect”, said Jennifer. “The tile guys were wonderful. They even let me determine how I wanted the texture with the grout to appear for a salt and pepper look; now that is a very skilled trade person making it custom”.
In Jennifer’s interview, she continued to reference Advance Design’s “Common Sense Remodeling”, so I took a minute to ask her exactly what that phrase meant to her and how it played out in her experience with her project and the Advance Design team. Here is what she said: “I was intrigued about Common Sense Remodeling and in my head that there would be clear costs and prices, great communication between the design team, the execution team and me”, said Jennifer. They did deliver on that, it was so clear about the cost breakdown, what I could expect from everyone who came to my house, and everything that we had ordered. That to me is the Common Sense”!
It’s great to see a client take literally our assertion that a well-planned remodeling project is simply “Common Sense”! She anticipated each step of the way would be clear, concise, and predictable, all the while protecting the outcome due to the careful upfront planning. “Advance Design delivered on their ‘Common Sense Remodeling’ promise,” Jennifer said. “From the design team, to the execution team - everything was straight forward like I imagined. The project turned out exactly how I envisioned, I enjoyed this process and absolutely would recommend Advance Design Studio to anyone.”
 Tile Doctor Ltd
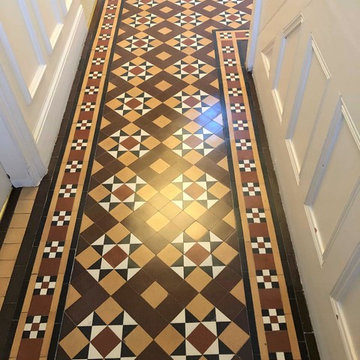
It’s not just major restoration work we do at Tile Doctor, sometimes a simple clean and seal is all that is required and that was the case at this property in Evesham. This medieval market town lies within the Vale of Evesham and is encompassed by the River Avon. It is located between the larger towns of Worcester, Cheltenham and Stratford-upon-Avon.
I was contacted by the owner and I arranged a visit to view their Victorian Hallway. The floor was in very good condition, but the previous sealer was now in-effective and the floor was dull and needed a good clean and seal. The colours were starting to fade, and it was due some attention. Sealers do wear off over time so if you have a similar floor to this it’s worth bearing that in mind. We discussed the work required and the cost involved, my quote was accepted, and the work scheduled.
On arrival I set up my equipment and covered any areas of carpet to protect from splashing during cleaning. I then used Tile Doctor Remove and Go spraying the product onto the floor allowing it to dwell for 10 minutes thus breaking down any sealers. This product is a non-flammable, multi-purpose stripper which works best when left to soak in for some time before scrubbing. This product is also great for drawing out ingrained stains and removing heavy grease build up.
The floor was then pasted with Tile Doctor Acid Gel which works to neutralise any alkaline salts in the tiles that can cause efflorescence later. This is a common issue with old floors which often do not have a damp proof membrane in place. I then went to work with my scrubbing machine and a black pad and worked the products into the tile. The resulting slurry was then rinsed off with water and removed with a wet vacuum.
I then went over the floor with microfibres and water to remove any remaining marks before leaving it to dry off overnight and ready for sealing.
I returned the following day and started by checking the floor was dry using a moisture meter. To seal the floor, I chose Tile Doctor Seal and Go Extra which is a fully breathable semi- gloss sealer which made a huge difference to the floor. Choosing a fully breathable sealer is important for floors that don’t have a damp proof membrane as you want to encourage any dampness to rise through the tile and not get trapped underneath where it might spread into the walls.
The deep clean and new seal brought out the vibrant colours in the tiles which were now shining through enhances by the lovely sheen which customer was very pleased with.
For aftercare I left the customer with a bottle of Tile Doctor Neutral Tile Cleaner which being concentrated goes a long way. Once diluted with water the product becomes completely pH neutral which unlike most household cleaners and washing up liquids which contain bleaches won’t prematurely degrade the sealer with use.
Mark Conway
Worcestershire Tile Doctor
 Tile Doctor Ltd
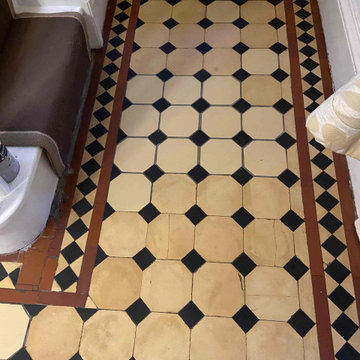
Detailed below is the restoration of a Victorian tiled hallway floor that we started back in June in Preston. Although we started in June there was so much damage to the subfloor and the tiles it took some time to complete, additionally, the client did not like the colour samples of the replacement tiles we had brought along and so decided to source their own which took some time.
Three months later with replacement tiles now sourced we were given the go ahead to start the restoration. The first day’s focus was cleaning the original floor using very coarse 100-grit and 200-grit Diamond pads fitted to a rotary buffer machine and applied to the floor using a strong dilution of Tile Doctor Remove and Go to add extra cleaning power. Tile edges were given special attention using a flex machine fitted with small diamond grit pads.
The floor was rinsed with water to remove the soil generated and this was followed up with an acid rinse using a 1:3 dilution of Tile Doctor Grout Clean Up. This last step in the cleaning process is especially recommend for old floors like this which don’t have a damp proof membrane and can suffer from efflorescence issues.
The next stage focused on repairing the floor and started by carefully knocking out all the broken and chipped tiles. We had previously estimated over 30 tiles needed replacing and so the client had bought two boxes, meaning I had plenty of spares to work with.
Before tiling however, the subfloor had suffered over the years and needed attention first. To deal with this the damaged areas were raked out, cleaned up and then back filled with rapid setting self-levelling screed from Mapie adhesives. Once the sub-base was fixed then we put the new tiles back in, they were not an exact match, about 5mm too short and lighter in tone, but the colour was pretty close.
Tiling an old Victorian floor like this can be a bit like dominoes as you move one out of place 2 decent ones come loose and then they also need refixing. Some of the tiles had hair line cracks in them and once they were loose, they just cracked in half. As such the 20 spare tiles that I thought were spare came into good use and I actually ended up using all of them. I could have done with a few more so it was decided to reset the last four broken tiles and grout them in. Luckily for me the client was very understanding about the nature of tile restoration and had accepted that there would be some imperfections and they were not expecting a new floor.
The Tiles were fixed down using Ultralite Rapid Flex (another product from Mapie) and then grouted using the same adhesive (not a grout, as they did not have grout back in the day, just cement and screed).
The floor was left this to cure overnight, and we came back the next day to finish the clean using a 200-grit diamond pad fitted to a buffing machine and lubricated with water, then one last acid rinse to get the tiles as clean as possible and remove any lingering grout haze. This last clean helps to blend the new tiles in with the original.
Before applying a protective sealer, the floor was left to dry for a couple of days, the tiles need to be thoroughly dry before sealing or you can end up with a patchy appearance.
For this floor with no damp proof membrane, it was important to use a fully breathable sealer that will allow moisture to rise through the tile and evaporate at the surface, so Tile Doctor Colour Grow was chosen. This is a good choice for old floors like this as its fully breathable, head wearing, and it contains a colour enhancer that improves the overall appearance of the tile.
Three coats of Tile Doctor Colour Grow which is a fully breathable, colour enhancing sealer hat works by soaking into the pores of the tile protecting it from within. It has a matt finish, and it works really well with all clay tiles and is ideal for these types of floors.
You can probably spot the lighter coloured tiles in the after photos on this page, however it’s a very subtle difference and I think they have blended in quite well with the original. Certainly, my client was very pleased with the newly restored floor, its completely transformed from when we first visited the client, and the floor has now gained character and history. For aftercare we recommend Tile Doctor Neutral Cleaner, its an effective pH neutral product that is compatible with the new sealer.
Russell Taylor
Lancashire Tile Doctor

 CBH Architects
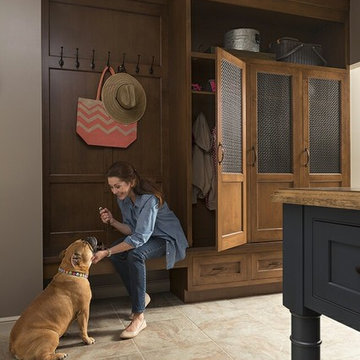
New mudroom on rear of 1875 home. Mudroom was part of an addition featuring a new powder room. Back door opens to deck beyond. Mudroom features plenty of storage closets, dark oak bench, wire mesh cabinet doors, oiled bronze hardware and a reclaimed brick floor. Construction by Murphy Construction; photo by Greg Martz.
 Tile Doctor Ltd
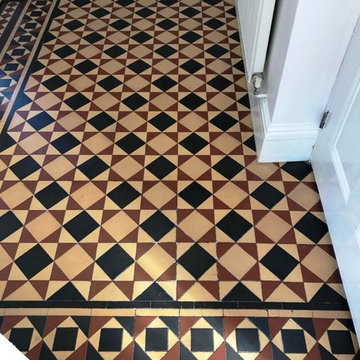
I was recently contacted by the owner of this Minton Victorian tiled floor in Kidderminster. The tiles had been covered over with carpet which I suspect was due to some the tiles being missing. Now uncovered it was stained with glue and carpet underlay was still stuck to the tiles in places. The owner was keen to have the floor fully restored including replacing damaged and missing tiles. We can replace missing or damaged tiles however the problem with old Victorian floors is finding matching replacements due to the unique patterns that many have. Fortunately, due to the popularity of Victorian tiles there are several suppliers who sell reproductions and occasionally you can find originals on ebay.
I went over to survey the floor an could see the tiles were certainly in need of some love and care. As part of the visit I carried out a test clean on a patch of the floor and the results were very satisfactory, so the owner asked me to go ahead.
On the day of arrival my first job was to spray the floor with neat Tile Doctor Remove and Go, this is a powerful cleaner/stripper which set to work on removing the glue and carpet underlay, this product will also remove any old sealer. I then left the solution to dwell and worked the chemical in with my buffer and a black pad removing the slurry with a wet and dry vacuum.
The tiles were then treated to an acid wash using Tile Doctor Acid Gel to further clean them and counter any potential efflorescence problem which is a problem with floors of this age that were installed without a damp-proof membrane. The product was scrubbed into the tile and grout, rinsed off with water and then extracted with the wet vacuum.
Once the floor was clean, I checked the colour of the tiles so I could cut and replace the missing section. I had managed to source some tiles that were a close match and set about cutting all the tiles to size and then fitted them using a flexible rapid set adhesive. The newly laid tiles needed to set, and the floor needed to dry out before we could apply the sealer.
The floor was left to dry overnight, on my return in the morning I tested the floor with a damp meter to check the moisture levels and ensure it was dry enough for sealing. I was satisfied it was dry so was able to proceed and seal the floor. Five coats of Tile Doctor Seal and Go Extra were applied which takes a lot of time as you need to wait for the previous coat to dry before applying the next. This product is a semi-gloss breathable sealer which gives a nice sheen to the tiles and fully protects them. It really allowed the colours and detail of the pattern to shine through and being breathable it will cope with any moisture rising though the floor.
The client was very happy with the overall finish and was really pleased that the Victorian tiles were now restored to their original appearance. It a fact that original features like these are in demand and add a lot of value to a property.
Mark Conway
Worcestershire Tile Doctor
 RST Brands
Create a beautiful outdoor living space with the complete Portofino Comfort 18-piece Estate Dining Set. Gather outside, relax and entertain with everything you need to sit, lounge and dine outdoors. Sink into true deep seating with plush and thick Sunbrella® wrapped cushions with coordinating accent toss pillows. Kick back on the cushioned chaise loungers with side table, chat amongst the 7-piece deep seating group, or enjoy the perfect outdoor meal on the stone top 7-piece dining table complete with an oversized dining umbrella.
Features:
Set includes 7-piece Deep Seating Set with a one-piece sofa, club chairs, coordinated accent toss pillows, ottomans, coffee and side table, 3-piece deluxe woven contour wave lounges with cushions and side table, 7-piece dining group with cushions, and an oversized dining umbrella.
Durable, all-weather SolarFast® resin wicker is engineered for outdoor use, and hand-woven over a strong and lightweight powder-coated aluminum frame.
Designed to sit deep with ample back support.
Engineered cushions feature breathable mesh bottom with integrated Velcro® strap system to hold cushions securely in place.
Designed for both hot and cold climates.
Easy to clean with mild soap and water.
 Tile Doctor Ltd
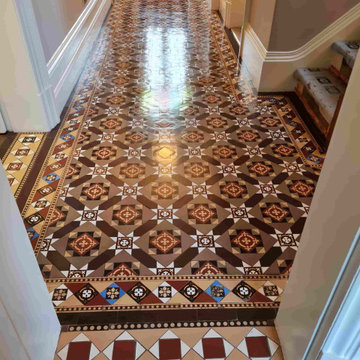
I was recently contacted by a client who had just moved into a large Victorian property in the West Cheshire village of Tarvin about renovating their Victorian tiled hallway. Apparently, the floor was in good condition, and it would just be a case of removing what was left of the old sealer, deep cleaning the tiles and then applying a fresh seal. Unless the floor has been regularly maintained with the same sealer it’s important to remove all traces of old sealers before applying fresh.
Victorian Hallway Before Cleaning Tarvin Cheshire
A lot of the work we do at Tile Doctor can be a lot more involved, often requiring the sourcing of matching replacement tiles and rebuilding large sections of tiled flooring so straight forward clean and seal job is always welcome.
To remove what was left of the sealer and the ingrained dirt from the pores of the Victorian tile I dressed the floor with a strong dilution of Tile Doctor Pro-Clean. On this occasion I used a 1:3 dilution with water and applied it to the floor with a mop. I left it to soak into the tile for fifteen minutes before scrubbing so it could get to work breaking down the old sealer.
During this time, I set up a weighted floor buffer and fitted a black buffing pad, these pads are designed for scrubbing hard floors and lifting out the dirt. I applied a little water as required during this process to ensure the pad was lubricated. Shortly the cleaning solution darkened as the old sealer and dirt was released from the tile.
The soil was rinsed away with water and then removed using a wet vacuum. Once clear the floor was inspected and the process repeated until I was satisfied it was as clean as it could be and free of sealer.
I left the floor to dry off overnight and returned the next day to apply a new sealer. Before doing so however I like to use a damp meter to take moisture readings from the floor. This is needed to ensure it is dry enough to seal which is important as any moisture in the tile can affect the sealer and lead to an inconsistent finish.
To seal I started with the application of a single coat of Tile Doctor Colour Grow which is a colour intensifying breathable impregnator that soaks into the tile improving appearance and adding protection from within. Any excess sealant was removed by wiping the floor with a microfibre cloth and then it was left to dry for an hour.
This was followed with four coats of Tile Doctor Seal and Go Extra which is an acrylic breathable sealer which adds a pleasing subtle shine to the tile. This is an important feature when choosing a sealer for old floors where moisture needs to be allowed to rise through the tile, otherwise it can become trapped under the floor and reach out to the walls causing rising damp.
The customer was very happy with the revamped hallway which made the house a lot brighter and welcoming. Before closing I should mention that for aftercare cleaning I recommend Tile Doctor Neutral cleaner which is designed for the daily cleaning for sealed tiles, this is important as most domestic supermarket cleaners are simply too strong and can prematurely erode the sealer.
Alastair Robb
West Cheshire Tile Doctor
30