
Search results for "Budget plan" in Home Design Ideas

 Jack Calderone
This custom kitchen is part of an adventuresome project my wife and I embarked upon to create a complete apartment in the basement of our townhouse. We designed a floor plan that creatively and efficiently used all of the 385-square-foot-space, without sacrificing beauty, comfort or function – and all without breaking the bank! To maximize our budget, we did the work ourselves and added everything from thrift store finds to DIY wall art to bring it all together.
We painted the cabinets an antique white and added visual interest with a dark glaze. This glaze adds depth to the doors and highlights the decorative bead board panels. It also creates a stunning contrast in the carved accent piece above the sink.

 Cantoni Atlanta
One can say that the redesign job on this Atlanta-area home was just what the doctor ordered, since physician Jim Linnane chose Cantoni designer Kohl Sudnikovich to help him re-imagine his 50s ranch-style residence.
Online browsing, and a fondness for modern design, led the medical professional into our Georgia store/" title="Cantoni Modern Furniture Stores" class="crosslinking">showroom after purchasing the 50s-built home in early 2011. Since then, walls were torn down, the kitchen got a facelift, a lone loft morphed in to a music room, and the fireplace got haute while the pool became cool.
As always, step one of the design process began with Kohl visiting the home to measure and scale-out floor plans. Next, ideas were tossed around and the client fell in love with the Mondrian sectional, in red. “Jim’s selection set the color scheme for the home’s living areas,” explains Kohl, “and he loves the punchy accents we added with art, both inside and out.”
“Kohl worked closely with me, from start to finish, and guided me through the entire process,” explains Jim. “He helped me find a great contractor, and I’m particularly fond of the plan he conceived to replace the dated fireplace with a more contemporary linear gas box set in striated limestone.”
Adds Kohl, “I love how we opened the loft and staircase walls by replacing them with metal and cable railings, and how we created a sitting area (in what was the dining room) to open to the living room we enhanced with mirrors.”
A creative fix, like re-facing the cabinets, drawers and door panels in the kitchen, illustrates how something simple (and not too pricey) can make a big impact.
The project, on a whole, is also a good example of how our full-service design studio and talented staff can help re-imagine and optimize your living space while working within your budget.
“Meeting and working with Kohl was such a great experience,” says Jim, in closing. “He is so talented. He came up with great design ideas to completely change the look of my home’s interior, and I think the results are amazing.” Guess what, Jim? We think the results of your collaboration with Kohl are pretty amazing, too.

 Metropolis Drafting and Construction Inc
A run down traditional 1960's home in the heart of the san Fernando valley area is a common site for home buyers in the area. so, what can you do with it you ask? A LOT! is our answer. Most first-time home buyers are on a budget when they need to remodel and we know how to maximize it. The entire exterior of the house was redone with #stucco over layer, some nice bright color for the front door to pop out and a modern garage door is a good add. the back yard gained a huge 400sq. outdoor living space with Composite Decking from Cali Bamboo and a fantastic insulated patio made from aluminum. The pool was redone with dark color pebble-tech for better temperature capture and the 0 maintenance of the material.
Inside we used water resistance wide planks European oak look-a-like laminated flooring. the floor is continues throughout the entire home (except the bathrooms of course ? ).
A gray/white and a touch of earth tones for the wall colors to bring some brightness to the house.
The center focal point of the house is the transitional farmhouse kitchen with real reclaimed wood floating shelves and custom-made island vegetables/fruits baskets on a full extension hardware.
take a look at the clean and unique countertop cloudburst-concrete by caesarstone it has a "raw" finish texture.
The master bathroom is made entirely from natural slate stone in different sizes, wall mounted modern vanity and a fantastic shower system by Signature Hardware.
Guest bathroom was lightly remodeled as well with a new 66"x36" Mariposa tub by Kohler with a single piece quartz slab installed above it.
Find the right local pro for your project

 Edgewater Design Group
As written in Northern Home & Cottage by Elizabeth Edwards
For years, Jeff and Ellen Miller spent their vacations sailing in Northern Michigan—so they had plenty of time to check out which small harbor town they might like to retire to someday. When that time arrived several years ago, they looked at properties up and down the coast and along inland lakes. When they discovered a sweet piece on the outskirts of Boyne City that included waterfront and a buildable lot, with a garage on it, across the street, they knew they’d found home. The couple figured they could find plans for their dream lake cottage online. After all, they weren’t looking to build anything grandiose. Just a small-to-medium sized contemporary Craftsman. But after an unfruitful online search they gave up, frustrated. Every plan they found had the back of the house facing the water—they needed a blueprint for a home that fronted on the water. The Millers first met the woman, Stephanie Baldwin, Owner & President of Edgewater Design Group, who solved that issue and a number of others on the 2015
Northern Home & Cottage Petoskey Area Home Tour. Baldwin’s home that year was a smart, 2000-square cottage on Crooked Lake with simple lines and a Craftsman sensibility. That home proved to the couple that Edgewater Design Group is as proficient at small homes as the larger ones they are often known for. Edgewater Design Group did indeed come up with the perfect plan for the Millers. At 2400 square feet, the simple Craftsman with its 3 bedrooms, vaulted ceiling in the great room and upstairs deck is everything the Millers wanted—including the fact that construction stayed within their budget. An extra courtesy of working with the talented design team is a screened in porch facing the lake (“She told us, of course you have to have a screened in porch,” Ellen says. “And we love it!’) Edgewater’s other touches are more subtle. The Millers wanted to keep the garage, but the home needed to be sited on a small knoll some feet away in order to capture the views of Lake Charlevoix across the street. The solution is a covered walkway and steps that are so artful they enhance the home. Another favor Baldwin did for them was to connect them with Legacy Construction, a firm known for its craftsmanship and attention to detail. The Miller home, outfitted with touches including custom molding, cherry cabinetry, a stunning custom range hood, built in shelving and custom vanities. A warm hickory floor and lovely earth-toned Craftsman-style color palette pull it all together, while a fireplace mantel hewn from a tree taken on the property rounds out this gracious lake cottage.

 ALL Renovation & Design LLC
The Deistel’s had an ultimatum: either completely renovate their home exactly the way they wanted it and stay forever – or move.
Like most homes built in that era, the kitchen was semi-dysfunctional. The pantry and appliance placement were inconvenient. The layout of the rooms was not comfortable and did not fit their lifestyle.
Before making a decision about moving, they called Amos at ALL Renovation & Design to create a remodeling plan. Amos guided them through two basic questions: “What would their ideal home look like?” And then: “What would it take to make it happen?” To help with the first question, Amos brought in Ambience by Adair as the interior designer for the project.
Amos and Adair presented a design that, if acted upon, would transform their entire first floor into their dream space.
The plan included a completely new kitchen with an efficient layout. The style of the dining room would change to match the décor of antique family heirlooms which they hoped to finally enjoy. Elegant crown molding would give the office a face-lift. And to cut down cost, they would keep the existing hardwood floors.
Amos and Adair presented a clear picture of what it would take to transform the space into a comfortable, functional living area, within the Deistel’s reasonable budget. That way, they could make an informed decision about investing in their current property versus moving.
The Deistel’s decided to move ahead with the remodel.
The ALL Renovation & Design team got right to work.
Gutting the kitchen came first. Then came new painted maple cabinets with glazed cove panels, complemented by the new Arley Bliss Element glass tile backsplash. Armstrong Alterna Mesa engineered stone tiles transformed the kitchen floor.
The carpenters creatively painted and trimmed the wainscoting in the dining room to give a flat-panel appearance, matching the style of the heirloom furniture.
The end result is a beautiful living space, with a cohesive scheme, that is both restful and practical.
 Cantoni Atlanta
One can say that the redesign job on this Atlanta-area home was just what the doctor ordered, since physician Jim Linnane chose Cantoni designer Kohl Sudnikovich to help him re-imagine his 50s ranch-style residence.
Online browsing, and a fondness for modern design, led the medical professional into our Georgia store/" title="Cantoni Modern Furniture Stores" class="crosslinking">showroom after purchasing the 50s-built home in early 2011. Since then, walls were torn down, the kitchen got a facelift, a lone loft morphed in to a music room, and the fireplace got haute while the pool became cool.
As always, step one of the design process began with Kohl visiting the home to measure and scale-out floor plans. Next, ideas were tossed around and the client fell in love with the Mondrian sectional, in red. “Jim’s selection set the color scheme for the home’s living areas,” explains Kohl, “and he loves the punchy accents we added with art, both inside and out.”
“Kohl worked closely with me, from start to finish, and guided me through the entire process,” explains Jim. “He helped me find a great contractor, and I’m particularly fond of the plan he conceived to replace the dated fireplace with a more contemporary linear gas box set in striated limestone.”
Adds Kohl, “I love how we opened the loft and staircase walls by replacing them with metal and cable railings, and how we created a sitting area (in what was the dining room) to open to the living room we enhanced with mirrors.”
A creative fix, like re-facing the cabinets, drawers and door panels in the kitchen, illustrates how something simple (and not too pricey) can make a big impact.
The project, on a whole, is also a good example of how our full-service design studio and talented staff can help re-imagine and optimize your living space while working within your budget.
“Meeting and working with Kohl was such a great experience,” says Jim, in closing. “He is so talented. He came up with great design ideas to completely change the look of my home’s interior, and I think the results are amazing.” Guess what, Jim? We think the results of your collaboration with Kohl are pretty amazing, too.
 Jay-Quinones Contracting Inc.
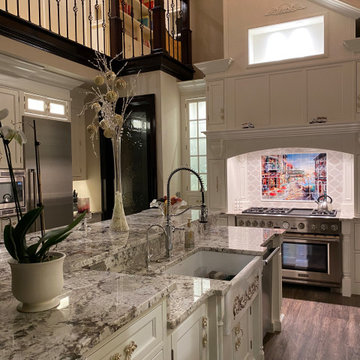
This was a complete kitchen renovation. The remodel included removing skylights and installing a two story bump up adding no square footage to the room but creating a dramatic visual even for the most discriminating designer. When you enter this kitchen your eyes wander trying to absorb the immense planning and detail that went into the renovation but ultimately you find yourself positioned under the large Theresa Maria chandelier gazing into the sky. The kitchen was designed around the 48 inch Thermador stove. The 2 story inset cabinet creation around the stove flows up into the addition creating a visual masterpiece that is only rivaled by original pieces of art works created by the likes of Van Gogh, Picasso and Rembrandt. The sink was relocated from the exterior wall and into the island so that the stove wall would be isolated and not connected any other cabinets. The 36-inch-wide refrigerator and 36-inch-wide freezer were designed and installed next to a microwave cabinet that makes heating up items as convenient as 1,2,3. The outside cabinet wall section is perfect for entertaining with the 42 inch base cabinets. The massive two-tiered island of 124 inches long is perfect for everyday family living. A farmer’s sink adds the perfect touch to this traditional design. Renovating a kitchen without ceiling detail is one of the most overlooked parts of the renovation. The amount of money spent on the renovation depends on the budget of course but I highly recommend including ceiling detail as much as one considers the tile backsplash.
Sponsored
Sunbury, OH

J.Holderby - Renovations
Franklin County's Leading General Contractors - 2X Best of Houzz!
 ALL Renovation & Design LLC
The Deistel’s had an ultimatum: either completely renovate their home exactly the way they wanted it and stay forever – or move.
Like most homes built in that era, the kitchen was semi-dysfunctional. The pantry and appliance placement were inconvenient. The layout of the rooms was not comfortable and did not fit their lifestyle.
Before making a decision about moving, they called Amos at ALL Renovation & Design to create a remodeling plan. Amos guided them through two basic questions: “What would their ideal home look like?” And then: “What would it take to make it happen?” To help with the first question, Amos brought in Ambience by Adair as the interior designer for the project.
Amos and Adair presented a design that, if acted upon, would transform their entire first floor into their dream space.
The plan included a completely new kitchen with an efficient layout. The style of the dining room would change to match the décor of antique family heirlooms which they hoped to finally enjoy. Elegant crown molding would give the office a face-lift. And to cut down cost, they would keep the existing hardwood floors.
Amos and Adair presented a clear picture of what it would take to transform the space into a comfortable, functional living area, within the Deistel’s reasonable budget. That way, they could make an informed decision about investing in their current property versus moving.
The Deistel’s decided to move ahead with the remodel.
The ALL Renovation & Design team got right to work.
Gutting the kitchen came first. Then came new painted maple cabinets with glazed cove panels, complemented by the new Arley Bliss Element glass tile backsplash. Armstrong Alterna Mesa engineered stone tiles transformed the kitchen floor.
The carpenters creatively painted and trimmed the wainscoting in the dining room to give a flat-panel appearance, matching the style of the heirloom furniture.
The end result is a beautiful living space, with a cohesive scheme, that is both restful and practical.

 Cascade West Development
Paint by Sherwin Williams
Body Color - City Loft - SW 7631
Trim Color - Custom Color - SW 8975/3535
Master Suite & Guest Bath - Site White - SW 7070
Girls' Rooms & Bath - White Beet - SW 6287
Exposed Beams & Banister Stain - Banister Beige - SW 3128-B
Wall & Floor Tile by Macadam Floor & Design
Tile Products by Florida Tile
Counter Backsplash & Shower Wall Product Streamline in Arctic Glossy
Shower Niche & Bathroom Floor Product MosaicArt Epic in Glossy White Arabesque Mosaic
Slab Countertops by Wall to Wall Stone Corp
Kitchen Quartz Product True North Calcutta
Master Suite Quartz Product True North Venato Extra
Girls' Bath Quartz Product True North Pebble Beach
All Other Quartz Product True North Light Silt
Windows by Milgard Windows & Doors
Window Product Style Line® Series
Window Supplier Troyco - Window & Door
Window Treatments by Budget Blinds
Lighting by Destination Lighting
Fixtures by Crystorama Lighting
Interior Design by Tiffany Home Design
Custom Cabinetry & Storage by Northwood Cabinets
Customized & Built by Cascade West Development
Photography by ExposioHDR Portland
Original Plans by Alan Mascord Design Associates


 Carrie Johnson
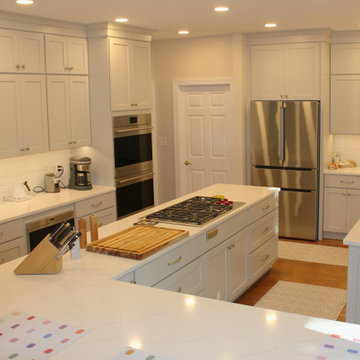
Homeowners aimed to bring the lovely outdoors into better view when they removed the two 90's dated columns that divided the kitchen from the family room and eat-in area. They also transformed the range wall when they added two wood encasement windows which frame the custom zinc hood and allow a soft light to penetrate the kitchen. Custom beaded inset cabinetry was designed with a busy family of 5 in mind. A coffee station hides behind the appliance garage, the paper towel holder is partially concealed in a rolling drawer and three custom pullout drawers with soft close hinges hold many items that would otherwise be located on the countertops or under the sink. A 48' Viking gas range took the place of a 30" electric cooktop and a Bosch microwave drawer is now located in the island to make room for a newly added beverage cooler on the fridge wall. Due to size and budget constraints, we kept the same footprint so every space was carefully planned for function and design. The family stayed true to their casual lifestyle with the black honed countertops but added a little bling with the rustic crystal chandelier, crystal prism arched sconces and calcutta gold herringbone backsplash. But the owner's favorite add was the custom island designed as an antique furniture piece with the essenza blue quartzite countertop cut with a demi-bull stepout. The kids can now sit at the ample sized counter and enjoy their breakfast or work on homework in the comfortable, cherry red swivel chairs which add a pop to the otherwise understated colors. This newly remodeled kitchen checked all of the homeowner's desires.
 Talon Construction Inc.
Renovating an open kitchen can be an exciting project that can improve the functionality, aesthetics, and value of your home. Here are some steps to guide you through the process:
Planning and Design:
Define your goals and budget for the renovation.
Determine the layout of your open kitchen. Consider factors like the work triangle (the relationship between the stove, sink, and refrigerator) and the flow of traffic.
Choose a design style and color scheme that suits your preferences and complements the rest of your home.
Research and Inspiration:
Collect inspiration from magazines, websites, and social media platforms to get ideas for your open kitchen design.
Create a mood board or vision board to help you visualize the final look.
Hiring Professionals:
Depending on the scale of your renovation, you may need to hire professionals, such as architects, interior designers, contractors, and electricians. Make sure to check references and get multiple quotes.
Demolition and Structural Work:
If your renovation involves structural changes, like removing walls, this is the time to do it. Ensure that the necessary permits are obtained.
Plumbing and Electrical Work:
Update or reconfigure plumbing and electrical systems as needed. This may include adding or moving outlets, switches, and lighting fixtures.
Cabinetry and Countertops:
Choose and install new kitchen cabinets and countertops. This is a significant part of your renovation and will greatly influence the kitchen's appearance and functionality.
Appliances:
Update or install new kitchen appliances, including the refrigerator, stove, oven, microwave, and dishwasher.
Flooring:
Select and install flooring that is suitable for a kitchen, such as hardwood, tile, laminate, or vinyl. Ensure it complements the overall design.
Backsplash and Wall Finishes:
Install a backsplash that matches your design and protects your walls. Consider materials like tile, glass, or stainless steel.
Lighting:
Choose and install various types of lighting, including ambient, task, and accent lighting. Pendant lights above an island or breakfast bar can add style and functionality.
Paint and Finishing Touches:
Paint the walls and ceiling in the colors you've selected. Add finishing touches like hardware, window treatments, and decorative elements.
Furniture and Accessories:
Bring in furniture, such as a dining table and chairs, barstools, and any other pieces you need to complete the space. Decorate with accessories like artwork, plants, and decorative items.
Final Inspection and Cleanup:
Ensure that all work meets safety and building code requirements. Clean the entire area thoroughly.
Enjoy Your New Kitchen:
Once the renovation is complete and everything is in its place, enjoy your beautiful, functional open kitchen.
Remember that open kitchen renovations can be complex and may require careful planning. It's essential to stay within your budget, communicate with your contractors and designers, and be flexible as unexpected issues may arise during the process. Ultimately, a well-executed open kitchen renovation can enhance the heart of your home and improve your overall living space.
 Allreno
In What Order Should You Renovate a Kitchen? Revolutionizing Kitchen and Bath Renovation with Allreno's Design AI
Renovating a kitchen can be one of the most exciting and rewarding home improvement projects. However, with so many decisions to make, it can also be overwhelming. From selecting kitchen cabinets to choosing countertops and appliances, the process often involves careful planning and organization. So, how do you ensure the renovation goes smoothly? One important factor is knowing the right order in which to tackle the project.
The Right Order for Kitchen Renovation
Renovating a kitchen involves multiple steps, and knowing the proper order of operations is crucial for both time efficiency and cost savings. Here’s a general guideline for how to approach your kitchen renovation:
1. Planning and Design: The first step in any renovation is planning. This includes deciding on the layout, design, and features you want in your kitchen. At this stage, you’ll also need to think about your budget and timeline. It’s essential to finalize these details before moving forward with the actual work.
2. Demolition: Once the design is set, it’s time to remove old fixtures, cabinets, appliances, and flooring. Demolition can be a messy process, but it’s necessary for starting fresh. Having a professional handle this phase is often a smart move to ensure everything is safely removed.
3. Structural Work: If you plan on altering the layout of the kitchen by knocking down walls or adding new plumbing or electrical work, now is the time to do it. Structural changes can be complicated and costly, so it’s important to ensure these are completed before installing any new elements.
4. Plumbing and Electrical Work: With the structure in place, you can begin installing plumbing and electrical systems. This might include adding new water lines, sinks, or electrical outlets for appliances. It’s best to bring in licensed professionals for this stage, as electrical and plumbing work requires expert knowledge.
5. Cabinet Installation: Once the plumbing and electrical work are in place, you can install the kitchen cabinets. Cabinets are one of the most important elements of the kitchen, and the Allreno design AI can make this process easier. Allreno's AI-driven platform allows you to visualize how different kitchen cabinets will fit into your space, ensuring you make the best choice based on your preferences and layout.
6. Countertops: After the cabinets are installed, it’s time to add countertops. Whether you choose granite, quartz, or a more budget-friendly option, countertops are a focal point of the kitchen, and they should complement the cabinets and other design elements.
7. Flooring: Now that the major structural elements are in place, it’s time to install your flooring. Whether you opt for tile, hardwood, or vinyl, flooring should be installed after the cabinets and countertops to prevent any damage during the installation process.
8. Appliances and Fixtures: With the foundation in place, you can now add your appliances (oven, refrigerator, dishwasher, etc.) and fixtures (sink, faucets, lighting). Allreno’s AI can also help here by offering kitchen design recommendations based on available appliances and space dimensions.
9. Final Touches: The last step is adding the finishing touches to your kitchen. This includes painting the walls, adding backsplash tiles, and installing accessories like handles and knobs on your cabinets. This is also the stage where you can implement any stylistic choices to make the space uniquely yours.
How Allreno's AI Transforms the Renovation Process
One of the biggest challenges of a kitchen renovation is visualizing how everything will come together. Allreno’s design AI changes that by offering an intuitive platform that brings your ideas to life. Here’s how:
• Personalized Design Recommendations: Allreno’s AI suggests design elements based on your preferences, style, and space dimensions. Whether it’s selecting the perfect kitchen cabinets or countertop finishes, the AI ensures everything works together cohesively.
• 3D Visualization: With Allreno’s AI-driven design tools, you can visualize your kitchen layout in 3D before any work begins. This allows you to see how different elements will fit into your space and make adjustments as needed.
• Efficient Project Management: Allreno helps you streamline the entire renovation process by generating accurate material lists, estimates, and timelines. This means you can avoid costly errors and keep your renovation on track.
Conclusion
Renovating a kitchen is an exciting project, but it requires careful planning and organization to ensure it’s done right. By following a strategic order of operations and leveraging cutting-edge technology like Allreno’s design AI, homeowners can streamline the process, save time and money, and bring their dream kitchen to life with ease. Allreno not only simplifies the design process but also provides innovative solutions that make kitchen and bath renovations faster and more efficient than ever before.
Ready to get started with your kitchen renovation? Allreno's AI-powered design platform is here to help you every step of the way.
Sponsored
Plain City, OH

The Creative Kitchen Company
Columbus Area Kitchen Remodeling and Refacing Professional

 Irons Brothers Construction Inc
It all began with an aqua Terrazo tile as the inspiration for -our client's master bathroom transformation. A master suite built for an Edmonds Queen, with walk-in closet, master bathroom, and 2 vanity areas were included. The project also included updates to her powder room and laundry room- which was relocated to the lower level. This allowed us to reframe her master suite area and create a larger, more dramatic, and very functional master bath.
Angled walls made space-planning and reframing a challenging puzzle to solve and we not only had to measure the interior, but the exterior angles as well since we were removing walls. Luckily, the large “wet room” concept met the client’s needs and overcame this obstacle. The new space features a stand-alone tub open showering area, as well as sink vanity, and seated makeup area. Additionally, storage needs were addressed with a wall of cabinetry installed adjacent to the new walk-in closet. A serene color palette and a variety of textures gives this bathroom a spa-like vibe and the aqua highlights repeated in glass accent tiles.
Our client enjoys her choice of a walk-in shower or soaking tub with bubbles in the modernized space. Storage was desperately needed, as you can see from the before photos, so the en-suite closet was designed in a linear wall configuration. The original Terrazo tile was used as the vertical accent in the corner of the shower and on the top of the rounded shower bench. Our client held onto her inspiration tile for years while she saved to create a budget worthy of this project and its amenities. Budget is always a consideration, and here our client chose to spoil herself.
Some unique design features include:
• The angled end of the makeup vanity with shelves for toiletries within easy reach of the tub and hidden view.
• The makeup vanity side lighting, seated counter and a convenient laundry chute
• The free-standing tub is perfectly positioned to create a direct sight-line through the master bedroom to the Puget Sound views beyond.
• Wall-mount waterfall filler and controls at the tub eliminate a bulky floor mount faucet.
• An angled countertop and glass shelving add interest between the sink vanity and closet cabinetry.
• The toilet is tucked out of sight just past the first tall cabinet.
• A glass partition blocks overspray from the shower.
She now enjoys a spa like retreat every day!

 Advance Design Studio, Ltd.
Raza and Baneen purchased their home in Schaumburg IL. knowing it needed work, but they saw the incredible potential it had with its expanse of beautiful kitchen windows and spacious floor plan.
The kitchen technically functioned fine, but was desperately outdated with its honey oak cabinets and plain countertops. This family loved to cook and host parties so it was an easy decision that the kitchen remodel was the first project they needed to tackle to make their home come to life.
Baneen had very specific ideas for her new dream kitchen and had been thinking about it for over 10 years! When they met Advance Design’s Project Designer Claudia Pop, Baneen felt an instant connection.
“From the first meeting, I knew that Claudia would guide us without putting down our ideas,” Baneen said.
The couple had two fears common among remodeling home owners: Would the project be done on time? And, would the project stay on budget? Advance Design was able to alleviate their fears early on, as Claudia shared the “Common Sense Remodeling” process. Raza and Baneen absolutely loved the custom project analysis that helped them understand how a budget could be accurately predicted and then safeguarded during the design process.
“Advance Design was spot on with both the budget and the project timeframe,” Baneen said. “Overall there were no surprises, and the budget was exactly what we were quoted. The experience was phenomenal, everybody was professional, everybody was courteous, everyone was nice, everyone was friendly. It wasn't stressful for us, they still left the house in a presentable state. It wasn't like we would come home and we were bring the kids in and it was going to be hazardous."
After the relationship was cemented, Raza, Baneen and Claudia began to finalize the kitchen design. The main objective was to create a functional space for preparing meals and to create an inviting space for their family and friends to enjoy, while incorporating interesting design elements such as the iconic blue island and reclaimed Chicago brick walls. Sufficient storage space was really important to Baneen, and high quality appliances were a priority. As the overall layout was being completed, together they reviewed each cabinet to determine exactly what would be stored there.
Because cooking was a high priority for this family, Claudia incorporated spice racks close to the range and included two mixer lift shelves for their larger countertop appliances.
The focal point of the kitchen is the striking blue island constructed from custom colored Dura Supreme cabinets. Designed with decorative shelving and a highly functional prep sink. The couple loves the “galley” prep sink, it adds even more functionality and significantly shortens preparation and cleaning time. This island also includes a 24" Bosch Dishwasher with matching panel to blend in.
"Aesthetically, and in terms of functionality, the island everything I imagined," Baneen said. "I love how beautiful it looks and how functional it is. It just brings everybody together."
The Praa Sands Quartz countertop with an ogee edge profile provides excellent contrast by blending it's subtle tones with the outer cabinetry. It ties the island together with the rest of the space. Overlooking the beautiful backyard through spacious windows, the crisp white farmhouse sink is something that Baneen envisioned in her kitchen for years.
Two tones of Dura Supreme Cabinetry were used throughout the rest of the kitchen. Chestnut Cherry cabinets grace the range and decorative range hood and as panels over the Wolf refrigerator and freezer. Antique White cabinets surround the perimeter, creating a warm balance that beckons guests into the softly rounded space.
Drawing the eye immediately to the custom wood hood hiding a powerful 1,500 CFM ventilation system and spectacular 60” Duel Fuel Wolf range, a creatively patterned Tessen in Café & Brine backsplash detail stands out from the white subway tile backsplash spanning the outer walls. The vibrant space reflects the lively personality of the family who now loves spending time both cooking and enjoying this kitchen as a family.
“The end result is a beautiful and extremely functional kitchen that is able to handle a growing family, lots of parties and lots of cooking,” Claudia said.
“Advance Design was wonderfully professional and a pleasure to work with. They catered to what my needs and ideas were, while skillfully guiding us to make the right choices where we seemed lost,” Baneen said.
 Cantoni Atlanta
One can say that the redesign job on this Atlanta-area home was just what the doctor ordered, since physician Jim Linnane chose Cantoni designer Kohl Sudnikovich to help him re-imagine his 50s ranch-style residence.
Online browsing, and a fondness for modern design, led the medical professional into our Georgia store/" title="Cantoni Modern Furniture Stores" class="crosslinking">showroom after purchasing the 50s-built home in early 2011. Since then, walls were torn down, the kitchen got a facelift, a lone loft morphed in to a music room, and the fireplace got haute while the pool became cool.
As always, step one of the design process began with Kohl visiting the home to measure and scale-out floor plans. Next, ideas were tossed around and the client fell in love with the Mondrian sectional, in red. “Jim’s selection set the color scheme for the home’s living areas,” explains Kohl, “and he loves the punchy accents we added with art, both inside and out.”
“Kohl worked closely with me, from start to finish, and guided me through the entire process,” explains Jim. “He helped me find a great contractor, and I’m particularly fond of the plan he conceived to replace the dated fireplace with a more contemporary linear gas box set in striated limestone.”
Adds Kohl, “I love how we opened the loft and staircase walls by replacing them with metal and cable railings, and how we created a sitting area (in what was the dining room) to open to the living room we enhanced with mirrors.”
A creative fix, like re-facing the cabinets, drawers and door panels in the kitchen, illustrates how something simple (and not too pricey) can make a big impact.
The project, on a whole, is also a good example of how our full-service design studio and talented staff can help re-imagine and optimize your living space while working within your budget.
“Meeting and working with Kohl was such a great experience,” says Jim, in closing. “He is so talented. He came up with great design ideas to completely change the look of my home’s interior, and I think the results are amazing.” Guess what, Jim? We think the results of your collaboration with Kohl are pretty amazing, too.

 Dynia Architects
This mixed-income housing development on six acres in town is adjacent to national forest. Conservation concerns restricted building south of the creek and budgets led to efficient layouts.
All of the units have decks and primary spaces facing south for sun and mountain views; an orientation reflected in the building forms. The seven detached market-rate duplexes along the creek subsidized the deed restricted two- and three-story attached duplexes along the street and west boundary which can be entered through covered access from street and courtyard. This arrangement of the units forms a courtyard and thus unifies them into a single community.
The use of corrugated, galvanized metal and fiber cement board – requiring limited maintenance – references ranch and agricultural buildings. These vernacular references, combined with the arrangement of units, integrate the housing development into the fabric of the region.
A.I.A. Wyoming Chapter Design Award of Citation 2008
Project Year: 2009

 Donald Lococo Architects
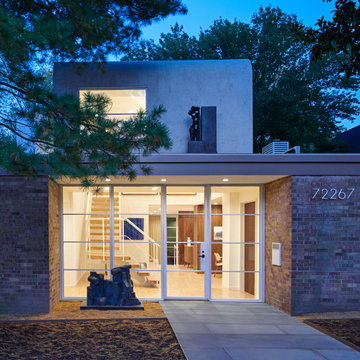
Designed in 1970 for an art collector, the existing referenced 70’s architectural principles. With its cadence of ‘70’s brick masses punctuated by a garage and a 4-foot-deep entrance recess. This recess, however, didn’t convey to the interior, which was occupied by disjointed service spaces. To solve, service spaces are moved and reorganized in open void in the garage. (See plan) This also organized the home: Service & utility on the left, reception central, and communal living spaces on the right.
To maintain clarity of the simple one-story 70’s composition, the second story add is recessive. A flex-studio/extra bedroom and office are designed ensuite creating a slender form and orienting them front to back and setting it back allows the add recede. Curves create a definite departure from the 70s home and by detailing it to "hover like a thought" above the first-floor roof and mentally removable sympathetic add.Existing unrelenting interior walls and a windowless entry, although ideal for fine art was unconducive for the young family of three. Added glass at the front recess welcomes light view and the removal of interior walls not only liberate rooms to communicate with each other but also reinform the cleared central entry space as a hub.
Even though the renovation reinforms its relationship with art, the joy and appreciation of art was not dismissed. A metal sculpture lost in the corner of the south side yard bumps the sculpture at the front entrance to the kitchen terrace over an added pedestal. (See plans) Since the roof couldn’t be railed without compromising the one-story '70s composition, the sculpture garden remains physically inaccessible however mirrors flanking the chimney allow the sculptures to be appreciated in three dimensions. The mirrors also afford privacy from the adjacent Tudor's large master bedroom addition 16-feet away.
 Jay-Quinones Contracting Inc.
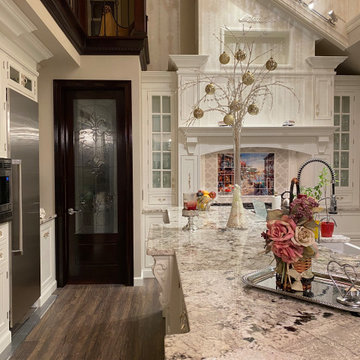
This was a complete kitchen renovation. The remodel included removing skylights and installing a two story bump up adding no square footage to the room but creating a dramatic visual even for the most discriminating designer. When you enter this kitchen your eyes wander trying to absorb the immense planning and detail that went into the renovation but ultimately you find yourself positioned under the large Theresa Maria chandelier gazing into the sky. The kitchen was designed around the 48 inch Thermador stove. The 2 story inset cabinet creation around the stove flows up into the addition creating a visual masterpiece that is only rivaled by original pieces of art works created by the likes of Van Gogh, Picasso and Rembrandt. The sink was relocated from the exterior wall and into the island so that the stove wall would be isolated and not connected any other cabinets. The 36-inch-wide refrigerator and 36-inch-wide freezer were designed and installed next to a microwave cabinet that makes heating up items as convenient as 1,2,3. The outside cabinet wall section is perfect for entertaining with the 42 inch base cabinets. The massive two-tiered island of 124 inches long is perfect for everyday family living. A farmer’s sink adds the perfect touch to this traditional design. Renovating a kitchen without ceiling detail is one of the most overlooked parts of the renovation. The amount of money spent on the renovation depends on the budget of course but I highly recommend including ceiling detail as much as one considers the tile backsplash.

 INSPIRED KITCHEN DESIGN
Amanda says her choice of IKEA cabinetry was both practical and purposeful.
“By the time I reached the cabinet stage of the kitchen remodel process, I was already way over my [initial budget of $10,000]. After receiving a quote for over $10,000 just for my cabinets at Home Depot, I knew I had to explore other options. I saw that IKEA cabinets came highly recommended and had much better reviews than the cabinets I had planned on buying.”
The painted blue-green DIY shaker-style cabinetry doors from Semihandmade are featured along the lower cabinetry and give a refreshing pop of color to the space. Functionally, they also provide ample storage options with space for pots and pans next to the dishwasher; three rows of drawers for utensils and other cutlery, and even a warming drawer-style area under the IKEA microwave.
This is complemented by more lower cabinetry storage on the opposite side of the oven as well as upper cabinetry on either side of the range hood.
She concludes: “I really wanted to go with the IKEA cabinets because they were such a great price. The design tool was driving me crazy when I tried to design the kitchen myself; but IKD took care of all of that, which was a huge time saver for me.”
207