
Search results for "Challenger" in Home Design Ideas
 E. F. San Juan
Gulf-Front Grandeur
Private Residence / Alys Beach, Florida
Architect: Khoury & Vogt Architects
Builder: Hufham Farris Construction
---
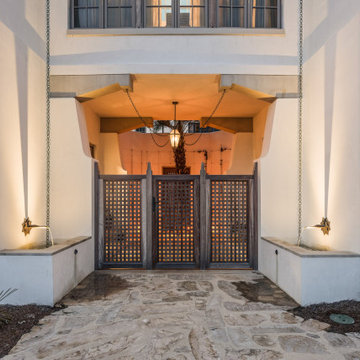
This one-of-a-kind Gulf-front residence in the New Urbanism community of Alys Beach, Florida, is truly a stunning piece of architecture matched only by its views. E. F. San Juan worked with the Alys Beach Town Planners at Khoury & Vogt Architects and the building team at Hufham Farris Construction on this challenging and fulfilling project.
We supplied character white oak interior boxed beams and stair parts. We also furnished all of the interior trim and paneling. The exterior products we created include ipe shutters, gates, fascia and soffit, handrails, and newels (balcony), ceilings, and wall paneling, as well as custom columns and arched cased openings on the balconies. In addition, we worked with our trusted partners at Loewen to provide windows and Loewen LiftSlide doors.
Challenges:
This was the homeowners’ third residence in the area for which we supplied products, and it was indeed a unique challenge. The client wanted as much of the exterior as possible to be weathered wood. This included the shutters, gates, fascia, soffit, handrails, balcony newels, massive columns, and arched openings mentioned above. The home’s Gulf-front location makes rot and weather damage genuine threats. Knowing that this home was to be built to last through the ages, we needed to select a wood species that was up for the task. It needed to not only look beautiful but also stand up to those elements over time.
Solution:
The E. F. San Juan team and the talented architects at KVA settled upon ipe (pronounced “eepay”) for this project. It is one of the only woods that will sink when placed in water (you would not want to make a boat out of ipe!). This species is also commonly known as ironwood because it is so dense, making it virtually rot-resistant, and therefore an excellent choice for the substantial pieces of millwork needed for this project.
However, ipe comes with its own challenges; its weight and density make it difficult to put through machines and glue. These factors also come into play for hinging when using ipe for a gate or door, which we did here. We used innovative joining methods to ensure that the gates and shutters had secondary and tertiary means of support with regard to the joinery. We believe the results speak for themselves!
---
Photography by Layne Lillie, courtesy of Khoury & Vogt Architects
 E. F. San Juan
Gulf-Front Grandeur
Private Residence / Alys Beach, Florida
Architect: Khoury & Vogt Architects
Builder: Hufham Farris Construction
---
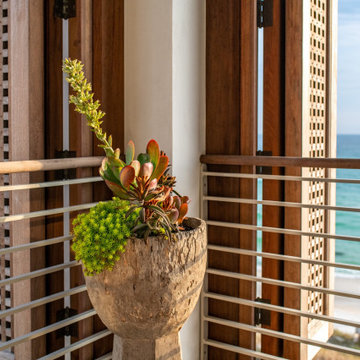
This one-of-a-kind Gulf-front residence in the New Urbanism community of Alys Beach, Florida, is truly a stunning piece of architecture matched only by its views. E. F. San Juan worked with the Alys Beach Town Planners at Khoury & Vogt Architects and the building team at Hufham Farris Construction on this challenging and fulfilling project.
We supplied character white oak interior boxed beams and stair parts. We also furnished all of the interior trim and paneling. The exterior products we created include ipe shutters, gates, fascia and soffit, handrails, and newels (balcony), ceilings, and wall paneling, as well as custom columns and arched cased openings on the balconies. In addition, we worked with our trusted partners at Loewen to provide windows and Loewen LiftSlide doors.
Challenges:
This was the homeowners’ third residence in the area for which we supplied products, and it was indeed a unique challenge. The client wanted as much of the exterior as possible to be weathered wood. This included the shutters, gates, fascia, soffit, handrails, balcony newels, massive columns, and arched openings mentioned above. The home’s Gulf-front location makes rot and weather damage genuine threats. Knowing that this home was to be built to last through the ages, we needed to select a wood species that was up for the task. It needed to not only look beautiful but also stand up to those elements over time.
Solution:
The E. F. San Juan team and the talented architects at KVA settled upon ipe (pronounced “eepay”) for this project. It is one of the only woods that will sink when placed in water (you would not want to make a boat out of ipe!). This species is also commonly known as ironwood because it is so dense, making it virtually rot-resistant, and therefore an excellent choice for the substantial pieces of millwork needed for this project.
However, ipe comes with its own challenges; its weight and density make it difficult to put through machines and glue. These factors also come into play for hinging when using ipe for a gate or door, which we did here. We used innovative joining methods to ensure that the gates and shutters had secondary and tertiary means of support with regard to the joinery. We believe the results speak for themselves!
---
Photography by Layne Lillie, courtesy of Khoury & Vogt Architects
 Interlocking Concrete Pavement Institute
HNA Hardscape Project Award Winner
Reno's Circular Whirlwind
Reno, Nevada
Hain Enterprises
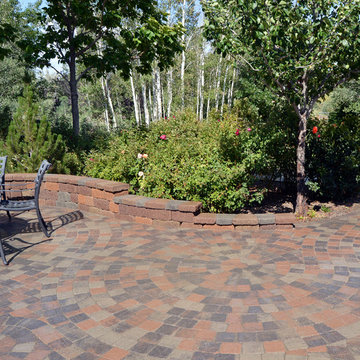
Late in 2013 in the pastoral horse country just west of Reno, Nevada, a homeowner challenged his contractor to design a patio environment incorporating as many circles as possible that would flow seamlessly from one to another and create a unique visual experience for family and guests. The contractor took up the challenge. He and his crews designed and installed one-of-a-kind patios, walls and planting areas, utilizing concrete paver circle kits. The kits spin off one another and linked two separate patio areas and adjacent walkways, without interrupting the flow of each circle. One of many design challenges of this project was deciding how to incorporate the existing drains into the design. The solution: use the drain grates as centers for the circles. Another challenge was determining how to continue the arc of the varying size circles onto and through the connecting pathways. To accomplish this, the contractor installed only curvilinear courses of pavers that appear to run off the pathways and rejoin later. In total, the contractor used 14 paver circle kits and approximately 3,600 square feet of pavement. Included in this project were freestanding seat walls and accent planting areas, creating the outdoor entertainment environment the customer envisioned.
Find the right local pro for your project
 McCoy Homes, Inc.
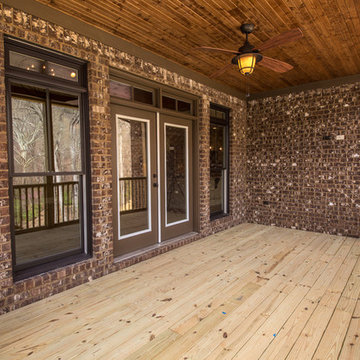
Custom build for a client who loves the brown tones. It was a challenge to work with a limited color pallet on this build. Having to work around the trim, cabinets, and wall colors within a similar color pallet was challenging in that the designer didn't want to have these items fighting against the lighting fixtures, plumbing fixtures, or even the other materials such as tile and hardwood. We also had the same challenge on the exterior with the brick, stone, roofing, and trim items. The home turned out to be a beauty, but the challenge of working with a set color pallet was one that we had not had to deal with before this build.
Philip Slowiak
 Mottram Architecture
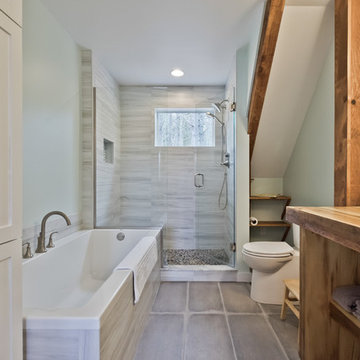
Timber frame homes offer unique challenges during a remodel. What often makes them beautiful and attractive to most homeowners, also makes them challenging for space requirements.
Context: The lovely couple that owned this home were struggling with some interesting floor plan challenges that just didn't work for their family. The loved the beautiful timbers and woodwork of their home, but the dramatically sloping ceilings on the second floor, particularly in the bathroom, just didn't work for this 1 1/2 bath home. Needing to use the skylight to approach the toilet was a less then ideal scenario. Although the bathroom footprint was more then adequate, the sloped ceiling only made half of the space useable. Check out the Before/After post on our blog to see the photos of the house pre-renovation. As much as they loved all the wood features in their home, another challenge they had was light. The wood ceiling made everything inside the house darker, even with a fantastic array of south facing windows, there were spaces in the home that felt dark and small. When they contacted us they wanted to know how could they make their brighter and more inviting, were there solutions to the 2nd floor sloped ceiling issues, and if they were going to do all of this work, how could they make their home more comfortable and efficient. A nagging water leak in the upstairs bathroom spurred them into action and here is how we solved their dilemma.
Conclusion: First, we added a little dormer to the rear of the house so we could get full headroom in nearly all of the upstairs bathroom! Then we decided to extend that dormer one more timber bay over to create a walk in closet with natural light and plenty of space. Since we were contemplating energy efficiency, we resolved a nagging issue that is present in a lot of timber frame construction, air tightness. Commonly found in timber frame construction, fiberglass insulation is installed in the rafter bays and board ceilings are installed over top. Unfortunately, board ceilings are anything but air tight, and fiberglass insulation needs to be in an airtight cavity for maximum effectiveness. So we were able to solve two issues at the same time for this homeowner. We removed the board ceiling and fiberglass insulation, we dense packed the rafter bays with cellulose insulation, and installed sheetrock in place of the boards. The boards were salvaged for re-use by the homeowner, and the space and light quality was dramatically improved. Some may think that losing the board ceiling took something away from the space, but what you'll see in the pictures is that it highly accentuates the heavy timbers and really makes them stand out in a beautiful way. Now with this added airtightness, better insulation, and brighter space, the homeowner hardly runs their wood stove, and it's so quiet in the space, an added bonus from changing the insulation. It became necessary to also add a sheetrock ceiling to the living room to hide the plumbing from the new bathroom layout above. Changing this ceiling gave the homeowner some real quality lighting that was lacking in the living room before. The brighter ceiling and new lighting layout completely transforms the living room into a space you want to hang out, even though the layout didn't change at all. When the homeowner saw the finished spaces she said "I can't believe this is my house, I want to live in this house"
Energy Efficiency: I touched a little on the efficiency above, but like all projects done with Mottram Architecture, we always want to leave you with a little extra. Timber frame construction with board ceilings and fiberglass insulation are notoriously leaky! If you want to know what we think about fiberglass insulation, check our our blog post on Why Fiberglass Insulation Sucks. By installing cellulose insulation and covering it with sheetrock we were able to greatly reduce the heat flowing out of this home. It not only improves cashflow it improves the comfort level in the space. Who wants to sit in their living room and feel a draft? Let us remind you, we are not saying cellulose insulation is an air barrier, we use the sheetrock to help with that, but it does significantly reduce the air flow over fiberglass insulation. And when we reduce the airflow, we reduce the heat flow. And when we reduce the heat flow, we reduce the need to re-heat that drafty air from outside. When it comes to energy efficiency the first and best place to start is air infiltration. We greatly reduced the air infiltration with the new insulation, but we also added a hat and warm boots. What I mean by that is, we improved the insulation in the roof, and we installed insulation in the basement. Maybe it's a silly analogy, but when you think about keeping warm, we always start with the hat and boots! With sustainability in mind, the next project will be to add a deck to the front of this house with rain catchment barrels from the metal roof. They are planning to plant a garden in the spring and the rain catchment system will help to irrigate the new garden.
Builder: East Shore Builders
Photographer: Michael Eric Berube
Michael Eric Berube, Maine Virtual Home Tours
 E. F. San Juan
Coastal Shingle Style on St. Andrew Bay
Private Residence / Panama City Beach, Florida
Architect: Eric Watson
Builder: McIntosh-Myers Construction
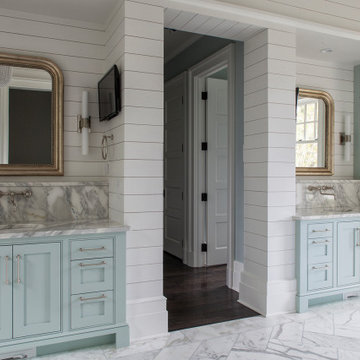
For this lovely Coastal Shingle–style home, E. F. San Juan supplied Loewen impact-rated windows and doors, E. F. San Juan Invincia® impact-rated custom mahogany entry doors, exterior board-and-batten siding, exterior shingles, and exterior trim and millwork. We also supplied all the interior doors, stair parts, paneling, mouldings, and millwork.
Challenges:
At over 10,000 square feet, the sheer size of this home—coupled with the extensive amount of materials we produced and provided—made for a great scheduling challenge. Another significant challenge for the E. F. San Juan team was the homeowner’s desire for an electronic locking system on numerous Invincia® doors we custom manufactured for the home. This was a first-time request for us, but a challenge we gladly accepted!
Solution:
We worked closely with the builder, Cliff Myers of McIntosh-Myers Construction, as well as the architect, Eric Watson, to ensure the timeliness of decisions as they related to the home’s critical production timeline. We also worked closely with our design engineer and the home’s engineer of record, Allen Barnes of Apex Engineering Group, to provide a solution that allowed for an electronic lock on our custom Invincia® mahogany doors. The completed home is a stunning example of coastal architecture that is as safe and secure as it is beautiful.
---
Photography by Jack Gardner
 HU-884212062
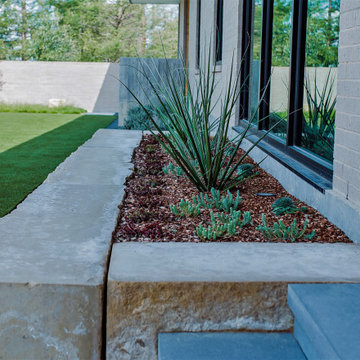
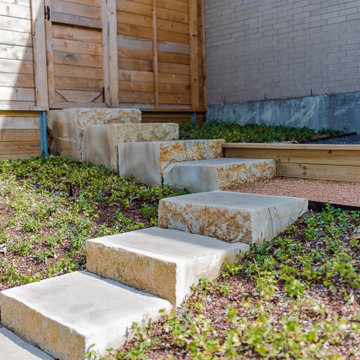
Our client recently purchased a newly-constructed home in order to downsize and have a low- maintenance home and yard. The existing side yard/back yard was undeveloped by the builder, leaving the homeowner with the huge challenge of creating a great outdoor entertaining space for family and friends, while creating privacy and overcoming the over 8-foot steep drop from the existing back porch down to the alley.
The grade was the largest challenge because the space was so narrow with such a large fall from existing porch to the property line. The second largest challenge is that this residence is located in a semi-private community where HOA approval of plans and materials is difficult, as all the residences here share a similar look and feel with a very clean and contemporary aesthetic.
We had to precisely shoot grades to know what kinds of retaining walls would need to be constructed along with how much backfill soil and dirt movement would need to be done. After that the design had to carefully consider the space with maximum functionality for outdoor entertainment with newly constructed walls to ensure it would last for many years to come. All of this was done with multiple meetings with the homeowners who are a retired engineer and active architect themselves. Once a design was settled upon, then submission to the HOA board of approval had to be completed and signed off on with all questions and concerns answered for the community by-laws.
The two biggest difficulties within the construction phase were that the neighbor next to the back yard had a large retaining wall not properly backfilled up to the property line. That neighbor wouldn’t allow us proper access and control to help alleviate the issues, so we had to skillfully work around this to ensure what we constructed would last, despite their property not being properly addressed. We also had to go through multiple shipments from the manufacturer due to large variances in the material’s appearance on the steps and another shipment that was broken during shipping. These two things delayed the project we were working to complete before the spring so the homeowner could have the maximum use of the space this year.
Topping off this challenging construction was a beautiful palette of native grasses, rosemary, groundcover, granite walkways, and synthetic grass to ensure year-round, practically effortless beauty.


 Prima Construction
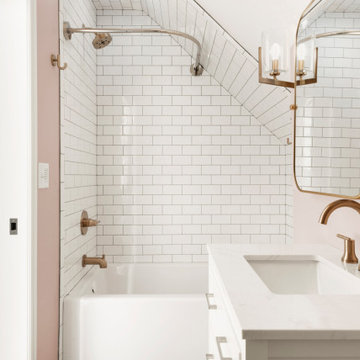
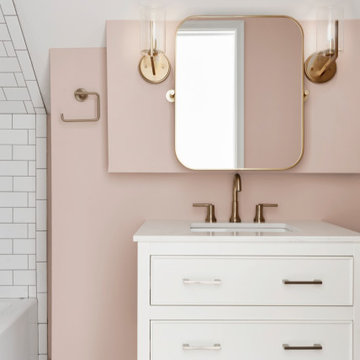
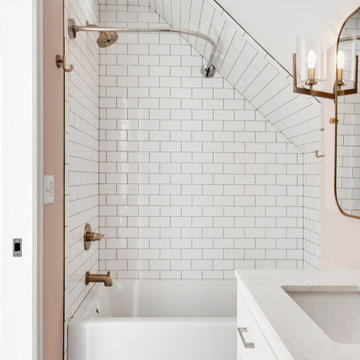
Project Goal: Utilize an unfinished story and a half-space to give each daughter a bedroom on the second floor along with a new full bath.
Challenge 1: The sloped ceilings in the area presented a challenge to how we could most cost-effectively add a bathroom within building code limits.
Solution 1: We’ve come across this challenge often when trying to fit a bathroom in sloped ceiling spaces and the budget or roof doesn't support adding a dormer. In these cases, we built out what we call a "vanity soffit", a tall soffit spanning from higher on the angled portion down to a comfortable height above the faucet bringing the upper portion of the flat wall forward. Its width typically depends on lighting needs and other considerations in the space. The vanity soffit allows the vanity to drop back to the original wall maintaining floor space and clearances while also providing just enough additional height for a practical mirror. For further flexibility, we typically recommend a pivoting mirror.
Challenge 2: Homeowners were told the floor structure was sound to finish for living space. Due to the spans, the first-floor ceiling joists did not meet the requirements to be second-floor floor joists.
Solution 2: In order to provide a solid base for the new living space, we consulted our engineer. The existing 2x6 members spanned beyond the distance they could while still structurally supporting the new living space floor. We determined throughout most of the space we needed to add in (“sister”) 2 additional 2x6 joists between the existing joists.
This additional work also took place during an unseasonably warm spell in June yet we persevered. So proud of our hard-working team.
 HU-884212062
Our client recently purchased a newly-constructed home in order to downsize and have a low- maintenance home and yard. The existing side yard/back yard was undeveloped by the builder, leaving the homeowner with the huge challenge of creating a great outdoor entertaining space for family and friends, while creating privacy and overcoming the over 8-foot steep drop from the existing back porch down to the alley.
The grade was the largest challenge because the space was so narrow with such a large fall from existing porch to the property line. The second largest challenge is that this residence is located in a semi-private community where HOA approval of plans and materials is difficult, as all the residences here share a similar look and feel with a very clean and contemporary aesthetic.
We had to precisely shoot grades to know what kinds of retaining walls would need to be constructed along with how much backfill soil and dirt movement would need to be done. After that the design had to carefully consider the space with maximum functionality for outdoor entertainment with newly constructed walls to ensure it would last for many years to come. All of this was done with multiple meetings with the homeowners who are a retired engineer and active architect themselves. Once a design was settled upon, then submission to the HOA board of approval had to be completed and signed off on with all questions and concerns answered for the community by-laws.
The two biggest difficulties within the construction phase were that the neighbor next to the back yard had a large retaining wall not properly backfilled up to the property line. That neighbor wouldn’t allow us proper access and control to help alleviate the issues, so we had to skillfully work around this to ensure what we constructed would last, despite their property not being properly addressed. We also had to go through multiple shipments from the manufacturer due to large variances in the material’s appearance on the steps and another shipment that was broken during shipping. These two things delayed the project we were working to complete before the spring so the homeowner could have the maximum use of the space this year.
Topping off this challenging construction was a beautiful palette of native grasses, rosemary, groundcover, granite walkways, and synthetic grass to ensure year-round, practically effortless beauty.
 Prima Construction
Project Goal: Utilize an unfinished story and a half-space to give each daughter a bedroom on the second floor along with a new full bath.
Challenge 1: The sloped ceilings in the area presented a challenge to how we could most cost-effectively add a bathroom within building code limits.
Solution 1: We’ve come across this challenge often when trying to fit a bathroom in sloped ceiling spaces and the budget or roof doesn't support adding a dormer. In these cases, we built out what we call a "vanity soffit", a tall soffit spanning from higher on the angled portion down to a comfortable height above the faucet bringing the upper portion of the flat wall forward. Its width typically depends on lighting needs and other considerations in the space. The vanity soffit allows the vanity to drop back to the original wall maintaining floor space and clearances while also providing just enough additional height for a practical mirror. For further flexibility, we typically recommend a pivoting mirror.
Challenge 2: Homeowners were told the floor structure was sound to finish for living space. Due to the spans, the first-floor ceiling joists did not meet the requirements to be second-floor floor joists.
Solution 2: In order to provide a solid base for the new living space, we consulted our engineer. The existing 2x6 members spanned beyond the distance they could while still structurally supporting the new living space floor. We determined throughout most of the space we needed to add in (“sister”) 2 additional 2x6 joists between the existing joists.
This additional work also took place during an unseasonably warm spell in June yet we persevered. So proud of our hard-working team.
 Prima Construction
Project Goal: Utilize an unfinished story and a half-space to give each daughter a bedroom on the second floor along with a new full bath.
Challenge 1: The sloped ceilings in the area presented a challenge to how we could most cost-effectively add a bathroom within building code limits.
Solution 1: We’ve come across this challenge often when trying to fit a bathroom in sloped ceiling spaces and the budget or roof doesn't support adding a dormer. In these cases, we built out what we call a "vanity soffit", a tall soffit spanning from higher on the angled portion down to a comfortable height above the faucet bringing the upper portion of the flat wall forward. Its width typically depends on lighting needs and other considerations in the space. The vanity soffit allows the vanity to drop back to the original wall maintaining floor space and clearances while also providing just enough additional height for a practical mirror. For further flexibility, we typically recommend a pivoting mirror.
Challenge 2: Homeowners were told the floor structure was sound to finish for living space. Due to the spans, the first-floor ceiling joists did not meet the requirements to be second-floor floor joists.
Solution 2: In order to provide a solid base for the new living space, we consulted our engineer. The existing 2x6 members spanned beyond the distance they could while still structurally supporting the new living space floor. We determined throughout most of the space we needed to add in (“sister”) 2 additional 2x6 joists between the existing joists.
This additional work also took place during an unseasonably warm spell in June yet we persevered. So proud of our hard-working team.
 Marvin
Architect: Patrick Ahearn Architect LLC
Construction: Rosbeck
BuildersInteriors: Slifer Designs
Photography By: Greg Premru
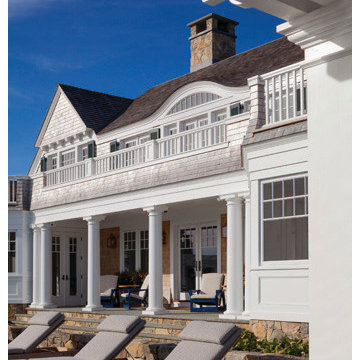
“Rigorously symmetrical yet relaxed in shape and proportions, this house is very well executed inside and out. It feels appropriately sized for its site and is well detailed. It’s by far the best of the Shingle Style submittals.”
The project is a new construction of a family compound consisting of two new houses and associated site development along South Beach. Due to the topography of the nearby dunes, the living spaces of the main and guest houses were located on the second floor in order to gain the panoramic views of the ocean and extended coastline beyond. The challenge was to create a shingle-style island vernacular architecture that did not reflect the upside-down nature of the primary living space.
The inspiration was based on the desire to take a large program and break it into smaller architectural elements based on the idea that the homes could have originally been constructed in the 1920s or 1930s and then added onto over time. This concept of "implied history" is one that creates a legacy of a seaside architecture from the rich history of New England’s past, yet has evolved into how people want to live today.
The Marvin products, with their hurricane-resistant capabilities, were a clear choice based on this locale. The use of the folding door systems allowed for the ease of flow from indoor to outdoor spaces in a timeless way.
 McCoy Homes, Inc.
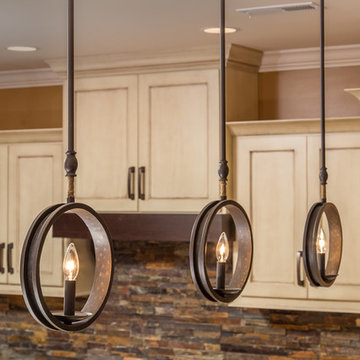
Custom build for a client who loves the brown tones. It was a challenge to work with a limited color pallet on this build. Having to work around the trim, cabinets, and wall colors within a similar color pallet was challenging in that the designer didn't want to have these items fighting against the lighting fixtures, plumbing fixtures, or even the other materials such as tile and hardwood. We also had the same challenge on the exterior with the brick, stone, roofing, and trim items. The home turned out to be a beauty, but the challenge of working with a set color pallet was one that we had not had to deal with before this build.
Philip Slowiak
 Mottram Architecture
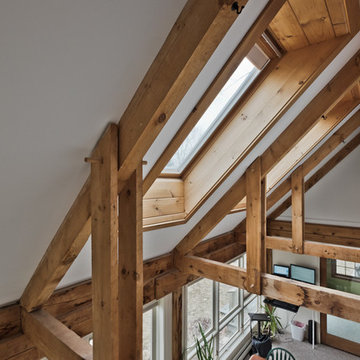
Timber frame homes offer unique challenges during a remodel. What often makes them beautiful and attractive to most homeowners, also makes them challenging for space requirements.
Context: The lovely couple that owned this home were struggling with some interesting floor plan challenges that just didn't work for their family. The loved the beautiful timbers and woodwork of their home, but the dramatically sloping ceilings on the second floor, particularly in the bathroom, just didn't work for this 1 1/2 bath home. Needing to use the skylight to approach the toilet was a less then ideal scenario. Although the bathroom footprint was more then adequate, the sloped ceiling only made half of the space useable. Check out the Before/After post on our blog to see the photos of the house pre-renovation. As much as they loved all the wood features in their home, another challenge they had was light. The wood ceiling made everything inside the house darker, even with a fantastic array of south facing windows, there were spaces in the home that felt dark and small. When they contacted us they wanted to know how could they make their brighter and more inviting, were there solutions to the 2nd floor sloped ceiling issues, and if they were going to do all of this work, how could they make their home more comfortable and efficient. A nagging water leak in the upstairs bathroom spurred them into action and here is how we solved their dilemma.
Conclusion: First, we added a little dormer to the rear of the house so we could get full headroom in nearly all of the upstairs bathroom! Then we decided to extend that dormer one more timber bay over to create a walk in closet with natural light and plenty of space. Since we were contemplating energy efficiency, we resolved a nagging issue that is present in a lot of timber frame construction, air tightness. Commonly found in timber frame construction, fiberglass insulation is installed in the rafter bays and board ceilings are installed over top. Unfortunately, board ceilings are anything but air tight, and fiberglass insulation needs to be in an airtight cavity for maximum effectiveness. So we were able to solve two issues at the same time for this homeowner. We removed the board ceiling and fiberglass insulation, we dense packed the rafter bays with cellulose insulation, and installed sheetrock in place of the boards. The boards were salvaged for re-use by the homeowner, and the space and light quality was dramatically improved. Some may think that losing the board ceiling took something away from the space, but what you'll see in the pictures is that it highly accentuates the heavy timbers and really makes them stand out in a beautiful way. Now with this added airtightness, better insulation, and brighter space, the homeowner hardly runs their wood stove, and it's so quiet in the space, an added bonus from changing the insulation. It became necessary to also add a sheetrock ceiling to the living room to hide the plumbing from the new bathroom layout above. Changing this ceiling gave the homeowner some real quality lighting that was lacking in the living room before. The brighter ceiling and new lighting layout completely transforms the living room into a space you want to hang out, even though the layout didn't change at all. When the homeowner saw the finished spaces she said "I can't believe this is my house, I want to live in this house"
Energy Efficiency: I touched a little on the efficiency above, but like all projects done with Mottram Architecture, we always want to leave you with a little extra. Timber frame construction with board ceilings and fiberglass insulation are notoriously leaky! If you want to know what we think about fiberglass insulation, check our our blog post on Why Fiberglass Insulation Sucks. By installing cellulose insulation and covering it with sheetrock we were able to greatly reduce the heat flowing out of this home. It not only improves cashflow it improves the comfort level in the space. Who wants to sit in their living room and feel a draft? Let us remind you, we are not saying cellulose insulation is an air barrier, we use the sheetrock to help with that, but it does significantly reduce the air flow over fiberglass insulation. And when we reduce the airflow, we reduce the heat flow. And when we reduce the heat flow, we reduce the need to re-heat that drafty air from outside. When it comes to energy efficiency the first and best place to start is air infiltration. We greatly reduced the air infiltration with the new insulation, but we also added a hat and warm boots. What I mean by that is, we improved the insulation in the roof, and we installed insulation in the basement. Maybe it's a silly analogy, but when you think about keeping warm, we always start with the hat and boots! With sustainability in mind, the next project will be to add a deck to the front of this house with rain catchment barrels from the metal roof. They are planning to plant a garden in the spring and the rain catchment system will help to irrigate the new garden.
Builder: East Shore Builders
Photographer: Michael Eric Berube
 HU-884212062
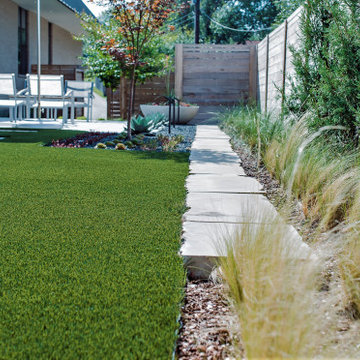
Our client recently purchased a newly-constructed home in order to downsize and have a low- maintenance home and yard. The existing side yard/back yard was undeveloped by the builder, leaving the homeowner with the huge challenge of creating a great outdoor entertaining space for family and friends, while creating privacy and overcoming the over 8-foot steep drop from the existing back porch down to the alley.
The grade was the largest challenge because the space was so narrow with such a large fall from existing porch to the property line. The second largest challenge is that this residence is located in a semi-private community where HOA approval of plans and materials is difficult, as all the residences here share a similar look and feel with a very clean and contemporary aesthetic.
We had to precisely shoot grades to know what kinds of retaining walls would need to be constructed along with how much backfill soil and dirt movement would need to be done. After that the design had to carefully consider the space with maximum functionality for outdoor entertainment with newly constructed walls to ensure it would last for many years to come. All of this was done with multiple meetings with the homeowners who are a retired engineer and active architect themselves. Once a design was settled upon, then submission to the HOA board of approval had to be completed and signed off on with all questions and concerns answered for the community by-laws.
The two biggest difficulties within the construction phase were that the neighbor next to the back yard had a large retaining wall not properly backfilled up to the property line. That neighbor wouldn’t allow us proper access and control to help alleviate the issues, so we had to skillfully work around this to ensure what we constructed would last, despite their property not being properly addressed. We also had to go through multiple shipments from the manufacturer due to large variances in the material’s appearance on the steps and another shipment that was broken during shipping. These two things delayed the project we were working to complete before the spring so the homeowner could have the maximum use of the space this year.
Topping off this challenging construction was a beautiful palette of native grasses, rosemary, groundcover, granite walkways, and synthetic grass to ensure year-round, practically effortless beauty.
 Whiski Kitchen Design Studio
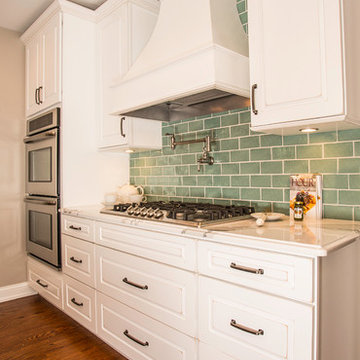
In this 1905 Tudor home, the intent of this design was to take advantage of the classic architecture of the home and incorporate modern conveniences.
Located in the Joseph Berry Subdivision in Detroit, this stellar home presented several design challenges. The most difficult challenge to overcome was the 11” slope from one end of the kitchen to the other, caused by 110 years of settling. All new floor joists were installed and the floor by the side door was then recessed down one step. This created a cozy nook when you first enter the kitchen. A tiered ceiling with strategically planned cabinetry heights and crown molding concealed the slope of the walls at the ceiling level.
The second challenge in this historic home was the awkward foot print of the kitchen. It’s likely that this kitchen had a butler’s pantry originally. However it was remodeled sometime in the 70’s and all original character was erased. Clever pantry storage was added to an awkward corner creating a space that mimicked the essence of a butler’s pantry, while providing storage desired in kitchens today.
Keeping the large footprint of the kitchen presented obstacles with the working triangle; the distance from the sink to the cooktop is several feet. The solution was installation of a pot filler over the cooktop that added convenience and elegance (not sure about this word). Not everything in this project was a challenge; the discovery of a brick chimney hiding behind plaster was a welcome surprise and brought character back honoring the historic charm of this beautiful home.
Kitchen Designer: Rebekah Tull of Whiski Kitchen Design Studio
Remodeling Contractor: Renaissance Restorations, Inc.
Counter Top Fabricator: Lakeside Solid Surfaces - Cambria
Cabinetry: Legacy Crafted Cabinets
Photographer: Shermin Photography
Lighting: Rejuvenation
Tile: TileBar.com
 E. F. San Juan
Gulf-Front Grandeur
Private Residence / Alys Beach, Florida
Architect: Khoury & Vogt Architects
Builder: Hufham Farris Construction
---
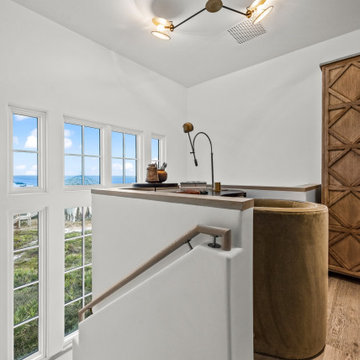
This one-of-a-kind Gulf-front residence in the New Urbanism community of Alys Beach, Florida, is truly a stunning piece of architecture matched only by its views. E. F. San Juan worked with the Alys Beach Town Planners at Khoury & Vogt Architects and the building team at Hufham Farris Construction on this challenging and fulfilling project.
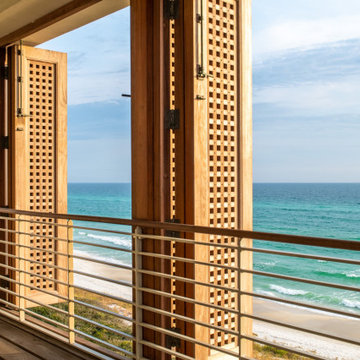
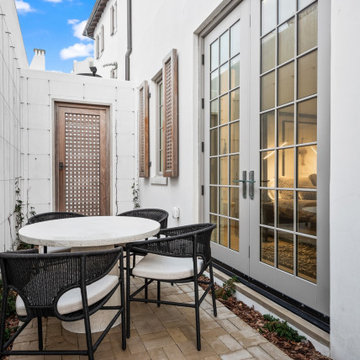
We supplied character white oak interior boxed beams and stair parts. We also furnished all of the interior trim and paneling. The exterior products we created include ipe shutters, gates, fascia and soffit, handrails, and newels (balcony), ceilings, and wall paneling, as well as custom columns and arched cased openings on the balconies. In addition, we worked with our trusted partners at Loewen to provide windows and Loewen LiftSlide doors.
Challenges:
This was the homeowners’ third residence in the area for which we supplied products, and it was indeed a unique challenge. The client wanted as much of the exterior as possible to be weathered wood. This included the shutters, gates, fascia, soffit, handrails, balcony newels, massive columns, and arched openings mentioned above. The home’s Gulf-front location makes rot and weather damage genuine threats. Knowing that this home was to be built to last through the ages, we needed to select a wood species that was up for the task. It needed to not only look beautiful but also stand up to those elements over time.
Solution:
The E. F. San Juan team and the talented architects at KVA settled upon ipe (pronounced “eepay”) for this project. It is one of the only woods that will sink when placed in water (you would not want to make a boat out of ipe!). This species is also commonly known as ironwood because it is so dense, making it virtually rot-resistant, and therefore an excellent choice for the substantial pieces of millwork needed for this project.
However, ipe comes with its own challenges; its weight and density make it difficult to put through machines and glue. These factors also come into play for hinging when using ipe for a gate or door, which we did here. We used innovative joining methods to ensure that the gates and shutters had secondary and tertiary means of support with regard to the joinery. We believe the results speak for themselves!
---
Photography by Layne Lillie, courtesy of Khoury & Vogt Architects
 Peter Jackson
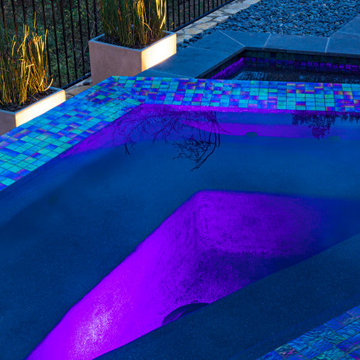
Challenge: Make a tilted, trapezoidal backyard work
Solved: No easy challenge, this property perches atop an 18-foot (yes foot) retaining wall with a grade falling away at 18” of slope per 12’. The tilted landscape seemed hell-bent on flooding the back yard. So… engineering challenge accepted! From the iridescent glass tile and volcanic basalt stone verticals of the spa, negative edge wall, and coping—to the smart-phone-controlled LED lighting and bespoke, California-crafted fire pit—we think we met the challenge! Beautifully, in fact. What a magical setting this family now enjoys.
 E. F. San Juan
Gulf-Front Grandeur
Private Residence / Alys Beach, Florida
Architect: Khoury & Vogt Architects
Builder: Hufham Farris Construction
---
This one-of-a-kind Gulf-front residence in the New Urbanism community of Alys Beach, Florida, is truly a stunning piece of architecture matched only by its views. E. F. San Juan worked with the Alys Beach Town Planners at Khoury & Vogt Architects and the building team at Hufham Farris Construction on this challenging and fulfilling project.
We supplied character white oak interior boxed beams and stair parts. We also furnished all of the interior trim and paneling. The exterior products we created include ipe shutters, gates, fascia and soffit, handrails, and newels (balcony), ceilings, and wall paneling, as well as custom columns and arched cased openings on the balconies. In addition, we worked with our trusted partners at Loewen to provide windows and Loewen LiftSlide doors.
Challenges:
This was the homeowners’ third residence in the area for which we supplied products, and it was indeed a unique challenge. The client wanted as much of the exterior as possible to be weathered wood. This included the shutters, gates, fascia, soffit, handrails, balcony newels, massive columns, and arched openings mentioned above. The home’s Gulf-front location makes rot and weather damage genuine threats. Knowing that this home was to be built to last through the ages, we needed to select a wood species that was up for the task. It needed to not only look beautiful but also stand up to those elements over time.
Solution:
The E. F. San Juan team and the talented architects at KVA settled upon ipe (pronounced “eepay”) for this project. It is one of the only woods that will sink when placed in water (you would not want to make a boat out of ipe!). This species is also commonly known as ironwood because it is so dense, making it virtually rot-resistant, and therefore an excellent choice for the substantial pieces of millwork needed for this project.
However, ipe comes with its own challenges; its weight and density make it difficult to put through machines and glue. These factors also come into play for hinging when using ipe for a gate or door, which we did here. We used innovative joining methods to ensure that the gates and shutters had secondary and tertiary means of support with regard to the joinery. We believe the results speak for themselves!
---
Photography by Layne Lillie, courtesy of Khoury & Vogt Architects
 E. F. San Juan
Gulf-Front Grandeur
Private Residence / Alys Beach, Florida
Architect: Khoury & Vogt Architects
Builder: Hufham Farris Construction
---
This one-of-a-kind Gulf-front residence in the New Urbanism community of Alys Beach, Florida, is truly a stunning piece of architecture matched only by its views. E. F. San Juan worked with the Alys Beach Town Planners at Khoury & Vogt Architects and the building team at Hufham Farris Construction on this challenging and fulfilling project.
We supplied character white oak interior boxed beams and stair parts. We also furnished all of the interior trim and paneling. The exterior products we created include ipe shutters, gates, fascia and soffit, handrails, and newels (balcony), ceilings, and wall paneling, as well as custom columns and arched cased openings on the balconies. In addition, we worked with our trusted partners at Loewen to provide windows and Loewen LiftSlide doors.
Challenges:
This was the homeowners’ third residence in the area for which we supplied products, and it was indeed a unique challenge. The client wanted as much of the exterior as possible to be weathered wood. This included the shutters, gates, fascia, soffit, handrails, balcony newels, massive columns, and arched openings mentioned above. The home’s Gulf-front location makes rot and weather damage genuine threats. Knowing that this home was to be built to last through the ages, we needed to select a wood species that was up for the task. It needed to not only look beautiful but also stand up to those elements over time.
Solution:
The E. F. San Juan team and the talented architects at KVA settled upon ipe (pronounced “eepay”) for this project. It is one of the only woods that will sink when placed in water (you would not want to make a boat out of ipe!). This species is also commonly known as ironwood because it is so dense, making it virtually rot-resistant, and therefore an excellent choice for the substantial pieces of millwork needed for this project.
However, ipe comes with its own challenges; its weight and density make it difficult to put through machines and glue. These factors also come into play for hinging when using ipe for a gate or door, which we did here. We used innovative joining methods to ensure that the gates and shutters had secondary and tertiary means of support with regard to the joinery. We believe the results speak for themselves!
---
Photography by Layne Lillie, courtesy of Khoury & Vogt Architects
26