
Search results for "Cheap quick time" in Home Design Ideas


 L Design/Build, LLC
Mid-sized country white two-story concrete fiberboard gable roof idea in Raleigh with a metal roof

 Raad Studio
Photo by Allan Zepeda
Small trendy built-in desk medium tone wood floor and brown floor study room photo in New York with white walls and no fireplace
Small trendy built-in desk medium tone wood floor and brown floor study room photo in New York with white walls and no fireplace
Find the right local pro for your project

 Katie Lydon Interiors
Jonny Valiant
Inspiration for a transitional dark wood floor dining room remodel in New York with white walls
Inspiration for a transitional dark wood floor dining room remodel in New York with white walls

 Kathleen Jennison
An Arts & Crafts Bungalow is one of my favorite styles of homes. We have quite a few of them in our Stockton Mid-Town area. And when C&L called us to help them remodel their 1923 American Bungalow, I was beyond thrilled.
As per usual, when we get a new inquiry, we quickly Google the project location while we are talking to you on the phone. My excitement escalated when I saw the Google Earth Image of the sweet Sage Green bungalow in Mid-Town Stockton. "Yes, we would be interested in working with you," I said trying to keep my cool.
But what made it even better was meeting C&L and touring their home, because they are the nicest young couple, eager to make their home period perfect. Unfortunately, it had been slightly molested by some bad house-flippers, and we needed to bring the bathroom back to it "roots."
We knew we had to banish the hideous brown tile and cheap vanity quickly. But C&L complained about the condensation problems and the constant fight with mold. This immediately told me that improper remodeling had occurred and we needed to remedy that right away.
The Before: Frustrations with a Botched Remodel
The bathroom needed to be brought back to period appropriate design with all the functionality of a modern bathroom. We thought of things like marble countertop, white mosaic floor tiles, white subway tile, board and batten molding, and of course a fabulous wallpaper.
This small (and only) bathroom on a tight budget required a little bit of design sleuthing to figure out how we could get the proper look and feel. Our goal was to determine where to splurge and where to economize and how to complete the remodel as quickly as possible because C&L would have to move out while construction was going on.
The Process: Hard Work to Remedy Design and Function
During our initial design study, (which included 2 hours in the owners’ home), we noticed framed images of William Morris Arts and Crafts textile patterns and knew this would be our design inspiration. We presented C&L with three options and they quickly selected the Pimpernel Design Concept.
We had originally selected the Black and Olive colors with a black vanity, mirror, and black and white floor tile. C&L liked it but weren’t quite sure about the black, We went back to the drawing board and decided the William & Co Pimpernel Wallpaper in Bayleaf and Manilla color with a softer gray painted vanity and mirror and white floor tile was more to their liking.
After the Design Concept was approved, we went to work securing the building permit, procuring all the elements, and scheduling our trusted tradesmen to perform the work.
We did uncover some shoddy work by the flippers such as live electrical wires hidden behind the wall, plumbing venting cut-off and buried in the walls (hence the constant dampness), the tub barely balancing on two fence boards across the floor joist, and no insulation on the exterior wall.
All of the previous blunders were fixed and the bathroom put back to its previous glory. We could feel the house thanking us for making it pretty again.
The After Reveal: Cohesive Design Decisions
We selected a simple white subway tile for the tub/shower. This is always classic and in keeping with the style of the house.
We selected a pre-fab vanity and mirror, but they look rich with the quartz countertop. There is much more storage in this small vanity than you would think.
The Transformation: A Period Perfect Refresh
We began the remodel just as the pandemic reared and stay-in-place orders went into effect. As C&L were already moved out and living with relatives, we got the go-ahead from city officials to get the work done (after all, how can you shelter in place without a bathroom?).
All our tradesmen were scheduled to work so that only one crew was on the job site at a time. We stayed on the original schedule with only a one week delay.
The end result is the sweetest little bathroom I've ever seen (and I can't wait to start work on C&L's kitchen next).
Thank you for joining me in this project transformation. I hope this inspired you to think about being creative with your design projects, determining what works best in keeping with the architecture of your space, and carefully assessing how you can have the best life in your home.


 Beach Bungalow Designs
Kitchen - coastal dark wood floor and brown floor kitchen idea in San Diego with a farmhouse sink, shaker cabinets, white cabinets, white backsplash and an island

 j witzel interior design
Mali Azima
Inspiration for a large contemporary light wood floor dining room remodel in Atlanta with white walls
Inspiration for a large contemporary light wood floor dining room remodel in Atlanta with white walls

 Matthew Bolt Graphic Design
Photography by Matthew Bolt
This is an example of a coastal porch design in San Francisco with decking.
This is an example of a coastal porch design in San Francisco with decking.

 Muffley Homes
State-of-the-art chef's kitchen
photo by Joshua Vick
Kitchen - transitional u-shaped kitchen idea in Atlanta with an undermount sink, shaker cabinets, beige cabinets, multicolored backsplash, stainless steel appliances and an island
Kitchen - transitional u-shaped kitchen idea in Atlanta with an undermount sink, shaker cabinets, beige cabinets, multicolored backsplash, stainless steel appliances and an island


 Lark Interiors
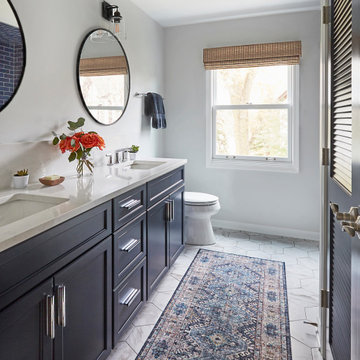
Bathroom vanity design in a Dallas home featuring soft blue cabinetry, a large mirror, and warm brass fixtures, creating a balanced, light-filled space with thoughtful storage and timeless finishes.


 TKS Design Group
Download our free ebook, Creating the Ideal Kitchen. DOWNLOAD NOW
Lakefront property in the northwest suburbs of Chicago is hard to come by, so when we were hired by this young family with exactly that, we were immediately inspired by not just the unusually large footprint of this 1950’s colonial revival but also the lovely views of the manmade lake it was sited on. The large 5-bedroom home was solidly stuck in the 1980’s, but we saw tons of potential. We started out by updating the existing staircase with a fresh coat of paint and adding new herringbone slate to the entry hall.
The powder room off the entryway also got a refresh - new flooring, new cabinets and fixtures. We ran the new slate right through into this space for some consistency. A fun wallpaper and shiplap trim add a welcoming feel and set the tone for the home.
Next, we tackled the kitchen. Located away from the rest of the first floor, the kitchen felt a little isolated, so we immediately began planning for how to better connect it to the rest of the first floor. We landed on removing the wall between the kitchen and dining room and designed a modified galley style space with separate cooking and clean up zones. The cooking zone consists of the refrigerator, prep sink and cooktop, along with a nice long run of prep space at the island. The cleanup side of the kitchen consists of the main sink and dishwasher. Both areas are situated so that the user can view the lake during prep work and cleanup!
One of the home’s main puzzles was how to incorporate the mudroom and area in front of the patio doors at the back of the house. We already had a breakfast table area, so the space by the patio doors was a bit of a no man’s land. We decided to separate the kitchen proper from what became the new mudroom with a large set of barn doors. That way you can quickly hide any mudroom messes but have easy access to the light coming in through the patio doors as well as the outdoor grilling station. We also love the impact the barn doors add to the overall space.
The homeowners’ first words to us were “it’s time to ditch the brown,” so we did! We chose a lovely blue pallet that reflects the home’s location on the lake which is also vibrant yet easy on the eye. Countertops are white quartz, and the natural oak floor works well with the other honey accents. The breakfast table was given a refresh with new chairs, chandelier and window treatments that frame the gorgeous views of the lake out the back.
We coordinated the slate mudroom flooring with that used in the home’s main entrance for a consistent feel. The storage area consists of open and closed storage to allow for some clutter control as needed.
Next on our “to do” list was revamping the dated brown bar area in the neighboring dining room. We eliminated the clutter by adding some closed cabinets and did some easy updates to help the space feel more current. One snag we ran into here was the discovery of a beam above the existing open shelving that had to be modified with a smaller structural beam to allow for our new design to work. This was an unexpected surprise, but in the end we think it was well worth it!
We kept the colors here a bit more muted to blend with the homeowner’s existing furnishings. Open shelving and polished nickel hardware add some simple detail to the new entertainment zone which also looks out onto the lake!
Next we tackled the upstairs starting with the homeowner’s son’s bath. The bath originally had both a tub shower and a separate shower, so we decided to swap out the shower for a new laundry area. This freed up some space downstairs in what used to be the mudroom/laundry room and is much more convenient for daily laundry needs.
We continued the blue palette here with navy cabinetry and the navy tile in the shower. Porcelain floor tile and chrome fixtures keep maintenance to a minimum while matte black mirrors and lighting add some depth the design. A low maintenance runner adds some warmth underfoot and ties the whole space together.
We added a pocket door to the bathroom to minimize interference with the door swings. The left door of the laundry closet is on a 180 degree hinge to allow for easy full access to the machines. Next we tackled the master bath which is an en suite arrangement. The original was typical of the 1980’s with the vanity outside of the bathroom, situated near the master closet. And the brown theme continued here with multiple shades of brown.
Our first move was to segment off the bath and the closet from the master bedroom. We created a short hall from the bedroom to the bathroom with his and hers walk-in closets on the left and right as well as a separate toilet closet outside of the main bathroom for privacy and flexibility.
The original bathroom had a giant soaking tub with steps (dangerous!) as well as a small shower that did not work well for our homeowner who is 6’3”. With other bathtubs in the home, they decided to eliminate the tub and create an oversized shower which takes up the space where the old tub was located. The double vanity is on the opposite wall and a bench is located under the window for morning conversations and a place to set a couple of towels.
The pallet in here is light and airy with a mix of blond wood, creamy porcelain and marble tile, and brass accents. A simple roman shade adds some texture and it’s top-down mechanism allows for light and privacy.
This large whole house remodel gave our homeowners not only the ability to maximize the potential of their home but also created a lovely new frame from which to view their fabulous lake views.
Designed by: Susan Klimala, CKD, CBD
Photography by: Michael Kaskel
For more information on kitchen and bath design ideas go to: www.kitchenstudio-ge.com

 Bestbath
 https://bestbath.com/products/showers/
walk in shower
walk in showers
walk-in showers
walk-in shower
handicap showers
ada shower
handicap shower
barrier free shower
barrier free showers
commercial bathroom
accessible shower
accessible showers
ada shower stall
barrier free shower pan
barrier free shower pans
ada bathtub
ada roll in shower
ada compliant shower
commercial shower
barrier free shower stall
barrier free shower stalls
ada shower base
commercial shower stalls
barrier free bathroom
barrier free bathrooms
ada compliant shower stall
accessible roll in shower
ada shower threshold
ada shower units
ada accessible shower
ada shower enclosures
innovative bathroom design
barrier free shower floor
bathroom dealer
bathroom dealers
ada compliant shower enclosures
tub surrounds that look like tile
shower threshold tile
tile shower tub combo
recessed soap dish for tile shower
ada tile shower
recessed soap holder for tiled shower
ada tile shower
barrier free shower pans tile ready
tile look tub surround
custom tile bathtub
tub walls that look like tile
shower tile patterns
tile ready shower pan
barrier free shower pan for tile
tub surrounds that look like subway tile
bath tile trim kit
accent tile
bathtub tile surround
how to tile a tub shower
how to install a fiberglass shower pan with tile
ceramic corner soap dish for tile shower
subway tile shower insert
non slip shower tile
shower surround vs tile
tile look shower surround
tile shower stalls with seat
subway tile patterns showers
shower curb tile ideas
ada compliant tile
corner soap dish for tile shower
how to tile a shower wall with tub
subway tile installation instructions
tile shower and tub
universal tile hours
tileless bathroom
best shower pan for tile
powder room wall tile ideas
tile bath surround design ideas
4 tile patterns
recessed tile soap dish
bathroom tile kits
tile shower base options
tile basin shower base
bathroom shower tub tile
tile shower installation instructions
pictures of tiled tub shower combo
tile around tub surround
houzz subway tile shower
shower pan or tile floor
multy tile
how to install a soap dish in tile shower
ceramic tile threshold options
prefab tile shower
tile around tub shower combo
tile shower systems
tiled tub
tile ready shower base with seat
how to install a shower base with tile walls
shower surrounds that look like tile
bathroom shower tile gallery
ceramic tile inserts
best shower base for tile
tile wall around bathtub
fiberglass shower enclosures that look like tile
textured porcelain tile shower
tile flange kit
fiberglass tub surround vs tile
tile panel kit
how to tile a shower wall with a window
corner ceramic soap dish for tiled showers
best shower curtain rod for tile
shower tile design patterns
tile around bathtub surround
how to install soap dish on tile wall
tubs n tiles
tile tub shower combo
installing shower valve tile wall
tile shower pan installation instructions
tile ready shower basin
tile stopper
tile shower seat
how to care for tile shower
tile tub surround height
fiberglass vs tile shower
tile installation videos free
tile walk in shower kits
accent on tile
how to tile window in shower
ceramic tile shower designs
tile shower base on concrete floor
prefab tile shower walls
pictures of ceramic tile walk in showers
how to tile bathroom walls and shower tub area
how to tile a walk in shower video
ceramic tile patterns for showers
bathroom tile inserts
fiberglass tile shower
drainage tile installation instructions
tile over bathtub surround
subway tile bathroom wall height
prefab tile shower kits
fiberglass shower pan with tile walls
non slip paint for tiles
shower base or tiles
tile shower base pan
tile soap dish
tile around garden tub
tiled roman bathtub
8 tile
walk in tile shower with bench
bath inserts vs tile
tile pieces
tub surround with subway tile
walk in tile shower
tile shower and tub combo
tile ready shower pan 30 x 48
tile ready shower pan with seat
how to tile a bathtub wall
houzz subway tile
tiled shower stalls
how to build a tiled shower enclosure
how to tile a shower stall video
pre tiled shower panels
subway tile tub
how to install a shower pan with tile walls
classic tile inc
walk in tile shower designs
tile threshold
shower pan ready to tile
bathroom tile installation instructions
shower inserts vs tile
tile side of tub
classic tiles trinidad
shower pan vs tile floor
how to tile a tub shower combo
tile walk in shower
tile and bath company
tile trench filler
rippled subway tile
universal tile flange kit
inset tiles
premade tile shower
bathroom shower tile images
shower tile height
prefab shower pan for tile
tile installation
subway tile shower surround
how to replace a fiberglass tub shower unit with tile
how to make a tile bathtub
tub skirt tile ideas
how to tile a bathtub surround
tub surround or tile
tiled tubs designs
open tile shower
pre tiled shower pan
houzz subway tile bathroom
shower floor tiles non slip
diamond tile pattern
custom tile shower ideas
how to tile a shower video
tile shower with fiberglass pan
bathroom surround tile
shower wall tile installation instructions
tile ready shower pan 48 x 72
tile trim around bathtub
interlocking shower tiles
ideal tile flemington
shower wall panels that look like tile
piece of tile
tile tub surround
how to install shower tile video
best tile for shower pan
subway tile tub surround panels
how to tile a jacuzzi tub surround
custom tile shower
tile shower construction
tileable shower base
custom bathroom tile design
how to tile a shower floor video
tile tub shower
tile shower pan installation video
8 inch tile
handicap tile shower designs
bathroom wall panels that look like tiles
can you tile the inside of a bathtub
roll in tile shower
tile ready shower pans cheap
tile shower floor pan
tile band in shower
walk in shower base for tile
fiberglass showers that look like tile
shower pan with tile walls
bathtub surrounds that look like tile
non tile shower walls
tub surround over tile
installing shower base with tile walls
tile shower ledge
grip tiles for bathroom
tiled shower walls with acrylic base pan
bath trim tiles
subway tile dimensions
tome custom tiles
tile tray shower base
powder room tile accent wall
bath tile trim kit
combo tile
premade tile shower walls
tile shower curtain
tile basin shower pan
corner shower base for tile
tile shower dimensions
anti slip shower floor tiles
what size tile for tub surround
shower surround over tile
36 x 36 tile ready shower pan
tub enclosure tile ideas
roman tile tub
subway tile soap dish
tileable shower seat
tile shower floor pan installation
shower inserts that look like tile
bathtub surround tile patterns
acrylic tub with tile surround
images of tiled showers
how to tile a shower surround
ceramic soap dishes for tile showers
shower pans that can be tiled
tub surround tile patterns
drop in tub tile
tile garden tub surround
window trim over tile
custom tile ready shower pan
how to clean a walk in tiled shower
shower kits that look like tile
tiled shower recess
subway tile bathtub surround
best tile hours
36 x 48 tile ready shower pan
vatican gallery tile
bathroom tile corner trim
shower step tile
neo angle shower tile ideas
bathroom shower tile kits
shower pan or tile
subway tile window trim
ceramic tile shower kits
replace shower base with tile
how to make a tiled walk in shower
over tile bath trim
surround tub tile design
shower base with tile walls
tub with tile walls
drop in tub with tile surround
solid surface shower walls that look like tile
how to make a tile shower seat
tile showers with seats
custom shower base for tile
best tiles for shower enclosure
tub tiles pictures
how to install tile shower pan video
powder room floor tile
how to replace a shower pan with tile floor
tub shower tile design ideas
shower tub tile designs
beautiful tile showers
tile surround
tile shower with fiberglass base
tub and shower tile designs
how to tile a bathtub front
bathroom walk in shower tile
bathroom tile soap dish
bathtub wall panels that look like tile
tile free bathroom
install shower base over tiles
prefab tile shower stalls
bathroom tub shower tile designs
tub tile designs
how to tile a shower wall with a tub
is beveled tile hard to clean
classic tile renovations
classic tile designs
best subway tile
tile trim window recess
48 x 48 tile ready shower pan
easy tile shower base
non slip ceramic tile for bathroom
ceramic tile shower accessories
concrete shower floor no tile
shower pans for tile showers
garden tub tile designs
soap dish for tile shower
tile threshold ideas
shower basin for tile
tile ready shower pan 36 x 60
bathroom tub tile surround
bath edging tiles
tile trench drain
inset soap dish tile
tiled shower ideas walk shower
3 accent tile
tileable shower pan
subway tile shower curtain
smooth tile
best tile inc
top tile new hartford ny
subway tile tub surround
tile bathtub shower combo
ceramic tile tub enclosure
tile over bathtub
how to tile a shower enclosure
how to replace a shower pan with tile
antigua subway tile
how to tile a tub surround
shower wall kits that look like tile
curtain tile
classic tile
subway tile bathtub
installing shower curtain rod into ceramic tile
prefabricated tile shower kits
best bathroom tub and tile cleaner
tile shower details
ceramic tile non slip coating
low maintenance shower tile
bathroom tub wall tile
diamond pattern shower tile
best tile for shower surround
tile shower stall installation video
how to tile a bathtub
tile grip
tile shower inserts
low maintenance bathroom tiles
replace shower pan with tile
tub with tile
tub shower with tile
tile shower accessories
how to tile a shower floor without a pan
popular tile patterns
no tile shower
temporary shower tiles
 Giffywalls
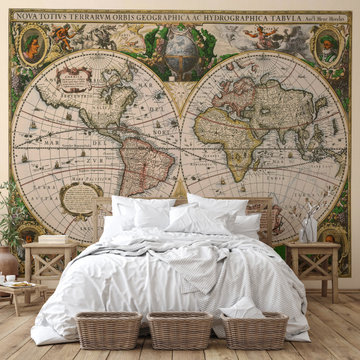
Peel and Stick Wallpaper. Cheap Peel and Stick Wallpaper is a perfect cheap way to redecorate any room! If you don't have much money and need a quick, dirty fix, try cheap peel and stick wallpaper.
 Kathleen Jennison
An Arts & Crafts Bungalow is one of my favorite styles of homes. We have quite a few of them in our Stockton Mid-Town area. And when C&L called us to help them remodel their 1923 American Bungalow, I was beyond thrilled.
As per usual, when we get a new inquiry, we quickly Google the project location while we are talking to you on the phone. My excitement escalated when I saw the Google Earth Image of the sweet Sage Green bungalow in Mid-Town Stockton. "Yes, we would be interested in working with you," I said trying to keep my cool.
But what made it even better was meeting C&L and touring their home, because they are the nicest young couple, eager to make their home period perfect. Unfortunately, it had been slightly molested by some bad house-flippers, and we needed to bring the bathroom back to it "roots."
We knew we had to banish the hideous brown tile and cheap vanity quickly. But C&L complained about the condensation problems and the constant fight with mold. This immediately told me that improper remodeling had occurred and we needed to remedy that right away.
The Before: Frustrations with a Botched Remodel
The bathroom needed to be brought back to period appropriate design with all the functionality of a modern bathroom. We thought of things like marble countertop, white mosaic floor tiles, white subway tile, board and batten molding, and of course a fabulous wallpaper.
This small (and only) bathroom on a tight budget required a little bit of design sleuthing to figure out how we could get the proper look and feel. Our goal was to determine where to splurge and where to economize and how to complete the remodel as quickly as possible because C&L would have to move out while construction was going on.
The Process: Hard Work to Remedy Design and Function
During our initial design study, (which included 2 hours in the owners’ home), we noticed framed images of William Morris Arts and Crafts textile patterns and knew this would be our design inspiration. We presented C&L with three options and they quickly selected the Pimpernel Design Concept.
We had originally selected the Black and Olive colors with a black vanity, mirror, and black and white floor tile. C&L liked it but weren’t quite sure about the black, We went back to the drawing board and decided the William & Co Pimpernel Wallpaper in Bayleaf and Manilla color with a softer gray painted vanity and mirror and white floor tile was more to their liking.
After the Design Concept was approved, we went to work securing the building permit, procuring all the elements, and scheduling our trusted tradesmen to perform the work.
We did uncover some shoddy work by the flippers such as live electrical wires hidden behind the wall, plumbing venting cut-off and buried in the walls (hence the constant dampness), the tub barely balancing on two fence boards across the floor joist, and no insulation on the exterior wall.
All of the previous blunders were fixed and the bathroom put back to its previous glory. We could feel the house thanking us for making it pretty again.
The After Reveal: Cohesive Design Decisions
We selected a simple white subway tile for the tub/shower. This is always classic and in keeping with the style of the house.
We selected a pre-fab vanity and mirror, but they look rich with the quartz countertop. There is much more storage in this small vanity than you would think.
The Transformation: A Period Perfect Refresh
We began the remodel just as the pandemic reared and stay-in-place orders went into effect. As C&L were already moved out and living with relatives, we got the go-ahead from city officials to get the work done (after all, how can you shelter in place without a bathroom?).
All our tradesmen were scheduled to work so that only one crew was on the job site at a time. We stayed on the original schedule with only a one week delay.
The end result is the sweetest little bathroom I've ever seen (and I can't wait to start work on C&L's kitchen next).
Thank you for joining me in this project transformation. I hope this inspired you to think about being creative with your design projects, determining what works best in keeping with the architecture of your space, and carefully assessing how you can have the best life in your home.
 Kathleen Jennison
An Arts & Crafts Bungalow is one of my favorite styles of homes. We have quite a few of them in our Stockton Mid-Town area. And when C&L called us to help them remodel their 1923 American Bungalow, I was beyond thrilled.
As per usual, when we get a new inquiry, we quickly Google the project location while we are talking to you on the phone. My excitement escalated when I saw the Google Earth Image of the sweet Sage Green bungalow in Mid-Town Stockton. "Yes, we would be interested in working with you," I said trying to keep my cool.
But what made it even better was meeting C&L and touring their home, because they are the nicest young couple, eager to make their home period perfect. Unfortunately, it had been slightly molested by some bad house-flippers, and we needed to bring the bathroom back to it "roots."
We knew we had to banish the hideous brown tile and cheap vanity quickly. But C&L complained about the condensation problems and the constant fight with mold. This immediately told me that improper remodeling had occurred and we needed to remedy that right away.
The Before: Frustrations with a Botched Remodel
The bathroom needed to be brought back to period appropriate design with all the functionality of a modern bathroom. We thought of things like marble countertop, white mosaic floor tiles, white subway tile, board and batten molding, and of course a fabulous wallpaper.
This small (and only) bathroom on a tight budget required a little bit of design sleuthing to figure out how we could get the proper look and feel. Our goal was to determine where to splurge and where to economize and how to complete the remodel as quickly as possible because C&L would have to move out while construction was going on.
The Process: Hard Work to Remedy Design and Function
During our initial design study, (which included 2 hours in the owners’ home), we noticed framed images of William Morris Arts and Crafts textile patterns and knew this would be our design inspiration. We presented C&L with three options and they quickly selected the Pimpernel Design Concept.
We had originally selected the Black and Olive colors with a black vanity, mirror, and black and white floor tile. C&L liked it but weren’t quite sure about the black, We went back to the drawing board and decided the William & Co Pimpernel Wallpaper in Bayleaf and Manilla color with a softer gray painted vanity and mirror and white floor tile was more to their liking.
After the Design Concept was approved, we went to work securing the building permit, procuring all the elements, and scheduling our trusted tradesmen to perform the work.
We did uncover some shoddy work by the flippers such as live electrical wires hidden behind the wall, plumbing venting cut-off and buried in the walls (hence the constant dampness), the tub barely balancing on two fence boards across the floor joist, and no insulation on the exterior wall.
All of the previous blunders were fixed and the bathroom put back to its previous glory. We could feel the house thanking us for making it pretty again.
The After Reveal: Cohesive Design Decisions
We selected a simple white subway tile for the tub/shower. This is always classic and in keeping with the style of the house.
We selected a pre-fab vanity and mirror, but they look rich with the quartz countertop. There is much more storage in this small vanity than you would think.
The Transformation: A Period Perfect Refresh
We began the remodel just as the pandemic reared and stay-in-place orders went into effect. As C&L were already moved out and living with relatives, we got the go-ahead from city officials to get the work done (after all, how can you shelter in place without a bathroom?).
All our tradesmen were scheduled to work so that only one crew was on the job site at a time. We stayed on the original schedule with only a one week delay.
The end result is the sweetest little bathroom I've ever seen (and I can't wait to start work on C&L's kitchen next).
Thank you for joining me in this project transformation. I hope this inspired you to think about being creative with your design projects, determining what works best in keeping with the architecture of your space, and carefully assessing how you can have the best life in your home.

 Plain & Fancy Custom Cabinetry
Dan Ryan — Southfield Media
Mid-sized trendy galley eat-in kitchen photo with flat-panel cabinets, brown cabinets, subway tile backsplash, stainless steel appliances, an island and an undermount sink
Mid-sized trendy galley eat-in kitchen photo with flat-panel cabinets, brown cabinets, subway tile backsplash, stainless steel appliances, an island and an undermount sink

 PLUMBERRY DESIGNS, INC.
Peter Rymwid Architectural Photography
Once a small bedroom for a governess, now creatively converted to "Le Petit Pantry de Plumberry"
Just steps away from the Master Bedroom, Dressing Area and Atrium lies a pantry like no other! A small, yet fully functional kitchen capable of fulfilling any request or appetite!
The cherry cabinetry is finished in a beautiful French blue-grey striate with accents of walnut and adorned with polished nickel and crystal glass knobs. The extraordinary white Calacatta Romano marble countertops are reflected in the hand cut marble mosaics extending the full height of the wall providing a breathtaking moment upon entering this room.
A quick cup of fresh hot coffee, espresso or cappuccino is easily accessible as Monsieur dresses for the start of his business day. Maybe he has time to sit at the marble peninsula and enjoy the view and the fireplace as he reads the morning paper and listens to the stock and traffic news.
The refrigerator is elegantly camouflaged as an antique mirrored armoire. Inside is an undisclosed amount of cookie dough that serves to cure Madame's fervor for fresh shortbreads with her afternoon tea or a quick snack for the little one's playing in the Atrium. Simply place a few dollops of dough and place in the speed oven for just several minutes and voila.
Monsieur loves to prepare a full breakfast for his d'amour as they lounge in their chambers on a lazy morning, along with hot baked croissants, frothing lattes, and fresh berries and cream. Everything he needs is just within reach...a fully stocked refrigerator, induction cooktop, speed oven and concealed dishwasher to provide an easy clean up.
10