
Search results for "Consideration prior" in Home Design Ideas
 Michael Nash Design, Build & Homes
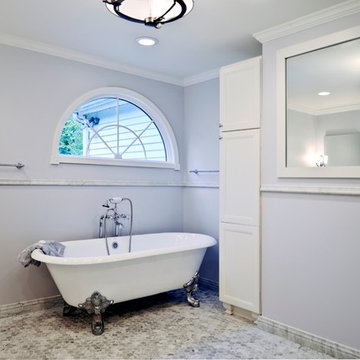
Starting Each Day Clean and Refreshed In This Classically-Modern, Marble Masterpiece
In 1985, the previous owner of the house had added an addition of which part included a 17 feet by 13 feet space off the master bedroom for both a master bath and walk-in closet. Irrespective of the dated red carpet that blanketed the entire bathroom of this 1964 colonial in Annandale, VA, the combination bathroom/closet space had its other oddities, primarily in that there was no shower. The current homeowners -- a family of five, who has been in the home for 7 years, was tired of going down the hall to use the kids’ bathroom to take a shower before work. The renovation that they have created now is a bright and luxurious space that one could bask in all day. They used this bathroom renovation opportunity to total remake the layout and function of this essential room that sets the tone for the day ahead.
Prior to the renovation, the existing bathroom oddly had two entrances, a typical one off of the master bedroom, but another straight off the upstairs hallway. As the toilet was out in the open in the previous design, ensuring that this second door was closed when company was in town was essential and a nuisance. As you entered the room, situated below the arc window, a large soaking tub that was covered on three sides with wooden steps dominated the room from the corner it projected. A relatively small 42” single bowl sink did not leave much space for his and hers toiletries, and there was no other linen closet or cabinetry for storage in the bathroom. The 8 foot by 5 foot closet with accordion doors had poorly laid out rungs not letting the storage space to be fully utilized. At over 220 square feet, the room did offer considerable space to work with, yet the existing layout, which even included a partition wall behind the vanity, felt cramped and dysfunctional.
The homeowners wished to create a classic yet modern, private, deluxe bathroom that would better integrate into their master suite and enable them to start and end each day in a luxurious way. They wanted to maintain having a soaking tub, add in a large shower, have an enclosed commode, expand to include double sinks, and add more storage for toiletries and linens. We worked with the customer to develop a creative design with extensive plumbing rework that accomplished all these needs and more.
The first order of business was to gut out all the carpet, tub, cabinetry, and non-load bearing partition walls. The new tub would be generally in the same location, but as the previous walk-in closet would be repurposed for the commode and the walk-in shower additional water lines, plumbing, and draining needed to be added; fortunately the room below is the garage, which enabled the team to frame out some bulkheads to accomplish this complex plumbing. Following the framing, including walling up the second entrance to the bathroom, adding in a pocket door for the commode, and creating the shape of the new shower, the team also laid down the wiring for one of the luxuries of this room – heated flooring. A glossy percaline boarder, and two-inch hexagon shape percaline tiles cover the entire floor, making it much easier and cleaner than the previous carpet.
Marble look tile is predominant throughout the bathroom as despite the angled frameless glass door, the entire shower is covered in 18 inch polished marble look tiles. The shower coats the user in water from either the overhead rain head, large main showerhead and/or the hand held sprayer. Over 7 feet of white Italian Statuetto marble countertop, enable the couple to have two sink bowls and plenty of room on each side. The bowls are exposed in this stainless steel console sink design which required the team to ensure that the exposed plumbing looked pristine, and painting the bottom of the porcelain bowl to match the coloring.
The white cast-iron 72-inch Cecilia claw-foot soaking tub and its chrome lion’s paws complement that other chrome and white used throughout the room. A tall, almost floor-to-ceiling linen closet finished in arctic white is nestled in the corner near the tub, enabling ample storage of towels, etc. Other cabinetry includes an 18 inch-wide vanity with decorative footing is centered between the two sinks, and a 27 inch wall mounted cabinet with shelf is above the Kohler Devonshire elongated toilet.
Billowing cloud colored grey blue paint was a great choice for this room to pick up on the veining in the marble. Mirrored medicine chests, a chandelier, wall sconces, and overhead recessed lighting also were incorporated into the design and function of the new room.
The artful combination of classic design from material choices, such as free-standing Victorian claw-foot tub along with the modern design as seen in the angled shower, frameless medicine cabinet mirrors, and frosted glass pocket door on the commode, make this bathroom quite a masterpiece.
The clients are enjoying having their private space and not having the use the kids’ bathroom anymore.
 cg interiors group
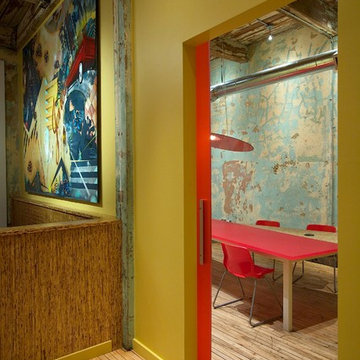
Two adjacent warehouse units in a circa 1915 building, listed on the National Register of Historic Places, were combined into a single modern live / work space. Careful consideration was paid to honoring and preserving original elements like exposed brick walls, timber beams and columns, hardwood and concrete floors and plaster walls.
 O’Hara Interiors
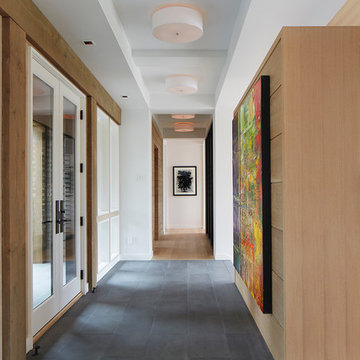
Martha O'Hara Interiors, Furnishings & Photo Styling | John Kraemer & Sons, Builder | Charlie and Co Design, Architect | Corey Gaffer Photography
Please Note: All “related,” “similar,” and “sponsored” products tagged or listed by Houzz are not actual products pictured. They have not been approved by Martha O’Hara Interiors nor any of the professionals credited. For information about our work, please contact design@oharainteriors.com.
Find the right local pro for your project
 Rodwin Architecture & Skycastle Construction
Rodwin Architecture & Skycastle Homes
Location: Boulder, Colorado, USA
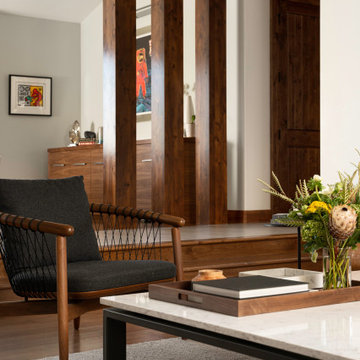
Interior design, space planning and architectural details converge thoughtfully in this transformative project. A 15-year old, 9,000 sf. home with generic interior finishes and odd layout needed bold, modern, fun and highly functional transformation for a large bustling family. To redefine the soul of this home, texture and light were given primary consideration. Elegant contemporary finishes, a warm color palette and dramatic lighting defined modern style throughout. A cascading chandelier by Stone Lighting in the entry makes a strong entry statement. Walls were removed to allow the kitchen/great/dining room to become a vibrant social center. A minimalist design approach is the perfect backdrop for the diverse art collection. Yet, the home is still highly functional for the entire family. We added windows, fireplaces, water features, and extended the home out to an expansive patio and yard.
The cavernous beige basement became an entertaining mecca, with a glowing modern wine-room, full bar, media room, arcade, billiards room and professional gym.
Bathrooms were all designed with personality and craftsmanship, featuring unique tiles, floating wood vanities and striking lighting.
This project was a 50/50 collaboration between Rodwin Architecture and Kimball Modern


 Lee Kimball
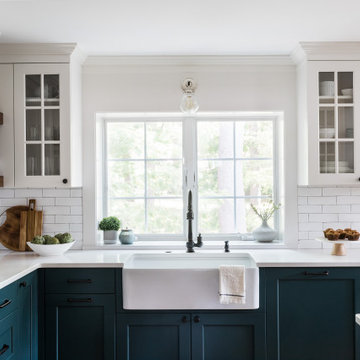
This 1940’s Colonial style home in Boston’s Jamaica Plain had strong bones and rich character but lacked the space, modern conveniences, and storage that our clients desired. While they wished to retain the look of the exterior, as well as some of the home’s unique original features,, the kitchen and dining room needed to be reimagined in design, layout, and functionality.
Key considerations were the compact size of the home and a smaller lot that didn’t give our client the flexibility of an addition. Without adding on to the existing floor plan, we needed to find a way to gain vital extra space in the kitchen, which, with walls enclosing it on all sides, was dark and disconnected from the rest of the house. Our design team coordinated with our client to reconfigure the space by opening up the wall between the dining room and the kitchen to add a few extra inches – just enough to create an open flow between the two rooms. With the removal of that wall, the formerly dark kitchen was flooded with the natural light coming from the existing dining room windows, making the entire space feel brighter and more cohesive.
The original kitchen dated back to the mid-20th century and lacked, among other conveniences, a dishwasher, enough storage, or even countertop space for food prep. In redesigning the kitchen, we visually expanded the space by incorporating white upper cabinetry, open shelving, and white subway tiles extending from the backsplash to the ceiling. A new, larger window featuring a deep stone sill brought in even more light, and the appliances and apron sink were selected to retain the traditional look of the home while delivering modern functionality.
Considering how our client would use this space, we focused on creating a purposeful workspace and storage, ensuring that there was ample countertop space and cabinetry between the sink and range. A multi-purpose cabinet and countertop which serves as a microwave station and food service area were added to the backside of the dining room wall, packing a lot of utility into a small space.
Prior to this renovation, our client had painted the dining room in Mount Saint Anne by Benjamin Moore, a tranquil blue-gray that suited the room well and allowed the original built-in corner cabinetry to stand out, highlighting the home’s charm. With the newly opened floor plan extending into the kitchen, we selected a deep custom color for the base cabinets, Yorktowne Green by Benjamin Moore, to complement the dining room and pull all of the elements together in a cohesive space.
This transformation was remarkable, both functionally and visually. The kitchen is now a bright and inviting space that flows seamlessly into the rest of the house. The homeowners are thrilled with the results, and the small changes we incorporated that made a big difference in the overall feel and functionality of the space.

 Design Connection, Inc.
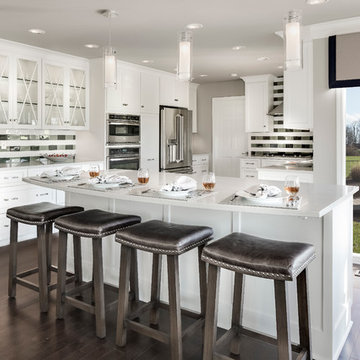
Overland Park Interior Designer, Arlene Ladegaard of Design Connection, Inc., was brought into this remodeling project by the client who wanted to update his 1980’s home which sits on a beautiful property, but which had an interior that was severely dated.
Prior to the remodel, this kitchen had dated oak cabinets, old counters, antiquated appliances, and inadequate storage. Ladegaard considered the client’s desire to lighten the kitchen, and transformed the space with the aid of Brackman Construction. A load bearing wall was removed to open the space to the great room, and a new large island was added… perfect for entertaining.
Aside from the beautiful aesthetics of gray glass staggered tile on the back splash, new quartz counters, gorgeous new appliances, and updated modern lighting, one of Ladegaard’s main considerations in planning this kitchen, was the client’s need for more storage.
Cabinets were designed in both the kitchen, and the adjoining laundry/pantry area, where storage was highly customized and made to suit the specific needs of the client. Upon completion of the project, the client is thrilled with the major updates to this functional space.
Design Connection Inc. of Overland Park provided: Kitchen plans and elevations, material selections, appliances selections, detailed materials key for the contractor and project management.
 TaylorPro Design and Remodeling, Inc.
"When we bought our house in Poway 11 years ago, we were so happy with our huge master bath and Jacuzzi tub. It was such a huge step-up from our prior home. But just like the rest of the house, the master bath was already almost 20 years old and getting out dated and in need of remodeling. We broke up our remodeling projects into every couple of years, doing what we could ourselves and hiring out for the rest. The master bath was the last project and much too big for us to do on our own. We got 3 quotes from 3 contractors listed on Angie’s list which all had good reviews. One was a major re modeler and the other two were smaller contractors. We ended up going with TaylorPro because he was right in the middle and had great reviews.
Kerry was very responsive getting us a timely estimate and had great suggestions for what we were looking for. From the start to finish it turned out to be a wonderful experience! To our delight, they were able to get started ahead of what we were told. Everything went almost as scheduled and we were informed constantly on where we were in the project. Kerry was very responsive to all our concerns or requests and we were never left wondering what the next step would be. His crew was wonderful, so polite and hard working. They were very professional, on time, considerate and knew exactly what they were doing.
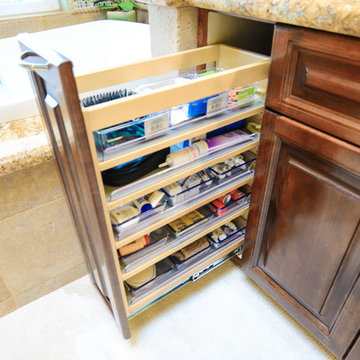
There were certain things we were really looking for in the remodel. First off, the bathroom was pretty large with a high ceiling. In the winter months, it was always really cold and hard to heat. To solve that we had TaylorPro install heated flooring beneath the travertine tiles. We also needed a custom vanity that would conceal hair appliances, most of our personal toiletries and have enough storage for everything else. The cabinetry was custom designed to exactly what we were looking for. Lastly, we wanted a classic, timeless look using tumbled travertine. After consulting with his designer we were able to select all the tile, accent tile and a beautiful frameless glass shower enclosure.
The finished project was beyond our highest expectations and we won’t hesitate to use Kerry and his crew for any future jobs or recommend him to family and friends."
~ Mark and Amy B, Clients
Frameless shower door, glass tile with rope border, dark and light travertine tiles on walls, travertine on floor, heated floor by NuHeat, tub and sinks by Kohler, shower/tub/vanity fixtures Hansgrohe, toilet Toto, custom cabinets by Thead Custom Cabinetry.
Photo by Kerry W. Taylor
 Michael Nash Design, Build & Homes
Starting Each Day Clean and Refreshed In This Classically-Modern, Marble Masterpiece
In 1985, the previous owner of the house had added an addition of which part included a 17 feet by 13 feet space off the master bedroom for both a master bath and walk-in closet. Irrespective of the dated red carpet that blanketed the entire bathroom of this 1964 colonial in Annandale, VA, the combination bathroom/closet space had its other oddities, primarily in that there was no shower. The current homeowners -- a family of five, who has been in the home for 7 years, was tired of going down the hall to use the kids’ bathroom to take a shower before work. The renovation that they have created now is a bright and luxurious space that one could bask in all day. They used this bathroom renovation opportunity to total remake the layout and function of this essential room that sets the tone for the day ahead.
Prior to the renovation, the existing bathroom oddly had two entrances, a typical one off of the master bedroom, but another straight off the upstairs hallway. As the toilet was out in the open in the previous design, ensuring that this second door was closed when company was in town was essential and a nuisance. As you entered the room, situated below the arc window, a large soaking tub that was covered on three sides with wooden steps dominated the room from the corner it projected. A relatively small 42” single bowl sink did not leave much space for his and hers toiletries, and there was no other linen closet or cabinetry for storage in the bathroom. The 8 foot by 5 foot closet with accordion doors had poorly laid out rungs not letting the storage space to be fully utilized. At over 220 square feet, the room did offer considerable space to work with, yet the existing layout, which even included a partition wall behind the vanity, felt cramped and dysfunctional.
The homeowners wished to create a classic yet modern, private, deluxe bathroom that would better integrate into their master suite and enable them to start and end each day in a luxurious way. They wanted to maintain having a soaking tub, add in a large shower, have an enclosed commode, expand to include double sinks, and add more storage for toiletries and linens. We worked with the customer to develop a creative design with extensive plumbing rework that accomplished all these needs and more.
The first order of business was to gut out all the carpet, tub, cabinetry, and non-load bearing partition walls. The new tub would be generally in the same location, but as the previous walk-in closet would be repurposed for the commode and the walk-in shower additional water lines, plumbing, and draining needed to be added; fortunately the room below is the garage, which enabled the team to frame out some bulkheads to accomplish this complex plumbing. Following the framing, including walling up the second entrance to the bathroom, adding in a pocket door for the commode, and creating the shape of the new shower, the team also laid down the wiring for one of the luxuries of this room – heated flooring. A glossy percaline boarder, and two-inch hexagon shape percaline tiles cover the entire floor, making it much easier and cleaner than the previous carpet.
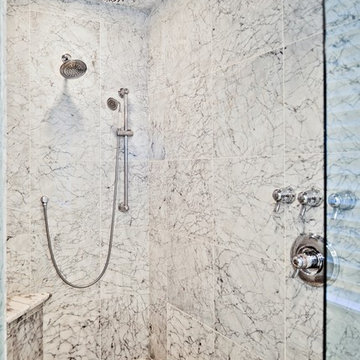
Marble look tile is predominant throughout the bathroom as despite the angled frameless glass door, the entire shower is covered in 18 inch polished marble look tiles. The shower coats the user in water from either the overhead rain head, large main showerhead and/or the hand held sprayer. Over 7 feet of white Italian Statuetto marble countertop, enable the couple to have two sink bowls and plenty of room on each side. The bowls are exposed in this stainless steel console sink design which required the team to ensure that the exposed plumbing looked pristine, and painting the bottom of the porcelain bowl to match the coloring.
The white cast-iron 72-inch Cecilia claw-foot soaking tub and its chrome lion’s paws complement that other chrome and white used throughout the room. A tall, almost floor-to-ceiling linen closet finished in arctic white is nestled in the corner near the tub, enabling ample storage of towels, etc. Other cabinetry includes an 18 inch-wide vanity with decorative footing is centered between the two sinks, and a 27 inch wall mounted cabinet with shelf is above the Kohler Devonshire elongated toilet.
Billowing cloud colored grey blue paint was a great choice for this room to pick up on the veining in the marble. Mirrored medicine chests, a chandelier, wall sconces, and overhead recessed lighting also were incorporated into the design and function of the new room.
The artful combination of classic design from material choices, such as free-standing Victorian claw-foot tub along with the modern design as seen in the angled shower, frameless medicine cabinet mirrors, and frosted glass pocket door on the commode, make this bathroom quite a masterpiece.
The clients are enjoying having their private space and not having the use the kids’ bathroom anymore.
 ODS Architecture
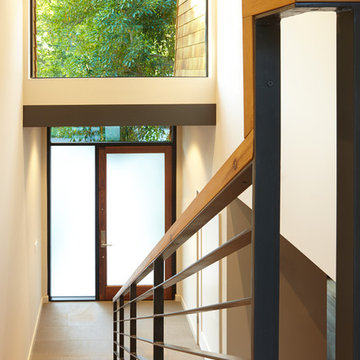
Located in Menlo Park, California, this 3,000 sf. remodel was carefully crafted to generate excitement and make maximum use of the owner’s strict budget and comply with the city’s stringent planning code. It was understood that not everything was to be redone from a prior owner’s quirky remodel which included odd inward angled walls, circular windows and cedar shingles.
Remedial work to remove and prevent dry rot ate into the budget as well. Studied alterations to the exterior include a new trellis over the garage door, pushing the entry out to create a new soaring stair hall and stripping the exterior down to simplify its appearance. The new steel entry stair leads to a floating bookcase that pivots to the family room. For budget reasons, it was decided to keep the existing cedar shingles.
Upstairs, a large oak multi-level staircase was replaced with the new simple run of stairs. The impact of angled bedroom walls and circular window in the bathroom were calmed with new clean white walls and tile.
Photo Credit: John Sutton Photography.

 William Hoffman Architect
4 Steps to Achieving a Rewarding Cost Effective Home Renovation
1 Home Renovation an Introduction
A home renovation due to changes in family needs and space requirements can be a challenging, but also a rewarding experience. As a homeowner, gathering and coordinating resources and possibly help from professional consultants are required. Once the construction phase has started, patience, endurance and commitment to follow through are necessary. Despite the challenges, the rewards of a well-planned and successfully completed project are meaningful, adding aesthetic and economic value, also providing the opportunity to personalize a home, encompassing the function, comfort and aesthetics to accommodate individual taste and lifestyle.
A renovation of an existing home is a viable alternative to moving or building a new home, assuming that a home is structurally sound, the expenditure to enlarge or improve can be a cost effective alternative. A home possessing charm, style, historical significance, established landscaping or an exceptional location could be a significant motivation to consider purchasing another home with the intent to renovate.
The complexity of a project could be relatively simple, changing the use of a room, consolidating two rooms into one, or opening up a room to the outdoors. It could also be a more involved task requiring planning, design and construction documents to build a second floor addition, the addition of a new wing or completely gutting the interior. Some projects could be completed in a weekend’s work or more complex projects, using a “Master Plan”, a plan which provides overall guidance; a renovation can be accomplished all at once or divided into manageable projects over a period of time. With the home evolving gradually allowing the renovation to be planned, timed and tailored to meet individual needs and circumstances.
The due diligence phase should precede the decision to renovate whether it’s an existing home or a home that is purchased with the intent to renovate. The due diligence phase will reveal the factors affecting the nature and scope of the project or if a renovation makes sense.
Every renovation project is unique relative to personal requirements, architectural style & construction type. This guide will be helpful in developing an understanding of the preliminary groundwork required to realize a successful project. If properly planned, a home renovation project can be a positive and rewarding experience resulting in a comfortable, practical and an attractive living environment.
The first step of the planning process is documenting the goals and long-range plans referred to as the “Project Program”. This will dictate the nature, scope and feasibility of the project. Providing a guide to achieving defined goals, the timing or phasing of the project and budget required to achieve the desired end result.
2 Documenting Existing Conditions
Once the “Project Program”, has been established, the next step is to determine what there is to work with. This requires documenting the home’s floor plan and site elements which includes drawing an “as built” floor & site plan consisting of the existing exterior walls, interior rooms, doors, windows, etc. and surrounding site elements, landscape and other significant exterior features. Additionally understanding and noting on the “as built” plan, the structural, mechanical and electrical systems as necessary. Gathering the “existing condition” information defines what there is to work with, creating the framework from which to facilitate and organize the decision making process and develop effective “project program” solutions.
3 Evaluating Existing Conditions
The goals and long-range plans have been established, and the existing floor plan and site elements have been documented. Before developing design solutions, the next step is to evaluate existing conditions. The evaluation includes: a detailed analysis of the structural, mechanical and electrical systems, determining the condition of the house, noting functional and aesthetic deficiencies. At the same time recognizing the home’s strengths, assets and evaluating its relationship to its site. The remaining parameters will be defined by the local jurisdiction’s zoning regulations, these regulations will define the “envelope”, within which the proposed project will be required to fit:
•required front, side & rear yard setbacks
•maximum allowable lot coverage & height
The previous three steps have provided the necessary foundation to start the design phase. The goals and long range plans have been established, existing conditions have been documented and the evaluation of what there is to work with are now in place. This will provide the framework from which to facilitate and organize design solutions. The consolidation of this information is manifested in the development of the “Master Plan” which will become the road map by which sound decision-making can be made as a home renovation evolves. Keeping the project, on a linear path, avoiding redundancies and back tracking, on time, within budget, concluding with a well crafted finished product. After all the “up front” research and documentation has been completed, the design phase of the project can now precede, with the creation of diagrammatic design drawings. Organizing interior spaces, taking into account the external elements, prevailing breezes, solar orientation, view, existing outdoor features, etc. Through the development of schematic sketches themes will emerge followed by design development drawings. Wise planning and renovation decisions can save money and time at the same time provide a well crafted finished project. The “Master Plan” provides a strategic path in the planning and decision making process leading to a successful and rewarding home renovation, which will add value and considerable enjoyment, for many years, living in a newly renovated home.
By virtue of having gone through these steps, frustrations sometimes encountered during a home renovation will be minimized, allowing the renovation to be a gratifying and rewarding experience. Being aware of the process allows one to become an “Educated Client,” which is worth quite a bit more than one might realize. The uneducated client may not realize the benefit of going through the planning, evaluation and documentation groundwork. He will only realize its benefits after having completed a prior renovation project. This rational approach keeps the design process on a direct path to achieving prescribed goals.
4 Exploring Design Solutions & Developing a Master Plan
The previous three steps have provided the necessary foundation to start the design phase. The goals and long range plans have been established, existing conditions have been documented and the evaluation of what there is to work with are now in place. This will provide the framework from which to facilitate and organize design solutions. The consolidation of this information is manifested in the development of the “Master Plan” which will become the road map by which sound decision-making can be made as a home renovation evolves. Keeping the project, on a linear path, avoiding redundancies and back tracking, on time, within budget, concluding with a well crafted finished product.
By virtue of having gone through these steps, frustrations sometimes encountered during a home renovation will be minimized, allowing the renovation to be a gratifying and rewarding experience. Being aware of the process allows one to become an “Educated Client,” which is worth quite a bit more than one might realize. The uneducated client may not realize the benefit of going through the planning, evaluation and documentation groundwork. He will only realize its benefits after having completed a prior renovation project. This rational approach keeps the design process on a direct path to achieving prescribed goals.
After all the “up front” research and documentation has been completed, the design phase of the project can now precede, with the creation of diagrammatic design drawings. Organizing interior spaces, taking into account the external elements, prevailing breezes, solar orientation, view, existing outdoor features, etc. Through the development of schematic sketches themes will emerge followed by design development drawings. Wise planning and renovation decisions can save money and time at the same time provide a well crafted finished project. The “Master Plan” provides a strategic path in the planning and decision making process leading to a successful and rewarding home renovation, which will add value and considerable enjoyment, for many years, living in a newly renovated home.
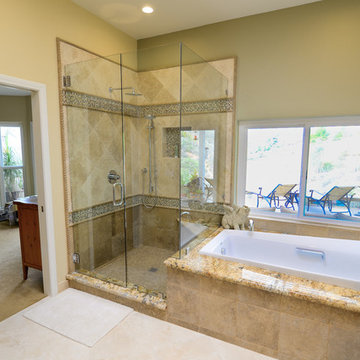 TaylorPro Design and Remodeling, Inc.
"When we bought our house in Poway 11 years ago, we were so happy with our huge master bath and Jacuzzi tub. It was such a huge step-up from our prior home. But just like the rest of the house, the master bath was already almost 20 years old and getting out dated and in need of remodeling. We broke up our remodeling projects into every couple of years, doing what we could ourselves and hiring out for the rest. The master bath was the last project and much too big for us to do on our own. We got 3 quotes from 3 contractors listed on Angie’s list which all had good reviews. One was a major re modeler and the other two were smaller contractors. We ended up going with TaylorPro because he was right in the middle and had great reviews.
Kerry was very responsive getting us a timely estimate and had great suggestions for what we were looking for. From the start to finish it turned out to be a wonderful experience! To our delight, they were able to get started ahead of what we were told. Everything went almost as scheduled and we were informed constantly on where we were in the project. Kerry was very responsive to all our concerns or requests and we were never left wondering what the next step would be. His crew was wonderful, so polite and hard working. They were very professional, on time, considerate and knew exactly what they were doing.
There were certain things we were really looking for in the remodel. First off, the bathroom was pretty large with a high ceiling. In the winter months, it was always really cold and hard to heat. To solve that we had TaylorPro install heated flooring beneath the travertine tiles. We also needed a custom vanity that would conceal hair appliances, most of our personal toiletries and have enough storage for everything else. The cabinetry was custom designed to exactly what we were looking for. Lastly, we wanted a classic, timeless look using tumbled travertine. After consulting with his designer we were able to select all the tile, accent tile and a beautiful frameless glass shower enclosure.
The finished project was beyond our highest expectations and we won’t hesitate to use Kerry and his crew for any future jobs or recommend him to family and friends."
~ Mark and Amy B, Clients
Frameless shower door, glass tile with rope border, dark and light travertine tiles on walls, travertine on floor, heated floor by NuHeat, tub and sinks by Kohler, shower/tub/vanity fixtures Hansgrohe, toilet Toto, custom cabinets by Thead Custom Cabinetry.
Photo by Kerry W. Taylor
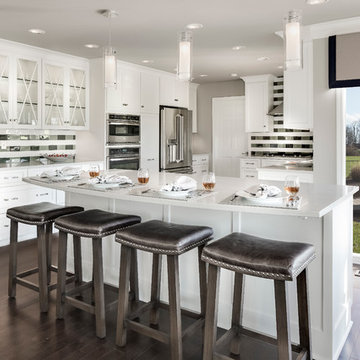 Design Connection, Inc.
Overland Park Interior Designer, Arlene Ladegaard of Design Connection, Inc., was brought into this remodeling project by the client who wanted to update his 1980’s home which sits on a beautiful property, but which had an interior that was severely dated.
Prior to the remodel, this kitchen had dated oak cabinets, old counters, antiquated appliances, and inadequate storage. Ladegaard considered the client’s desire to lighten the kitchen, and transformed the space with the aid of Brackman Construction. A load bearing wall was removed to open the space to the great room, and a new large island was added… perfect for entertaining.
Aside from the beautiful aesthetics of gray glass staggered tile on the back splash, new quartz counters, gorgeous new appliances, and updated modern lighting, one of Ladegaard’s main considerations in planning this kitchen, was the client’s need for more storage. Cabinets were designed in both the kitchen, and the adjoining laundry/pantry area, where storage was highly customized and made to suit the specific needs of the client. Upon completion of the project, the client is thrilled with the major updates to this functional space.
Design Connection Inc. of Overland Park provided: Kitchen plans and elevations, material selections, appliances selections, detailed materials key for the contractor and project management.
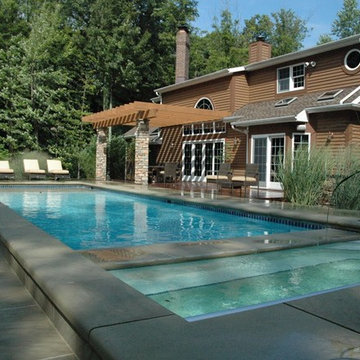
 ONeill Landscape Design and Installation
Award winning residential garden with contemporary pool. The pool decking is 3" thick bull-nosed sandstone with custom built hot tub and autocover. Arbor is solid cedar beams with cultured stone columns. Pool by High-Tech pools
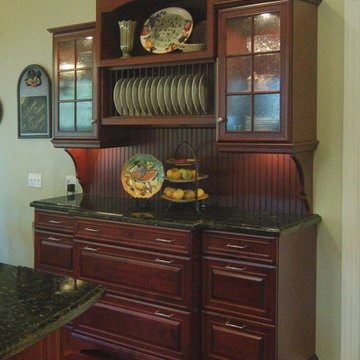
 San Luis Kitchen Co.
Recently, this Victorian style home welcomed its new owners with open arms – the only glitch in the budding relationship, the kitchen. The U shaped kitchen huddled in just half of the nice large room available to it – a long peninsula bisecting the space creating an awkward divide between the work area and the cramped breakfast nook/serving area.
The new owners enjoy cooking and they needed space for both of them to work in the kitchen at the same time. The old U shape did not accommodate this. The sink was too close to the range, the peninsula hemmed them in without providing a focused workstation, and the refrigerator sat at the end competing with people entering the space. And finally, the kitchen just lacked style – it did not fit with the Victorian style architecture and décor of the home.
San Luis Kitchen to the rescue! After attending a few of our monthly design seminars, the homeowners decided to take the remodeling plunge. They brought us a sketch of the space, explained their need for a more functional 2-cook space, and expressed interest in replacing the peninsula with an island. After visiting the home, we identified some other areas of design opportunity/constraint – an exterior door that was seldom used, an existing wood floor that extended throughout the house, a beautiful view from the breakfast nook windows, and a large existing pantry.
Our first thought for the new kitchen was to provide a visual focal point. The homeowners were excited by the idea of a “mantle” type wood hood which we situated facing out toward the formal dining room as the opening statement for the kitchen. We also added an island set at 90 degrees to the prior location of the peninsula – decorative open shelves face out from the island creating more visual interest. The new island not only reinforces the focal point of the hood, but also, working with the new built-in hutch, embraces the breakfast nook and integrates it with the rest of the kitchen. (Changing the peninsula to an island did create a need to patch the hardwood floor – thankfully the homeowner was able to find a source for replacement flooring that was almost a seamless blend)
Working with both the homeowners and their interior designer, we decided to combine a creamy white finish for the main cabinets with a cordovan maple stain for the island and hutch. The goal of this color scheme was a bright happy kitchen (the white) with a formal furniture feel to the cabinetry (the dark red maple pieces). Often, in Victorian or other classic style spaces, we see different pieces brought together (over time or as a planned design) to form a cohesive but diverse whole.
As functional considerations for the design, the main sink was moved to the island and a prep sink was added in the corner between the new cook-top and a designated bake center/prep station located where the old range had been. This gives space for both homeowners to work in the kitchen simultaneously using multiple workstations. We added a built-in refrigerator with decorative door panels (to blend comfortably with the cabinets), a wall oven/microwave combo – both of which are now in the space that used to have the redundant exterior door – expanding the kitchen all the way to the far wall. And lastly, keeping the basic structure of the existing pantry, we refaced it with matching doors and added rollout shelves for convenience.
The new kitchen gracefully meets all of the homeowners needs both as a showpiece and as a backdrop to their daily lives. Now they are comfortably ensconced in their entire home, including the kitchen!
 Nancy Finneson | DeMane Design
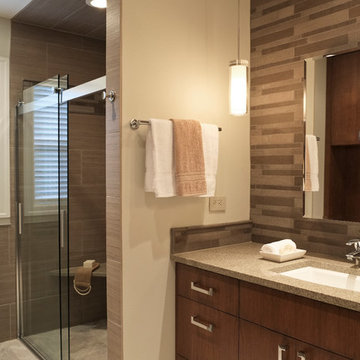
A contemporary spa space offers all the options you need take on the day. Your first step inside is on a heated floor that is programmable so it's always warm. The cabinets have personal touches that suit a busy persons lifestyle. such as a handy pull-out hamper in the vanity. The adjacent cabinets include both open shelves and closed storage along with a comfortable bench that floats in the air. The shower was appointed with uniquely textured tile and has easy access with barn style glass doors and a curb-less threshold.
Photo: DeMane Design
 Design Connection, Inc.
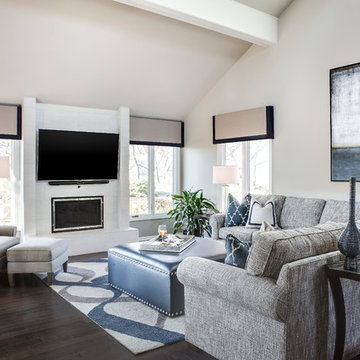
Prior to remodeling, this spacious great room was reminiscent of the 1907’s in both its furnishings and window treatments. While the view from the room is spectacular with windows that showcase a beautiful pond and a large expanse of land with a horse barn, the interior was dated.
Our client loved his space, but knew it needed an update. Before the remodel began, there was a wall that separated the kitchen from the great room. The client desired a more open and fluid floor plan. Arlene Ladegaard, principle designer of Design Connection, Inc., was contacted to help achieve his dreams of creating an open and updated space.
Arlene designed a space that is transitional in style. She used an updated color palette of gray tons to compliment the adjoining kitchen. By opening the space up and unifying design styles throughout, the blending of the two rooms becomes seamless.
Comfort was the primary consideration in selecting the sectional as the client wanted to be able to sit at length for leisure and TV viewing. The side tables are a dark wood that blends beautifully with the newly installed dark wood floors, the windows are dressed in simple treatments of gray linen with navy accents, for the perfect final touch.
With regard to artwork and accessories, Arlene spent many hours at outside markets finding just the perfect accessories to compliment all the furnishings. With comfort and function in mind, each welcoming seat is flanked by a surface for setting a drink – again, making it ideal for entertaining.
Design Connection, Inc. of Overland Park provided the following for this project: space plans, furniture, window treatments, paint colors, wood floor selection, tile selection and design, lighting, artwork and accessories, and as the project manager, Arlene Ladegaard oversaw installation of all the furnishings and materials.
 TaylorPro Design and Remodeling, Inc.
"When we bought our house in Poway 11 years ago, we were so happy with our huge master bath and Jacuzzi tub. It was such a huge step-up from our prior home. But just like the rest of the house, the master bath was already almost 20 years old and getting out dated and in need of remodeling. We broke up our remodeling projects into every couple of years, doing what we could ourselves and hiring out for the rest. The master bath was the last project and much too big for us to do on our own. We got 3 quotes from 3 contractors listed on Angie’s list which all had good reviews. One was a major re modeler and the other two were smaller contractors. We ended up going with TaylorPro because he was right in the middle and had great reviews.
Kerry was very responsive getting us a timely estimate and had great suggestions for what we were looking for. From the start to finish it turned out to be a wonderful experience! To our delight, they were able to get started ahead of what we were told. Everything went almost as scheduled and we were informed constantly on where we were in the project. Kerry was very responsive to all our concerns or requests and we were never left wondering what the next step would be. His crew was wonderful, so polite and hard working. They were very professional, on time, considerate and knew exactly what they were doing.
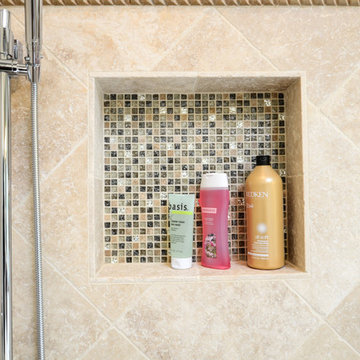
There were certain things we were really looking for in the remodel. First off, the bathroom was pretty large with a high ceiling. In the winter months, it was always really cold and hard to heat. To solve that we had TaylorPro install heated flooring beneath the travertine tiles. We also needed a custom vanity that would conceal hair appliances, most of our personal toiletries and have enough storage for everything else. The cabinetry was custom designed to exactly what we were looking for. Lastly, we wanted a classic, timeless look using tumbled travertine. After consulting with his designer we were able to select all the tile, accent tile and a beautiful frameless glass shower enclosure.
The finished project was beyond our highest expectations and we won’t hesitate to use Kerry and his crew for any future jobs or recommend him to family and friends."
~ Mark and Amy B, Clients
Frameless shower door, glass tile with rope border, dark and light travertine tiles on walls, travertine on floor, heated floor by NuHeat, tub and sinks by Kohler, shower/tub/vanity fixtures Hansgrohe, toilet Toto, custom cabinets by Thead Custom Cabinetry.
Photo by Kerry W. Taylor
2