
Search results for "Consideration prior" in Home Design Ideas

 Warm Timber Saunas & Wine Cellars
This previously unused attic space is now a sauna/yoga room. The left sauna wall follows the attic rafters down diagonally to allow a wider space for leg room on the twin sauna benches.


Find the right local pro for your project
 Mitchell & Best Homes
In early 2022, Mitchell & Best was contacted by a homeowner residing in a brick end-unit townhome that was originally built in 1979. The client was a friend of the company through prior business dealings and had originally considered a new custom single-family home through Mitchell & Best Next Door. After months of consideration and realization that they loved their current location and neighborhood, this couple – both attorneys and parents of a young child and a beloved elderly pet – decided to stay put and figure out how to make the floorplan better fit their family’s needs.
The project’s Scope of Work included:
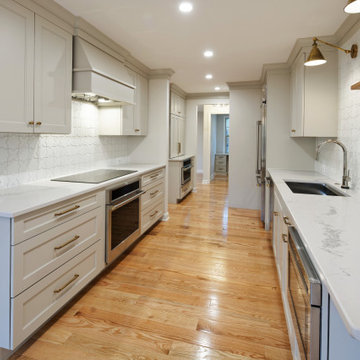
Main Level - The plan re-organized the main floor, giving significantly more cooking, entertainment, and functional working space to the kitchen. All-new appliances, cabinetry, countertops, and extensive tile work were installed. The original oversized den was opened to the kitchen to create a generous dining space in the front of the house where natural light comes in. At the rear of the house, adjacent to the kitchen, a walk-up butler’s pantry/bar was created, and a new space was carved out for a private office accessed by a glass-front French pocket door. The office cabinetry was customized for the client’s needs with a built-in desk, bookshelves and sliding printer shelf. The Powder Room was also re-worked and with new plumbing and vanity is unrecognizable from its former self.
Upper Level – In the Owner’s Bedroom, a deep closet was added with two sets of double doors. Most significantly on the upper level, the Owner’s Bathroom was completely re-worked to provide a wet room for the shower and free-standing tub. Spacious double vanity and a private water closet with pocket door completed the room. The Hall Bath was also gutted and re-worked to eliminate a tub and create a spacious shower. The two secondary bedrooms were re-worked slightly, including the elimination of a window seat that created a niche for a large desk.
Lower Level – Original plans did not call for this area to be touched, as work had been done in the basement a few years before. However, as other work was underway, the homeowner decided they wanted the laundry room to rise to the quality level of the rest of the home’s renovations. This resulted in a beautiful and functional new mudroom with built-in cubbies and storage, laundry sink and stacked washer/dryer.
Whole House – Mitchell & Best installed brand-new hardwood flooring, including a custom herringbone pattern in the foyer. New stair treads, handrails, carpet runner, light fixtures, interior two-panel doors, and interior hardware gave the entire house the look and feel of a brand-new home!
Special thanks to Meredith Ericksen of Tuscan Blue Design for interior architecture, design and finish details on this project.

 Custom Surface Solutions
 (www.css-tile.com) - Owner Craig Thompson (512) 430-1215. This project shows new 12 x 24 tile installed vertically with offset layout pattern on wall and floor. Includes shower box with linear glass accent tile back and vertical glass accent band. Tile edges are finished with Schluter Jolly satin aluminum profile edge trim.

 McCullough's Flooring
Gorgeous master bath finished with Dal-Tile's Fabrique porcelain tile in the color Noir Linen polished. Tile size is 12"x24" installed in a brick joint pattern. The floor boasts underfloor heating on a timed thermostat.

 Troico
This tired apartment was purchased by a traditional Japanese family with the intent of turning it into the ultimate minimalist retreat. Inspired by their home land, they envisioned a home with clean lines, a natural colour palette and a calming aura.
Opening up the wall between the galley kitchen and the living room to create a larger space was imperative. Structural considerations were budgeted for to remove the wall in this low rise wood frame building. Allocating part of the budget to complete this look proved well worth the investment as the finished space gives the kitchen an open and airy feeling that was desired. The kitchen was expanded along the prior living room wall. Simplistic colours of whites, creams and wood tones were used to achieve the desired look.
Flair was added with sculptural light fixtures and geometric accents. The island was lit with a side mounted fixture, and the waterfall island that was purposely cut on an angle to add an interesting depth to the otherwise clean lines. Vinyl flooring in a wood tone was used to achieve a classic wood floor look while maintaining durability.
European appliances were chosen to keep the modern, clean lines in place. A microwave was placed in the lower island in order to ensure that it was relatively hidden. The kitchen backsplash was mixed to provide further depth and dimension. A 4 inch splash matching the countertops was run on the sink wall to keep with the minimalist feel, while a bolder patterned large format tile in all white was used to create texture on the stove wall and provide adequate coverage while cooking on the range. Thin profile edge pull handles were strategically placed to be functional but unimposing.

 San Luis Kitchen Co.
Recently, this Victorian style home welcomed its new owners with open arms – the only glitch in the budding relationship, the kitchen. The U shaped kitchen huddled in just half of the nice large room available to it – a long peninsula bisecting the space creating an awkward divide between the work area and the cramped breakfast nook/serving area.
The new owners enjoy cooking and they needed space for both of them to work in the kitchen at the same time. The old U shape did not accommodate this. The sink was too close to the range, the peninsula hemmed them in without providing a focused workstation, and the refrigerator sat at the end competing with people entering the space. And finally, the kitchen just lacked style – it did not fit with the Victorian style architecture and décor of the home.
San Luis Kitchen to the rescue! After attending a few of our monthly design seminars, the homeowners decided to take the remodeling plunge. They brought us a sketch of the space, explained their need for a more functional 2-cook space, and expressed interest in replacing the peninsula with an island. After visiting the home, we identified some other areas of design opportunity/constraint – an exterior door that was seldom used, an existing wood floor that extended throughout the house, a beautiful view from the breakfast nook windows, and a large existing pantry.
Our first thought for the new kitchen was to provide a visual focal point. The homeowners were excited by the idea of a “mantle” type wood hood which we situated facing out toward the formal dining room as the opening statement for the kitchen. We also added an island set at 90 degrees to the prior location of the peninsula – decorative open shelves face out from the island creating more visual interest. The new island not only reinforces the focal point of the hood, but also, working with the new built-in hutch, embraces the breakfast nook and integrates it with the rest of the kitchen. (Changing the peninsula to an island did create a need to patch the hardwood floor – thankfully the homeowner was able to find a source for replacement flooring that was almost a seamless blend)
Working with both the homeowners and their interior designer, we decided to combine a creamy white finish for the main cabinets with a cordovan maple stain for the island and hutch. The goal of this color scheme was a bright happy kitchen (the white) with a formal furniture feel to the cabinetry (the dark red maple pieces). Often, in Victorian or other classic style spaces, we see different pieces brought together (over time or as a planned design) to form a cohesive but diverse whole.
As functional considerations for the design, the main sink was moved to the island and a prep sink was added in the corner between the new cook-top and a designated bake center/prep station located where the old range had been. This gives space for both homeowners to work in the kitchen simultaneously using multiple workstations. We added a built-in refrigerator with decorative door panels (to blend comfortably with the cabinets), a wall oven/microwave combo – both of which are now in the space that used to have the redundant exterior door – expanding the kitchen all the way to the far wall. And lastly, keeping the basic structure of the existing pantry, we refaced it with matching doors and added rollout shelves for convenience.
The new kitchen gracefully meets all of the homeowners needs both as a showpiece and as a backdrop to their daily lives. Now they are comfortably ensconced in their entire home, including the kitchen!

 Spire North
Tucked away in the backwoods of Torch Lake, this home marries “rustic” with the sleek elegance of modern. The combination of wood, stone and metal textures embrace the charm of a classic farmhouse. Although this is not your average farmhouse. The home is outfitted with a high performing system that seamlessly works with the design and architecture.
The tall ceilings and windows allow ample natural light into the main room. Spire Integrated Systems installed Lutron QS Wireless motorized shades paired with Hartmann & Forbes windowcovers to offer privacy and block harsh light. The custom 18′ windowcover’s woven natural fabric complements the organic esthetics of the room. The shades are artfully concealed in the millwork when not in use.
Spire installed B&W in-ceiling speakers and Sonance invisible in-wall speakers to deliver ambient music that emanates throughout the space with no visual footprint. Spire also installed a Sonance Landscape Audio System so the homeowner can enjoy music outside.
Each system is easily controlled using Savant. Spire personalized the settings to the homeowner’s preference making controlling the home efficient and convenient.

 Landwell Design + Build Co.
photography by Joslyn Amato
Example of a large minimalist backyard concrete patio kitchen design in San Luis Obispo with a pergola
Example of a large minimalist backyard concrete patio kitchen design in San Luis Obispo with a pergola

 Jack Calderone
This bedroom and full bathroom are part of an adventuresome project my wife and I embarked upon to create a complete apartment in the basement of our townhouse. We designed a floor plan that creatively and efficiently used all of the 385-square-foot-space, without sacrificing beauty, comfort or function – and all without breaking the bank! To maximize our budget, we did the work ourselves and added everything from thrift store finds to DIY wall art to bring it all together.
A partial double closet bar adds a little extra space while still leaving room for longer hanging clothes.

 User
Wool Patterned Field Carpet with Linen Wide Binding & Chrome Upholstery Nails
Mid-sized transitional carpeted u-shaped staircase photo in Chicago with carpeted risers
Mid-sized transitional carpeted u-shaped staircase photo in Chicago with carpeted risers

 Legacy Glass Studios
Custom leaded glass panel used for privacy and charm in small window of front entry door.
Glass: clear textured glass (granite, 1/16" reed, beveled glue chip) and beveled glass
Lead: 3/16" rounded
Size: 1 @ ~8" x 18" x 1/4" thick
*This product was commissioned and made-to-order. If you're interested in this design, let's chat! We can recreate it for you to your specified dimensions, or we can discuss any design changes you'd like, as well as additional options for materials (glass texture, color, lead size, etc.). Reach out to hello@legacyglass.com to get started!

 Prestige Custom Building & Construction, Inc.
Staircase - mid-sized traditional wooden straight wood railing staircase idea in New York with painted risers

 Greystone Homes LLC
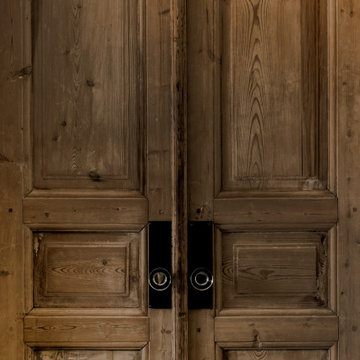
Unique pivot front door with frosted glass.
Front door - large contemporary dark wood floor front door idea with beige walls and a glass front door
Front door - large contemporary dark wood floor front door idea with beige walls and a glass front door
 William Hoffman Architect
4 Steps to Achieving a Rewarding Cost Effective Home Renovation
1 Home Renovation an Introduction
A home renovation due to changes in family needs and space requirements can be a challenging, but also a rewarding experience. As a homeowner, gathering and coordinating resources and possibly help from professional consultants are required. Once the construction phase has started, patience, endurance and commitment to follow through are necessary. Despite the challenges, the rewards of a well-planned and successfully completed project are meaningful, adding aesthetic and economic value, also providing the opportunity to personalize a home, encompassing the function, comfort and aesthetics to accommodate individual taste and lifestyle.
A renovation of an existing home is a viable alternative to moving or building a new home, assuming that a home is structurally sound, the expenditure to enlarge or improve can be a cost effective alternative. A home possessing charm, style, historical significance, established landscaping or an exceptional location could be a significant motivation to consider purchasing another home with the intent to renovate.
The complexity of a project could be relatively simple, changing the use of a room, consolidating two rooms into one, or opening up a room to the outdoors. It could also be a more involved task requiring planning, design and construction documents to build a second floor addition, the addition of a new wing or completely gutting the interior. Some projects could be completed in a weekend’s work or more complex projects, using a “Master Plan”, a plan which provides overall guidance; a renovation can be accomplished all at once or divided into manageable projects over a period of time. With the home evolving gradually allowing the renovation to be planned, timed and tailored to meet individual needs and circumstances.
The due diligence phase should precede the decision to renovate whether it’s an existing home or a home that is purchased with the intent to renovate. The due diligence phase will reveal the factors affecting the nature and scope of the project or if a renovation makes sense.
Every renovation project is unique relative to personal requirements, architectural style & construction type. This guide will be helpful in developing an understanding of the preliminary groundwork required to realize a successful project. If properly planned, a home renovation project can be a positive and rewarding experience resulting in a comfortable, practical and an attractive living environment.
The first step of the planning process is documenting the goals and long-range plans referred to as the “Project Program”. This will dictate the nature, scope and feasibility of the project. Providing a guide to achieving defined goals, the timing or phasing of the project and budget required to achieve the desired end result.
2 Documenting Existing Conditions
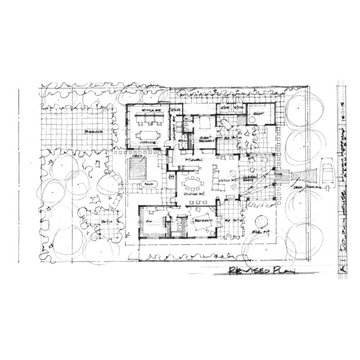
Once the “Project Program”, has been established, the next step is to determine what there is to work with. This requires documenting the home’s floor plan and site elements which includes drawing an “as built” floor & site plan consisting of the existing exterior walls, interior rooms, doors, windows, etc. and surrounding site elements, landscape and other significant exterior features. Additionally understanding and noting on the “as built” plan, the structural, mechanical and electrical systems as necessary. Gathering the “existing condition” information defines what there is to work with, creating the framework from which to facilitate and organize the decision making process and develop effective “project program” solutions.
3 Evaluating Existing Conditions
The goals and long-range plans have been established, and the existing floor plan and site elements have been documented. Before developing design solutions, the next step is to evaluate existing conditions. The evaluation includes: a detailed analysis of the structural, mechanical and electrical systems, determining the condition of the house, noting functional and aesthetic deficiencies. At the same time recognizing the home’s strengths, assets and evaluating its relationship to its site. The remaining parameters will be defined by the local jurisdiction’s zoning regulations, these regulations will define the “envelope”, within which the proposed project will be required to fit:
•required front, side & rear yard setbacks
•maximum allowable lot coverage & height
The previous three steps have provided the necessary foundation to start the design phase. The goals and long range plans have been established, existing conditions have been documented and the evaluation of what there is to work with are now in place. This will provide the framework from which to facilitate and organize design solutions. The consolidation of this information is manifested in the development of the “Master Plan” which will become the road map by which sound decision-making can be made as a home renovation evolves. Keeping the project, on a linear path, avoiding redundancies and back tracking, on time, within budget, concluding with a well crafted finished product. After all the “up front” research and documentation has been completed, the design phase of the project can now precede, with the creation of diagrammatic design drawings. Organizing interior spaces, taking into account the external elements, prevailing breezes, solar orientation, view, existing outdoor features, etc. Through the development of schematic sketches themes will emerge followed by design development drawings. Wise planning and renovation decisions can save money and time at the same time provide a well crafted finished project. The “Master Plan” provides a strategic path in the planning and decision making process leading to a successful and rewarding home renovation, which will add value and considerable enjoyment, for many years, living in a newly renovated home.
By virtue of having gone through these steps, frustrations sometimes encountered during a home renovation will be minimized, allowing the renovation to be a gratifying and rewarding experience. Being aware of the process allows one to become an “Educated Client,” which is worth quite a bit more than one might realize. The uneducated client may not realize the benefit of going through the planning, evaluation and documentation groundwork. He will only realize its benefits after having completed a prior renovation project. This rational approach keeps the design process on a direct path to achieving prescribed goals.
4 Exploring Design Solutions & Developing a Master Plan
The previous three steps have provided the necessary foundation to start the design phase. The goals and long range plans have been established, existing conditions have been documented and the evaluation of what there is to work with are now in place. This will provide the framework from which to facilitate and organize design solutions. The consolidation of this information is manifested in the development of the “Master Plan” which will become the road map by which sound decision-making can be made as a home renovation evolves. Keeping the project, on a linear path, avoiding redundancies and back tracking, on time, within budget, concluding with a well crafted finished product.
By virtue of having gone through these steps, frustrations sometimes encountered during a home renovation will be minimized, allowing the renovation to be a gratifying and rewarding experience. Being aware of the process allows one to become an “Educated Client,” which is worth quite a bit more than one might realize. The uneducated client may not realize the benefit of going through the planning, evaluation and documentation groundwork. He will only realize its benefits after having completed a prior renovation project. This rational approach keeps the design process on a direct path to achieving prescribed goals.
After all the “up front” research and documentation has been completed, the design phase of the project can now precede, with the creation of diagrammatic design drawings. Organizing interior spaces, taking into account the external elements, prevailing breezes, solar orientation, view, existing outdoor features, etc. Through the development of schematic sketches themes will emerge followed by design development drawings. Wise planning and renovation decisions can save money and time at the same time provide a well crafted finished project. The “Master Plan” provides a strategic path in the planning and decision making process leading to a successful and rewarding home renovation, which will add value and considerable enjoyment, for many years, living in a newly renovated home.

 Village Home Stores
Full-overlay Rustic Beech cabinets in the "Charleston" door style and "Briarwood" finish.
Village Home Stores
Example of a large mountain style kitchen design in Chicago
Example of a large mountain style kitchen design in Chicago



 Solar Luminance
 – Semi-Custom Daylight Light Fixture
Model#: DLF-149
Style: Semi-Flush Pendant
Finish: Brushed Nickel
*Note: Price does not include Daylight Tube Product and/or Installation
Semi-Custom Product Shipment Lead Time: 6-10 Weeks*
The Solar Luminance DLF-149, is an Architectural Element Transitional Semi Flush Pendant, designed to assist the home owner, retail location and/or office location, the ability to benefit from Natural Daylight available with Tubular Skylight systems, while also reflecting your custom interior design and décor theme and needs.
Natural Daylight provides incredible mental and physical health and wellness benefits that help the human body and mind maintain a sense of time, absorb natural vitamins, and work with the human eye to perceive color and definition in clarity and contrast to increase visual awareness. Our hope is that your friends, colleagues and guests will be “Inspired & Design” in a way that is both elegant and considerate of the impact we have on the earth and its resources.
The DLF-149 is a Semi-Custom Fixture. Full Custom Versions and Options are available for price quote. Please feel free to contact a Solar Luminance Design Assistant for Full Custom Options.
Product Specification (List Price based on the following)
Over All Dimensions:
Over All Height: 22”
Shade Dims: 10” H. X 24” Dia. – ¾” Metal Trim with 1” Opening Square Weld Metal Mesh
Drop Length: 12”
Column Sleeve Diameter: 11 3/4” Dia.
Center Wireway: (1) 3/8” Dia. Wireway
Hangers: (4) Medium Oval Standard Chain (3 and 4 Hanger Options Available) (Chain available in Various Size Options, pricing may vary)
Lamping Specification
Daylight Tube System*: 10” Dia. Daylight Tube System – Includes Dome, Flashing, 8’-0” Length of Tube Extension, Tube Manufacturer provided Installation, Product and Installation Warranty
10” Diameter Tube provides the Equivalent of (10) 100Watt White Lamps
Secondary Lamping
Canopy Lamping: (1) 1.8 Watts (Per Foot) - 48”L. - LED Flex Strip, 5,000K - 12 Volts DC (Lamp Life: 50,000 Hour Rating)
Candelabra Lamping: (6) 3.5Watt LED Candelabra Based Screw in Torpedo Warm White Bulbs, 120v 2700K (25Watt Equiv.) (Provided by Solar Luminance)
Finish Specification and Materials
Metal Finish: Brushed Nickel
(Available in other Color Options – Some Color Options may require a price adjustment)
Glass Diffuser: Clear Glass (Sandblasted Interior) (Not Tempered)
Product Notes
Daylight Tubular Product is Supplied and Installed by Tube Product Manufacturer. Tube Product Manufacturer is responsible for all Product, Installation, Warranty, and Service of Tube Related issues. Solar Luminance is not responsible for any errors and/or omissions related the tube related issues that may arise. Solar Luminance will assist in sourcing a local and/or regional Daylight Tubular Product Supplier and Installer, to assist with Roof and Ceiling inspection and Tube supply and Installation. Solar Luminance is not responsible for the Tube Installers quality of work or service.
All Secondary Electrical must be performed by a Licensed and/or certified Electrician and/or General Contractor. Solar Luminance is not responsible for the Installation of the fixture. Solar Luminance is not responsible for any errors and/or omissions, damaged and or fault or injury caused by the general contractor.
Shipping and Payments
Shipping and/or Freight is the responsibility of the purchaser. Solar Luminance will supply a quote based on the fixture size, weight, crating method and delivery location, prior to commencement of fabrication and production. All Finishes and Semi-Custom Modifications must be Signed and Approved via the Solar Luminance Client Approval Drawings, in order for your Custom Daylight Light Fixture to begin Fabrication and Production. Any and all Price adjustments and shipping and/or freight must be paid in full prior to shipment of product.
Semi-Custom Product Shipment Lead Time is estimated at 6-10 Weeks, to begin upon receipt of all of the following:
• Receipt of full payment
• Receipt of signed & approved Client Approval Drawings
• Receipt and Confirmation of Approved Finish and Materials
• And Verification and Approval of All Price adjustments for Custom Modifications and Shipping and/or Freight Cost
Return Policy
Product must be inspected upon arrival and receipt of product, at the designated delivery location. Any damage must be reported to Solar Luminance in a written statement of reported damage, by email (Sales@SolarLuminance.com), along with dated and time stamped photo documentation of reported damage. Report of product damage must emailed within 24 hours of receipt of product. Solar Luminance will work with Purchaser and/or Purchasers Agents, to replace and/or fix any damaged and/or missing parts in a timely manner. If damage occurs and/or is reported beyond the 24 hour reporting period Solar Luminance maintains no liability and/or responsibility for the product and/or its condition. Solar Luminance does take pride in our work, craftsmanship, and product, so we do promise to provide exceptional support in remedying any situation that may arise related to your fixture. We do promise to do all that we can to make you happy with your Custom Solar Luminance Daylight Light Fixture.
Please feel free to contact us with any Questions or Concerns you may have.
Sales@SolarLuminance.com
(855) 687-6233
A California based company.
5