
Search results for "Container contact" in Home Design Ideas
 Nature's Touch
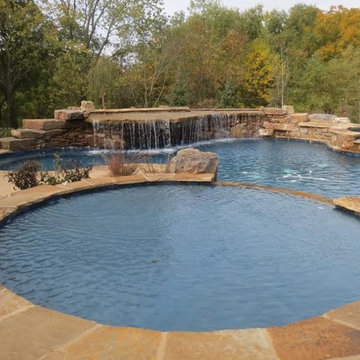
Mossy boulders accent the edge of this two level pool and jacuzzi in a natural and rustic design. Flagstone coping borders the swimming pool. Huge rocks cantilever over the main swimming pool allowing a sheet of water to cascade down. You can swim through the wide waterfall to a seat bench for shade from the sun. A six foot infinity edge separates the upper toddler pool from the main lower pool. Adding to the entertainment area is an outdoor kitchen which sits in a lanai (a covered porch design originating in Hawaii). The lanai pulls the elements of outside closer to the home. Along the back side of the lower level pool sits a rare stone retaining wall. The type of stone used for this wall is not typically found in this region. The retaining wall contains a built in plant pocket.

 Mr Shishir
Computer numerical control or CNC machining is an automated manufacturing process used to make components of devices or appliances. It employs computer-aided software and codes to control complex machinery, including mills, grinders, lathes, and cutters. It is used to manufacture multiple parts from diverse raw materials such as aluminium, brass, acrylic, plastics, and wood.
It is a subtractive process in which a solid piece of material is carved into a 2D or 3D object of any shape or size. This enables the creation of prototypes for parts and finished products. It also enables automated mass production of parts such as fittings, housings, brackets, gears, fasteners, shafts, electrical contacts, and moulds using specific materials.
This process is a quick, safe, versatile, precise, and cost-effective production method. These advantages allow it to be used for various applications in industries ranging from healthcare and electronics to aerospace and the military. Moreover, it is used to create parts for several objects you use at home every day.
Here are 10 things in your house that you may not know are manufactured using CNC machining:
1. Kitchen Appliances
Several manufacturers employ CNC machines to create heavy-duty parts for durable kitchen appliances. Through pre-programmed software, the machine produces parts of different shapes, sizes, colours, and textures using a variety of materials like metals and plastic.
CNC-machined components of kitchen appliances include metal plates, covers, textured handles, pins, rings, and wires. These small but essential parts improve the utility of your everyday kitchen appliances such as the electric can opener, dishwasher, hand blender, grinder, and coffee brewing machine.
2. Electronic Devices
Components of electronic devices are usually small in size and have fine details and shapes that require precision machining. CNC machines offer the flexibility and efficiency to manufacture large and small parts of various shapes, sizes, and materials required to complete electronic appliances.
CNC machining enables accurate, computerized prototyping and the production of detailed, intricate, and sensitive parts from a wide range of metals. It can be used to produce parts such as connectors, housing, wires, heat sinks, semiconductors, and fixtures. It can also be used to create the chassis or the framework of various electronic appliances.
You can find CNC-machined parts in the following electronic home appliances:
- Laptops and Computers
- Mobile phones
- Cameras
- Television
- Speakers
- Keyboard
- Mouse
- Router
- Refrigerator
- Air conditioner
- Washing machine
- Fans, air purifiers, and humidifiers
- Robotic vacuum cleaners
- Remote control
 InnovationLand
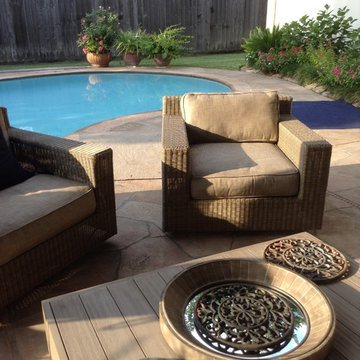
Outdoor furniture from Restoration Hardware really made this Houston outdoor living space design project shine.
“It really went well,” says Wayne Franks, owner of Outdoor Homescapes of Houston. “It's not a huge space, but moving the existing two columns about four feet and bringing the roof out only three feet made all the difference in the world.”
“This particular client wanted a larger space to entertain,” says senior designer Lisha Maxey, who served as an outdoor furniture consultant while managing construction for the project.
The original space, Lisha explains, had two oddly placed columns blocking a clear view of the beautiful pool area from inside the home. “We removed those columns and gave her three more feet of roof, which extended her living area while also giving her the view she wanted.”
Since the client - a woman in her mid-50s with grown children who visit frequently - only wanted a small outdoor kitchen island with a 30-inch RCS grill Outdoor Homescapes closed up a French door that led from the master bedroom (which she never used) and created a new stucco wall for the kitchen.
“I would definitely call the style of this space ‘transitional,” says Lisha. The client is a very eclectic world traveler and a collector of art, yet wanted her outdoor living space to feel like a warm, homey living room once we placed the furniture and décor. In the end, her finishes centered around rustic stone, detailed columns and furniture leaning towards the contemporary.”
Much of the warmth in the space, she says, comes from the colors of the dry-stacked Sunset Canyon ledgestone. “It looks just like it sounds – like the sun setting in a deep canyon!”
“The columns are unique – decorative and fluted,” adds Wayne.
The client, who’d received five free hours of outdoor furniture consultation as part of an ongoing promotion, also wanted Lisha to help her select, buy and help place furnishings.
“I believe that now - more than ever - consumers are looking for turn-key operations in any type of service industry - a ‘one-stop-shop,’ so to speak,” says Lisha. “It gives us a more personal touch with the client, as well as an edge in the industry in terms of selling our designs, as the client is reassured that we’ll work with them in every aspect to give them the outdoor living space of their dreams.”
The client ended up choosing the Biscayne collection – including a chair that rocks and swivels - from Restoration Hardware. They also went with a lower, unique teak coffee table from the Belvedere collection.
“We mixed wicker with teak for an equally soft and hard look and added pops of color to bring out the beautiful art collection inside,” says Lisha. “The neutral gray wicker, by the way, was the perfect match for the distressed teak coffee table and credenza. The grays of the Key West granite countertop also echoed this color palette.”
For the fabric, Lisha helped keep it neutral with a Mocha linen and popped the color with royal blue throw pillows matching the area rug: “To make the space truly her own, we added some unique copper pots from her collection and a few items she's collected abroad.”
Ready to let outdoor furniture transform your living space? Contact us, and we'll get your outdoor design project started!
Find the right local pro for your project
 ARK DESIGN
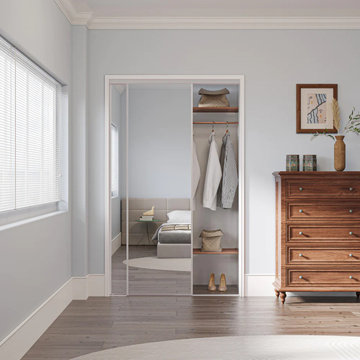
【Package Includes】2 door panels, a complete hardware set, and a detailed instruction manual. You do not need to buy any other parts; just follow the instructions to install.
【Door Size】 Each size of sliding door contains two door panels. The 48“ x 80" slidiing door actual panel size is 2 x 25 "(Width) x 78.58"(Height) x 1.18 ". The 60"x80" sliding door actual panel size is 2 x 31" (Width) x 78.58"(Height) x 1.18 ".
【Widely Used】The elegant design matches your home perfectly. You can use it in your closet, storage room, etc. We offer various sizes to accomodate different openings.
【Top-notch Hardware】Our hardware only requires a top track, keeping your floor clear and eliminating the need to damage your floor or carpet. Our hardware has passed a 100k+ open & close test, ensuring lifelong usage.
【Dedicated Service】We are dedicated to providing you with quality products and services. If you have any questions regarding your purchase, please feel free to contact us and we will do our best to help you solve the problem.
 Vintage Cellars & Saunas
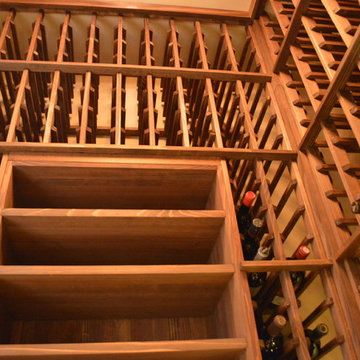
This Orange Country California wine cellar racking system contains rectangular bins to maximize storage capacity.
Vintage Cellars has built gorgeous custom wine cellars and wine storage rooms across the United States and World for over 25 years. We are your go-to business for anything wine cellar and wine storage related! Whether you're interested in a wine closet, wine racking, custom wine racks, a custom wine cellar door, or a cooling system for your existing space, Vintage Cellars has you covered!
We carry all kinds of wine cellar cooling and refrigeration systems, incuding: Breezaire, CellarCool, WhisperKool, Wine Guardian, CellarPro and Commercial systems.
We also carry many types of Wine Refrigerators, Wine Cabinets, and wine racking types, including La Cache, Marvel, N'Finity, Transtherm, Vinotheque, Vintage Series, Credenza, Walk in wine rooms, Climadiff, Riedel, Fontenay, and VintageView.
Vintage Cellars also does work in many styles, including Contemporary and Modern, Rustic, Farmhouse, Traditional, Craftsman, Industrial, Mediterranean, Mid-Century, Industrial and Eclectic.
Some locations we cover often include: San Diego, Rancho Santa Fe, Corona Del Mar, Del Mar, La Jolla, Newport Beach, Newport Coast, Huntington Beach, Del Mar, Solana Beach, Carlsbad, Orange County, Beverly Hills, Malibu, Pacific Palisades, Santa Monica, Bel Air, Los Angeles, Encinitas, Cardiff, Coronado, Manhattan Beach, Palos Verdes, San Marino, Ladera Heights, Santa Monica, Brentwood, Westwood, Hancock Park, Laguna Beach, Crystal Cove, Laguna Niguel, Torrey Pines, Thousand Oaks, Coto De Caza, Coronado Island, San Francisco, Danville, Walnut Creek, Marin, Tiburon, Hillsborough, Berkeley, Oakland, Napa, Sonoma, Agoura Hills, Hollywood Hills, Laurel Canyon, Sausalito, Mill Valley, San Rafael, Piedmont, Paso Robles, Carmel, Pebble Beach
Contact Vintage Cellars today with any of your Wine Cellar needs!
Vintage Cellars
904 Rancheros Drive
San Marcos, California 92069
(800) 876-8789
 McAdams Remodeling & Design
Jesse Young of Real Estate Photography
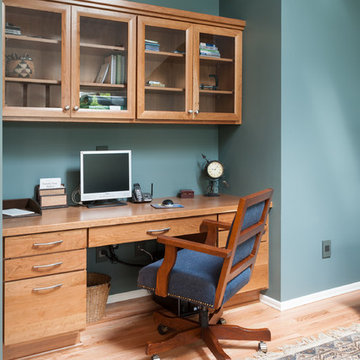
Small elegant built-in desk light wood floor home office photo in Seattle with blue walls
Small elegant built-in desk light wood floor home office photo in Seattle with blue walls
 User
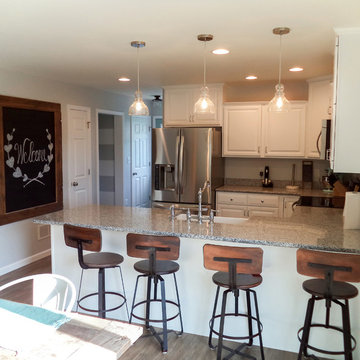
UserKitchen in the Blair 3
-
Unique Features of the Blair 3: The Blair 3: Approximately 1,568 square foot two-story home, 3 bedrooms, 2 1/2 baths, large living room and master bedroom, concrete stoop at front door and side entrance.
All representations of home ideas, plans, features are for illustrative purposes only and are subject to change as we deem necessary to serve our Customers. Many images may contain custom features we have incorporated at the request of our Customers. Brookside Homes assumes no responsibility for inaccurate information displayed on this website. For any specific information, please contact a Sales Counselor directly.
16-29M

 Gallery KBNY
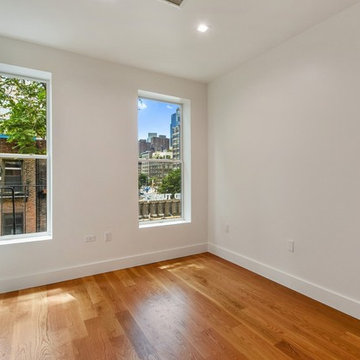
The owner of this historic and landmarked town-home renovation in Hudson Square, originally built in 1826, hired Gallery Kitchen and Bath to fully gut-renovate this 3-unit row-home. The scope of work included a full-scale renovation of the owners unit, including the renovation of the kitchen, one 4-piece master ensuite bathroom, one 3-piece bathroom with a walk-in steam shower, and a beautiful powder room. Additional work in the owners unit also included flooring, electrical upgrade, major plumbing work, new HVAC system, restoration of a fireplace, installation of a fully integrated smart home system and landmarked approved windows.
CELLAR RENOVATION IN NYC LANDMARKED TOWN-HOME
Rounding out the owners unit we renovated the cellar, which was converted into an entertainment space and featured a custom glass curtain wall, along with a custom staircase with an exposed brick wall. During the demolition phase of the cellar, our team discovered 56 wine jugs filled with wine from the prohibition era, leading us to name this project the prohibition house. For the two tenant units, Gallery Kitchen and Bath undertook the renovation of 2 kitchens, 4 bathrooms, new hardwood flooring throughout, along with detailed carpentry work in the entire home.
WHY GALLERY KITCHEN AND BATH
After interviewing multiple contractors, our client decided on Gallery Kitchen and Bath primarily because of our turnkey design, selection, and build process. In a renovation of this magnitude it is crucial to have a centralized full service contractor under one roof to handle all of the aspects and simultaneous moving parts of the project. Decentralizing the entire process by having multiple unaffiliated vendors handle various parts of the process can easily become chaotic, time consuming, and costly.
Because Gallery Kitchen and Bath undertook the entire process, from the design of the entire space to the selection and procurement of all finishes and fixtures, down to the procurement of all permits and LPC filings, it made a seemingly chaotic project a’lot more manageable.
PHASE 1: DESIGN, SELECTION, PROCUREMENT
Our client wanted the renovation to incorporate a fully modern design into his Hudson Square town-house. Being that this is a landmarked property, the exterior facade had to be restored and kept with the original aesthetic, the interior of the home however was a whole different story.
In keeping up with the modern aesthetic, our designers went to work to design a custom kitchen that included fully custom flat panel base cabinets in a white high gloss finish and an absolute matte black appliance/pantry wall. The kitchen design also included a white quartz countertop and backsplash with a waterfall edge island. To bring warmth to the modern kitchen, our designers incorporated a rifted and quartered select oak wood floor in a herringbone pattern, and custom blended stain with matte polyurethane finish. For continuity, the wood floor was also extended throughout the entire owners unit.
In the ensuite bathroom we created a “wet area” which houses a standalone soaking tub as well as a beautiful rainfall shower, completely leveled with the rest of the floor in the bathroom. Some highlights within this space include a tiled square drain, large niche cutouts with a carrera marble accents. Once again, to bring warmth to this modern bathroom, our designers incorporated a floating rustic oak vanity and carrera marble mosaic floor tile.
Last on the list on the owners unit floor was the cellar, which our client wanted to utilize as an entertainment space for his friends and family. During the design phase, we incorporated an open concept layout, wedding the indoor and outdoor space with a custom glass curtain wall. The design also included custom walnut built-ins that serve as a custom wet bar and storage piece.
With the design approved and selections made our office liaisons moved to procure all of the material selections and finishes.
PHASE 2: DEMO
Because this home is almost two centuries old, we had to take extra precaution during the interior demolition phase of the project. One specific area that we had to pay special attention to was the existing brick. Over time the mortar in old brick homes deteriorates and turns into dust – for this reason it was extremely important that a thorough and ongoing inspection of the exteriors and interior walls took place during the demolition of the space.
After 14 30-yard debris containers and 56 wine filled jugs from the prohibition era later , the demolition of this historic Hudson Square town-home came to an end. If you are wondering whether we tried the wine? After notifying the owner we agreed to open one of the jugs and try them together – nothing but vinegar.
PHASE 3: BUILD
One of the challenges in a renovation project of this scope is nailing down the logistics and delivery of fixtures and finish material. Adding to this challenge was a narrow entry door that required us to use a boom truck in order to deliver some of the larger materials on site. To ensure a succinct time schedule, we boomed all of the materials through the 3rd floor for the entire project and worked our renovation work from top floor to cellar. This technique also insured that any unexpected water issues during the renovation process would not damage a finished floor.
With all roughing and framing complete, the Gallery KBNY team proceeded to execute on the design plan.
THE REVEAL
From what was once a dilapidated town-home with nothing but potential, to a glamorous and luxurious modern interior space – the prohibition house was complete. Ready to speak with us about your renovation project? Contact us to schedule your free consultation and let Gallery KBNY show you why our all-inclusive approach to your renovation is the smartest way to renovating in NYC.
 Turbo Beds
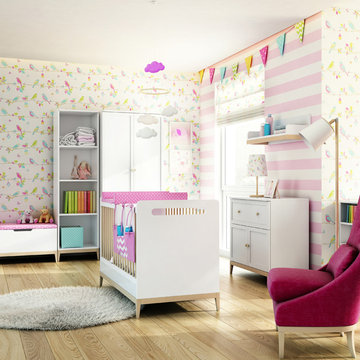
White baby cot first will serve as a playpen for your baby and then change into bed for a larger child. Baby cot has many conveniences that will make your toddler grow in a safe environment. We offer two sizes of beds. Smaller one you can easily put in your bedroom to have close contact and watch over his bed. For an older child we offer practical single bed with option of pull-out drawers for additional bedding. Our box for toys, which carry toys and other children's accessories may become irreplaceable. Will also serve as a table or extra seating.
 Intown Craftsmen
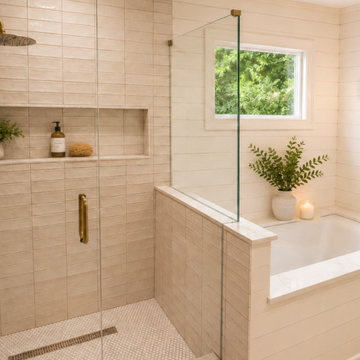
As part of a comprehensive whole-house renovation in Decatur, GA, Intown Craftsmen completely transformed this master bathroom suite into a clean, functional, and beautifully finished retreat.
Our priority on every project is executing high-end visual details while maintaining absolute structural and technical integrity beneath the surface.
Scope of Work & Technical Highlights:
Site Preparation & Protection: Set up complete containment by closing off HVAC vents and doorways to protect the home’s air quality and living space during full demolition.
Prep & Substrate: Performed complete rough-in plumbing and electrical updates, followed by full wall repairs and skim coating for flush, seamless finishes.
Advanced Waterproofing: Installed a state-of-the-art Schluter® waterproofing shower system to ensure long-term moisture protection and durability.
Custom Tile Work: Laid new tile flooring and installed precision tile on the shower walls, extending coverage up to 8 feet.
Fixtures & Carpentry: Installed a new vanity, modern lighting fixtures, and custom carpentry detailing—including replacing all trim, door casings, and shoe molding.
Paint & Finish: Finished with professional-grade paint on the ceiling, walls, and trim to tie the space together.
Services Provided: Master Bathroom Remodeling, Kitchen Remodeling, Basement & Attic Finishing, & Full-Home Renovations
Service Area: Inside the Perimeter (ITP) Atlanta & Decatur, GA
? Planning a master bath update or whole-house remodel? Visit www.intowncraftsmen.com to fill out our contact form and schedule your free in-person estimate.
 Weninger Construction & Design Ltd
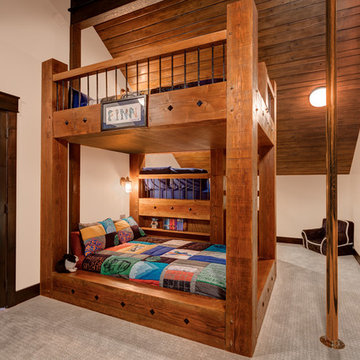
Custom three level bunk beds with fire pole to create a kids paradise. The middle bunk contains a reading nook underneath, while the built in stairs have drawers for storage.
 ATA Architects Inc
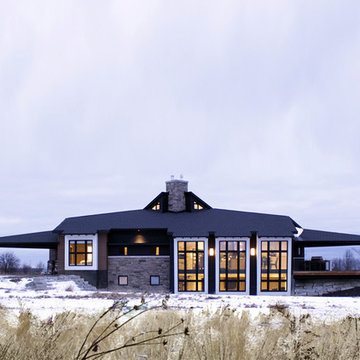
Function meets form in the Delta House, which incorporates innovative building solutions for our challenging rural Canadian climate. Perhaps more akin to aeronautics than architecture, biomimetic processes drove the problem-solving approach while seeking multiple functions for each component. A typical Canadian home grows up and out of the site, exposing more of the facade to the elements. Instead of building up, the focus here was to make better use of the lower level. A section of the house was dug out on the south side, making room for three main glazed boxes. The spaces and bedrooms of a typical second floor were transferred to the more protected basement, thus lowering the volume of conditioned air within the dwelling.
To minimize energy losses through the glazing, ATA centralized the windows on the south side of the building, while minimizing the glazing on other facades. The centralized windows became the “three sisters” allowing the winter sun into the main floor and lower level of the house. The aerodynamic delta shape of the building was tested in a wind tunnel and was designed to minimize energy loss due to contact with the turbulent winter wind. The sisters are tilted 10 degrees towards the sun, leveraging the properties of glass as a reflector, when the sun is at a high angle of incidence in the summer.
The house also contains an innovative thermal mass battery in the basement slab and a connected radiative masonry fireplace. Excess heat, gathered at the top of the tent-like roof is directed down and reheated through the chimney before being drawn into the basement slab for storage. Openings in the floor areas ensure the energy is equally distributed throughout the dwelling.
Read an article in the Globe and Mail about ATA’s Delta project here.
 Tile Doctor Ltd
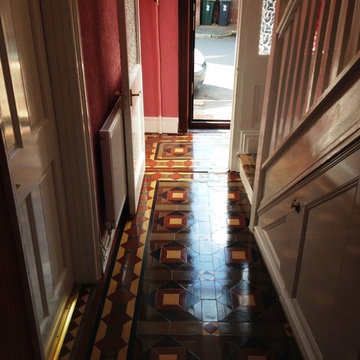
This Victorian tiled hallway at a house in the Forest of Dean had a very interesting pattern, consisting of an array of different colours, including shades of red, yellow and blue. Unfortunately, as you can see from the first photograph below, the tiles had lost all life, with the colours largely masked by months’ – or maybe even years’ – worth of ingrained dirt and muck. The floor as a whole was also suffering from a number of loose tiles that needed to be reset before it could be cleaned.
The property owner was keen to employ some professional assistance to restore the appearance of the floor and prevent it from getting in an even wrote state, and so contacted Tile Doctor who have a lot of experience working with Victorian tiled floors.
As mentioned, the loose tiles had to be repaired before the cleaning process could be started. I removed the tiles and extracted excess grout and old adhesive from the exposed concrete substrate using a vacuum, before putting the original tiles back into place and fixing them back into position carefully using fresh adhesive and matching grout.
Once happy the replaced tiles had set, I started the process of cleaning the entire area of hallway tiles using a combination of Tile Doctor Remove and Go to strip away the old sealer and Tile Doctor NanoTech HBU (formerly Ultra Clean) remover to get the tiles as clean as possible. The latter product contains nano-sized cleaning particles (hence the name) to reach difficult areas of trapped dirt, making it more effective than your run-of-the-mill tile cleaner. These two products were scrubbed into the tiles using a rotary machine fitted with a black scrubbing pad. The floor was then rinsed with water and the soiled residue was extracted with a wet vacuum.
I then paid particular attention to the grout, applying our alkaline-based multi-purpose cleaner Tile Doctor Pro-Clean to the grout lines, before scrubbing them with a narrow grout brush. This quickly had the grout looking clean again: I’d even go as far as to say that it matched it seamlessly with the fresh grout that had just been laid.
With the tile and grout as clean as it was possible to get it, I gave the whole floor a final rinse to neutralise the excess chemicals. I extracted as much water as possible with a wet vacuum and left the floor to dry overnight.
My first task upon returning to the property the next day was to check for any dampness. If you neglect to remove all excess moisture from the surface of the tiles before sealing it is more than likely going to cloud the sealer, rendering it less effective I’m protecting the stone against ingrained dirt and stains.
Once satisfied that the floor was completely dry, I proceeded to seal the tiles using multiple costs of Tile Doctor Seal and Go. Seal and Go is what we would classify as a topical sealer, meaning it rests on the surface of the tiles to act as a durable layer of protection against all kinds of muck. While providing surface protection, Seal and Go also adds a nice subtle sheen to the tiles, as per the customer’s request.
The customer was quite amazed at how quickly the appearance of the tiles had been restored. It was fantastic to see the colours we both knew were hidden in the tiles come to life once again. Another satisfied customer for sure!
Paul Wales
Monmouthshire Tile Doctor
 ATA Architects Inc
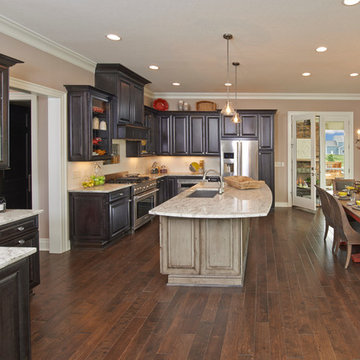
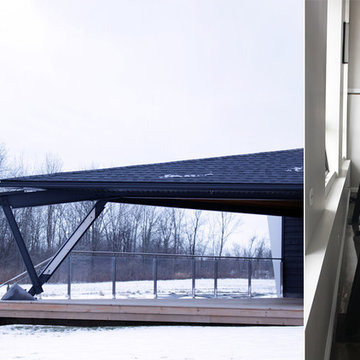
Function meets form in the Delta House, which incorporates innovative building solutions for our challenging rural Canadian climate. Perhaps more akin to aeronautics than architecture, biomimetic processes drove the problem-solving approach while seeking multiple functions for each component. A typical Canadian home grows up and out of the site, exposing more of the facade to the elements. Instead of building up, the focus here was to make better use of the lower level. A section of the house was dug out on the south side, making room for three main glazed boxes. The spaces and bedrooms of a typical second floor were transferred to the more protected basement, thus lowering the volume of conditioned air within the dwelling.
To minimize energy losses through the glazing, ATA centralized the windows on the south side of the building, while minimizing the glazing on other facades. The centralized windows became the “three sisters” allowing the winter sun into the main floor and lower level of the house. The aerodynamic delta shape of the building was tested in a wind tunnel and was designed to minimize energy loss due to contact with the turbulent winter wind. The sisters are tilted 10 degrees towards the sun, leveraging the properties of glass as a reflector, when the sun is at a high angle of incidence in the summer.
The house also contains an innovative thermal mass battery in the basement slab and a connected radiative masonry fireplace. Excess heat, gathered at the top of the tent-like roof is directed down and reheated through the chimney before being drawn into the basement slab for storage. Openings in the floor areas ensure the energy is equally distributed throughout the dwelling.
Read an article in the Globe and Mail about ATA’s Delta project here.
 Fredman Design Group
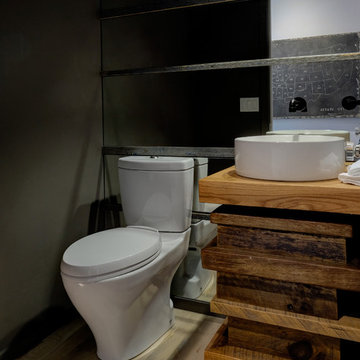
The juxtaposition of raw, weathered and finished woods with sleek whites, mixed metals and soft textured elements strike a fabulous balance between industrial, rustic and glamorous – exactly what the designers envisioned for this dream retreat.

 Carmichael Environmental
Any size container will do to grow food in your own backyard. Here is a a featuring of our corten beds full of summer herbs, flowers, & greens. Happy growing and eating from your backyard this summer! Contact us today to help design, build, or prepare your gardens for seeding and planting.
 yardscapes Inc.
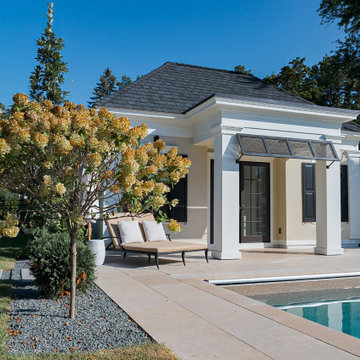
This Edina, MN project started when the client’s contacted me about their desire to create a family friendly entertaining space as well as a great place to entertain friends. The site amenities that were incorporated into the landscape design-build include a swimming pool, hot tub, outdoor dining space with grill/kitchen/bar combo, a mortared stone wood burning fireplace, and a pool house.
The house was built in 2015 and the rear yard was left essentially as a clean slate. Existing construction consisted of a covered screen porch with screens opening out to another covered space. Both were built with the floor constructed of composite decking (low lying deck, one step off to grade). The deck also wrapped over to doorways out of the kitchenette & dining room. This open amount of deck space allowed us to reconsider the furnishings for dining and how we could incorporate the bar and outdoor kitchen. We incorporated a self-contained spa within the deck to keep it closer to the house for winter use. It is surrounded by a raised masonry seating wall for “hiding” the spa and comfort for access. The deck was dis-assembled as needed to accommodate the masonry for the spa surround, bar, outdoor kitchen & re-built for a finished look as it attached back to the masonry.
The layout of the 20’x48’ swimming pool was determined in order to accommodate the custom pool house & rear/side yard setbacks. The client wanted to create ample space for chaise loungers & umbrellas as well as a nice seating space for the custom wood burning fireplace. Raised masonry walls are used to define these areas and give a sense of space. The pool house is constructed in line with the swimming pool on the deep/far end.
The swimming pool was installed with a concrete subdeck to allow for a custom stone coping on the pool edge. The patio material and coping are made out of 24”x36” Ardeo Limestone. 12”x24” Ardeo Limestone is used as veneer for the masonry items. The fireplace is a main focal point, so we decided to use a different veneer than the other masonry areas so it could stand out a bit more.
The clients have been enjoying all of the new additions to their dreamy coastal backyard. All of the elements flow together nicely and entertaining family and friends couldn’t be easier in this beautifully remodeled space.

 Continental Ponds
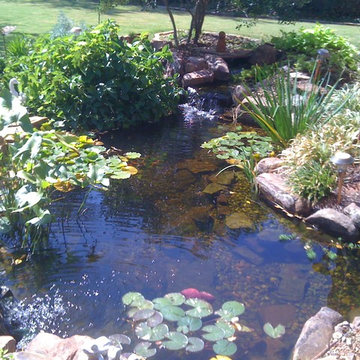
Garden Pond Oklahoma City, OK, Waterfall Pond, Ecosystem Fish Pond, Koi Pond, Landscape Pond, Pond Designer, Pond Contractor, Pond Service, Pond Maintenance, Pond Installer, Pond Builder, Pond Repair, Pond Design by Continental Ponds.
Check out our website http://www.continentalponds.com and give us a call 405.834.2291.
Continental Ponds, installs ponds, water features and low maintenance water gardens. Renovation, Repair and maintenance are our specialties.
Certified Aquascape Contractor of Oklahoma. Service areas include Oklahoma City, Norman, Moore, Nichols Hills, Edmond, Yukon, Shawnee, Newcastle, Mustang, Bethany, Piedmont, Guthrie, Jones, Chandler, Midwest City, Del City, Shawnee, Tuttle, Blanchard, Bridge Creek , Warr Acres, Woodlawn Park
Contact Continental Ponds here: http://www.continentalponds.com/contact.html
For more info about our Ecosystem Ponds, please click: https://www.facebook.com/notes/continental-ponds-inc/aquascape-pond-ecosystem-water-gardens-pond-contractor-pond-installation-contine/10151455072550815
Continental Ponds of Yukon, OK, 405.834.2291, is a Master Certified Aquascape Contractor, Landscape Designer, Outdoor Lighting Designer, Installer, Builder, Contractor and Design Service Company from Yukon, Oklahoma. We have professional Installation and Design Services available for the following:
Landscape Design
Backyard Ponds and Waterfalls Design & Construction
Low Voltage Landscape Lighting
LED Landscape Lighting
Swimming Ponds
Ecosystem Ponds
LED Outdoor Lighting
Retaining Walls
Fountains
Water Features
Pondless Waterfalls
Pond Maintenance and Design
Aquatic and Under Water LED Lights
Bubbling Boulders and Urns
Garden Ponds
Fish or Koi Ponds
Waterfall Ponds
Low Maintenance Plantings
Aquascape Rainwater Collection Systems
We serve Oklahoma City, Norman, Moore, Nichols Hills, Edmond, Yukon, Shawnee, Newcastle, Mustang, Bethany, Piedmont, Guthrie, Jones, Chandler, Midwest City, Del City, Shawnee, Tuttle, Blanchard, Bridge Creek , Warr Acres, Woodlawn Park
 Tile Doctor Ltd
If you have a tiled shower area in your home, it’s very likely you’ve experienced problems with the grout becoming excessively dirty and ridden with displeasing black spots of mould. The underlying issue is due to inadequate ventilation which can be a real problem in modern insulated houses and occasionally the grout can get so imbued with contamination that the problem needs to be resolved professionally.
In the case of this Ceramic tiled shower area, located at a property in Galgate, Lancashire, mould had turned the grout black and had got into the sealant strip around the base. The property owner had tried using the run-of-the-mill cleaning products you can buy in superstores, but they simply couldn’t get the job done. So, she contacted me to see what could be done.
At Tile Doctor, we come across the problem of mouldy shower tiles very often. Excess soaps and shampoos – many of which contain chemicals that harmful to the grout – can quickly build-up if not removed, causing mould and soap scum to emerge quickly, and before you know it, you have a problem like this one.
Thankfully, with the right strength product and cleaning methods, mould can be removed quite easily. The cleaning product used here was Tile Doctor Mould Away, which does what it says on the bottle and can quickly remove mould and black spots from grout and silicone. I applied Mould Away to the grout and surrounding Ceramic tiles and left it to dwell for a short period, before starting to clean the affected areas carefully using soft nail brushes and a small amount of water.
Sometimes it is necessary to repeat this process several times to achieve the best possible results, but in this case two attempts was all it took to get the grout looking like new once again.
Following the cleaning, the area was rinsed thoroughly with water, before bring dried off quickly with a heat gun on a low setting. I then sealed the grout with a single coat of Tile Doctor Wall Grout Sealer, which is a water-based sealer designed to protect against water, oil and acid-based contaminants, and stop them from spoiling the appearance of the grout. It also provides a transparent finish that does not diminish the original colouring of the grout. To add the finishing touches, I polished off the Ceramic tiles as these were already fully glazed and did not require any extra sealer.
The before and after photos are a testament to how significantly the condition and appearance of the grout was quickly improved and needless to say, the customer was very satisfied with the result.
Russell Taylor
Lancashire Tile Doctor
 ATA Architects Inc
Function meets form in the Delta House, which incorporates innovative building solutions for our challenging rural Canadian climate. Perhaps more akin to aeronautics than architecture, biomimetic processes drove the problem-solving approach while seeking multiple functions for each component. A typical Canadian home grows up and out of the site, exposing more of the facade to the elements. Instead of building up, the focus here was to make better use of the lower level. A section of the house was dug out on the south side, making room for three main glazed boxes. The spaces and bedrooms of a typical second floor were transferred to the more protected basement, thus lowering the volume of conditioned air within the dwelling.
To minimize energy losses through the glazing, ATA centralized the windows on the south side of the building, while minimizing the glazing on other facades. The centralized windows became the “three sisters” allowing the winter sun into the main floor and lower level of the house. The aerodynamic delta shape of the building was tested in a wind tunnel and was designed to minimize energy loss due to contact with the turbulent winter wind. The sisters are tilted 10 degrees towards the sun, leveraging the properties of glass as a reflector, when the sun is at a high angle of incidence in the summer.
The house also contains an innovative thermal mass battery in the basement slab and a connected radiative masonry fireplace. Excess heat, gathered at the top of the tent-like roof is directed down and reheated through the chimney before being drawn into the basement slab for storage. Openings in the floor areas ensure the energy is equally distributed throughout the dwelling.
Read an article in the Globe and Mail about ATA’s Delta project here.
25