
Search results for "Dating recommendations" in Home Design Ideas

 TaylorPro Design and Remodeling, Inc.
"When we bought our house in Poway 11 years ago, we were so happy with our huge master bath and Jacuzzi tub. It was such a huge step-up from our prior home. But just like the rest of the house, the master bath was already almost 20 years old and getting out dated and in need of remodeling. We broke up our remodeling projects into every couple of years, doing what we could ourselves and hiring out for the rest. The master bath was the last project and much too big for us to do on our own. We got 3 quotes from 3 contractors listed on Angie’s list which all had good reviews. One was a major re modeler and the other two were smaller contractors. We ended up going with TaylorPro because he was right in the middle and had great reviews.
Kerry was very responsive getting us a timely estimate and had great suggestions for what we were looking for. From the start to finish it turned out to be a wonderful experience! To our delight, they were able to get started ahead of what we were told. Everything went almost as scheduled and we were informed constantly on where we were in the project. Kerry was very responsive to all our concerns or requests and we were never left wondering what the next step would be. His crew was wonderful, so polite and hard working. They were very professional, on time, considerate and knew exactly what they were doing.
There were certain things we were really looking for in the remodel. First off, the bathroom was pretty large with a high ceiling. In the winter months, it was always really cold and hard to heat. To solve that we had TaylorPro install heated flooring beneath the travertine tiles. We also needed a custom vanity that would conceal hair appliances, most of our personal toiletries and have enough storage for everything else. The cabinetry was custom designed to exactly what we were looking for. Lastly, we wanted a classic, timeless look using tumbled travertine. After consulting with his designer we were able to select all the tile, accent tile and a beautiful frameless glass shower enclosure.
The finished project was beyond our highest expectations and we won’t hesitate to use Kerry and his crew for any future jobs or recommend him to family and friends."
~ Mark and Amy B, Clients
Frameless shower door, glass tile with rope border, dark and light travertine tiles on walls, travertine on floor, heated floor by NuHeat, tub and sinks by Kohler, shower/tub/vanity fixtures Hansgrohe, toilet Toto, custom cabinets by Thead Custom Cabinetry.
Photo by Kerry W. Taylor
 TaylorPro Design and Remodeling, Inc.
"When we bought our house in Poway 11 years ago, we were so happy with our huge master bath and Jacuzzi tub. It was such a huge step-up from our prior home. But just like the rest of the house, the master bath was already almost 20 years old and getting out dated and in need of remodeling. We broke up our remodeling projects into every couple of years, doing what we could ourselves and hiring out for the rest. The master bath was the last project and much too big for us to do on our own. We got 3 quotes from 3 contractors listed on Angie’s list which all had good reviews. One was a major re modeler and the other two were smaller contractors. We ended up going with TaylorPro because he was right in the middle and had great reviews.
Kerry was very responsive getting us a timely estimate and had great suggestions for what we were looking for. From the start to finish it turned out to be a wonderful experience! To our delight, they were able to get started ahead of what we were told. Everything went almost as scheduled and we were informed constantly on where we were in the project. Kerry was very responsive to all our concerns or requests and we were never left wondering what the next step would be. His crew was wonderful, so polite and hard working. They were very professional, on time, considerate and knew exactly what they were doing.
There were certain things we were really looking for in the remodel. First off, the bathroom was pretty large with a high ceiling. In the winter months, it was always really cold and hard to heat. To solve that we had TaylorPro install heated flooring beneath the travertine tiles. We also needed a custom vanity that would conceal hair appliances, most of our personal toiletries and have enough storage for everything else. The cabinetry was custom designed to exactly what we were looking for. Lastly, we wanted a classic, timeless look using tumbled travertine. After consulting with his designer we were able to select all the tile, accent tile and a beautiful frameless glass shower enclosure.
The finished project was beyond our highest expectations and we won’t hesitate to use Kerry and his crew for any future jobs or recommend him to family and friends."
~ Mark and Amy B, Clients
Frameless shower door, glass tile with rope border, dark and light travertine tiles on walls, travertine on floor, heated floor by NuHeat, tub and sinks by Kohler, shower/tub/vanity fixtures Hansgrohe, toilet Toto, custom cabinets by Thead Custom Cabinetry.
Photo by Kerry W. Taylor

 Zelaya Properties LLC
We used: Custom cherry cabinetry in Arts & Crafts Shaker style by Kabinart in Boulder and Espresso stains. Liberty Hardware Venetian bronze 1-1/2" cabinet knobs. KitchenAid Architect II Series 22 CF counter-depth French door refrigerator. KitchenAid Architect Series II 27" convection single wall oven. KitchenAid 36" 6-burner dual fuel freestanding commercial-style range. KitchenAid Architect II Series 24" dishwasher. Sharp Insight Pro Series 24" built-in microwave drawer (Model #KB6524PS). Crystorama Solaris 12" wide pendant lights in English bronze. Granite countertops in Brown Fantasy. 3"x6" polished marble backsplash.
Paint colors:
Walls: Glidden Silver Cloud 30YY 63/024
Ceilings/Trims/Doors: Glidden Swan White GLC23
Robert B. Narod Photography
Find the right local pro for your project
 TaylorPro Design and Remodeling, Inc.
"When we bought our house in Poway 11 years ago, we were so happy with our huge master bath and Jacuzzi tub. It was such a huge step-up from our prior home. But just like the rest of the house, the master bath was already almost 20 years old and getting out dated and in need of remodeling. We broke up our remodeling projects into every couple of years, doing what we could ourselves and hiring out for the rest. The master bath was the last project and much too big for us to do on our own. We got 3 quotes from 3 contractors listed on Angie’s list which all had good reviews. One was a major re modeler and the other two were smaller contractors. We ended up going with TaylorPro because he was right in the middle and had great reviews.
Kerry was very responsive getting us a timely estimate and had great suggestions for what we were looking for. From the start to finish it turned out to be a wonderful experience! To our delight, they were able to get started ahead of what we were told. Everything went almost as scheduled and we were informed constantly on where we were in the project. Kerry was very responsive to all our concerns or requests and we were never left wondering what the next step would be. His crew was wonderful, so polite and hard working. They were very professional, on time, considerate and knew exactly what they were doing.
There were certain things we were really looking for in the remodel. First off, the bathroom was pretty large with a high ceiling. In the winter months, it was always really cold and hard to heat. To solve that we had TaylorPro install heated flooring beneath the travertine tiles. We also needed a custom vanity that would conceal hair appliances, most of our personal toiletries and have enough storage for everything else. The cabinetry was custom designed to exactly what we were looking for. Lastly, we wanted a classic, timeless look using tumbled travertine. After consulting with his designer we were able to select all the tile, accent tile and a beautiful frameless glass shower enclosure.
The finished project was beyond our highest expectations and we won’t hesitate to use Kerry and his crew for any future jobs or recommend him to family and friends."
~ Mark and Amy B, Clients
Frameless shower door, glass tile with rope border, dark and light travertine tiles on walls, travertine on floor, heated floor by NuHeat, tub and sinks by Kohler, shower/tub/vanity fixtures Hansgrohe, toilet Toto, custom cabinets by Thead Custom Cabinetry.
Photo by Kerry W. Taylor
 Tile Doctor Ltd
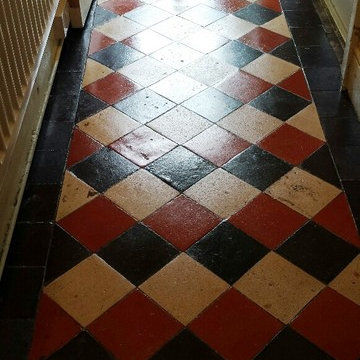
The pictures below were taken at a house in the town of Merthyr Tydfil, which is located not too far north of Cardiff. My client was keen to keep her very old Quarry tiled floor – which dated back to 1905 – intact. The floor had understandably seen a large amount of traffic in its lifetime, and was now in dire need of a professional restoration, including a thorough clean and seal.
First, I completed a survey of the area and provided my client with a quote. After completing many similar jobs in the past, I generally have a good idea of what the final result will look like. I passed on some images of a final result to my client, who was happy for me to begin my work.
On the first day, my first task was to take run some damp tests which were fine; it’s always good to know up front if there are likely to be any damp issues. Next I covered the floor with water to take the surface suction out and waited fifteen minutes before applying a cocktail of Tile Doctor NanoTech Heavy Build-Up cleaner mixed with Pro-Clean and Grout clean-up covering the whole floor. I then immediately starting to work the solution into the floor with a rotary machine fitted with a coarse black pad. The solution was then rinsed off with water which was then extracted with a wet vacuum as I worked. For stubborn areas I applied more of the previously mixed solution scrubbed into the floor with coarse wire wool by hand followed by further rinsing with water.
Each of the products used serves a particular purpose. Pro-Clean is a strong high-alkaline cleaner for natural stone, while NanoTech HBU is a particularly powerful cleaner that uses nano-sized particles to penetrate deep into the stone to get underneath and lift out ingrained dirt and stains. Grout Clean-Up, as the name implies, is a product for resolving grout related problems such as removing grout smears from tile surfaces aka grout haze.
After completing the clean I left the house for 48 hours, to leave enough time for the floor to dry completely in preparation for sealing. Upon my arrival back at the house I conducted some more damp tests to check that the floor was dry enough to seal using the previous readings as a benchmark. The results indicated that I was fine to proceed with the seal, so I applied a total of eight coats of Tile Doctor Seal & Go for durable protection. This was the product I recommended to my client as she wanted a nice, soft shine for her surface seal.
As you can see from the photos, the desired result was achieved to a high standard and needless to say my client was delighted with the transformation.
Julian Iancono
South East Wales
 Tile Doctor Ltd
I thought I would share this case history of a Yellow and Black Victorian Tiled floor that we worked on at a large house in Lancaster last year. It’s a great example of the typical problems we face with old Victorian floors, especially around door thresholds where the transition between the different foundation invariable cause problems.
I didn’t know the full history of the floor, but it was now in quite a state and recent renovation work had left the floor unstable with loose and cracked tiles. The tiles needed to be removed and then the damaged subfloor carefully scraped out and replaced. Once that was done the floor would need relaying and then cleaned and sealed so everything would blend in.
After visiting the property and providing a quotation we were given the go ahead and agreed a date to do the work.
We returned on the agreed date and set about carefully removing the loose and cracked Victorian tiles and put them aside for later use. Some would need replacing however this would not present a problem and they are still widely available, and I have several contacts I can turn to for this.
Once this was done and the subfloor exposed and cleaned up, I used self-levelling cement to bring the floor level up and in-line with the existing. This now needed to set hard, so the rest of the day was spent cleaning up the tiles we removed earlier with Tile Doctor Grout Clean-up and Pro-clean. Our goal is to reuse as many of the original tiles as possible to preserve the heritage of the floor.
The next day with the new subfloor set it was ready for tiling. This involves laying out the tiles first without adhesive carefully cutting and fitting new tiles as needed to maintain the overall pattern of the floor. Once I was happy the tiles were moved to a board and then fitted with fresh adhesive.
I came back on day three with the aim of cleaning the floor so it could be sealed however whilst inspecting my new tiling I was disappointed to discover some were not as level as I had hoped. I had noticed the replacement tiles were not the same thickness as the originals the previous day but I had worked around this by using different levels of adhesive, clearly this plan was not as effective as I had hoped for.
To counter this problem, I used a set of 50-Grit, 100-grit and then 200-grit diamond pads in sequence to mill the floor flat and remove the lippage between them. This is done with water to lubricate the process and a weighted floor buffer. The pads generate a lot of slurry and so you need to rinse this off with more water and extract all the soil after each pad.
I followed this up with various Diamond burnishing pads of increasingly finer grits across the whole floor until we achieved a consistent finish and had the added benefit of getting the whole floor clean. More water is used to rinse the tiles after burnishing and the soil extracted with a wet vacuum as before. Once done and inspected the floor was left to dry off overnight.
Tile Doctor Colour Grow was applied to enhance the appearance of the tiles and protect them going forward. This product copes well with damp which can always be a problem with old floors like this one with no damp proof membrane present.
The floor looked amazing when finished and our attention to detail had really paid off, in fact you simply could not tell we had done any tiling work or replaced any tiles. For aftercare I recommend the use of Tile Doctor Neutral Cleaner which is designed for the regular cleaning of sealed tiles.
Russell Taylor
Lancashire Tile Doctor

 Mark Of Excellence
This homeowner had been considering new exterior siding for their home in Manasquan, NJ for some time. A sub-division in Long Branch of new high end homes; caught their attention due to the combination of stone and vinyl siding that provided great curb appeal and increased value to their home. The homeowner required the knowledge of Design Build expertise and residential remodeling experience. They knew this could not be found from a siding contractor or stone mason alone. Help was needed with the Design aspect of the project that would transform their weather worn exterior into a beautifully built new home. Their internet research; led them to Mark of Excellence Remodeling, a Design Build Pros Preferred Network Remodeler. Before their consultation with the Project Designer they looked into the reputation of the company with the BBB where the company had an A plus rating and were able to see the company had been doing business and completed numerous projects in Monmouth County over their 28 year history.
Monmouth County vinyl and stone siding remodel in Manasquan, NJ (10)The Project Designer met with the customer and went through our needs analysis process. The customer wanted little or no future maintenance, energy efficiency and an up to date and up market appearance. We recommended a full back insulated vinyl siding material for this large home; which would improve energy efficiency and improve the value proposition of the investment. The homeowner had a very specific color combination in mind and the Project Designer determined that Somerset Wheat Prodigy Siding would be ideal in combination with Savannah Ledge Vintage Wine Boral Stone as the main two elements of the exterior. The Project Designer added some architectural accents; a stone arch front entrance to the home in conjunction two stone flower containers. Mark of Excellence Remodeling completely re-framed the front entrance working with Pella windows and doors for the entry door system. Additional features included Prodigy window lineal to give the front windows a more substantial and elegant appearance. Color coordinated exterior trim for soffits and fascia in Adobe Cream, seamless gutters and leaders in Eggshell and Wicker Keystones pull the color pallet and architectural components together.
Here is how the home looked BEFORE the exterior makeover and remodeling:
BEFORE vinyl and stone siding remodel in Manasquan, NJ (1) BEFORE vinyl and stone siding remodel in Manasquan, NJ (2)
The homeowner had a particular challenge with the projecting bay windows on the front and rear of the home. The Project Designer felt that to effectively emulate the exterior siding project the homeowner had seen in Long Branch; the application of AZEK building products exterior trim would break up the predominance of Summer Wheat on large wall areas. The homeowner had already selected low maintenance garage doors which were only available in white. With some direction on the door style from the Project Designer the use of AZEK trim was the ideal complement to the finished doors. A team experienced in emulating traditional construction using AZEK building products was brought in for the bay area detail. This Siding and Stone Project in Monmouth County New Jersey is the envy of the neighborhood!
 Tile Doctor Ltd
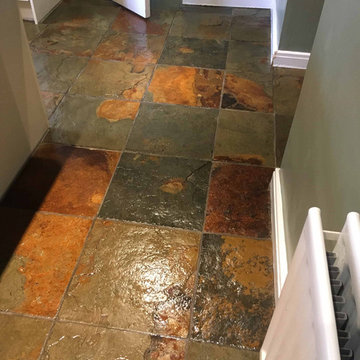
Except for general cleaning this multi-coloured slate floor had not been professionally cleaned since installation eleven years prior. Any sealer that had once been applied to the slate had long since worn off and dirt was now ingrained in the pores of the stone causing it to look dull and un-attractive. The property was in the lovely town of Staines Upon Thames, obviously situated on the banks of the River Thames and a popular place to live for London commuters.
I visited site to take a closer look at the floor and provide the client with an accurate price for renovating the stone. It turns out that the client had used all sorts of different household cleaners in an attempt to get the floor clean. Unfortunately, they were probably making the situation worse as these strong cleaning products would have actually stripped the sealant off the stone leaving it open to dirt. I carried out a test clean for them and they were very pleased to see how the floor could look. We agreed a price for the work and arranged a suitable date to carry out the work.
Cleaning a Multi-Coloured Slate Tiled Kitchen Floor
My first task was to strip off what was left of the old sealer and deep clean the stone using a dilution of Tile Doctor Remove and Go mixed 50:50 with Tile Doctor Pro-Clean. This powerful cocktail was applied to the floor and left to soak in for ten minutes before being scrubbed in using a rotary machine fitted with a black scrubbing pad.
The grout was hand scrubbed using more of the cleaning solution along the grout lines until I was happy the floor was as clean as it possibly could be. The floor was rinsed with water and the soil extracted by using the wet vacuum.
Once the floor was clear the Slate was inspected, and any stubborn areas were spot treated using the same process as before. After a final rinse and extraction, the floor was dried as much as possible using the wet vacuum and left to dry off overnight.
Sealing a Multi-Coloured Slate Tiled Kitchen Floor
I came back the next day and checked the moisture levels of the tiles using a damp meter. The floor had dried well so I had a green light for applying a new sealer. For this I used four Coats of Tile Doctor Seal and Go, allowing each coat to dry before applying the next. This product works really well on Slate and gave the tiles a nice sheen finish, the fresh sealer will also make maintenance cleaning far easier in the future.
The client was very happy with the result, the floor now looks great and the natural colours of the stone is so much more evident. For aftercare I recommended they throw away all those supermarket products and use Tile Doctor Neutral Tile Cleaner which is a pH neutral product that won’t prematurely erode the new sealer with use.
Jonathan Oldham
South Middlesex Tile Doctor

 Bilotta Kitchen & Home
This kitchen was designed by two Bilotta designers, Randy O’Kane and Danielle Florie in concert with Murphy Brothers Contracting and Tim Button of Stedila Design Inc. It is in an existing home which was renovated with an eye to the original structure and neighborhood in Rye. The kitchen itself was an addition, as well as the family room adjacent to the kitchen. The interior wall of the kitchen was the exterior brick of the existing structure. The Waterworks Grove Brickworks tile gives the appearance of the “old” existing brick but painted. The concept was to create a new kitchen with all the up-to-date technology and accessories, but with the feel of an old scullery. We used 1” thick shaker-style Bilotta Collection cabinetry in a custom paint on the perimeter and a custom stain and texture on rift cut white oak for the island. The tall pantry larders cap off the runs of countertop allowing for work tops at each vignette. By using a column refrigerator and freezer in different sizes, we could address refrigeration needs while also addressing symmetry. The Wolf range and the fireplace in the family room are centered on each other which you can see by peeking through to each room. Reclaimed floor and beams help to give this new room that “lived-in” look. Although this kitchen is big enough for catering a large party, it still has a warm family feel with a layout that will serve both functions.
Designer: Randy O’Kane & Danielle Florie, Bilotta Kitchens Photo Credit: Peter Krupenye

 Innovative Design Build
Five stars isn’t enough! Our project was to reconfigure and update the main floor of a house we recently purchased that was built in 1961. We wanted to maintain some of the unique feeling it originally had but bring it up-to-date and eliminate the closed-in rooms and downright weird layout that was the result of multiple, partial remodeling projects. We began with a long wishlist of changes which also required replacement of very antiquated plumbing, electrical wiring and HVAC. We even found a fireplace that had been walled in and needed major re-construction. Many other aspects and details on this incredible list we made included an all new kitchen layout, converting a bedroom into a master closet, adding new half-bath, completely rebuilding the master bath, and adding stone, tile and custom built cabinetry. Our design plans included many fixtures and details that we specified and required professional installation and careful handling. Innovative helped us make reasonable decisions. Their skilled staff took us through a design process that made sense. There were many questions and all were answered with sincere conversation and positive – innovation – on how we could achieve our goals. Innovative provided us with professional consultants, who listened and were courteous and creative, with solid knowledge and informative judgement. When they didn’t have an answer, they did the research. They developed a comprehensive project plan that exceeded our expectations. Every item on our long list was checked-off. All agreed on work was fulfilled and they completed all this in just under four months. Innovative took care of putting together a team of skilled professional specialists who were all dedicated to make everything right. Engineering, construction, supervision, and I cannot even begin to describe how much thanks we have for the demolition crew! Our multiple, detailed project designs from Raul and professional design advice from Mindy and the connections she recommended are all of the best quality. Diego Jr., Trevor and his team kept everything on track and neat and tidy every single day and Diego Sr., Mark, Ismael, Albert, Santiago and team are true craftsmen who follow-up and make the most minuscule woodworking details perfect. The cabinets by Tim and electrical work and installation of fixtures by Kemchan Harrilal-BB and Navindra Doolratram, and Augustine and his crew on tile and stone work – all perfection. Aisling and the office crew were always responsive to our calls and requests. And of course Clark and Eric who oversaw everything and gave us the best of the best! Apologies if we didn’t get everyone on this list – you’re all great! Thank you for your hard work and dedication. We can’t thank you enough Innovative Construction – we kind of want to do it again!
Dave Hallman & Matt DeGraffenreid
 Tile Doctor Ltd
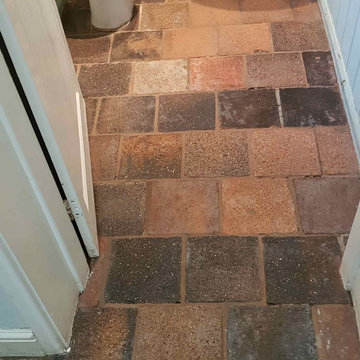
We were contacted by a client from Formby asking for advice on how to remove a thick layer of floor leveller from her Quarry tiled floor. I suspect at some point in the past a previous owner had decided to cover the tiles with lino and a cement-based levelling compound was applied to level the floor first. My client had tried to remove it herself but found it very hard going and after realising she had quite a project on her hands decided to call us instead and see if we could help with the restoration.
I worked out a quote for the client which would include removing the self-levelling compound, cleaning up the tiles and then sealing them to improve its appearance and protect it going forward. The quote was accepted, and a date agreed for the restoration to be completed which would take two days.
We have a variety of tools that we can use for removing cement but in this case, I decided to use an air operated pin gun. The head of the gun has long pins of different length which are fired at the floor gently chipping away at the floor compound, this made short work of breaking up the cement so it could be swept away. A lot easier than the method the client had previously tried.
With the floor clear of cement, it was given an acid wash with Tile Doctor Acid Gel scrubbed in with a buffing machine fitted with a black pad. The acidic formula cleans up the stone of old cement including fine particles of dust. Afterwards the gel was rinsed off the floor with water and extracted with a wet vacuum.
We let the floor dry out overnight and returned the next morning to apply the sealer. For the best results, the stone needs to be dry so before sealing I always take several moisture readings with a damp meter to make sure. The results were good so the first of what would be three coats of sealer were applied to the floor. I used Tile Doctor Colour Grow for sealing, it is an impregnating sealer that works by occupying the pores in the store thereby protecting it from within, it also brings out the colour in the stone.
Once done the floor looked great, the old self-levelling compound was gone and the rich colours in the tile had been restored. In fact is was only when finished did we realise these were in fact Baked Clay Quarry Tiles, minerals are added during manufacturing to give then colour, although 95% clay they are very tough like stone. The client was over the moon with the outcome, the floor had been restored to its’ former glory.
For aftercare I recommended the use of Tile Doctor Neutral Tile Cleaner to keep the floor in good condition. It is pH neutral so will ensure the newly applied sealer is not compromised and the floor will continue to look good for a long while to come.
Andrew Robb
Merseyside Tile Doctor
 Innovative Design Build
Five stars isn’t enough! Our project was to reconfigure and update the main floor of a house we recently purchased that was built in 1961. We wanted to maintain some of the unique feeling it originally had but bring it up-to-date and eliminate the closed-in rooms and downright weird layout that was the result of multiple, partial remodeling projects. We began with a long wishlist of changes which also required replacement of very antiquated plumbing, electrical wiring and HVAC. We even found a fireplace that had been walled in and needed major re-construction. Many other aspects and details on this incredible list we made included an all new kitchen layout, converting a bedroom into a master closet, adding new half-bath, completely rebuilding the master bath, and adding stone, tile and custom built cabinetry. Our design plans included many fixtures and details that we specified and required professional installation and careful handling. Innovative helped us make reasonable decisions. Their skilled staff took us through a design process that made sense. There were many questions and all were answered with sincere conversation and positive – innovation – on how we could achieve our goals. Innovative provided us with professional consultants, who listened and were courteous and creative, with solid knowledge and informative judgement. When they didn’t have an answer, they did the research. They developed a comprehensive project plan that exceeded our expectations. Every item on our long list was checked-off. All agreed on work was fulfilled and they completed all this in just under four months. Innovative took care of putting together a team of skilled professional specialists who were all dedicated to make everything right. Engineering, construction, supervision, and I cannot even begin to describe how much thanks we have for the demolition crew! Our multiple, detailed project designs from Raul and professional design advice from Mindy and the connections she recommended are all of the best quality. Diego Jr., Trevor and his team kept everything on track and neat and tidy every single day and Diego Sr., Mark, Ismael, Albert, Santiago and team are true craftsmen who follow-up and make the most minuscule woodworking details perfect. The cabinets by Tim and electrical work and installation of fixtures by Kemchan Harrilal-BB and Navindra Doolratram, and Augustine and his crew on tile and stone work – all perfection. Aisling and the office crew were always responsive to our calls and requests. And of course Clark and Eric who oversaw everything and gave us the best of the best! Apologies if we didn’t get everyone on this list – you’re all great! Thank you for your hard work and dedication. We can’t thank you enough Innovative Construction – we kind of want to do it again!
Dave Hallman & Matt DeGraffenreid
 Prima Luxe Property
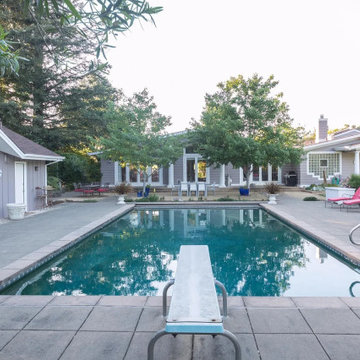
The perfect blend of design, relaxation, and wine country charm at this stunning 4-bedroom, 2-bathroom Santa Rosa vacation rental. A true mid-century modern masterpiece, this architectural gem offers panoramic vineyard views, a private pool, and seamless indoor-outdoor living—ideal for wine lovers, design enthusiasts, and group getaways.
✨ Why You’ll Love This Santa Rosa Escape
✔️ 4 Stylish Bedrooms – Plush bedding, chic mid-century decor & thoughtfully curated furnishings
✔️ 2 Spa-Inspired Bathrooms – Walk-in showers, modern vanities & luxury amenities
✔️ Private Pool & Sun Deck – Lounge under the California sun with a glass of wine in hand
✔️ Breathtaking Vineyard Views – Wake up to stunning sunrises over rolling hills
✔️ Seamless Indoor-Outdoor Living – Sliding glass doors open to a private patio oasis
✔️ Chef’s Kitchen – Premium appliances, sleek cabinetry & gourmet-ready design
? Timeless Mid-Century Elegance with Modern Comforts
Step inside a sun-drenched retreat where mid-century aesthetics meet contemporary luxury. Whether you're sipping wine on the deck, preparing a farm-to-table meal, or relaxing by the pool, every detail of this home is designed to elevate your stay.
Perfect For:
? Wine Country Weekends – Minutes from Sonoma’s finest vineyards
? Romantic Getaways – A secluded and stylish escape
???? Small Group Retreats – Ideal for friends & family vacations
? Luxury Stays – Experience high-end design & comfort
? Prime Location in Sonoma Wine Country
Explore Northern California’s best wineries, fine dining, and outdoor adventures, all just moments away:
? World-Class Wineries & Tasting Rooms – Minutes from Sonoma & Napa Valley vineyards
?️ Michelin-Star Dining – Indulge in farm-to-table cuisine & wine-pairing experiences
?️ Scenic Hiking & Biking Trails – Adventure through rolling vineyards & redwood forests
? Hot Air Balloon Rides – A bucket-list experience over wine country
?️ Boutique Shopping & Local Culture – Stroll through Healdsburg, Calistoga & St. Helena
? Premium Amenities for a Seamless Stay
✔️ Exclusive Access – Enjoy a private pool, sun deck & outdoor lounge
✔️ Fast Wi-Fi & Smart TVs – Stay connected or stream your favorite shows
✔️ Self Check-In with Smart Lock – Hassle-free & flexible arrival
✔️ Dedicated Host Support – A local team available for recommendations & assistance
✔️ Fully Licensed Rental – Vacation Rental License #LIC23-0050 ensures a worry-free stay
? Book Your Sonoma Wine Country Escape Today
Whether you're planning a luxury retreat, a romantic getaway, or a wine-tasting adventure, this designer Santa Rosa home offers the perfect setting.
? Availability is limited—secure your preferred dates now!
https://primaluxeproperty.holidayfuture.com/listings/356535
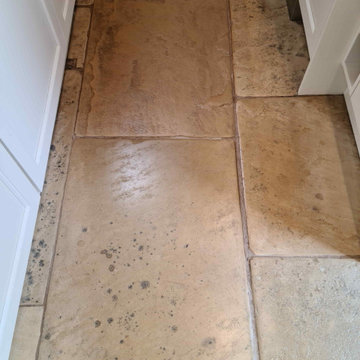 Tile Doctor Ltd
These pictures are of a beautiful Sandstone floor in Ilkley, the tiles were sourced from Lapicida of Harrogate and installed around twelve years prior. If you take a look at their website now you will see they are selling a similar London White Sandstone for nearly £100 per m2. This floor was 35 square metres so clearly this was a significant investment for the owner at the time.
After twelve years of use however the sealer had worn off the floor and dirt had become ingrained in the pores of the stone making it very difficult to keep clean. A good sealer takes a long time to wear off so the change to the appearance of the stone happens so slowly you don’t notice it. The floor was now looking permanently dirty, and the owner of the property had decided it was time to get it renovated.
Before quoting I paid a visit to the property to survey the floor and conduct an initial test clean which came out well. The test cleaning did not go as quickly as I had hoped it might however, due to traces of old satin sealer on some of the stone. It’s important to remove all the old sealer before applying new or you can end up with a patchy appearance. The remnants of old sealer proved challenging to remove as a result I had to try several products and methods before working out the right approach. In the end I resulted to using a product called Tile Doctor Wax Away. I had considered applying diamond burnishing pads which would have been a quicker option, but the flagstones had a riven finish, and the dirt was deeply pitted.
With a successful cleaning plan worked out I provided the client with a which was accepted, and a date agreed for my return.
The cleaning plan I had worked out was to apply a strong dilution of Tile Doctor Wax Away, leave it to soak into the stone for thirty minutes and then scrub it in with a rotary buffer fitted with a black scrubbing pad. The old sealer proved to be tough to remove and in total I used five litres of Tile Doctor Wax Away in the process, as I said it was a big floor!
On day three, I sealed the floor using three coats of Tile Doctor Seal and Go which gave the Sandstone a lovely satin finish that the client liked. This product is also water based so it doesn’t leave a smell as it dries.
Once done the floor was completely transformed, and my client very pleased with the floor which looked so much lighter and cleaner. For aftercare cleaning I recommended the use of Tile Doctor Neutral Tile Cleaner for maintenance, it is pH neutral so will ensure the newly applied seal is protected. It has a nice fresh smell and is gentle enough to use frequently keeping the newly renovated floor looking lovely.
Nigel Stoker
North West Yorkshire Tile Doctor
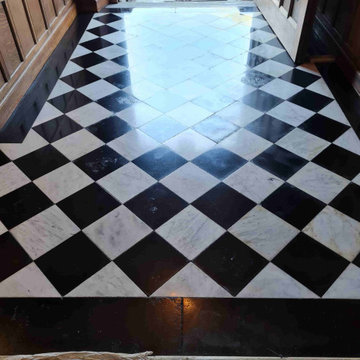 Tile Doctor Ltd
This Black and White Marble tiled hallway floor at a Grade II listed property in the village of Tattenhall has quite a history. The building was constructed in 1865 and at one time it has been the home to the high sheriff of Cheshire, and the family home of Edith Wignall the daughter of Sir Henry Tate the founder of the sugar company Tate and Lyle.
In more recent years the property had been used as a council building and even a nursing home for the elderly. After a long history of decline it has now been restored to a lavish family mansion however the marble floor had suffered over the years and still need attention. The current owner had been in touch as they wanted it restoring and basically brought back to life.
As it turns out I had already planned to go to Tattenhall the following week to work on another listed building which was formerly the village bank. After discussing the Marble floor over the phone, I agreed a date and time to pop over from the bank and inspect the floor in detail. I can provide a rough quote from photographs, which has been especially useful recently, but it’s far better for all concerned if I’m able to properly survey the floor first.
The Marble floor consisted of Black and White Mable tiles laid in a diamond pattern, it wasn’t a very large area perhaps 9 square metres in total. The tiles were well worn as described but also stained and scratched. I would see they would need a deep burnish and polish to bring them back to life and then protected with a fresh sealer. Following on from that visit I was able to provide an accurate quote which was accepted, and a date agreed for my return.
The first job was to protect the surrounding heavy wooden panelling with masking film. The floor was very heavily stained yellow with deep scratches, to remove these I would have to grind the marble back until a clean fresh tile was left. To start I used a 200-grit coarse pad fitted to a weighted buffing machine, the abrasive action of the pad was lubricated with water. After inspection I found that the staining and scratches were still there, so I needed to use stronger pads, so I worked my way through a set of very coarse milling pads starting at a 50, 100 and finishing with a 200-grit pad. Again, water was used to lubricate, and the resultant slurry was removed by a powerful wet vacuum and washed down between each pad.
The milling pads had the desired effect, and I was then able to bring back the polished appearance of the Marble surface using a set of finer burnishing pads with the same process. The 400 and 800-grit pads helped to clean and remove the fine scratches left by the milling pads and then the next 1500-grit pad started to build the shine back on the marble tile.
After finishing with 1500-grit pad I washed the Marble with Tile Doctor Stone Soap and vacuumed up the residue with the wet vacuum. I left an industrial blower in place overnight to dry out the floor ready for the next morning when it would be sealed.
The next morning, I used the last of the four burnishing pads which is a very fine 3000-grit to polish the floor further. This last pad is applied dry with just a spray of water to create a high gloss finish.
When I was happy, I sealed the floor with two coats of Tile Doctor Colour Grow which is an impregnating sealer that soaks into the fine pores of the Marble to protect it from within. This product also improves colour and after application it was left to soak into the tile for five minutes before polishing off and then leaving it to dry.
The last step was to I buff the floor with a white pad. The finish was impressive, and the family were very happy with the work we had carried out. For aftercare I recommended they use Stone Soap as its designed for the regular cleaning of sealed and polished stone, as well as cleaning it also helps build the patina.
Alastair Robb
West Cheshire TIle Doctor
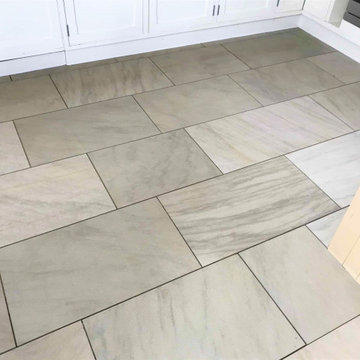 Tile Doctor Ltd
I received an enquiry from a property in Crowthorne to come and survey an unknown Flagstone Floor in a converted barn that was ready to be rented out. The owners where concerned the stone was letting the rest of the property down due to it being dirty and heavily stained, particularly around the kitchen and entrance areas. If your selling or renting out a property it really needs to look its best if you want to achieve a good price. Having spoken over the phone we agreed a date for me to pop over to complete a survey.
From further inspection I confirmed the stone was in fact a Sandstone, it was also clear that the sealer protecting the stone from ingrained dirt had worn away and was now allowing dirt and staining to ruin the appearance of the flagstones. It was a large floor so I measured up so I could work out the quantities of cleaning and sealing products needed and then walked the customer through the cleaning process. Later that day I sent over a detailed quotation which was accepted, and a date agreed for my return.
I should mention this work took place during the Covid restrictions, fortunately being a rental property, I was able to work in the property alone.
To deep clean the floor and remove the ingrained dirt and staining I used a strong dilution of Tile Doctor Pro-Clean. It is sprayed onto the floor and left to soak in for five minutes before agitating with a Black scrubbing pad fitted to a weighted buffing machine. The resultant slurry was then wet extracted away using a powerful high-pressure van mounted extracting system.
This action cleaned up most of the stone nicely however certain areas where heavily stained, particularly in the kitchen area where food and drink stains were more apparent. To tackle this, I applied a stronger cleaner/stripper product called Tile Doctor Remove and Go this time allowing ten minutes for it to soak in before scrubbing the surface with a very coarse 100-grit soft milling pad. This took quite a few attempts each time extracting the slurry away and then inspecting the floor to see if more work was needed.
Happy the stains have been removed, I then focused on renovating the surface Sandstone after the application of the coarse pad. This involves the application of several finer grit burnishing pads which close the pores and adds a subtle polish to the Sandstone. As I started with 100-grit pad it was necessary to gradually refine the surface with an incremental series of pads that included 200, 400 and finally 800-grit pads. Then to ensure a uniform finish across the floor I continued the 400 and 800 grit pads throughout the property. Water is used to lubricate the process and this turns into a fine slurry that is rinse extracted as before.
The cleaning process took up the whole of the first day and I am pleased to say the Sandstone floor looked very clean after I had finished.
The stone was then allowed dry off overnight with the aid of an industrial air mover and I returned later the next day to apply a new protective seal. In the meantime, my customer had been over to check out the floor and were over the moon with how it looked and wanted to keep the finish as natural as possible.
With this in mind, I applied Tile Doctor Ultra-Seal sealer to the Sandstone throughout, only two coats were needed. This is a premium sealer that is almost invisible and works by penetrating the stone thus preventing dirt from becoming ingrained. Once done the floor looked very clean and much brighter than before, it now had that wow factor which will help it attract a good yield in the rental market.
The trouble with rental properties of course is making sure the tenant uses the right product to maintain the floor and not a typical supermarket tile cleaner that are only designed for use on Ceramic and Porcelain tiles. In fact, these types of cleaning product can slowly strip the sealer off the floor so it’s always worth checking the label before purchasing. Fortunately Tile Doctor sells a product called Neutral Cleaner that is ideal for maintaining sealed stone floors, so I left them with a complimentary bottle and recommended they get some more to leave under the sink for the new tenant.
Dennis Buckland
Berkshire Tile Doctor
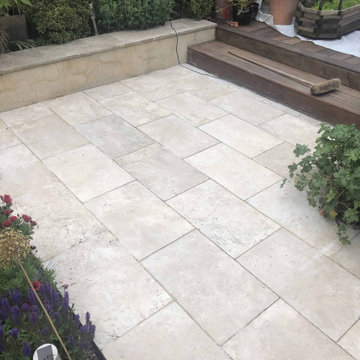 Tile Doctor Ltd
The picture shows an Travertine patio that was installed at a property in Hackney E5 around ten years ago and it had never been sealed. Over the year’s pollution and weather etc had taken its toll on the stone leaving the travertine stained with lichen, dull and grey as opposed to their original white/cream colour. Had the patio been sealed it would have provided some protection from the elements.
I conducted an initial visit where I tested several products to see what would be the most effective and establish what was required. Using that knowledge, I followed up with a written quote which was accepted, and a date arranged to complete the work.
We have adopted new working practices since the COVID-19 epidemic so we can work safely inside or outside but given the excellent weather this year this was an ideal and much easier to maintain social distancing.
During day 1 on site I started by sweeping away loose stones and other debris you typically find on patios. Then Tile Doctor Patio and Brick Driveway cleaner was applied neat to the stone and left for two hours. This is a very strong product designed for use by professionals which cuts through the dirt and was ideal for this situation. There are certain precautions you do need to take when using it such as wearing PPE and you must keep it away from ponds etc.
Using water to lubricate, the solution was then scrubbed into the stone using a coarse 200-grit pad fitted to a rotary machine and followed up with a lot of rinsing and extracting with water and a wet vacuum.
To refine the surface after the coarse Travertine the 200-grit pad I followed with 400, 800 and then 1500-grit burnishing pads in sequence rinsing with water and extracting after each pad was applied. This process is known as burnishing and closes the pores in the stone giving it a polished appearance. By this point the Travertine looked way better and we were starting to get the smooth finish back.
The weather held so the following morning a 3000-grit polishing pad was applied dry to the stone using only a little water. This brings up the appearance of the stone even further and has the added advantage of leaving it dry and ready for sealing.
The client wanted a natural appearance so two coats of Tile Doctor Ultra Seal were applied to seal the stone. Ultra-Seal is an impregnating sealer that soaks into the stone, protecting it from within yet without changing the appearance of the stone leaving a completely natural look.
The client very happy with job and now proud so show off her revamped patio. They hadn’t realised that the patio should have looked like this from the start. For aftercare I recommended they use Tile Doctor Stone Soap, many day to day cleaning products you find in supermarkets can strip off a sealer so if your using something else do check the label first.
Jackson Davis
East London Tile Doctor
 Innovative Design Build
Five stars isn’t enough! Our project was to reconfigure and update the main floor of a house we recently purchased that was built in 1961. We wanted to maintain some of the unique feeling it originally had but bring it up-to-date and eliminate the closed-in rooms and downright weird layout that was the result of multiple, partial remodeling projects. We began with a long wishlist of changes which also required replacement of very antiquated plumbing, electrical wiring and HVAC. We even found a fireplace that had been walled in and needed major re-construction. Many other aspects and details on this incredible list we made included an all new kitchen layout, converting a bedroom into a master closet, adding new half-bath, completely rebuilding the master bath, and adding stone, tile and custom built cabinetry. Our design plans included many fixtures and details that we specified and required professional installation and careful handling. Innovative helped us make reasonable decisions. Their skilled staff took us through a design process that made sense. There were many questions and all were answered with sincere conversation and positive – innovation – on how we could achieve our goals. Innovative provided us with professional consultants, who listened and were courteous and creative, with solid knowledge and informative judgement. When they didn’t have an answer, they did the research. They developed a comprehensive project plan that exceeded our expectations. Every item on our long list was checked-off. All agreed on work was fulfilled and they completed all this in just under four months. Innovative took care of putting together a team of skilled professional specialists who were all dedicated to make everything right. Engineering, construction, supervision, and I cannot even begin to describe how much thanks we have for the demolition crew! Our multiple, detailed project designs from Raul and professional design advice from Mindy and the connections she recommended are all of the best quality. Diego Jr., Trevor and his team kept everything on track and neat and tidy every single day and Diego Sr., Mark, Ismael, Albert, Santiago and team are true craftsmen who follow-up and make the most minuscule woodworking details perfect. The cabinets by Tim and electrical work and installation of fixtures by Kemchan Harrilal-BB and Navindra Doolratram, and Augustine and his crew on tile and stone work – all perfection. Aisling and the office crew were always responsive to our calls and requests. And of course Clark and Eric who oversaw everything and gave us the best of the best! Apologies if we didn’t get everyone on this list – you’re all great! Thank you for your hard work and dedication. We can’t thank you enough Innovative Construction – we kind of want to do it again!
Dave Hallman & Matt DeGraffenreid
 Tile Doctor Ltd
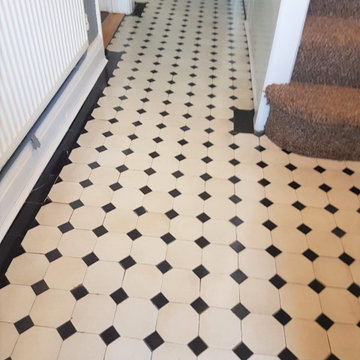
This enquiry from Neath came from an elderly gentleman who was moving into a care home in the near future and wanted his Victorian tiled hallway renovated before the property went on the market. He mentioned he didn’t think it was that dirty however it could do with a clean and reseal.
We arranged to call in one morning and take a look at the tiles and whilst there we completed a test clean so we could provide an accurate price for renovating the floor. For the clean I applied Tile Doctor Pro-Clean, the purpose of this was to see whether and how fast the dirt would shift and also to get an idea of the condition of the floor beneath the layer of dirt.
The test clean went well and the owner was happy to accept our price and suggested that as we had already made a start we might as well continue. Fortunately, there were two of us that day and I only had a couple of other quotes in the area, so I was able to crack on. I should mention this work was done at the beginning of 2020 before the COVID-19 lockdown.
All sorts of detritus gets walked into hallways so we began by using a hand held scraper to take off any anything that sat upon/above the floors surface. This also makes the cleaning process that little bit easier for us. The earlier test clean had enabled us to establish which cleaning methods and products would work best on the floor so it was just a question of putting the plan into action.
The process involved applying a strong dilution of Tile Doctor Pro-Clean to the floor, leaving it to soak in for ten minutes and then working it with a coarse 400-grit diamond pad fitted to a rotary buffer. More water was applied for lubrication where required and the soil produced afterwards was rinsed off and extracted with a wet vacuum. The pad is encrusted with industrial diamonds and cuts into the tile and removes a very thin layer leaving the tile very clean.
After extracting the soil, the floor was inspected, and we noticed that there were a few tiles throughout the floor that needed more work. To deal with these we used hand-held diamond blocks of varying grits to remove the ingrained dirt and bring the tiles back to life.
The client was over the moon with the results of the cleaning and we scheduled a date of the following week to come back and seal the tiles. We also discussed sealers and he had asked if we could leave the floor with a shiny finish. With that in mind we recommended Tile Doctors Seal and Go which works really well on Victorian tiles. It is also water based and so doesn’t produce a smell as it dries.
On our return the floor was given a quick wipe down and once dry sealed with four coats of Tile Doctor Seal and Go which will add protection and make them easy to keep clean.
Once complete the floor looked great and very welcoming, just what you need when selling a property as initial impressions always count.
Adrian Iacono
Swansea Tile Doctor
 Innovative Design Build
Five stars isn’t enough! Our project was to reconfigure and update the main floor of a house we recently purchased that was built in 1961. We wanted to maintain some of the unique feeling it originally had but bring it up-to-date and eliminate the closed-in rooms and downright weird layout that was the result of multiple, partial remodeling projects. We began with a long wishlist of changes which also required replacement of very antiquated plumbing, electrical wiring and HVAC. We even found a fireplace that had been walled in and needed major re-construction. Many other aspects and details on this incredible list we made included an all new kitchen layout, converting a bedroom into a master closet, adding new half-bath, completely rebuilding the master bath, and adding stone, tile and custom built cabinetry. Our design plans included many fixtures and details that we specified and required professional installation and careful handling. Innovative helped us make reasonable decisions. Their skilled staff took us through a design process that made sense. There were many questions and all were answered with sincere conversation and positive – innovation – on how we could achieve our goals. Innovative provided us with professional consultants, who listened and were courteous and creative, with solid knowledge and informative judgement. When they didn’t have an answer, they did the research. They developed a comprehensive project plan that exceeded our expectations. Every item on our long list was checked-off. All agreed on work was fulfilled and they completed all this in just under four months. Innovative took care of putting together a team of skilled professional specialists who were all dedicated to make everything right. Engineering, construction, supervision, and I cannot even begin to describe how much thanks we have for the demolition crew! Our multiple, detailed project designs from Raul and professional design advice from Mindy and the connections she recommended are all of the best quality. Diego Jr., Trevor and his team kept everything on track and neat and tidy every single day and Diego Sr., Mark, Ismael, Albert, Santiago and team are true craftsmen who follow-up and make the most minuscule woodworking details perfect. The cabinets by Tim and electrical work and installation of fixtures by Kemchan Harrilal-BB and Navindra Doolratram, and Augustine and his crew on tile and stone work – all perfection. Aisling and the office crew were always responsive to our calls and requests. And of course Clark and Eric who oversaw everything and gave us the best of the best! Apologies if we didn’t get everyone on this list – you’re all great! Thank you for your hard work and dedication. We can’t thank you enough Innovative Construction – we kind of want to do it again!
Dave Hallman & Matt DeGraffenreid
9