
Search results for "Degradation" in Home Design Ideas
 Tile Doctor Ltd
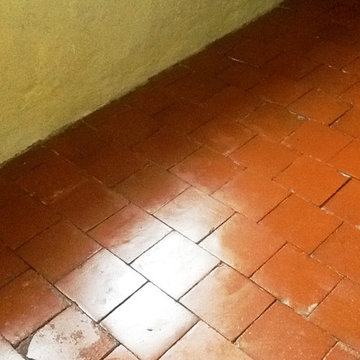
Here’s an interesting work I recently completed on a red Quarry tiled floor at a house in the town of Abington, Northampton. In post-war Britain (more specifically in the 1940s and 1950s), many new homes were built with Quarry tiled hallways and kitchens, so quite a popular feature back then. These floors are typically quite hard wearing and therefore ideal for such high traffic areas; additionally they don’t need a great deal of maintenance but their appearance will degrade over time.
In this particular house, the Quarry tiled floor had been covered with linoleum for many years, causing significant patches of visible black mould. The floor also had a loose tile (which I promptly reset to mitigate the potential tripping hazard) and splashes of paint due to a lack of precaution while the house was being renovated. Needless to say, the floor needed a lot of work.
Before beginning the cleaning I made sure to vacuum up all of the loose debris from the floor. I then applied Tile Doctor Remove & Go to the tiles, left it to dwell for a short period, and then agitated the area with a black stripping pad, adding water to aid the process. This helped to break down any old and ineffectual sealer, along with the paint splashes marking the tiles, leaving a much cleaner and more refined appearance.
I followed this up with Tile Doctor Grout Clean-Up to eliminate the odd speck of cement and grout haze dating back to when the floor was first installed; Gout Clean-up has an acid base so it’s not advised to leave it on the tiles for too long, consequently as soon as I was happy it had done the job I rinsed it off with water and give the floor a thorough wash down.
I used a wet-vacuum machine to extract as much water as possible and gave the floor a once over with steam cleaner which improves the evaporation of any remaining moisture by heating up the tiles.
After completing the cleaning process, I left the house to allow time for the floor to dry completely. Upon my return, I conducted a damp test which showed the floor needed to dry further before sealing so I left an industrial fan in place for a couple of hours to help speed things up.
Once I was satisfied that the floor was dry enough to take the sealant, I sealed the floor using Tile Doctor Colour Grow which is an interesting product that will not only provide durable stain protection but also improves the natural colours of the tile.
While the floor required a lot of time and work to restore, I think you will agree the results were certainly worth waiting for.
Phil Vissian
Northamptonshire Tile Doctor
 Tile Doctor Ltd
It’s not just major restoration work we do at Tile Doctor, sometimes a simple clean and seal is all that is required and that was the case at this property in Evesham. This medieval market town lies within the Vale of Evesham and is encompassed by the River Avon. It is located between the larger towns of Worcester, Cheltenham and Stratford-upon-Avon.
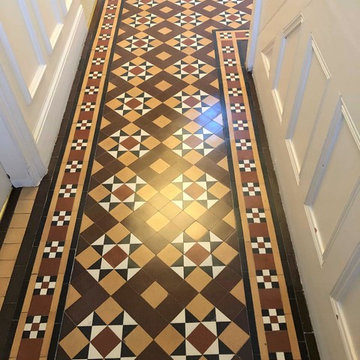
I was contacted by the owner and I arranged a visit to view their Victorian Hallway. The floor was in very good condition, but the previous sealer was now in-effective and the floor was dull and needed a good clean and seal. The colours were starting to fade, and it was due some attention. Sealers do wear off over time so if you have a similar floor to this it’s worth bearing that in mind. We discussed the work required and the cost involved, my quote was accepted, and the work scheduled.
On arrival I set up my equipment and covered any areas of carpet to protect from splashing during cleaning. I then used Tile Doctor Remove and Go spraying the product onto the floor allowing it to dwell for 10 minutes thus breaking down any sealers. This product is a non-flammable, multi-purpose stripper which works best when left to soak in for some time before scrubbing. This product is also great for drawing out ingrained stains and removing heavy grease build up.
The floor was then pasted with Tile Doctor Acid Gel which works to neutralise any alkaline salts in the tiles that can cause efflorescence later. This is a common issue with old floors which often do not have a damp proof membrane in place. I then went to work with my scrubbing machine and a black pad and worked the products into the tile. The resulting slurry was then rinsed off with water and removed with a wet vacuum.
I then went over the floor with microfibres and water to remove any remaining marks before leaving it to dry off overnight and ready for sealing.
I returned the following day and started by checking the floor was dry using a moisture meter. To seal the floor, I chose Tile Doctor Seal and Go Extra which is a fully breathable semi- gloss sealer which made a huge difference to the floor. Choosing a fully breathable sealer is important for floors that don’t have a damp proof membrane as you want to encourage any dampness to rise through the tile and not get trapped underneath where it might spread into the walls.
The deep clean and new seal brought out the vibrant colours in the tiles which were now shining through enhances by the lovely sheen which customer was very pleased with.
For aftercare I left the customer with a bottle of Tile Doctor Neutral Tile Cleaner which being concentrated goes a long way. Once diluted with water the product becomes completely pH neutral which unlike most household cleaners and washing up liquids which contain bleaches won’t prematurely degrade the sealer with use.
Mark Conway
Worcestershire Tile Doctor
 Tile Doctor Ltd
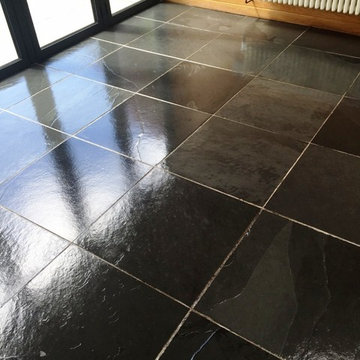
Tenuous link I know but I worked on this semi riven Black Brazilian Slate Tiles in the kitchen and dining room of a house in the seaside town of Thornton-Cleveleys around the time of the Rio Olympics. I love working on Slate as although it’s appearance can degrade without proper maintenance due to a build-up of dirt I knew they would look fantastic by the time I had finished.
The tile itself had lost its rich black colour and the grout lines had become stained, leaving the floor as a whole looking very unattractive. Out of interest honed Slate has a smooth, refined texture whereas the riven Slate has a rougher, more natural texture, and this can make it more difficult to keep clean. Needless to say, the customer was keen to have the tiles restored to looking their best.
To restore the appearance of the Slate, I cleaned the floor and removed what remained of the old sealer off using Tile Doctor Remove and Go. This was scrubbed into the floor using a scrubbing pad fitted to a rotary machine. The floor was then rinsed with water, and the process repeated where necessary to tackle particularly stubborn areas of dirt.
As mentioned previously, the grout lines were in a particularly bad state, and would need special cleaning attention. I cleaned carefully with a strong 5-to-1 dilution of Tile Doctor Pro Clean with water, which is our high alkaline cleaner. The cleaning solution was scrubbed I’m using a stiff handheld grout brush, with the grout lines looking immediately cleaner. When I was satisfied that the grout lines had been restored to the best possible condition, I gave the floor a thorough rinse using the wet pickup function of a wet wax machine to get the floor as dry as possible and then left the whole floor to dry off overnight.
Upon my return to the property I ran some quick damp tests to check that the floor was completely dry. This is important as any excess moisture would have prevented me from sealing the tiles, since it can cloud the sealer and damage it performance.
Previously I discussed sealer options with the customer and they stated that they would prefer a Satin finish, so I applied a sealer called Tile Doctor Seal and Go, our topical sealer which will both protect the Slate from dirt and stains, and also gave it the desired finish. As you can see from the below photographs, the rich, dark shades in the Slate were really enhanced.
The customer was very pleased with the finished result, but was also concerned about keeping the Slate clean in the long-term. For regular cleaning I advised the customer to use a pH neutral cleaner for aftercare called Tile Doctor Neutral Cleaner. As a pH neutral cleaner, it will not erode the sealer compared to acidic cleaners you so often find in supermarkets.
Russell Taylor
Lancashire Tile Doctor
Find the right local pro for your project


 Tile Doctor Ltd
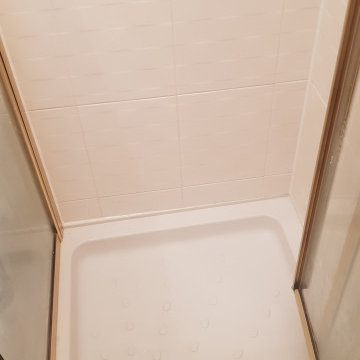
The pictures below detail the renovation of Ceramic Tiled Shower Cubicleat a property in Bolton Upon Dearne South Yorkshire. I was called in as the homeowners dreaded using the shower due to the state of the tiles, grout and cubicle in general.
As you can see from the photograph the grout was filthy, the silicone was mouldy, and the shower frame was caked in mouldy dirt. Over the years there had been a build-up of hard water and staining from products which leave a residue. They had used everyday cleaning products, but these had not been able to touch the problem as it had been left for too long.
I discussed with the clients how Tile Doctor could help, and how we would be able to deep clean the shower area and replace the mouldy silicone. I was confident we could get the renovate the cubicle and get it looking like new again. They were happy to accept my price and we arranged a time to complete the job. It would certainly be far cheaper than ripping out the shower cubicle and replacing with new.
Bolton Upon Dearne is a small village in the very middle of South Yorkshire, it is almost the same distance away from the centres of Barnsley, Rotherham and Doncaster. It has a rich history of coal mining but like many pit villages it has suffered since the pit closures of the 80’s and 90’s.
To start the shower was treated with Tile Doctor Oxy Gel, being a gel this product sticks well to the vertical surfaces giving it time to break down grease and grime, you’ll see from the picture just how much dirt was released.
This was followed with a strong dilution of Tile Doctor Duo Clean which is great for restoring lighter coloured grout back to its original state as well as removing mould. After scrubbing the soiled water was easily drained away using the shower hose. The transformation was amazing, the area already looked so much more inviting!
Next the old silicone that had gone mouldy was removed with a sharp knife, this is a slow work as you have avoid damaging the tile or the shower tray. Additionally, a clean and dry surface is required for the new silicone to adhere well.
The tiles were Ceramic which are given a glazed surface during manufacture, so they don’t need a specialist sealant like natural stone. However, the surface of grout is cementous and attracts dirt easily so the whole shower wall was sealed using a can of Tile Doctor Wall and Grout Sealer. This gives a layer which will protect the tiles and grout and will ensure the tiles are easier to keep clean.
For everyday cleaning I recommended they use Tile Doctor Aqua-Pro which is an effective, yet pH neutral tile and grout cleaner designed for everyday use in Bathrooms and Kitchens. The formula eliminates soap scum build-up and hard water deposits and its neutral formula won’t prematurely degrade the sealer. Used regularly this will prevent the build-up they had previously experienced and will keep the tiles looking good for some time to come.
As you can imagine my client was very happy with the completed work.
Matthew Lovett
South Yorkshire Tile Doctor
 Tile Doctor Ltd
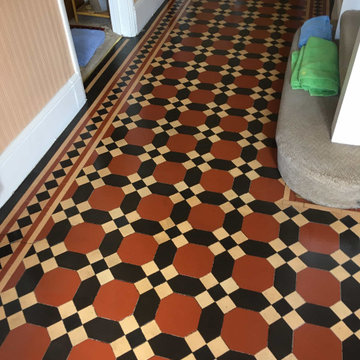
This Victorian floor in Twickenham, Middlesex was in good physical condition for its age but needed a good deep clean. Our customer had informed us that they had never cleaned or sealed the floor in the sixteen years that they had lived there so it was well overdue.
I went over to survey the floor and completed a test clean on a small section of tiling to see which products/techniques would work best. I like to do this as it demonstrates to the client what can be done, and it allows me to come up with an accurate price for doing the work.
As you can see from the pictures, there was quite a difference in the test patch compared to the rest of the floor. Years of foot traffic from the street had taken its’ toll and the floor was very dirty. Luckily, the floor was in very good condition and had not worn too badly.
Once they had seen the test patch, they were confident that it would be worth go ahead with my quote. It would ensure that the period feature was retained for many years to come. The colours on the floor were quite faded so it would be nice to get it restored.
I started the cleaning process by first taping up the surrounding skirting boards and doors to ensure they were protected from potential splashing. Cleaning involved spraying the Victorian tiles with a strong dilution of Tile Doctor Pro-Clean which is a dedicated Tile and Grout cleaning product. This was left to soak in for about ten minutes and then scrubbed in using a black pad fitted to a heavy-duty rotary scrubber.
This gives the floor a good mechanical scrub and works wonders releasing the ground-in dirt and soil from the tiles. The strong dilution of Pro-Clean will also remove any remaining sealers from the tile, however after sixteen years I doubted there would much trace of sealer left. Once done the floor was rinsed with water and all the soils removed with a wet vacuum.
Following the initial clean the colours were already much stronger. Next step however was to improve on that by giving the floor an acid rinse using Tile Doctor Grout Clean-Up. This removes mineral deposits and generally brightens up the appearance of the tile. After another round of scrubbing the floor was rinsed with our high-pressure washer and then vacuumed, extracting all of the dirty water and dirt away in one go. The floor was looking a lot better and was left to dry overnight.
After allowing the floor to dry overnight, we returned the next day to seal the floor. First, checking the floor was dry using the damp meter. Floors of this age can take a little longer to dry as there is no damp-proof membrane so it’s always worth checking as applying a sealer to damp tiles is not a good idea.
Once I was satisfied it was dry eight coats of Tile Doctor Seal and Go sheen finish sealer were applied. This takes a while to do as each coat needs to dry before applying the next. The sealer will protect the Victorian tiles for dirt and stains, it also enhanced the colours in the tile and will make it easier to keep the floor clean going forward.
My client was very pleased with the floor and mentioned that they should have called me in sooner! For aftercare cleaning I recommended Tile Doctor Neutral Clean which is an effective cleaner with a neutral pH, its designed for cleaning tiles without degrading the sealer.
Jonathan Oldham
South Middlesex Tile Doctor

 Fine Art Expressions
"Heritage 1 & 2" African Fine Art Prints
My fine art prints are just the way to add that beautiful finishing touch to a room! Each is printed on archival quality paper and a perfect matte finish for framing.
• Printed on Breathing Color Pura Smooth paper (archival quality) • 300gsm weight
• Matte finish, no surface glare
• Printed using an eleven-color printer and archival inks
• Inks are museum quality and feature print permanence ratings of up to 200 years
• Resistant to humidity, UV and atmospheric ozone
*Various border options are available for all fine art prints. Note: Selecting on an option will reduce the image size and add more white space. The overall dimensions of the piece will remain the same. This will help ensure that all elements of the scene are visible when framed.

 SUPERIOR CHIMNEY SERVICES CORPORATION
September 21st is the first day of Fall. I know we don’t want to think about it yet, but it is good to prepare and get the chimney swept early. Why? According to the Farmer’s Almanac, they are predicting a colder and snowier Winter. But you say, “eh, I got a gas fireplace.” Better yet, “I don’t use my fireplace, so why should I sweep it, and clean it early?” Let’s discuss why all types of chimneys and fireplaces need to be swept.
Why Do All Types of Chimney’s and Fireplaces Need to Be Swept?
When we think of the fireplace, we picture the real wood burning fireplace with the sounds of crackling wood. With regular use of the wood-burning fireplaces, a byproduct called creosote forms and over time, lines the side of the chimney flue. This needs to be swept at least once per year as creosote is flammable. However, all chimney’s, regardless of whether it burns wood or utilizes gas, needs to be professionally inspected and swept annually.
Many homeowners mistakenly believe that a gas or unused chimney is immune to problems since it doesn't produce a byproduct. However, these chimney systems face their own unique dangers. Gas fireplaces, especially those that are high-efficiency, can lead to the buildup of corrosive deposits. Over time, these deposits can degrade your chimney liner. Getting it inspected by a certified chimney technician will control this issue so it doesn’t turn into a problem.
4 Key Reasons to Prioritize Your Annual Chimney Inspection
The annual chimney inspection is more than just a sweep; it’s a comprehensive health check for your entire chimney system. We call it the 14 Point Inspection. A certified chimney technician will look for:
1. Fire Hazards: Again, for wood-burning chimneys, the removal of creosote is important to prevent a chimney fire. Gas fireplaces release corrosive deposits. If you don’t use the fireplace, you never know what debris may have settled in. If you want to use the fireplace, please be sure to have it professionally inspected and swept before use.
2. Obstructions: There’s a whole world outside of your home, and especially in the Fall, our little friends are searching for a warm place to stay. Your chimney looks pretty good. And, let’s not forget how the wind in the Chicagoland are does a great job of moving debris around that can get up and under the chimney cap or directly into the chimney if you don’t have a cap. These blockages need to be cleared for you and your home’s protection.
3. Structural Damage: A chimney technician will be able to spot cracks, water damage, or deterioration of the chimney and chimney liner that could compromise the system's safety.
4. Ventilation Issues: Ventilation is key for your home to breathe. The certified chimney technician will ensure proper draft and airflow, which is the best way to get rid of toxic gases.
NFPA
Remember, the National Fire Protection Association (NFPA) recommends an annual inspection for all chimney types. This simple, proactive maintenance can save you from costly repairs. Don't wait for a problem to become obvious.
Contact Superior Chimney today at 877-244-6349 to schedule a 14-Point Chimney inspection to ensure your home and family are protected.

 Kariouk Associates
m.o.r.e. Cabin
The paradigmatic North American cottage is romanticized as a wilderness log cabin. Nonetheless, typical cottages are “woodsy” versions of suburban homes with every modern convenience. These buildings sustain the myth that appearing to be one with the land equates to a reduced impact on the environment.
The m.o.r.e. Cabin inverts this idea through a separation from the landscape that is more sustainably constructed than other cottages. This unravelling of eco-fictions is not cynical, but optimistic: while organic environments are being degraded, what remains can be engaged more responsibly.
To this end, m.o.r.e. Cabin touches the land lightly through:
- Interpreting the law creatively to uphold its principles.
- Reducing foundation size through a steel mast.
- Low-waste cross-laminated timber (CLT) structure.
- Achieving greater tensile strength through a “folded” structure.
- Off-grid power and high-efficiency heating.
- Creating a home for endangered bats.
Interpreting the Law with Finesse
Zoning rules required a 100-foot (30-metre) setback from the lake. A cliff face at that 100-foot mark was incorporated into the design, whereas conventional construction approaches would entail blasting.
To minimize harm to the hillside and forest, a zoning variance was obtained to allow the front of m.o.r.e. Cabin to hover above, rather than sit on, the 100-foot (30-metre) mark.
The Mast
The technical solution to the environmental issue involved a single concrete footing and a steel “mast” placed within the required setback.
Avoiding a conventional large foundation preserved the watershed and prevented erosion, as did elevating the construction zone. Use of carbon-intensive concrete was also reduced for a lower carbon footprint.
m.o.r.e. Than One Way to Skin a Home
m.o.r.e. Cabin is built with suitably-sourced CLT panels and glulam beams.
The CLT was milled offsite then hoisted into place, avoiding damage to the landscape by the maneuvering of construction machinery.
Cabin-as-Beam
m.o.r.e. Cabin’s environmental considerations yielded structural innovation. Our challenge became to develop a structural strategy using cantilevered CLT panels as a response to the zoning variance that we obtained; CLT is fundamentally deployed in vertical/compressive sections, not horizontally in tension.
Conventional 5-ply CLT is too heavy to support itself over longer spans. The solution used thinner 3-ply CLT, with structural capacity ensured through “folding” (just like paper gains strength when folded).
Off-Grid
The home is solar-powered.
The elevated cottage catches more breezes and has excellent cross-ventilation. Heat is provided by a high-efficiency “green carbon” wood stove. Good R-value and thermal comfort are provided by CLT’s mass, and precise joinery provides air-tightness.
Inviting Over the Neighbours
One goal of the home was to create extensive lodging for endangered brown bats. Bat pods were integrated into the mast to provide safety from climbing predators and a clear flight path to the lake.
*“m.o.r.e.” stands for the clients’ grandmothers’ names; all of whom did more with less — and gracefully so.

 Zelaya Properties LLC
We used: Custom cherry cabinetry in Arts & Crafts Shaker style by Kabinart in Boulder and Espresso stains. Liberty Hardware Venetian bronze 1-1/2" cabinet knobs. KitchenAid Architect II Series 22 CF counter-depth French door refrigerator. KitchenAid Architect Series II 27" convection single wall oven. KitchenAid 36" 6-burner dual fuel freestanding commercial-style range. KitchenAid Architect II Series 24" dishwasher. Sharp Insight Pro Series 24" built-in microwave drawer (Model #KB6524PS). Crystorama Solaris 12" wide pendant lights in English bronze. Granite countertops in Brown Fantasy. 3"x6" polished marble backsplash.
Paint colors:
Walls: Glidden Silver Cloud 30YY 63/024
Ceilings/Trims/Doors: Glidden Swan White GLC23
Robert B. Narod Photography


 Moss Yaw Design studio
Engineered cedar siding creates beautiful gray-blue tones at the exterior of the home, while adding a textural element to activate the simple exterior design.
 safe ZOnea
Every year, the same thing happens. The first real snowfall arrives, demand for de-icing materials spikes overnight, and the businesses that waited too long find themselves scrambling for supply at the worst possible moment. Facility managers, property owners, contractors, and municipalities all depend on a steady supply of salt and ice melt to keep their properties safe and operational through winter. The ones who plan ahead sail through. The ones who don't pay more, wait longer, and take on real risk.
Sourcing de-icing materials well is not complicated, but it does require thinking ahead and understanding the options. The choices you make about what to buy, how to buy it, and who to buy it from have a direct effect on your costs, your reliability, and your ability to keep people safe when conditions turn dangerous. This article lays out what matters.
Why Your Choice of Supplier Matters More Than You Think
It is easy to treat de-icing material as a commodity, something you grab whenever you need it without much thought about where it comes from. That works fine until the moment it doesn't, usually in the middle of a storm when everyone needs supply at once and the casual sources have run dry. At that point, the relationships you built before the season become the difference between staying stocked and being stuck.
Reliable supply is the whole game in winter operations. A property that runs out of ice melt during a storm faces safety hazards, liability exposure, and disruption, none of which can wait for a back-ordered shipment. This is why establishing relationships with dependable rock salt suppliers before the season starts is one of the smartest moves a facility manager or contractor can make. It locks in supply, often locks in better pricing, and removes a major source of mid-winter stress.
The lesson here is to treat sourcing as a planning decision rather than a last-minute errand. The businesses that come through winter smoothly are almost always the ones that secured their supply chain early, chose suppliers who could actually deliver when it counted, and never had to gamble on finding material during a shortage. Reliability bought in advance is far cheaper than scarcity paid for in a crisis.
Bagged or Bulk: Matching the Material to the Job
One of the first practical decisions is whether to buy de-icing material in bags or in bulk, and the right answer depends entirely on the operation. Each format has clear advantages, and many operations end up using both for different purposes.
Bagged material offers convenience, control, and easy storage. It is simple to handle, easy to distribute to different locations or crews, straightforward to store without special equipment, and convenient for spot application by hand. It suits smaller properties, businesses without bulk storage, and situations where portion control and tidiness matter. Bulk material, on the other hand, tends to make sense for large operations that go through high volumes, where buying in quantity lowers the per-unit cost and the operation has the equipment and space to store and handle it. The tradeoff is between the convenience and flexibility of bags and the volume economics of bulk.
For many operations, the right approach is a mix: bulk for the high-volume core of the work and bags for flexibility, spot treatment, and locations where bulk handling is impractical. The key is to match the format to how the material will actually be stored, moved, and applied, rather than defaulting to one or the other out of habit. Thinking this through in advance avoids both the waste of over-buying bulk you can't handle and the expense of relying entirely on bags for a large operation.
Rock Salt Is Not Your Only Option
Rock salt, or sodium chloride, is the workhorse of winter de-icing for good reason. It is effective, widely available, and cost-efficient, which makes it the default choice for most operations most of the time. But it has limits, and understanding the alternatives helps you choose the right material for the conditions you actually face.
The most important limitation is temperature. Rock salt becomes less effective as temperatures drop, and in genuinely cold conditions it can struggle to do the job at all. This is where alternatives come in. Calcium chloride, for instance, works at much lower temperatures than rock salt and acts quickly, which makes it valuable when conditions are severe or when fast melting matters. Operations that face hard freezes or need dependable performance in extreme cold often keep calcium chloride for sale on hand for exactly those situations, using it alongside rock salt rather than instead of it.
The practical approach is to understand the conditions your property faces and stock accordingly. For many operations, rock salt handles the bulk of the work while a faster, colder-rated material like calcium chloride covers the extreme days when ordinary salt falls short. Matching the material to the temperature and the urgency of the situation is what separates an operation that stays ahead of winter from one that is constantly reacting to it.
Securing Your Supply Before the Season
Knowing what to buy is only half the equation. The other half is making sure you can actually get it when you need it, which means securing your supply before winter arrives rather than after it has already started. Timing is one of the most underrated factors in winter operations.
The logic is simple. Demand for de-icing materials is highly seasonal and spikes sharply during storms, when everyone needs supply simultaneously. Prices and availability both move against the buyer at exactly those moments. By contrast, planning ahead, estimating your needs and arranging supply before the season, puts you in a far stronger position. Working with established rock salt suppliers ahead of time means your material is accounted for before the rush, often at better pricing and with the confidence that it will be there when the first storm hits.
This kind of planning also lets you think clearly rather than react under pressure. You can estimate your seasonal needs based on your property and past winters, decide on the right mix of materials and formats, and arrange storage in advance. Operations that do this consistently spend less, worry less, and never find themselves making frantic calls during a storm. The effort of planning ahead is modest, and the payoff in reliability and cost savings is substantial.
Storing and Handling What You Buy
Securing supply is not much use if the material degrades before you can use it, which makes proper storage and handling an important and often overlooked part of the equation. De-icing materials are sensitive to moisture, and poor storage can turn a good supply into a clumped, hardened mess that is difficult to apply.
The fundamentals are straightforward. Keep material dry and protected from moisture, since salt and ice melt readily absorb water and can harden if exposed. Store it in a way that suits the format, whether that means a proper bulk storage area or a dry space for stacked bags. Keep it accessible, so crews can get to it quickly when a storm hits and time is short. And handle it with the right equipment for the format and volume, which protects both the material and the people working with it. None of this is complicated, but neglecting it can undermine even a well-planned supply.
Good storage practices protect the investment you made in securing supply early. There is little point in arranging your materials ahead of the season only to have them degrade before use. Treating storage and handling as part of the overall plan, rather than an afterthought, ensures that the material you secured is actually usable when the moment comes. It is the final link in a supply chain built to perform under winter conditions.
Estimating How Much You Actually Need
One question trips up operations of every size: how much de-icing material to buy. Order too little and you risk running short during a storm. Order too much and you tie up money and storage space in material you may not use. Getting the estimate reasonably right is a meaningful part of sourcing well.
Several factors shape the answer. The size and type of the areas you treat, sidewalks, lots, entrances, and drive lanes, set the baseline for how much material each application consumes. The local climate matters too, since colder regions and those with frequent snowfall go through far more material than milder ones. Application frequency depends on how often storms hit and how quickly surfaces need to be cleared, which varies with the kind of property and the expectations of the people who use it. And the type of material plays a role, since different products are applied at different rates.
Past experience is often the best guide. Operations that track what they used in previous winters, adjusted for the size of the property and the severity of the season, can estimate their needs with reasonable confidence. For newer operations without that history, it helps to plan conservatively and to work with a supplier who can replenish stock reliably, so that a low estimate does not turn into a mid-storm shortage.
The goal is not perfect precision but a sound, slightly cautious estimate paired with a dependable supply relationship. That combination lets an operation keep enough material on hand to handle the season without over-committing to volume it cannot store or use. Thinking this through before winter, rather than guessing during it, is one more way that planning ahead pays off when the snow starts to fall.
The Bottom Line
Sourcing de-icing materials well comes down to a few straightforward principles: plan ahead, choose reliable suppliers before the season, match your materials and formats to your actual needs and conditions, and store what you buy properly. The operations that follow these principles move through winter with confidence, while those that improvise pay more and take on needless risk.
Winter is predictable in one respect: it arrives every year, and demand for de-icing material spikes the moment it does. The businesses that prepare for that reality, rather than being surprised by it, are the ones that keep their properties safe, their costs controlled, and their operations running no matter what the season throws at them. A little foresight before the first snowfall pays off through every storm that follows.


 McCullough's Flooring
Gorgeous master bath finished with Dal-Tile's Fabrique porcelain tile in the color Noir Linen polished. Tile size is 12"x24" installed in a brick joint pattern. The floor boasts underfloor heating on a timed thermostat.

 Renovisions
It’s no surprise these Hanover clients reached out to Cathy and Ed of Renovisions for design and build services as they wanted a local professional bath specialist to turn their plain builder-grade bath into a luxurious handicapped accessible master bath.
Renovisions had safety and universal design in mind while creating this customized two-person super shower and well-appointed master bath so their clients could escape to a special place to relax and energize their senses while also helping to conserve time and water as it is used simultaneously by them.
This completely water proofed spacious 4’x8’ walk-in curb-less shower with lineal drain system and larger format porcelain tiles was a must have for our senior client –with larger tiles there are less grout lines, easier to clean and easier to maneuver using a walker to enter and exit the master bath.
Renovisions collaborated with their clients to design a spa-like bath with several amenities and added conveniences with safety considerations. The bench seat that spans the width of the wall was a great addition to the shower. It’s a comfortable place to sit down and stretch out and also to keep warm as electric mesh warming materials were used along with a programmable thermostat to keep these homeowners toasty and cozy!
Careful attention to all of the details in this master suite created a peaceful and elegant environment that, simply put, feels divine. Adding details such as the warming towel rack, mosaic tiled shower niche, shiny polished chrome decorative safety grab bars that also serve as towel racks and a towel rack inside the shower area added a measure of style. A stately framed mirror over the pedestal sink matches the warm white painted finish of the linen storage cabinetry that provides functionality and good looks to this space. Pull-down safety grab bars on either side of the comfort height high-efficiency toilet was essential to keep safety as a top priority.
Water, water everywhere for this well deserving couple – multiple shower heads enhances the bathing experience for our client with mobility issues as 54 soft sprays from each wall jet provide a soothing and cleansing effect – a great choice because they do not require gripping and manipulating handles yet provide a sleek look with easy cleaning. The thermostatic valve maintains desired water temperature and volume controls allows the bather to utilize the adjustable hand-held shower on a slide-bar- an ideal fixture to shower and spray down shower area when done.
A beautiful, frameless clear glass enclosure maintains a clean, open look without taking away from the stunning and richly grained marble-look tiles and decorative elements inside the shower. In addition to its therapeutic value, this shower is truly a design focal point of the master bath with striking tile work, beautiful chrome fixtures including several safety grab bars adding aesthetic value as well as safety benefits.

 Ginkgo Leaf Studio
Runnels in the concrete function to drain water out of the patio area but also add a subtle inlay detail. Here the runnel is filled with both beach pebbles and dry-laid bluestone.
Renn Kuhnen Photography

 GS Construction
Example of a small classic 3/4 white tile and stone tile mosaic tile floor alcove shower design in Chicago with an undermount sink, recessed-panel cabinets, black cabinets, quartzite countertops, a two-piece toilet and gray walls


 Legacy Glass Studios
Custom leaded glass panel used for privacy and charm in small window of front entry door.
Glass: clear textured glass (granite, 1/16" reed, beveled glue chip) and beveled glass
Lead: 3/16" rounded
Size: 1 @ ~8" x 18" x 1/4" thick
*This product was commissioned and made-to-order. If you're interested in this design, let's chat! We can recreate it for you to your specified dimensions, or we can discuss any design changes you'd like, as well as additional options for materials (glass texture, color, lead size, etc.). Reach out to hello@legacyglass.com to get started!
15