
Search results for "Determination" in Home Design Ideas

 JRP Design & Remodel
Untouched since 1974, our clients knew the JRP team were the ones to call and help them bring their renovation dreams to fruition. With an awkward closet inside the bathroom, it was determined that a new spatial layout was a must. Moving the closet to a new location and with a rearrangement of the plumbing fixtures, this dull and dated bathroom now has a clean contemporary and spa-like feel designed for relaxation.
This bathroom renovation features wall-mounted cabinetry and an exaggerated countertop detail that really creates a statement. Robern mirrored cabinets, with integrated lights, are not only beautiful but add much need storage. A linear shower drain provides the appropriate slope for the large wood-like porcelain tile throughout the shower pan, add in a solar tube, and you now have a bright, clean-lined, and serene aesthetic.
PROJECT DETAILS:
• Style: Transitional
• Colors: White
• Countertops: Vadara Quartz, Absolute Blanc
• Cabinets: DeWils, Shaker, White
• Hardware/Plumbing Fixture Finish: Polished Chrome
• Lighting Fixtures: Sconces
• Flooring: Porcelain Wood Look Tile
• Tile/Backsplash: Ceramic White Gloss
Photographer: Andrew (Open House VC)

 ODS Architecture
Originally a nearly three-story tall 1920’s European-styled home was turned into a modern villa for work and home. A series of low concrete retaining wall planters and steps gradually takes you up to the second level entry, grounding or anchoring the house into the site, as does a new wrap around veranda and trellis. Large eave overhangs on the upper roof were designed to give the home presence and were accented with a Mid-century orange color. The new master bedroom addition white box creates a better sense of entry and opens to the wrap around veranda at the opposite side. Inside the owners live on the lower floor and work on the upper floor with the garage basement for storage, archives and a ceramics studio. New windows and open spaces were created for the graphic designer owners; displaying their mid-century modern furnishings collection.
A lot of effort went into attempting to lower the house visually by bringing the ground plane higher with the concrete retaining wall planters, steps, wrap around veranda and trellis, and the prominent roof with exaggerated overhangs. That the eaves were painted orange is a cool reflection of the owner’s Dutch heritage. Budget was a driver for the project and it was determined that the footprint of the home should have minimal extensions and that the new windows remain in the same relative locations as the old ones. Wall removal was utilized versus moving and building new walls where possible.
Photo Credit: John Sutton Photography.

 Progressive Design Build
It was in 2012 when Mike Spreckelmeier first met Roy and Patti. They had been despondent after meeting with multiple contractors in an attempt to start their kitchen remodel. The contractors lacked follow through, came tardy to meetings and even failed to show up at others.
Determined to leave nothing to chance in the pursuit of their dream, Roy and Patti followed up on a recommendation after overhearing a conversation that was taking place while they were standing in a gallingly long line waiting to cast a vote on Election Day.
With a solid recommendation to pursue, Roy and Patti contacted Progressive Design Build. The rest is history.
Mike showed up on time. For a small retainer, he provided preliminary sketches, ideas for maximizing space and storage, and solutions for a sunken family room that created a safety hazard and a problem with traffic flow. More importantly, he designed the project to the homeowners’ budget.
Progressive Design Build shot some different elevations and designed a plan to raise the floor, allowing all finished floors to be on the same level. Upon completion, the kitchen was stunning. Features included LED backlit fire glass shelving, white recessed panel cabinets, a subway tile backsplash, Granite countertop, integrated refrigerator, undermount sink, and more.
The living room was designed with complimentary finishes and included a natural stone fireplace wall with open cabinets flanked on both sides. The 12’ fireplace was made with a floor-to-ceiling white pebble finish.
This Bonita Bay project completed on time and on budget—allowing this fabulous family a wonderful opportunity to create lasting memories for many years to come.
Find the right local pro for your project
 Talon Construction Inc.
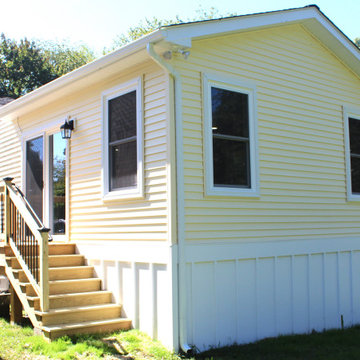
Designing and building a kitchen addition is a complex process that involves multiple steps and considerations. Here is a general outline to help you get started on your kitchen addition project:
Define Your Goals and Budget:
• Determine the purpose of the kitchen addition. Is it for more cooking space, a dining area, or a combination of both?
• Establish a realistic budget for your project. Consider all costs, including construction, permits, materials, and furnishings.
Hire a Design Professional:
• Seek the services of a design build company who specializes in kitchen additions.
• Discuss your vision, needs, and budget with the design professional to create a design concept.
Site Evaluation:
• Assess the existing space and structural condition of your home to ensure it can support the addition.
• Consider factors like zoning regulations, setbacks, and building codes.
Design Development:
• Collaborate with your design professional to refine the concept, including the layout, size, and architectural style.
• Choose materials, finishes, and fixtures that fit your design and budget.
Obtain Permits:
• Consult with your local design build contractor to determine the necessary permits and approvals.
• Prepare and submit all required documents, including architectural drawings and engineering plans.
Create Construction Documents:
• Work with your design build professional to develop detailed construction drawings and specifications.
• These documents will serve as a guide for contractors during construction.
Hire a design build contractor:
• Check references, credentials, and licenses before selecting a contractor.
• Sign a detailed contract that outlines the scope of work, timeline, and payment schedule.
Construction Phase:
• Demolition: If needed, remove any existing structures or walls.
• Foundation: Construct the foundation for the addition.
• Framing: Build the structural framework of the addition.
• Plumbing, Electrical, and HVAC: Install or update utilities as required.
• Insulation: Ensure proper insulation for energy efficiency.
• Drywall and Finish Work: Complete the walls and ceilings.
• Flooring and Cabinetry: Install flooring and kitchen cabinets.
• Appliances and Fixtures: Add appliances, plumbing fixtures, and lighting.
• Paint and Finish: Apply paint and finishes to achieve the desired look.
• Final Inspection: Schedule inspections to ensure compliance with building codes.
Final Inspections and Approvals:
• Arrange for final inspections to ensure the addition meets all safety and code requirements.
• Obtain any necessary certificates of occupancy or compliance.
Move In and Enjoy:
• Once all inspections and approvals are received, you can move into your new kitchen addition and start enjoying it.
Remember that every kitchen addition project is unique, so adapt this outline to your specific needs and circumstances. Consulting with professionals and obtaining the required permits and inspections is crucial to a successful and safe project.

 Donohoe Living Landscapes
The landscape design for this private residence brings together a diverse array of elements to create an ethereal, multi-sensory experience where sound, movement, colour and scent are simultaneously evoked. Shielded by a forty foot hedge, the site challenged us to create an exterior, yet interior, world where Asian and Western influences intersect. In honouring the traditions of Feng Shui, the retaining wall does not sit directly on the entrance. Meditation pathways lead to areas of retreat and socialization (including an outdoor fire, a restored pool and covered seating area). An ergonomic garden and potting station lined with fruit trees allows the client to grow her own plants and vegetables. A multi-leveled water feature is framed with lush camellias and peonies; the landscape is lined with evergreens and decorated with Chinese basalt and local granite. The multi-sensory design comes to life in the grove of Shirofugen cherry trees as it sheds its petals to the music of a custom Corten steel wind chime sculpture made by English artist David Harber. A weather station was placed on site for a month to determine the weight of the chimes—each one set to the pentatonic scale. This is a space where our clients can grow and evolve their lives with the seasons.

 Vanguard Development
The best interior designers & architects in NYC!
Residential interior design, Common area design, Hospitality design, Exterior design, Commercial design - any interior or architectural design basically from a unique design team :)
Our goal is to provide clients in Manhattan, New York, New Jersey & beyond with outstanding architectural & interior design services and installation management through a unique approach and unparalleled work quality.
Our mission is to create Dream Homes that change people's lives!
Working with us is a simple two step process - Design & Installation. The core is that all our design ideas (interior design of an apartment, restaurant, hotel design or architectural design of a building) are presented through exceptionally realistic images, delivering the exact look of your future interior/exterior, before you commit to investing. The Installation then abides to the paradigm of 'What I See Is What I Get', replicating the approved design. All together it gives you full control and eliminates the risk of having an unsatisfactory end product - no other interior designer or architect can offer.
Our team's passion, talent & professionalism brings you the best possible result, while our client-oriented philosophy & determination to make the process easy & convenient, saves you great deal of time and concern.
In short, this is Design as it Should be...
Other services: Lobby design, Store & storefront design, Hotel design, Restaurant design, House design
www.vanguard-development.com

 Advance Design Studio, Ltd.
Jennifer and Dan have lived in their Deer Park Illinois home for 15 years, slowly making minor fixes like painting and decorating; but they had a new plan for their kitchen the entire time. An awkwardly placed garage door, and an island cooktop with a terrible downdraft made a full-scale kitchen remodel an absolute must. Jennifer had many ideas in mind and wanted to work with a company that could provide high-end work, while partnering with a designer that would tailor the kitchen to her ideas.
She was intrigued by the phrase “Common Sense Remodeling” in Advance Design’s feature she discovered while perusing an issue of the community’s Quintessential Barrington Magazine. Doing further research on the company’s website, as she looked through project profiles and read about Advance Design’s “Common Sense Remodeling” philosophy, she promptly scheduled an appointment to see if the people and ideas she read about were truly who they said they were. The more she read, the more she knew that the “Common Sense” approach to remodeling they described was exactly the type of company she was looking for.
The partnership was sealed after an initial consultation with Owner Todd Jurs and Project Designer Michelle Lecinski. They displayed a combination of friendliness, professionalism and respect that was unmatched by any of the other companies Jennifer talked to. She knew that with Advance Design, she would be able to retain the vision that she had in mind with high-quality craftsmanship.
“I reached out to Advance Design because of the ‘Common Sense Remodeling’ tagline,” Jennifer said. “That’s what lingered for me”. “Advance Design was the most respectful- of the house and of my design ideas, and the most professional of the handful of companies that looked at my project”.
Soon after the meeting Jennifer began working with Michelle on the project design. They quickly developed chemistry. Jennifer loved how Michelle researched and located every detail that Jennifer wanted for the kitchen. Between the two of them, every concept and idea was worked through and perfected. “Jennifer had definite ideas about what she wanted the new kitchen to look like, she just didn’t know how to bring it all together. We worked together really well to make her ideas into the practical reality necessary for a well-functioning kitchen, with the look and feel that she had envisioned”, says Michelle.
“Michelle was wonderful in using the CAD system she would show me new drawings every time we changed the layout while working through the design,” Jennifer said. “She was a really wonderful partner in execution, she made sure everything happened quickly and easily.”
The finished design drew out elements of Jennifer’s style and personality. The pair call the look “sophisticated farmhouse” to describe the kitchen renovation to family and friends. The result was a beautifully crafted, authentic-feeling space that satisfied Jennifer’s dreams 15 years in the making. The whole project consisted of a kitchen remodel, mudroom upgrade with powder room, and garage entry relocation. “The projects I personally like the best, are the ones that put the client’s dreams on display,” Project Designer Michelle said. “And this is one of those projects.”
The main focal point of the kitchen is custom zinc and brass ventilation hood with a vintage sheen, which was hand made to order by a small company in Indiana named Vogler Metalworking. “It’s like sculpture, a true work of art”, says Jennifer. Your eye is immediately drawn towards this elegant yet practical hood that eliminated the home’s downdraft problem and added a striking conversation piece at the same time. The carpenters had to use special gloves when transporting and installing it, so they didn’t smudge it with fingerprints. The beautiful hood centers proudly over the stunning black enamel and brass LaCornue Range. “I had a friend who had a LaCornue range and after learning how easy it was to cook perfect meals, I was convinced I wanted to have one”, says Jennifer. This unique, breathtaking combination anchors the entire kitchen and is apparent immediately as you walk into the great room the surrounds the space.
DuraSupreme Crestwood cabinets with a Kendall Panel add function and sophistication. A custom gray paint color paired with a storm blue was developed so that the new kitchen looked like it belonged to the existing space. Unlacquered brass faucets and hardware were important to Jennifer because she wanted the living finishes to age over time. Remarkable brass diamond mesh cabinet door inserts imported from the UK continue to add this one-of-a-kind kitchen renovation; giving it a “you won’t see this everywhere” quality. The use of old railcar flooring for the coffee bar countertop and reclaimed oak for the open shelving gives an authenticity to the space uncommon in kitchens today.
Jennifer and Michelle fell in love with the Limestone Grey Stone while they were investigating unique island countertop ideas. They liked the fact that the limestone as a living finish will age and change over time. Calcutta Miel Quartz countertops made for an excellent pairing around the perimeter, as it’s durable and perfect for cooking preparations. A textured white subway tile backsplash that runs to the ceiling keeps your eye moving towards the open shelving, and to the main focal point of the stunning range hood combination.
“The kitchen functions beautifully, and it’s gorgeous,” beams Jennifer as she gestures with both hands while smiling ear to ear. “The most important thing was I wanted a kitchen that had a wonderful flow, cooked beautiful meals and was a great gathering place for family and friends, and this space does that perfectly! Beauty wise, it turned out exactly how I had envisioned. I felt the function part was the hardest part, and that was nailed”!
Relocating the garage entry to the new mudroom was a huge priority and has finally separated the family’s arriving home functions from their kitchen. Now coats and shoes and bags have their own area for dropping once members arrive home. Matching gray DuraSupreme cabinetry helped create gorgeous, purposeful lockers for the family. A reclaimed vintage sink and custom wall paper were added to the tiny powder room to beautify the once previously only functional space. Advance Design was even able to create a custom space for their dog to sleep while the family is away.
“It was unbelievable that a project of this size was completed in such a short time, and I think that’s because of the large amount of planning and preparation that went into it,” Jennifer marveled, “When we started, we were ready, and everything was prepared”.
When it came to execution, Project Manager Justin Davis and his crew were quick, accessible, and organized. Projects like this kitchen are typically completed in as little as 8-10 weeks. Jennifer’s kitchen however despite the relocation of some challenging HVAC in a soffit and moving of an exterior door was completed remarkably fast in part because the team was working with an existing tile floor that ran throughout the first floor that the client really loved.
“You get to know these people really well because they’re living in your house while you’re living in your house. They were so fast and really good, it didn’t take as long as even planned” reported Jennifer. “I would text Justin and he always responded almost immediately. I got to know all the guys who were working in our house and they were all wonderful people”.
Details in a customized kitchen like this one require skill and care from the people who install it. “All the guys on the job were skilled at what the did. I wanted small details like little feet to look like furniture, that is where their carpentry skill came in to make these all perfect”, said Jennifer. “The tile guys were wonderful. They even let me determine how I wanted the texture with the grout to appear for a salt and pepper look; now that is a very skilled trade person making it custom”.
In Jennifer’s interview, she continued to reference Advance Design’s “Common Sense Remodeling”, so I took a minute to ask her exactly what that phrase meant to her and how it played out in her experience with her project and the Advance Design team. Here is what she said: “I was intrigued about Common Sense Remodeling and in my head that there would be clear costs and prices, great communication between the design team, the execution team and me”, said Jennifer. They did deliver on that, it was so clear about the cost breakdown, what I could expect from everyone who came to my house, and everything that we had ordered. That to me is the Common Sense”!
It’s great to see a client take literally our assertion that a well-planned remodeling project is simply “Common Sense”! She anticipated each step of the way would be clear, concise, and predictable, all the while protecting the outcome due to the careful upfront planning. “Advance Design delivered on their ‘Common Sense Remodeling’ promise,” Jennifer said. “From the design team, to the execution team - everything was straight forward like I imagined. The project turned out exactly how I envisioned, I enjoyed this process and absolutely would recommend Advance Design Studio to anyone.”

 J.THOM Residential Design & Cabinetry
Our goal was to modernize an outdated spec kitchen by increasing the overall storage capacity and re-configuring the work-space to accommodate more use while increasing the natural light into the kitchen.
We collaborated with the Owners Architect and determined it was necessary to partially remove the wall between the kitchen and dining room. Two small windows along the rear wall were replaced with a new over-sized window bringing in massive amounts of natural light. We removed a breakfast table that previously crowded the kitchen circulation and replaced it with a breakfast counter facing the kitchen and new window.
The semi-open kitchen, delineated by the breakfast counter created a visual buffer for a busy kitchen and maximized the views and natural from the new window. By organizing every cabinet, we maximized the storage capacity and further increased the ergonomics of the kitchen using drawers for dishes and other items.
Jonathan Kolbe Photographer

 Flooret
Part of the Modin Vinyl Plank Collection, Available Exclusively From www.Flooret.com
$3.49 / sq ft, 22.08 sq ft per box
50% WIDER. 25% LONGER. TWICE AS DURABLE
Luxury Vinyl Plank, 5 mm x 9" x 60" (1.0 mm / 40 mil wear-layer)
Lifetime Residential Warranty, 20 year Commercial Warranty
Sleek and chic. In terms of high-impact, going with a dark wire-brush pattern is a sure way to quickly define a space. Never boring, this modern pattern will set the mood immediately.
The most important specification for determining the durability of vinyl flooring is the thickness of the wear-layer. The best wear-layers are made of thick, clear virgin PVC, which covers the paper print-film that gives the floor its unique appearance. Once the wear-layer wears through, the paper is damaged and the floor will need replacement.
Most vinyl floors come with a 8-12 mil wear-layer (0.2-3 mm). The top commercial specs in the industry are higher, at 20-22 mil (0.5 mm). A select few manufacturers offer a “super” commercial spec of 28 mil (0.7 mm).
For Modin, we decided to set a new standard: 40 mil (1.0 mm) of premium virgin PVC. This allows us to offer an industry-leading 20 year Commercial Warranty (Lifetime Residential), compared to nearly all other commercial vinyl floors’ 10 year Commercial Warranty.
Beyond our superior wear-layer, we also use a patented click mechanism for superior hold, and a ceramic-bead coating.
SIZE MATTERS
Wider and longer planks create a sense of space and luxury. Most vinyl floors come in 6” or 7” widths, and 36” or 48” lengths.
For Modin, we designed our planks to be 9” wide, and 60” long. This extra large size allows our gorgeous designs to be fully expressed.
DETAILS THAT COUNT
We made sure to get all the details right. Real texture, to create the feel of wire-brushed wood. Low sheen level, to ensure a natural look that wears well over time. 4-sided bevels, to more accurately emulate the look of real planks. When added together they help create the unique look that is Modin.
DESIGNS THAT INSPIRE
We spent nearly a year just focusing on our designs, to ensure they provide the right mix of color and depth. Focusing on timeless wire-brush and European Oak styles, as well as more contemporary modern washes, our collection offers truly beautiful design that is both functional and inspiring.
 Vanguard Development
The best interior designers & architects in NYC!
Residential interior design, Common area design, Hospitality design, Exterior design, Commercial design - any interior or architectural design basically from a unique design team :)
Our goal is to provide clients in Manhattan, New York, New Jersey & beyond with outstanding architectural & interior design services and installation management through a unique approach and unparalleled work quality.
Our mission is to create Dream Homes that change people's lives!
Working with us is a simple two step process - Design & Installation. The core is that all our design ideas (interior design of an apartment, restaurant, hotel design or architectural design of a building) are presented through exceptionally realistic images, delivering the exact look of your future interior/exterior, before you commit to investing. The Installation then abides to the paradigm of 'What I See Is What I Get', replicating the approved design. All together it gives you full control and eliminates the risk of having an unsatisfactory end product - no other interior designer or architect can offer.
Our team's passion, talent & professionalism brings you the best possible result, while our client-oriented philosophy & determination to make the process easy & convenient, saves you great deal of time and concern.
In short, this is Design as it Should be...
Other services: Lobby design, Store & storefront design, Hotel design, Restaurant design, House design
www.vanguard-development.com
 Donohoe Living Landscapes
The landscape design for this private residence brings together a diverse array of elements to create an ethereal, multi-sensory experience where sound, movement, colour and scent are simultaneously evoked. Shielded by a forty foot hedge, the site challenged us to create an exterior, yet interior, world where Asian and Western influences intersect. In honouring the traditions of Feng Shui, the retaining wall does not sit directly on the entrance. Meditation pathways lead to areas of retreat and socialization (including an outdoor fire, a restored pool and covered seating area). An ergonomic garden and potting station lined with fruit trees allows the client to grow her own plants and vegetables. A multi-leveled water feature is framed with lush camellias and peonies; the landscape is lined with evergreens and decorated with Chinese basalt and local granite. The multi-sensory design comes to life in the grove of Shirofugen cherry trees as it sheds its petals to the music of a custom Corten steel wind chime sculpture made by English artist David Harber. A weather station was placed on site for a month to determine the weight of the chimes—each one set to the pentatonic scale. This is a space where our clients can grow and evolve their lives with the seasons.
 Flooret
Classic color with refined texture. Picking up on the natural blonde tones of oak, but adding in a light wire brush. Santal can either dress up a space or just create a comfortable canvas. The range of color allows a lot of versatility with furniture and complimenting elements.
REDEFINING DURABILITY
The most important specification for determining the durability of vinyl flooring is the thickness of the wear-layer. The best wear-layers are made of thick, clear virgin PVC, which covers the paper print-film that gives the floor its unique appearance. Once the wear-layer wears through, the paper is damaged and the floor will need replacement.
Most vinyl floors come with a 8-12 mil wear-layer (0.2-3 mm). The top commercial specs in the industry are higher, at 20-22 mil (0.5 mm). A select few manufacturers offer a “super” commercial spec of 28 mil (0.7 mm).
For Modin, we decided to set a new standard: 40 mil (1.0 mm) of premium virgin PVC. This allows us to offer an industry-leading 20 year Commercial Warranty (Lifetime Residential), compared to nearly all other commercial vinyl floors’ 10 year Commercial Warranty.
Beyond our superior wear-layer, we also use a patented click mechanism for superior hold, and a ceramic-bead coating.
SIZE MATTERS
Wider and longer planks create a sense of space and luxury. Most vinyl floors come in 6” or 7” widths, and 36” or 48” lengths.
For Modin, we designed our planks to be 9” wide, and 60” long. This extra large size allows our gorgeous designs to be fully expressed.
DETAILS THAT COUNT
We made sure to get all the details right. Real texture, to create the feel of wire-brushed wood. Low sheen level, to ensure a natural look that wears well over time. 4-sided bevels, to more accurately emulate the look of real planks. When added together they help create the unique look that is Modin.
DESIGNS THAT INSPIRE
We spent nearly a year just focusing on our designs, to ensure they provide the right mix of color and depth. Focusing on timeless wire-brush and European Oak styles, as well as more contemporary modern washes, our collection offers truly beautiful design that is both functional and inspiring.

 Michelle Mohlere Interior Color & Design
Finished kitchen & entry.
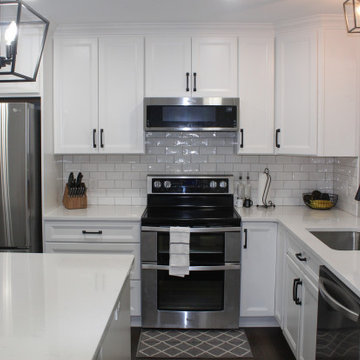
Eat-in kitchen - mid-sized transitional u-shaped medium tone wood floor eat-in kitchen idea in Los Angeles with an undermount sink, shaker cabinets, white cabinets, multicolored backsplash, glass tile backsplash, stainless steel appliances, marble countertops and a peninsula
Eat-in kitchen - mid-sized transitional u-shaped medium tone wood floor eat-in kitchen idea in Los Angeles with an undermount sink, shaker cabinets, white cabinets, multicolored backsplash, glass tile backsplash, stainless steel appliances, marble countertops and a peninsula
 SV Design
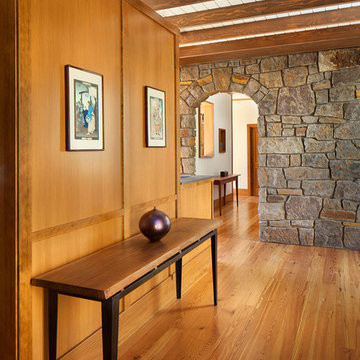
When full-time Massachusetts residents contemplate building a second home in Telluride, Colorado the question immediately arises; does it make most sense to hire a regionally based Rocky Mountain architect or a sea level architect conveniently located for all of the rigorous collaboration required for successful bespoke home design. Determined to prove the latter true, Siemasko + Verbridge accompanied the potential client as they scoured the undulating Telluride landscape in search of the perfect house site.
The selected site’s harmonious balance of untouched meadow rising up to meet the edge of an aspen grove and the opposing 180 degree view of Wilson’s Range spoke to everyone. A plateau just beyond a fork in the meadow provided a natural flatland, requiring little excavation and yet the right amount of upland slope to capture the views. The intrinsic character of the site was only enriched by an elk trail and snake-rail fence.
Establishing the expanse of Wilson’s range would be best served by rejecting the notion of selected views, the central sweeping curve of the roof inverts a small saddle in the range with which it is perfectly aligned. The soaring wave of custom windows and the open floor plan make the relatively modest house feel sizable despite its footprint of just under 2,000 square feet. Officially a two bedroom home, the bunk room and loft allow the home to comfortably sleep ten, encouraging large gatherings of family and friends. The home is completely off the grid in response to the unique and fragile qualities of the landscape. Great care was taken to respect the regions vernacular through the use of mostly native materials and a palette derived from the terrain found at 9,820 feet above sea level.
Photographer: Gibeon Photography
 Talon Construction Inc.
Designing and building a kitchen addition is a complex process that involves multiple steps and considerations. Here is a general outline to help you get started on your kitchen addition project:
Define Your Goals and Budget:
• Determine the purpose of the kitchen addition. Is it for more cooking space, a dining area, or a combination of both?
• Establish a realistic budget for your project. Consider all costs, including construction, permits, materials, and furnishings.
Hire a Design Professional:
• Seek the services of a design build company who specializes in kitchen additions.
• Discuss your vision, needs, and budget with the design professional to create a design concept.
Site Evaluation:
• Assess the existing space and structural condition of your home to ensure it can support the addition.
• Consider factors like zoning regulations, setbacks, and building codes.
Design Development:
• Collaborate with your design professional to refine the concept, including the layout, size, and architectural style.
• Choose materials, finishes, and fixtures that fit your design and budget.
Obtain Permits:
• Consult with your local design build contractor to determine the necessary permits and approvals.
• Prepare and submit all required documents, including architectural drawings and engineering plans.
Create Construction Documents:
• Work with your design build professional to develop detailed construction drawings and specifications.
• These documents will serve as a guide for contractors during construction.
Hire a design build contractor:
• Check references, credentials, and licenses before selecting a contractor.
• Sign a detailed contract that outlines the scope of work, timeline, and payment schedule.
Construction Phase:
• Demolition: If needed, remove any existing structures or walls.
• Foundation: Construct the foundation for the addition.
• Framing: Build the structural framework of the addition.
• Plumbing, Electrical, and HVAC: Install or update utilities as required.
• Insulation: Ensure proper insulation for energy efficiency.
• Drywall and Finish Work: Complete the walls and ceilings.
• Flooring and Cabinetry: Install flooring and kitchen cabinets.
• Appliances and Fixtures: Add appliances, plumbing fixtures, and lighting.
• Paint and Finish: Apply paint and finishes to achieve the desired look.
• Final Inspection: Schedule inspections to ensure compliance with building codes.
Final Inspections and Approvals:
• Arrange for final inspections to ensure the addition meets all safety and code requirements.
• Obtain any necessary certificates of occupancy or compliance.
Move In and Enjoy:
• Once all inspections and approvals are received, you can move into your new kitchen addition and start enjoying it.
Remember that every kitchen addition project is unique, so adapt this outline to your specific needs and circumstances. Consulting with professionals and obtaining the required permits and inspections is crucial to a successful and safe project.
 Talon Construction Inc.
Designing and building a kitchen addition is a complex process that involves multiple steps and considerations. Here is a general outline to help you get started on your kitchen addition project:
Define Your Goals and Budget:
• Determine the purpose of the kitchen addition. Is it for more cooking space, a dining area, or a combination of both?
• Establish a realistic budget for your project. Consider all costs, including construction, permits, materials, and furnishings.
Hire a Design Professional:
• Seek the services of a design build company who specializes in kitchen additions.
• Discuss your vision, needs, and budget with the design professional to create a design concept.
Site Evaluation:
• Assess the existing space and structural condition of your home to ensure it can support the addition.
• Consider factors like zoning regulations, setbacks, and building codes.
Design Development:
• Collaborate with your design professional to refine the concept, including the layout, size, and architectural style.
• Choose materials, finishes, and fixtures that fit your design and budget.
Obtain Permits:
• Consult with your local design build contractor to determine the necessary permits and approvals.
• Prepare and submit all required documents, including architectural drawings and engineering plans.
Create Construction Documents:
• Work with your design build professional to develop detailed construction drawings and specifications.
• These documents will serve as a guide for contractors during construction.
Hire a design build contractor:
• Check references, credentials, and licenses before selecting a contractor.
• Sign a detailed contract that outlines the scope of work, timeline, and payment schedule.
Construction Phase:
• Demolition: If needed, remove any existing structures or walls.
• Foundation: Construct the foundation for the addition.
• Framing: Build the structural framework of the addition.
• Plumbing, Electrical, and HVAC: Install or update utilities as required.
• Insulation: Ensure proper insulation for energy efficiency.
• Drywall and Finish Work: Complete the walls and ceilings.
• Flooring and Cabinetry: Install flooring and kitchen cabinets.
• Appliances and Fixtures: Add appliances, plumbing fixtures, and lighting.
• Paint and Finish: Apply paint and finishes to achieve the desired look.
• Final Inspection: Schedule inspections to ensure compliance with building codes.
Final Inspections and Approvals:
• Arrange for final inspections to ensure the addition meets all safety and code requirements.
• Obtain any necessary certificates of occupancy or compliance.
Move In and Enjoy:
• Once all inspections and approvals are received, you can move into your new kitchen addition and start enjoying it.
Remember that every kitchen addition project is unique, so adapt this outline to your specific needs and circumstances. Consulting with professionals and obtaining the required permits and inspections is crucial to a successful and safe project.
 Vanguard Development
The best interior designers & architects in NYC!
Residential interior design, Common area design, Hospitality design, Exterior design, Commercial design - any interior or architectural design basically from a unique design team :)
Our goal is to provide clients in Manhattan, New York, New Jersey & beyond with outstanding architectural & interior design services and installation management through a unique approach and unparalleled work quality.
Our mission is to create Dream Homes that change people's lives!
Working with us is a simple two step process - Design & Installation. The core is that all our design ideas (interior design of an apartment, restaurant, hotel design or architectural design of a building) are presented through exceptionally realistic images, delivering the exact look of your future interior/exterior, before you commit to investing. The Installation then abides to the paradigm of 'What I See Is What I Get', replicating the approved design. All together it gives you full control and eliminates the risk of having an unsatisfactory end product - no other interior designer or architect can offer.
Our team's passion, talent & professionalism brings you the best possible result, while our client-oriented philosophy & determination to make the process easy & convenient, saves you great deal of time and concern.
In short, this is Design as it Should be...
Other services: Lobby design, Store & storefront design, Hotel design, Restaurant design, House design
www.vanguard-development.com

 Shapiro & Company Architects
Our clients loved this tree-lined older, established neighborhood. They bought a house there that needed substantial renovations as it probably had not been updated in 30-40 years. They contacted Shapiro & Co in hopes that they would be able to transition an older, outdated house to a home that retained its character but was redesigned to meet the current needs of the family. The house foyer was very small and not accomodating for visitors so the architects relocated the entry and added a welcoming front porch. After an assessment of the existing conditions, it was determined that the kitchen, while serving its purpose in the 1940s, was completely out of character and in the wrong location for a modern family's needs. So the architects relocated and created an entirely new kitchen, and family and dining spaces. As indicative of homes in the ’40s and '50s, the master bedroom and bathroom were very small and not meeting current needs. Therefore we repurposed one bedroom into the master bath and dressing area and reorganized and enlarged the master bedroom area. The original second-floor plan was very small and confining. We captured some attic space and were able to create two bedrooms with ensuite bathrooms and a central common room for the children. By a sensitive assessment of the client’s needs and while maintaining the charm of the home, we were able to completely renovate and enlarge the house while keeping it in context with the beautiful neighborhood.
Contractor: RKA Construction, LLC
Interior: Lindsey Black Interiors
Photographer: Sélavie Photography
 SV Design
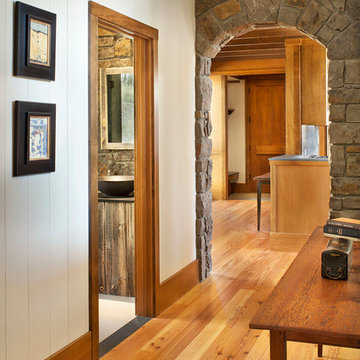
When full-time Massachusetts residents contemplate building a second home in Telluride, Colorado the question immediately arises; does it make most sense to hire a regionally based Rocky Mountain architect or a sea level architect conveniently located for all of the rigorous collaboration required for successful bespoke home design. Determined to prove the latter true, Siemasko + Verbridge accompanied the potential client as they scoured the undulating Telluride landscape in search of the perfect house site.
The selected site’s harmonious balance of untouched meadow rising up to meet the edge of an aspen grove and the opposing 180 degree view of Wilson’s Range spoke to everyone. A plateau just beyond a fork in the meadow provided a natural flatland, requiring little excavation and yet the right amount of upland slope to capture the views. The intrinsic character of the site was only enriched by an elk trail and snake-rail fence.
Establishing the expanse of Wilson’s range would be best served by rejecting the notion of selected views, the central sweeping curve of the roof inverts a small saddle in the range with which it is perfectly aligned. The soaring wave of custom windows and the open floor plan make the relatively modest house feel sizable despite its footprint of just under 2,000 square feet. Officially a two bedroom home, the bunk room and loft allow the home to comfortably sleep ten, encouraging large gatherings of family and friends. The home is completely off the grid in response to the unique and fragile qualities of the landscape. Great care was taken to respect the regions vernacular through the use of mostly native materials and a palette derived from the terrain found at 9,820 feet above sea level.
Photographer: Gibeon Photography
 Vanguard Development
The best interior designers & architects in NYC!
Residential interior design, Common area design, Hospitality design, Exterior design, Commercial design - any interior or architectural design basically from a unique design team :)
Our goal is to provide clients in Manhattan, New York, New Jersey & beyond with outstanding architectural & interior design services and installation management through a unique approach and unparalleled work quality.
Our mission is to create Dream Homes that change people's lives!
Working with us is a simple two step process - Design & Installation. The core is that all our design ideas (interior design of an apartment, restaurant, hotel design or architectural design of a building) are presented through exceptionally realistic images, delivering the exact look of your future interior/exterior, before you commit to investing. The Installation then abides to the paradigm of 'What I See Is What I Get', replicating the approved design. All together it gives you full control and eliminates the risk of having an unsatisfactory end product - no other interior designer or architect can offer.
Our team's passion, talent & professionalism brings you the best possible result, while our client-oriented philosophy & determination to make the process easy & convenient, saves you great deal of time and concern.
In short, this is Design as it Should be...
Other services: Lobby design, Store & storefront design, Hotel design, Restaurant design, House design
www.vanguard-development.com
126