
Search results for "Differs drastically" in Home Design Ideas

 Stacey Kocevar Designs, LLC
This kitchen went from dark and dated, to bright and timeless! We achieved this look by removing the soffits above the cabinetry, along with the patterned wallpaper, dark cabinetry, and view obstructing cabinets and pendants. The white cabinets with a charcoal glaze were the perfect color to go along with the hardwood floors that were brought in from the living room, which helped to tie the spaces together seamlessly. The homeowner wanted a maintenance-free and bright backsplash, so we took the Ceasarstone "London Gray" quartz countertops and continued them up the wall; in the thinner 2cm thick material. The sleek look was maintained by using Adorne under-cabinet outlets, as well as Hafele's LOOX modular switches for the under-cabinet, above-cabinet, and interior-cabinet lights, which were also installed under the cabinets. The new windows and doors made all the difference by increasing the view to the outside and pool area, as well as allowing more natural light to flood into the space. Although the layout did not change drastically, this kitchen is packed with accessories and details that make this a truly beautiful and classy kitchen that will be enjoyed for many years to come. Photography by: Bob Skalkowski Photography
Find the right local pro for your project
 Stacey Kocevar Designs, LLC
This kitchen went from dark and dated, to bright and timeless! We achieved this look by removing the soffits above the cabinetry, along with the patterned wallpaper, dark cabinetry, and view obstructing cabinets and pendants. The white cabinets with a charcoal glaze were the perfect color to go along with the hardwood floors that were brought in from the living room, which helped to tie the spaces together seamlessly. The homeowner wanted a maintenance-free and bright backsplash, so we took the Ceasarstone "London Gray" quartz countertops and continued them up the wall; in the thinner 2cm thick material. The sleek look was maintained by using Adorne under-cabinet outlets, as well as Hafele's LOOX modular switches for the under-cabinet, above-cabinet, and interior-cabinet lights, which were also installed under the cabinets. The new windows and doors made all the difference by increasing the view to the outside and pool area, as well as allowing more natural light to flood into the space. Although the layout did not change drastically, this kitchen is packed with accessories and details that make this a truly beautiful and classy kitchen that will be enjoyed for many years to come. Photography by: Bob Skalkowski Photography

 Edmond Kitchen & Bath LLC
This Edmond Kitchen was taken from Golden Oak to Transitional in just a few simple steps. New doors and drawer fronts were painted and faux finished, then new flooring, countertops, backsplash, and lighting completed the project. What a difference! Thank you AA for letting us work in your home!

 Vintage Elements LLC
California Kitchen Remodel with custom built cabinetry, French appliances and reclaimed French Terracotta floors and oak inlay pattern.
Mid-sized tuscan galley terra-cotta tile kitchen photo in Sacramento with a farmhouse sink and marble countertops
Mid-sized tuscan galley terra-cotta tile kitchen photo in Sacramento with a farmhouse sink and marble countertops

 Cummings Architecture + Interiors
When Cummings Architects first met with the owners of this understated country farmhouse, the building’s layout and design was an incoherent jumble. The original bones of the building were almost unrecognizable. All of the original windows, doors, flooring, and trims – even the country kitchen – had been removed. Mathew and his team began a thorough design discovery process to find the design solution that would enable them to breathe life back into the old farmhouse in a way that acknowledged the building’s venerable history while also providing for a modern living by a growing family.
The redesign included the addition of a new eat-in kitchen, bedrooms, bathrooms, wrap around porch, and stone fireplaces. To begin the transforming restoration, the team designed a generous, twenty-four square foot kitchen addition with custom, farmers-style cabinetry and timber framing. The team walked the homeowners through each detail the cabinetry layout, materials, and finishes. Salvaged materials were used and authentic craftsmanship lent a sense of place and history to the fabric of the space.
The new master suite included a cathedral ceiling showcasing beautifully worn salvaged timbers. The team continued with the farm theme, using sliding barn doors to separate the custom-designed master bath and closet. The new second-floor hallway features a bold, red floor while new transoms in each bedroom let in plenty of light. A summer stair, detailed and crafted with authentic details, was added for additional access and charm.
Finally, a welcoming farmer’s porch wraps around the side entry, connecting to the rear yard via a gracefully engineered grade. This large outdoor space provides seating for large groups of people to visit and dine next to the beautiful outdoor landscape and the new exterior stone fireplace.
Though it had temporarily lost its identity, with the help of the team at Cummings Architects, this lovely farmhouse has regained not only its former charm but also a new life through beautifully integrated modern features designed for today’s family.
Photo by Eric Roth
Sponsored
Columbus, OH

Hope Restoration & General Contracting
Columbus Design-Build, Kitchen & Bath Remodeling, Historic Renovations

 VFLA Architecture + Interiors
Example of a mid-sized arts and crafts master carpeted and white floor bedroom design in Denver with white walls, a standard fireplace and a stone fireplace


 Ashleys Building and Construction, LLC.
Drastic kitchen and bathroom transformation pictures coming your way.
This remodeling project has a bitter sweet story.
This home was built in 1975 and was the childhood home for our client. Many, many holidays, birthdays, graduations, and life milestones were celebrated here with her brothers and sisters. This home was the hub for all life events and milestones.
When her parents passed a few years ago, our client decided to purchase the home with plans of renovations and continuing the family traditions and celebrations she always loved.
That's where we come in.
Our job was to redesign the kitchen and bathroom into a functional space where family and friends could gather during the celebratory times and give it a rustic flare. Challenge accepted!
What was on their wish list?
•Remove the peninsula area and add an island. ✔️ Got it!
•Warm colors, materials to be used to give a rustic farmhouse feel. ✔️ Yes Ma'am!
•Open the wall to the family room. ✔️ Absolutely!
•Tone down the orange bathroom and turn it into a half bath. ✔️ Our pleasure!
As you can see from the before and after pictures, every wish was signed sealed and delivered.
A new chapter is happening in this home. Memories of Mom and Dad are still alive and well in every space of this home and now traditions will continue with loving thoughts of the past and excitement of the future.
Working for this family was truly an honor.

 Lisa Batson Goldberg Design
Betty Wang
Mid-sized eclectic freestanding desk study room photo in Toronto
Mid-sized eclectic freestanding desk study room photo in Toronto




 Alair Homes Plano
Our clients drastically needed to update this master suite from the original forest green floral wallpaper to something more clean and simple. They wanted to open up the dated cultured marble enclosed tub and shower and remove all soffits and plant ledges above the vanities. They wanted to explore the possibilities of opening up the shower with glass and look at installing a freestanding bathtub and they definitely wanted to keep the double sided fireplace but update the look of it.
First off, we did some minor changes to the bedroom. We replaced the carpet with a beautiful soft multi-color gray low pile carpet and painted the walls a soft white. The fireplace surround was replaced with Carrara 12×12 polished porcelain tile for a more elegant look. Finally, we tore out a corner built in desk and squared off and textured the wall, making it look as though it were never there.
We needed to strip this bathroom down and start from scratch. We demoed the cabinets, counter tops, all plumbing fixtures, ceiling fan, track lighting, tub and tub surround, fireplace surround, shower door, shower walls and ceiling above the shower, all flooring, soffits above vanity areas, saloon doors on the water closet and of course the wallpaper!
We changed the walls around the shower to pony walls with glass on the upper half, opening up the shower. The tile was lined with Premium Antasit 12×24 tile installed vertically in a 50/50 brick pattern. The shower floor and the floor below the tub is Solo River Grey Pebble mosaic tile. A contemporary Jaclo Collection shower system was installed including a contemporary handshower and square shower head. The large freestanding tub is a white Hydro Sytsems “Picasso” with “Steelnox” wall mounted tub filler and hardware from Graff.
All of the cabinets were replaced with Waypoint maple mocha glazed flat front doors and drawers. Quartzmasters Calacatta Grey countertops were installed with 2 Icera “Muse” undermount sinks for a clean modern look. The cabinet hardware the clients chose is ultra modern ”Sutton” from Hardware Resources and the faucet and other hardware is all from the Phylrich “Mix” collection.
Pulling it all together, Premium Antasit 12×14 installed floor tile was installed in a 50/50 brick pattern. The pebble tile that was installed in the shower floor was also installed in an oval shape under the bathtub for a great modern look and to break up the solid gray flooring.
Addison Oak Wood planks were installed vertically behind the bathtub, below the fireplace surround and behind the potty for a modern finished look. The fireplace was surrounded with Carrara 12×12 polished porcelain, as well as the wood planks. Finally, to add the finishing touches, Z-Lite brushed nickel vanity lights were installed above each vanity sink. The clients are so pleased to be able to enjoy and relax in their new contemporary bathroom!
 Golden View Renovation
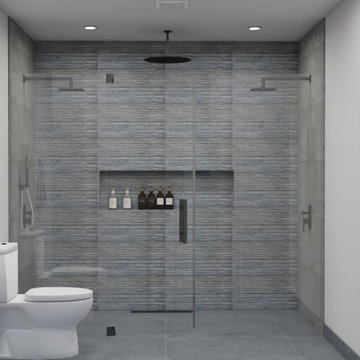
Bathroom - modern gray tile and mosaic tile porcelain tile, gray floor and double-sink bathroom idea in San Francisco with a one-piece toilet, a hinged shower door, flat-panel cabinets, white cabinets, white walls, an integrated sink and a floating vanity

 User
This is an organic Lime Wash done with a true lime wash product as opposed to a brick mortar or concrete that is often seen on new houses. This product can be applied as a solid coating making the surface completely white, or can be applied and "washed off" in many artistic ways, as seen here. If you hate your brick or just want something unique this is a great option!
Photo credit: Jeff Murrey


Sponsored
Columbus, OH

Trish Takacs Design
Award Winning & Highly Skilled Kitchen & Bath Designer in Columbus

 Spiritcraft Design Furniture
Transform a room with a modern built in wall unit of hardwoods that match your interior decor style. Form and function come together in any transitional, modern or contemporary design motif with the use of single or multiple hardwoods in a customize-able built in that allows your personal design style to radiate.
Our use of modern influences from the Mid Century Modern era have allowed us to create an interior design product that can enhance our clients interior decor vision and provide a dramatic visual statement while solving space planning and storage issues. Our Madison Avenue collection of built in modular wall units can be customized to enhance any room in your home or office and provide timeless eye appeal with customized function.
Our Madison Avenue wall units, plinths and casework are available in varying configurations for the bedroom that includes built in floating nightstands along with a vast array of choices for padding in differing shapes and fabric offerings. The wall installations are also available in any custom size and length and in nearly any hardwood imaginable for office, commercial, bathrooms and any other living or work environment.
Installations can be adapted to include shelving, cube arrays, floating plinth elements along with lighting options that include incorporated wall sconce and overhead LED spot lighting. Our lighting options can be controlled with our original touch switch dimmers that are built into the consoles, night stands, walls or shelving.
The pictured Mid-Century influenced console is 93.5" wide by 24" deep and high and offers three internal compartments for media and storage and two outer compartments that are covered in fabric to mimic a classic stereo console. The case is made from solid hardwood while the doors are covered in reconstituted real wood veneer over Meranti marine ply for superb stability and ultimate longevity. The four doors slide effortlessly and conceal adjustable Walnut shelves though open compartments and drawers are options in this console design.
The media console is available in a vast array of solid hardwoods, depths, widths and internal configurations while the appearance can be drastically changed by the choice of veneers for the sliding doors and by adding open compartments or visually apparent drawers to the cabinet face. The Mad Ave console is also available in various leg styles and heights that will adapt this Mid Century influenced case into a dining room sideboard, bedroom dresser or of course into a standalone stereo / media console.
Several designs within our new furniture collection along with other collections, upholstery and window treatments will be on display at our new interior design showroom and furniture gallery, Interior Design Accents located at 7 Jackson Street in East Dundee, IL.

 The Rinfret Group
Example of a mid-sized transitional freestanding desk dark wood floor and brown floor study room design in New York with beige walls and no fireplace
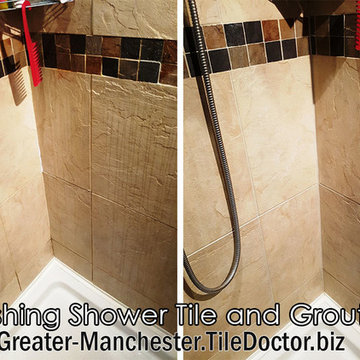
 Tile Doctor Ltd
Shower and bathroom mould and soap scum growth are probably the most common, annoying and frustrating tile-related problems. Wet and high humidity areas with poor ventilation provide the perfect breeding ground for mould and stains. Soap residue and body oils also create a food source for soap scum, mould to grow.
My customer in Dane Bank had the exact problem with dirty and mouldy grout lines in her shower cubicle. She had tried scrubbing the grout lines herself with a toothbrush and standard supermarket cleaners but never got the result she wanted.
Fortunately she was lucky to find Tile Doctor from the internet and I was asked to pop over and take a look to see what could be done. I was confident we could make a big difference so I went through the options with her and give her price for the job. She was happy with the price and we agreed a date for me to return and complete the work.
For grout lines cleaning I used Tile Doctor Grout Colorant Pre-Treat Cleaner, which successfully removes dirt, soil, soap scum and hard water deposits from grout joints. The product was sprayed on to the grout and left to dwell and seep into the pores for approximately five minutes to break down the soap scum and dirt before being scrubbed in using a stiff grout brush. The cleaning was successful but there were still few mouldy spots left. On these spots I used Tile Doctor Mould Away Spray that is meant for quick removal of mould from grout and silicone. One again product got sprayed on grout lines and left to dwell for five minutes and then scrubbed with stiff grout brush and then rinsed with clean water. After I had finished cleaning I express dried the tile and grout using high power heat gun.
With the area nice and dry, I had to choose the matching colour for the existing grout. There are ten colours to choose from the Tile Doctor range of Grout Colourant and on this occasion we chose Limestone as the best colour to match the tile.
The colourant is easily applied directly to the grout and in this case I applied two coats. The product is epoxy based and completely seals and rejuvenates the appearance of the grout, which not only drastically improves appearance it also makes it much easier to clean in the future. After applying the re-colourant I buffed all grout colorant excess off the tiles and the shower cubicle was ready.
My customer was very satisfied with the work and left the following comment on the Tile Doctor Feedback system
“Really, really happy with the service Tony provided and the recommendations he suggested. The work was carried out in a highly professional manner, to a high standard. I have already recommended him to friends. Thank you”
Tony Olmet
Greater Manchester Tile Doctor
8