
Search results for "Doctors specializing" in Home Design Ideas
 Tile Doctor Ltd
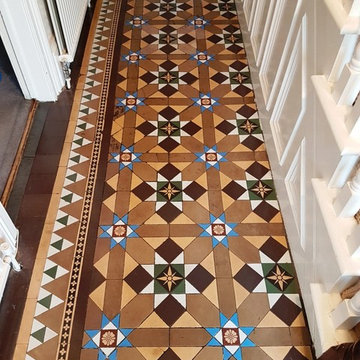
Shipley is a town in West Yorkshire that was heavily shaped by the Industrial Revolution and the Victorian period. It became particularly well-known for its textile industry and some of the original mills in which textiles were manufactured still survive in the town today. Being in West Yorkshire, Shipley is also part of what is commonly known as ‘Brontë country’ – once home to the famous Brontë sisters.
Many Victorian era properties still survive in the area too and all too often the original Victorian tiled floors contained within are not well maintained. I recently visited a customer in Shipley who had a Victorian tiled hallway that was in need of a deep clean and seal. What’s more, the customer told me that there were around 20 loose tiles in the hallway that would need to be reinstalled.
On the first day, I started by refitting the 20 loose tiles in the hallway. The problem however was a lot worse than originally thought and, in the end, I had to take up 108 tiles, so I could rebuild the base of the floor, and then relay them. This process took up most of the day but at least the adhesive and grout would be set in time for cleaning the next day.
On day two I focused on deep cleaning the tiles and removing any remaining sealer by applying a strong dilution of Tile Doctor Pro-Clean. Pro-Clean is a strong alkaline heavy-duty tile and grout cleaner that serves the purpose of both cleaning the stone and when used in a strong dilution will strip off sealers.
I applied the Pro Clean liberally across the length of the hallway and left it to soak into the tiles for about twenty minutes. This allows the product time to breakdown the sealer and dirt before being scrubbed in with a black scrubbing pad.
Special attention had to be paid to parts of the floor which had suffered paint splashes from previous decoration. I was also surprised to find that there were even some chewing gum stains marking the tiles. These were removed using the combination of a steam cleaner, more Pro-Clean and the careful use of a handheld scraper.
The floor was then given a thorough rinse with fresh water and then dried as much as possible with a wet vacuum. It was then also left to dry off overnight.
Upon returning to the property the next day I checked for any moisture issues with a damp tester. Thankfully, the floor proved dry and I could proceed with sealing the tiles which was done using four coats of Tile Doctor Seal and Go that leaves a deep satin finish that the customer had requested.
Nigel Stoker
North West Yorkshire Tile Doctor
 Tile Doctor Ltd
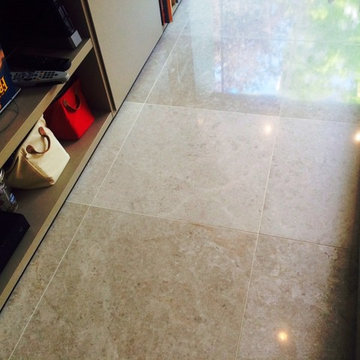
I was recently engaged to refresh the Limestone tiled floor at a house in St. John’s Wood, which is a very affluent area and apparently has the 5th most expensive postcode in London so as you can imagine this was a very expensive floor. The client had requested an improvement condition of the Limestone tiles in the living room and a thorough clean, polishing and seal was required. Over time, the floor in this busy living room – which was also used as a play area for young children – had become dirty and certainly worse for wear with all the use it had been getting. So, I set about my work to get this floor back to looking its best.
Cleaning and burnishing a Limestone floor
My initial task before beginning the cleaning process was to remove any furniture (as well as toys) from the room so I would have a clear area to work in. I then applied a layer of Tile Doctor Pro-Clean cleaner, diluted with water, to the floor. Pro-Clean is also suitable for use on other natural stone floors such as Slate, Granite and Travertine.
After leaving the solution to dwell for a period of a few minutes, I began to scrub the floor with a stiff hand brush. Whilst helping to remove a lot of the built up dirt on the surface of the tiles, the product also stripped off the old sealer and polish. Following this, I paid special attention to the dirty grout lines, cleaning them with Tile Doctor Oxy-Pro, a powerful, high-alkaline cleaner.
After completing the cleaning, I rinsed the floor with clean water to remove any excess cleaning products. I then began to burnish the floor using Tile Doctor Diamond encrusted burnishing pads. This was done in four steps, as I used four different pads (coarse, medium, fine and very fine) rinsing the floor with water between each pad. I would recommend using this setup of four pads for restoring the appearance of polished stone floors; you starting with a coarse pad and the gradually work your way up to the very fine pad achieving a high polish finish in the process. I finished of the process with a quick rinse and a buffing pad to give the floor a final polish before I commenced the sealing.
Sealing a Limestone floor
My choice of sealer was Tile Doctor Colour Grow, which is specifically designed to not only provide durable surface protection, but also to intensify the colour of the tiles. The sealer penetrates deep into the pores of the stone, providing water resistance and long-term protection from ingrained dirt and stains. As you can see from the photos, the sealer really helped to accentuate the fantastic natural colours in the Limestone.
My client was very pleased with the final result, and was amazed by how quickly I had been able to improve the state of her floor which, with a colourful and shiny finish, has really brightened up the living room.
 Tile Doctor Ltd
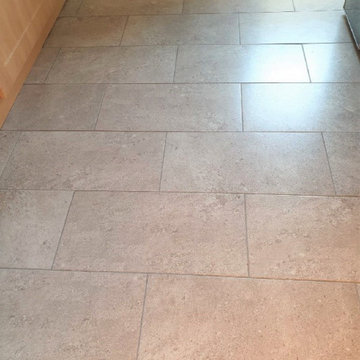
The owners of this house in Adwick Le Street, which is North of Doncaster, were fed up with the appearance of the Grout in their Ceramic tiled kitchen floor. They had not been able to keep the grout clean and it was now patchy, discoloured, darker and consequently always looked dirty.
I visited the property, to survey the floor and could see the Ceramic tiles and where in good condition, but the grout lines were really letting the kitchen down. I discussed with my client the option of re-colouring the grout, which they agreed was sensible, anything to keep the impossible grout clean. The alternative of scraping out the grout and replacing would be a messy and time-consuming option which we both agreed was not the choice they wanted to go for. I gave them a price to complete the work which they were happy to go ahead with.
Before any grout colouring could be done the grout first needed to be prepared, this was done using Tile Doctors Grout Colourant Pre-Treater which is an acid-based cleaner specially made for the job. This product cleans and prepares the grout for the colourant to ensure a better contact with the colourant later. It’s very simple to apply and is simply sprayed onto the grout lines, left to dwell for five minutes and then scrubbed into the grout by hand. Once done the soiled pre-treater is rinsed off with water and removed with a wet vacuum.
Once the grout lines are dry, they are ready to be coloured, unfortunately this is a manual process which take a lot of attention to detail and can be quite tedious. The best way of doing it I have found is go get down on your hands and knees with a toothbrush and gently scrub the colourant into each grout line, any colourant that seeps over onto the tiles needs to be quicky wiped away before it dries. The one upside however is observing the highly satisfying transformation of the grout as the result is instant and you can see the improvement as you go along.
There are ten grout colours of Tile Doctor Grout Colourant to choose from and in this case the owners had chosen Natural Grey. If you want to save a few points they also sell a Grout Colourant kit that contains both the colourant and the pre-treater. The grout colourant is epoxy based so it remains water and stain proof and will last for years.
I’m not sure the pictures I took do the transformation justice, but my client was over the moon with the difference it had made to the floor. The patchy grout was gone and then whole room seemed brighter.
For regular cleaning I recommended the use of Tile Doctor Neutral Tile Cleaner which will keep the floor looking good but is gentle enough to use every day and won’t compromise the colourant.
Matthew Lovett
South Yorkshire Tile Doctor
Find the right local pro for your project


 PPG PROLUXE Wood Finishes
The rich wood tone and sheen of this log home were achieved with PPG® PROLUXE™ Cetol® Log & Siding wood finish in Teak, applied by Rudy Mendiola of The Log Doctor. The contrast of the chinking (the special sealant used between the logs) is used as a stylistic element of this home. Metal trim on barn-style window shutters adds additional character.
 Tile Doctor Ltd
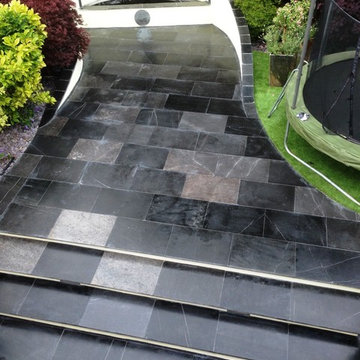
Details of a Limestone patio I was asked to clean at a property in the affluent neighbourhood of Alderly Edge, Cheshire, famous for being the home of choice for several Premier League footballers. In fact Alderly Edge, which lies not too far south of Manchester and is one of the most sought after places to live in the UK. My client was unhappy with the look of the patio had previously been sealed using a topical sealer, and this had left the tiles looking dull and lifeless.
Limestone is a fantastic natural stone, popularly used for internal floors as well as patios, it comes in a variety of fantastic colours and shades. What my client really wanted for the patio was a wet look to bring out the character of the Limestone. So, my job was to strip the old sealer off and replace it will one that would achieve the desired finish.
To strip the old sealer from the patio, I used a series of fine diamond encrusted burnishing pads which are applied in order from Coarse, Medium, Fine and then Super Fine. The coarse pad is effective at stripping off sealer without damaging the tile, and without the need to use a liquid product. The finer burnishing pads then rebuild the appearance of the Limestone to provide a nice deep shine.
The new sealer of choice was Tile Doctor Colour Grow, which can be used on both internal and external natural stone surfaces. Colour Grow is an impregnating sealer which penetrates deep into the pores of the stone, providing both long-lasting resistance and durable protection against ingrained dirt and stains. As you can see from the photos, Colour Grow is also specially formulated to intensify the natural colours in the stone, and it really helped to bring the Limestone back to life again.
The finished job left this patio with the wet, polished look my client had requested. She was very pleased with the result and amazed by just how quickly such a marked difference could be made. Another happy client!
Steve Keary
North Cheshire Tile Doctor

 User
Rick Mendoza
Eclectic master freestanding bathtub photo in Los Angeles with a drop-in sink, open cabinets, white walls, white cabinets and solid surface countertops
Eclectic master freestanding bathtub photo in Los Angeles with a drop-in sink, open cabinets, white walls, white cabinets and solid surface countertops
 Tile Doctor Ltd
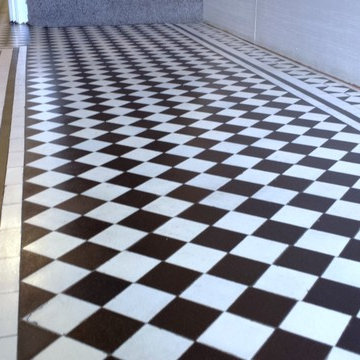
Sometimes you survey a job and you know that if you get the chance to restore it the results will be totally fantastic! This was the case with this Victorian black & white chequer tiled floor in the hallway of a large terraced Victorian house in Cardiff which dated back to around 1900 and was now looking well past its best, I know this because my family used to live in the house opposite. It was a well laid floor with no readings of dampness; I believe it’s imperative you check a floor for dampness before starting so you know what the baseline damp level is and which sealers will work with the floor.
My first action was to hoover the floor and then scrape as much debris off the surface as possible, and then as always I mixed 50/50 Tile Doctor HBU (Heavy Build-Up) remover with Pro-Clean and on this occasion because I wanted the white tiles to become really white I added the same amount of Tile Doctor Grout Clean-Up. This special recipe created a very formidable and strong cleaning solution which is what the job called for. I swept it over the whole floor letting it soak in for about ten minutes and then worked it into the floor using a scrubbing machine fitted with a coarse black pad adding more of the solution to the floor where it was drying out as I went.
The next step was to rinse the floor twice with water and extract the now filthy cleaning solution using a wet vacuum. At this point I inspected the tiles and I could see there were still a few stubborn areas with spots of paint and glue which I addressed with a decorators steam plate together with a scraper and hand held scrubbing pad.
I was now happy that the floor was clean and ready to be sealed, before sealing though it’s important to remove any trace of cleaning solution as it may contaminate the sealer so I gave the floor a thorough rinse and extracted as much of the water as possible to reduce drying times.
I left the floor to dry for 48hrs before coming back to seal the tiles taking a reader on my damp meter first to establish they had indeed dried out. To seal the floor I used eight coats of Tile Doctor Seal & Go which really works well on Victorian tiles and in this case made the whites really stand out.
The customer wanted this floor to look good because they were selling the property and were due to have an open day. The clean tiles really gave the house the wow factor and period features are so desirable these days so I don’t think it will take long to sell.
 Tile Doctor Ltd
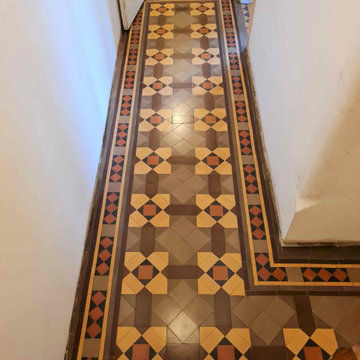
We were contacted by a customer in West Kirby who needed help renovating a Victorian tiled hallway in a house they had just purchased. Kirby is a desirable seaside location North of Heswall that expanded with the arrival of the railway in 1848. The railway brought a demand for property and so it’s not unusual to find housing stock in this area dating back to the Victorian era.
The Victorian tiles at this property appear to have been neglected by the previous owner and were now looking very dull and marked by paint from decorating; all the colours looked washed out and the floor was now looking very unappealing.
The good news however is that this problem is not uncommon and with a deep clean and a fresh sealer applied it can be transformed. I gave the owner a quote which was accepted a date agreed for my return to do the work.
On the first day the floor was sprayed with a neat solution of Tile Doctor Remove and Go which is a powerful alkaline cleaning and stripping agent used to remove old seals and paint. The solution was left to dwell for about twenty minutes so it could soak in and get to work. It was then scrubbed into the tiles using a coarse 200-grit pad fitted to a heavy buffing machine. Water was then added to the floor for lubrication and the soils released from the pores of the tile during scrubbing was removed by with a wet vacuum.
To treat the stubborn paint stains and remains of what I suspect was carpet adhesive a hand scraper and wire brush was used, this was made easier by the Remove and Go which had softened the paint etc.
The next stage was to give the Victorian tiles a mild acid wash using Acid Gel which is applied to the floor, scrubbed in, and rinsed off with a little water then extracted using the wet vacuum. We always recommend an acid wash for old floors like these as it will counter any efflorescent salts resident in the tiles and helps to remove other mineral contaminates and old grout that can mask the true beauty of the tiles.
I left the tiles to dry out for two days before returning to apply the sealer, first checking it was dry by testing for moisture in various places with an electronic damp tester. It’s not a good idea to apply a sealer to a damp floor so we always check first.
Satisfied the floor was dry, I started applying a coat of Tile Doctor Colour Grow which is a colour enhancing impregnating sealer that helps to bring out the true colours in the tile. This was allowed to dry for thirty minutes and then followed up five coats of Tile Doctor Seal and Go Extra which is a breathable sealer that leaves a lovely satin finish and builds on the protection.
Once done the Victorian hallway tiles looked so much cleaner and healthier. It was quite a transformation and the new sealer had given the floor a nice low sheen shine which the customer was very happy with.
For aftercare cleaning I left them with a bottle of Tile Doctor Neutral Cleaner which is specially formulated for cleaning sealed tiles. We don’t recommend tile cleaning products you find on supermarket shelves as the are usually too strong and can strip a sealer off the floor prematurely. If your choosing another product to clean your floor always read the label to make sure its compatible.
Andrew Robb
Merseyside Tile Doctor
 Tile Doctor Ltd
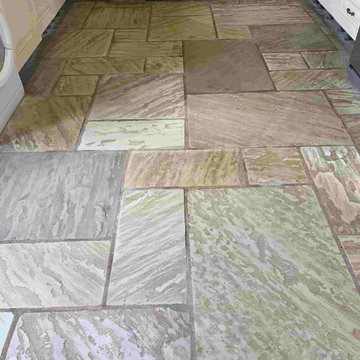
This client at a property in Bamber Bridge was really fed up with his Indian sandstone kitchen floor. The sandstone suited the age of the property but due to its course rough texture he was having issues keeping the stone clean and maintaining it to a decent standard. Ideally, he wanted something long lasting that was easier to keep clean.
Sealers can only help so much on a rough stone like this, in my opinion really rough stone is best sold for use outside in patio’s etc. My client didn’t want to rip it up as it ran underneath the kitchen units and it cost them a lot of money to have it laid, so having been on our website and checked out our previous work they realised we could mill the stone and smooth down the rough texture to a much smoother finish and yet still leave enough texture in the stone for it to look very natural.
We have developed a system at Tile Doctor called “Milling” which is very similar to sanding rough wood to reveal the inner patina. Once done we then we give it one more clean before adding a fresh sealer to add protection. Milling does change the look of the stone as you will see on the before and after pictures on this page, so it is not for everyone. It is however a one-off process so once done it will never need to be milled again. Like all stone floors it will still benefit from a deep clean and re-seal every five years (depending on use) just to keep it looking its best but after milling you will be able to walk on the stone in bare feet or socks and slippers as it really does make a big difference to the finish.
By milling we mainly use coarse-grit burnishing pads that contain segments made from hard industrial diamonds. Working our way up the different grits the pads are applied using a weighted floor buffer which is run over each tile several times to cut the stone back. The process is so effective we often find that the pads are all you need to clean the stone so hardly ever use any chemicals with this process, apart from the sealer which is applied once fully dry.
I should mention that Milling is not something a customer should consider doing themselves as you need invest in a heavy-duty weighted buffing machine which are rarely available for hire.
To seal internal Sandstone floors, I usually use Tile Doctor Colour Grow which brings out the natural colours in the stone. On this occasion however two coats of Tile Doctor Ultra Seal were applied to the stone and grout which results in an invisible natural finish and better matched the clients’ requirements.
My client was really pleased with the new floor and left the following feedback:
“Only finished today but looks so good now. Russell did a great job milling the flags to a much smoother finish. Two coats of sealant applied by Heidi on last day which hopefully will keep it looking that way. Mark F. Bamber Bridge”
For aftercare cleaning I left them with a bottle of Tile Doctor Neutral Cleaner which is specially designed for cleaning sealed floors. You need to be very careful when using supermarket cleaners as many are tool strong and will slowly strip the sealer off the floor, always read the label.
Russell Taylor
Lancashire Tile Doctor
 Tile Doctor Ltd
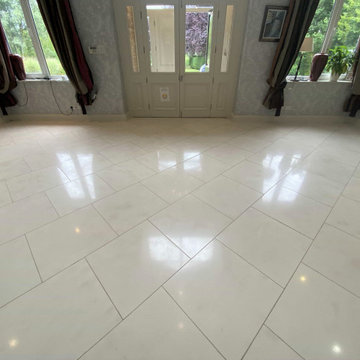
This job was for a repeat client in Toft near Cambridge who had aa stunning large hallway that was tiled in beautiful pale Limestone. My client had asked me back to work on the floor having previously completed the deep clean and seal of a Terracotta floor previously.
The Limestone tiling in the entrance hall had years of some type of topical sealer applied to it. This caused the stone to look slightly discoloured and from certain lights showed up hundreds of scratches and smudges embedded in the seal. I’ve tried to capture this problem in the photographs on this page, but it was very difficult.
A topical sealer sits on the surface of the tile where it is vulnerable to scratching, hallways are generally high traffic areas and so more likely to see this sort of problem. Ideally an impregnating sealer should have been applied, impregnators work by occupying the pores in the stone thus preventing soiling from becoming ingrained in the stone.
Before starting we protected the woodwork against splashing with blue film, I don’t usually make a great deal of mess, but you can never be too careful when working in someone’s property especially one as beautiful as this.
To strip off the old sealer I began by applying a strong dilution of Tile Doctor Remove and Go to the Limestone tiles. I split the floor into sections and used a 400-grit diamond burnishing pad to work the Tile Doctor Remove and Go into the tiles. The floor was then rinsed off using our high-pressure cleaning system that applies pressurised hot water to the floor whilst simultaneously extracting the soil with its built-in vacuum. The system is quite heavy, so it is built into my van, and I run a large flexible hose to a spinner tool that does the cleaning. It is an expensive tool, but it saves a lot of time and leaves the floor fairly dry afterwards.
The 400-grit pad had released a lot of the sealer but there were quite a few layers to get through, so I changed the burnishing pad to a coarse 200-grit pad and repeated the process. After another rinse and extract I would see it had the desired effect and I was able to carry on building up the finish on the Limestone by apply the 400-grit followed by the 800, 1500 grit pads. It was a large floor and so this took up much of the day so once complete I left for the day so it could dry off overnight.
The next day I finished the polishing process with the application of a 3000-grit burnishing pad which is applied with a little water sprayed onto the tile and really brings up the polish on the stone. This process has the added advantage of leaving the floor dry so not long afterwards I was able to move on to sealing.
For this floor two coats of Tile Doctor Ultra-Seal were applied, it is an impregnating sealer that won’t alter the colour of the tiles leaving a natural look.
My client was much happier with the new finish and has asked for another quotation on some more Terracotta flooring that needs attention. For aftercare I recommend using Tile Doctor stone soap, it’s a special formula that builds on the patina which will help maintain the polished appearance of the Limestone.
Tom Conlon
Cambridge Tile Doctor
 Tile Doctor Ltd
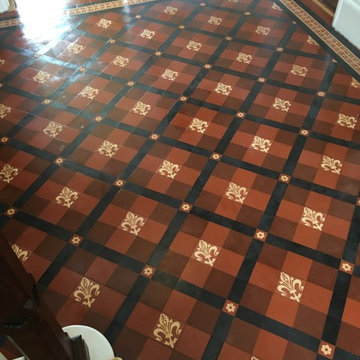
It’s always a great surprise to find old tiled flooring hidden underneath carpet or linoleum which appears especially common with 19th century properties where it’s not unusual for the owners to uncover fantastically patterned, original Victorian tiled floors and, naturally, they want to restore them to their former glory. If you have a property of this type you might want to look under the carpets.
The majority of the time, however, these tiles have been covered up for decades, allowing for thick layers of muck to build-up and are invariably damaged carpet grippers, surface glue and adhesive tape.
This was pretty much the case with this customer who lives in the town of Warminster and was keen to have her own newly discovered Victorian hallway brought back to life, and called me down to see what could be done. Upon arrival at the property, I determined that the tiles would definitely require a very deep clean, including the remove of numerous glue stains, followed by the application of a new seal.
Before I could begin the deep cleaning process, I needed to remove the carpet grippers and surface glue, attempting to remove as much as possible by hand using a scraper.
For the particularly stubborn areas, I applied Tile Doctor Remove & Go, a powerful stripper specially designed to break down adhesives and solvents, and left it to dwell for 20 minutes to eat through the glue deposits. I then attached a black pad to a rotary machine and scrubbed the area thoroughly to clean the affected areas, before removing the resulting slurry using a wet vacuum and rinsed with clean water.
Once I was satisfied that all of the glue had been removed, I proceeded to soak the floor using a solution of the high alkaline cleaner known as Tile Doctor Pro Clean. This is a versatile product that can be used on a wide range of natural stone floors to deal with heavy soil build-up.
I left the Pro-Clean to dwell for ten minutes, and then scrubbed it into the tiles to remove the ingrained dirt and also to break down any old and ineffectual seals. The floor was then once again rinsed thoroughly with clean water which was then extracted using a wet vacuum before being left to dry for a couple of days.
Upon our return to the property I immediately tested the floor for damp using a damp meter. This is an extremely important test to carry out before sealing any kind of tiled flooring, due to the fact that excess moisture left over from cleaning can cloud the sealer and damage its ability to protect against dirt and stains.
Thankfully, the damp test revealed no excess moisture, and I was able to proceed with sealing the tiles. My choice of sealer was Tile Doctor Seal and Go, a water-based topical sealer that simultaneously provides both a stain resistant surface seal and a durable and aesthetically pleasing low sheen finish, also being water based it doesn’t give off a smell as it dries.
This is a very cost effective product that is highly suitable for use on Victorian and Quarry tiles, I applied five costs to achieve the desired finish.
The customer was very pleased with the final results. It’s always satisfying to restore original Victorian tiled floors to looking their best once again – and this one was no exception.
Stuart Ford
Wiltshire Tile Doctor
 Tile Doctor Ltd
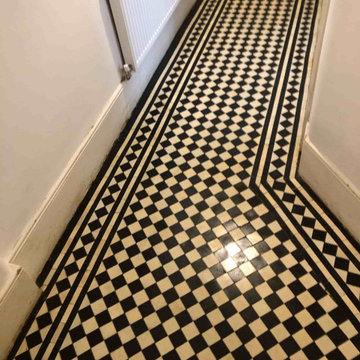
This property was in theLadbroke Grove area of West London near Kensington. The client had found an old and probably original black and white checkered pattern Victorian tiled floor under their cork tiled flooring. They also reported that it was badly damaged so I thought it would be best if I paid them a visit first to see how extensive the damage was and whether it was repairable. The floor was in a quite a state, the tiles were covered in glue from the cork and had several areas had been back filled with cement.
I reassured them that the damage could be rectified, and that it would be possible to completely restore the floor back to a good standard. I would have to remove the glue, remove the cement that had been used to level the floor and replace with reclaimed tiles to match. They were relieved to find out it could be done and happy with my quote I was instructed to go ahead with the work.
We started by taping up the skirting boards to protect the woodwork. With this done attention was turned to the glue which was softened using a strong dilution of Tile Doctor Remove and Go so it could be carefully scraped off. Multiple techniques and tools were needed to remove the glue including hand-held scrappers and a black pad fitted to a buffing machine. For the stubborn areas steam was applied to help lift the adhesive out the tile.
Once all the glue was removed the floor was rinsed and the alkaline cleaner neutralised with Tile Doctor Grout Clean Up which further cleaned the tiles and removed old traces of grout from the floor. Old floors like this generally don’t have a damp proof membrane underneath so the acids in the Grout Clean-up also counter any efflorescent salts trapped in the tile.
Once this was completed the slurry was removed with a wet vacuum and left to fully dry out overnight.
The following day focus turned to repairing the areas of the floor where the tiles were missing or broken. The main issue being the cemented areas, we see this a lot with Victorian Hallways and generally what happens is a heating engineer digs out the floor to install pipework. Not being tilers, your average plumber then repairs the floor with a self-levelling cement that brings the level up to the surface of the tile so it can be covered with lino, carpet of in this case cork.
The sub floor was then rebuilt with rapid setting self-levelling compound but this time to below the level of the tile.
Once the new base was dry it was a just a question of re-tiling with the replacement tiles to match the original checkered pattern. The replacement reproduction tiles were sourced from Original Features in Crouch End North London. After grouting we left the floor to dry out over the weekend.
When we returned to seal the floor our first step was to check the floor was dry using a moisture meter. This is critical as the sealant will not cure correctly if there is too much moisture in the floor. In this case the extra two days we had allowed had done its job and the test had confirmed it was ready to accept a sealer.
The client wanted the floor finish not to be too shiny once sealed so we opted to seal with two coats of Tile Doctor Seal and Go Extra. This is good choice for old Victorian floors such as this example as it’s special acrylic-based formula allows for moisture vapour transmission which as mentioned previously is a concern where no damp proof membrane has been installed.
I’m please to confirm my clients were delighted with the result, as you can see from the pictures the black and white floor restoration makes for a dramatic entrance well in keeping with the style of the property. For aftercare I recommended the use of Tile Doctor Neutral Tile Cleaner which will keep the tiles in good condition going forward without damaging the new sealer.
Jackson Davis
Central London Tile Doctor
 Tile Doctor Ltd
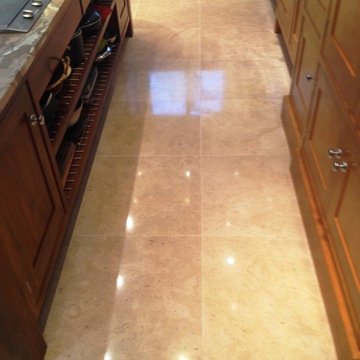
Another quick job here in Cheshire, this time in the town of Wilmslow. Much like Alderly Edge, where I recently completed another job, Wilmslow is an affluent area known for its upmarket lifestyle and as a popular option for residence amongst celebrities and famous figures. In fact it is currently, and has previously been, home to several Premier League footballers from the nearby clubs Manchester United and Manchester City.
This job was another case of where a tiled floor had lost its shine due to the sealer wearing away over time. In this instance, my client had a Travertine tiled floor in her kitchen that she wanted to me to restore back to looking at its best.
Travertine is a fantastic natural stone which possesses unique features that no other stone can offer. It offers a particularly distinctive design style, making it a popular choice both for commercial and residential use. Many homeowners use Travertine tiles for kitchen flooring, bathroom walls and floors and for external floors, such as patios.
The process of stripping off old sealer can be done effectively and relatively quickly without using a liquid stripper. The best method is to use a series of fine diamond encrusted burnishing pads, which is exactly what I did in this case. The burnishing pads are applied in sequence from coarse, medium, fine and superfine to remove the old sealer without damaging the Travertine and then re-polish to a lovely polished shine.
One the floor had been burnished, rinsed and dried; I proceeded to re-seal the floor with Tile Doctor Colour Grow. Colour Grow is particularly effective when to seal porous natural stone surfaces such as Travertine and Limestone, whether internal or external. This is because the product is specially formulated to penetrate deep into the pores of the stone, providing durable surface protection from within.
The other key benefit of Colour Grow is that it intensifies the colours within the stone, as you can from the photos. This adds additional character and flair to already impressive household features like this Travertine floor.
The finished results were exactly what my client had hoped for. It goes to show that with the right methods and know-how such a big difference can be made to the appearance of tiled floors. I was very happy to help.
Steve Keary
North Cheshire Tile Doctor
 Tile Doctor Ltd
I was recently contacted by a client who lives in the small coastal town of Bridlington, East Yorkshire. Bridlington has a small sea fishing port known for its great shellfish.
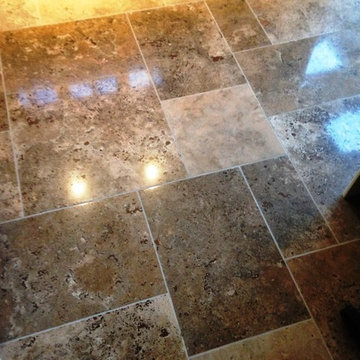
My client had a Limestone floor that was really in need of a fresh up: over the years the tiles had become dull and worn-looking, and she was keen to restore a nice shine to the surface. I was on hand to treat the floor to a much needed clean, polish and seal.
My first job was to strip off the old sealer. I did this using a coarse diamond burnishing pad fitted to a rotary machine. The floor was then given a thorough rinse with clean water to clear off any dirt and excess sealer. Following this, the excess water was quickly soaked up with a wet-dry vac machine to make sure there was no leftover moisture, as this could have potentially affected the performance of the new sealer (which I would apply at a later stage).
To polish the floor I continued with the system of burnishing pads, starting first with a medium burnishing pad, followed by the fine and very fine pads to achieve the desired effect. The result was a very nice overall sheen.
After cleaning and polishing, the only task remaining was to provide the floor with a durable seal. I did this using Tile Doctor Ultra Seal, which is a premium, natural-look penetrating sealer that is specially designed to provide maximum stain protection from within. This particular product is suitable for use on a range of different natural stone floors, including Limestone, Slate, Granite, Marble and Travertine.
Overall, my client was very happy with the results. As you can see from the photographs, the clean, polish and seal made a marked difference on the condition of the floor, turning the tiles from dull and lifeless to full of character and colour once again.
 Tile Doctor Ltd
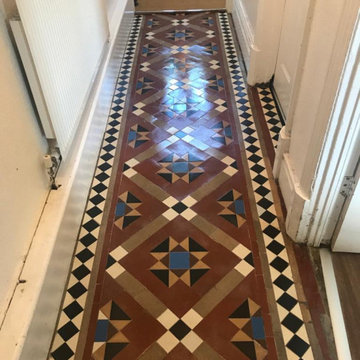
I recently worked on the restoration of a Victorian tiled hallway in Cwmbran Wales which is six miles North of Newport. As you can see from the photographs the floor was in quite a neglected dirty state and many of the the black and white border tiles needed removing and replacing. The worst part was the area by the front door where most of the tiles had been removed and then backfilled with concrete. I can only assume at some point in the past it was deemed to difficult or expensive to restore the floor, so they simply covered it up.
After visiting to survey the floor I did offer to source replacements for the concreted section and restore that as part of the work however my client’s budget would not stretch to that at the time. My quote was therefore focused on the main section of flooring and included replacing border tiles, deep cleaning the whole floor and then sealing the tiles to add protection. Although I did need to check that I could indeed source the replacement tiles before being able to provide the quote which as it turned out would not be an issue.
They were happy to go ahead and we arranged a suitable time to carry out the work which would enable me to work in the property whilst minimising contact with the owners due to the Covid-19 situation.
I spend the first day sorting out the black and white border tiles which needed to be gently prised out of position without upsetting the main part of the floor. The exposed subfloor was then cleaned up to remove old adhesive and replacements were fitted where required and secured into place. The floor would need to be solid before cleaning so that was left for day two so the new adhesive could go off overnight.
On day two I gave the floor an initial clean using a combination of Tile Doctor Pro-Clean and Remove and Go diluted with water. This produces a strong cleaner/stripper that will tackle dirt and remove coatings such as previous sealers. The old tiles had accumulated years of ingrained dirt, so I needed this extra power to remove the years of dirt and contaminates from the tile. It was sprayed onto the tiles and then left to soak in for ten minutes before being actively scrubbed into the tile using a rotary machine fitted with a black scrubbing pad. The soil was then rinsed off with water and extracted with a wet vacuum. The floor was inspected, and the process repeated on the tough stains until I was satisfied all the dirt had been removed.
Next the floor was treated to an acid wash using Tile Doctor Acid Gel using a similar method as before. This is an important treatment for these old Victorian floors that have no damp proof course as it neutralises efflorescent salts trapped in the tile which can appear as white salt deposits later. Once I was happy with the condition of the floor it was given a final rinse and left to dry off. I use a wet vacuum to remove liquids from the floor and on this last extraction I spent extra time to remove as much moisture from the tiles as possible.
I came back a few days later and after checking the tiles were dry using a damp meter, I started the application of the sealer. For this floor I applied seven coats of Tile Doctor Seal and Go for a satin finish. Tile Doctor Seal and Go is a specially formulated water-based sealer that provides both stain resistance and a durable low-sheen finish. It is perfect on a floor of this age where it leaves a lovely finish and will remain durable in what is a essentially a high traffic area.
Although we didn’t manage to sort out the area by the front door the client managed to fit a made to measure coir door mat along with carpet bar which was quite practical and looked fine so they were able to resolve that problem without blowing their budget.
The client was over the moon with results, the floor had a lovely pattern and the colours now shone through. I suggested the use of Tile Doctor Neutral Tile Cleaner to keep the floor clean and in good condition. It is neutral in pH so will ensure that the newly applied sealer stays in place and will ensure maintenance is nice and easy for them.
Paul Wales
Monmouthshire Tile Doctor
 Tile Doctor Ltd
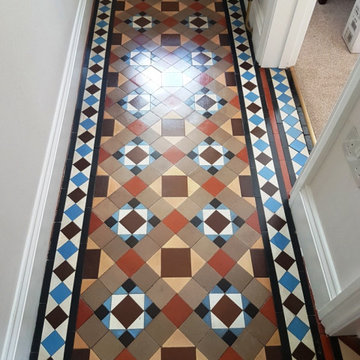
I was contacted by a homeowner who had moved into a property in the small Yorkshire market town of Masham and discovered a Victorian tiled floor under the hallway carpet. Realising this was a valuable period feature he was keen to see if it could be restored. As you can imagine he was delighted when I told him that it should be possible, and he was keen to get it uncovered and back on show.
After discussing the floor on the phone, I visited the property and removed the carpet so we could take a long look at the Victorian tile’s underneath. The carpet had protected the floor well and it was in good physical order, (i.e. no cracks etc.) it was just very dirty but was also marked with paint splashes from some untidy decorating work from the past. I confirmed none of these issues should present a problem and got the go ahead for the work to start.
There was no sealer on the floor, so I started the cleaning process using a medium dilution of Tile Doctor Pro-Clean which was worked into the tiles using a coarse 200-grit pad fitted to a rotary floor buffer. I then used a 400-grit hand-held diamond block to clean the edges which couldn’t be reached by the machine. This also removed the paint splashes which should have been on the skirting boards and not the floor!
The floor was then rinsed with water and the soil extracted with a wet vacuum. I was able to inspect the floor at this stage and spot treat areas that needed more work as they were a little stubborn. It wasn’t a large hallway and except for the paint it only needed a light clean. The result was I was able to complete the cleaning process by lunch time. I dried the floor as much as possible and left an air blower in the space for a couple of hours.
I returned later that afternoon and checked the floor for moisture using a damp meter. The floor was mostly dry, but some areas needed some more help with a heat gun. It was late summer and so still warm and so there was no need on this occasion to leave the floor overnight.
Once I was happy the floor was dry, I started sealing the tiles with the first of four coats of Tile Doctor Seal and Go. This is a specially formulated water-based blend of acrylic polymers that provides both a stain resistant surface seal and a durable low-sheen finish. It is perfect for a floor of this age as it allows moisture vapour to pass through, this is an important feature when considering a sealer for old floors which will not have a damp-proof membrane installed. If you were to apply a non-breathable sealer moisture can get trapped under the floor causing it to spread out to the walls resulting in rising damp.
The combination of the cleaning and new sealer brought the floor back to life and it now looked in keeping with the rest of the property which had numerous other period features. My client was over the moon with the difference and very happy to see the back of the grubby carpet.
Nigel Stoker
North West Yorkshire Tile Doctor
 Tile Doctor Ltd
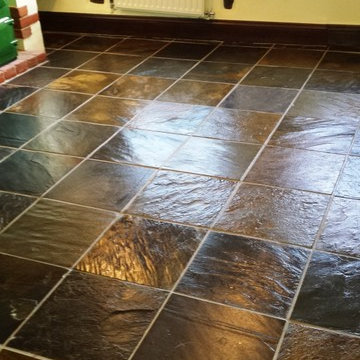
I recently made a trip down to South Molton, a small town which sits on the River Mole. The river, actually a tributary of the River Taw, gets its name from the two small towns it runs by, North Molton and South Molton. Anyway I digress, my client asked me to take a look at a Chinese Slate floor in her house, as it was in dire need of a good clean due to the original sealer having worn off over time allowing the dirt to become ingrained in the tile.
As this particular type of floor is naturally quite rough, I advised my client to have the Slate milled flat. This would not only make the floor easier to clean on a regular basis, but also it would reduce the hazard of people tripping over the exposed edges. However, the milling procedure is expensive due to the need to use a special grinding disc formed of diamond segments, which is then attached to a rotary machine and used on the stone. My client decided against this, instead opting for a thorough clean and seal. This would be the first time the floor had ever received a proper clean – it had not even been cleaned when the tilers first fitted it!
My choice of product for the cleaning was Tile Doctor Pro-Clean, a high alkaline cleaner which, along with Slate, is suitable for use on other natural stone floors such as Limestone, Granite and Travertine. The product, diluted with clean water, was applied evenly to the floor using a Polybrush, as well as a rotary machine fitted with a buffing pad. This also helped to remove any remaining old sealer although, as aforementioned, the vast majority of the old sealer had already worn away.
Following this, I cleaned the grout using Tile Doctor Grout Clean-Up and a long-handled stiff grout brush. Grout Clean-Up penetrates below the surface of the grout to lift out grout haze and general dirt. After completing the cleaning I rinsed the floor several times with clean water to remove any trace of cleaning product. The floor was then left to dry completely before sealing, as any moisture left over on the floor could have impacted on the sealer.
When I returned to seal the floor I opted to use Tile Doctor High Shine Sealer, which is suitable for use on textured natural stone floors, as well as textured ceramic, textured porcelain, and a range of others. Five coats of High Shine Sealer were applied, providing the floor with durable surface protection and a nice high-sheen finish. This dramatically improved the appearance of the floor to the point that it is hard to believe this is the first time it has been treated to a proper clean and seal!
Both myself and my client were very pleased with the results. Chinese Slate is one of the most beautiful and characterful types of stone for tiled floors, so it was very rewarding to be able to make such a difference here.
 Tile Doctor Ltd
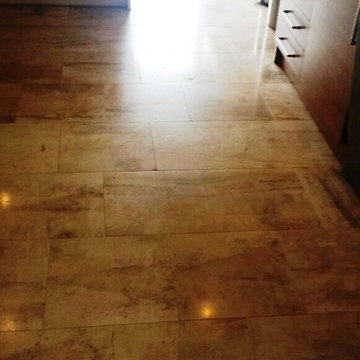
This customer from the historic city of Cardiff was keen to see what Tile Doctor could do to put some life back into their treasured Limestone kitchen floor that was laid in 2008. My first observations were mainly centred on the horrific condition of the surface which although adequately sealed initially the floor had not received any subsequent maintenance and its condition had deteriorated over time. The light shining in from the patio doors highlighted all the imperfections in the floor caused by surface wear and tear commonly seen in high traffic areas such as a kitchen.
Upon closer inspection, there were further problems: the floor was stained and scuffed, and in most places the sealer had worn off completely allowing the dirt to become ingrained into the pores of the Limestone. Additionally the grout was recessed but was now flush with the tile surface due to dirt build-up. There were also areas contaminated with grease and kitchen cooking oil.
The Limestone floor tiles were 20mm thick French Limestone, and had been laid very well so there was no requirement to do any tile or grout repairs however to get this floor back to its original condition the surface would need to be reconditioned using the Tile Doctor four stage burnishing system.
I started by giving the floor a wash with a medium dilution of Tile Doctor Pro-Clean, focusing mainly on the grout lines in order to remove the muck that had built-up there. I used a special stiff grout brush for this activity; it’s quite narrow and ideal for grout scrubbing.
This worked well, but the significant build-up of dirt along some of the grout lines meant more work was required. I tackled this problem with a hand scraper assisted with steam. At the end of this process, the whole floor was then rinsed down with water to remove any soil and the resulting slurry was then extracted using a wet vacuum.
The next step was to start the burnishing process, which basically involves applying four diamond encrusted floor pads in sequence over the floor. Each pad is a different grade, starting with the most abrasive coarse pad and moving through to the finer grades using a little water to lubricate and rinsing away any slurry between each pad.
I eventually finished with the extra fine pad which builds up shine and lustre on the tile; it had taken two days to clean the grout and burnish the Limestone but the floor was much improved and so after a final rinse down I left the floor to dry off overnight with the aid of the underfloor heating.
During this time, I also addressed the stained Limestone in the area of the kitchen where the dustbin was situated. This had been a major upset for the customer and I’m happy to report I managed to deal with it. However, it was quite an involved process, so I’ll write about this in a separate post.
On the third day I came back to seal the floor, checking first that it had dried sufficiently with a damp meter. Fortunately, the underfloor heating had done a great job of drying the stone and I was able to seal the floor using three coats of Tile Doctor Colour Grow sealant. This sealant not only provides a durable seal but also penetrates deep into the pores of the stone protecting it from within and enhancing the natural colours of the Limestone in the process.
After the final layer of sealant, I worked over the floor again with the extra fine burnishing pad both to add shine again following sealing, and to ensure that no smear marks were visible as the lighting conditions were unforgiving and highlighted any imperfections.
The customer was delighted with the results: so much so, in fact, that they booked me in to restore their Victorian hallway floor as well but that’s a story for another time!
Julian Iancono
SE Wales Tile Doctor

 Painting in Partnership, Inc.
This week, as paint restoration specialists from the Chicago area, we undertook work on a historical, 1858, Greek Revival and Federalist brick house built for Gustavus Palmer, a successful farmer and early settler in McHenry county. The house sits on its original corner lot in Crystal Lake, Illinois and still looks quite impressive. In 1985, the house was added to the National Register of Historical Places and the Park District is now responsible for the preservation of this special piece of McHenry county history.
Because of its design, the house has no gutters. The water drains over the large crown and dental moldings, and causes the paint to fail in a major way, thereby compromising the integrity of the original wood components of the building. As shown in the first picture, on the West side of the house, once the scraping process started, one hundred fifty five years of paint came off a twenty foot section of the crown. To preserve the wood, we used a product designed to restore wooden boats. The product is a Clear Penetrating Epoxy Sealer (CPES) known as “ The Rot Doctor ”. It seals the wood fibers and creates an ideal surface for paint to adhere to.
3