
Search results for "Dogs require" in Home Design Ideas

 Southern Landscape
Xeric landscape designed and built by Southern Landscape. This Austin homeowner reduced their turf area by over 17,000 square feet, reducing water consumption and maintenance. The remaining turf areas were required for the septic leach field. Limestone retaining walls with leuders caps control erosion. The plant palette contains lantana, plumbago, various grasses, and yuccas, all chosen for their specific water usage appropriate to the area. Landscape lighting was also added to highlight the beauty of this large xeriscape.
 M-Squared Contracting Inc.
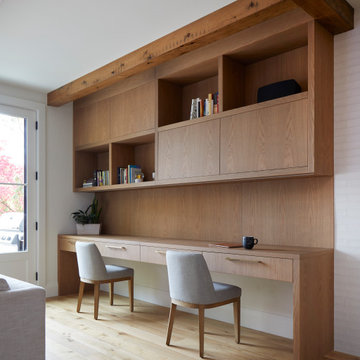
Perched above High Park, this family home is a crisp and clean breath of fresh air! Lovingly designed by the homeowner to evoke a warm and inviting country feel, the interior of this home required a full renovation from the basement right up to the third floor with rooftop deck. Upon arriving, you are greeted with a generous entry and elegant dining space, complemented by a sitting area, wrapped in a bay window.
Central to the success of this home is a welcoming oak/white kitchen and living space facing the backyard. The windows across the back of the house shower the main floor in daylight, while the use of oak beams adds to the impact. Throughout the house, floor to ceiling millwork serves to keep all spaces open and enhance flow from one room to another.
The use of clever millwork continues on the second floor with the highly functional laundry room and customized closets for the children’s bedrooms. The third floor includes extensive millwork, a wood-clad master bedroom wall and an elegant ensuite. A walk out rooftop deck overlooking the backyard and canopy of trees complements the space. Design elements include the use of white, black, wood and warm metals. Brass accents are used on the interior, while a copper eaves serves to elevate the exterior finishes.

 Natural Environments
The client originally wanted a garden on the side of the house, but city code required that a 400 square-foot parking space be available behind the fence. To meet regulations and give the client the green space they desired, a brilliant solution was implemented.
Two concrete parking strips were installed, and then flagstone pads were installed over the strips. The rest was covered and filled in with soil and plantings that can be driven over were placed in-between and around each of the pads.
A swinging gate was installed, but with a pedestrian gate built in the middle so that the entire gate needn’t be opened for foot traffic. The garden area was then enclosed with another iron pedestrian gate leading to the remodeled pool and back patio.
All landscape plantings were picked and installed as well.
Find the right local pro for your project

 Advance Design Studio, Ltd.
Jennifer and Dan have lived in their Deer Park Illinois home for 15 years, slowly making minor fixes like painting and decorating; but they had a new plan for their kitchen the entire time. An awkwardly placed garage door, and an island cooktop with a terrible downdraft made a full-scale kitchen remodel an absolute must. Jennifer had many ideas in mind and wanted to work with a company that could provide high-end work, while partnering with a designer that would tailor the kitchen to her ideas.
She was intrigued by the phrase “Common Sense Remodeling” in Advance Design’s feature she discovered while perusing an issue of the community’s Quintessential Barrington Magazine. Doing further research on the company’s website, as she looked through project profiles and read about Advance Design’s “Common Sense Remodeling” philosophy, she promptly scheduled an appointment to see if the people and ideas she read about were truly who they said they were. The more she read, the more she knew that the “Common Sense” approach to remodeling they described was exactly the type of company she was looking for.
The partnership was sealed after an initial consultation with Owner Todd Jurs and Project Designer Michelle Lecinski. They displayed a combination of friendliness, professionalism and respect that was unmatched by any of the other companies Jennifer talked to. She knew that with Advance Design, she would be able to retain the vision that she had in mind with high-quality craftsmanship.
“I reached out to Advance Design because of the ‘Common Sense Remodeling’ tagline,” Jennifer said. “That’s what lingered for me”. “Advance Design was the most respectful- of the house and of my design ideas, and the most professional of the handful of companies that looked at my project”.
Soon after the meeting Jennifer began working with Michelle on the project design. They quickly developed chemistry. Jennifer loved how Michelle researched and located every detail that Jennifer wanted for the kitchen. Between the two of them, every concept and idea was worked through and perfected. “Jennifer had definite ideas about what she wanted the new kitchen to look like, she just didn’t know how to bring it all together. We worked together really well to make her ideas into the practical reality necessary for a well-functioning kitchen, with the look and feel that she had envisioned”, says Michelle.
“Michelle was wonderful in using the CAD system she would show me new drawings every time we changed the layout while working through the design,” Jennifer said. “She was a really wonderful partner in execution, she made sure everything happened quickly and easily.”
The finished design drew out elements of Jennifer’s style and personality. The pair call the look “sophisticated farmhouse” to describe the kitchen renovation to family and friends. The result was a beautifully crafted, authentic-feeling space that satisfied Jennifer’s dreams 15 years in the making. The whole project consisted of a kitchen remodel, mudroom upgrade with powder room, and garage entry relocation. “The projects I personally like the best, are the ones that put the client’s dreams on display,” Project Designer Michelle said. “And this is one of those projects.”
The main focal point of the kitchen is custom zinc and brass ventilation hood with a vintage sheen, which was hand made to order by a small company in Indiana named Vogler Metalworking. “It’s like sculpture, a true work of art”, says Jennifer. Your eye is immediately drawn towards this elegant yet practical hood that eliminated the home’s downdraft problem and added a striking conversation piece at the same time. The carpenters had to use special gloves when transporting and installing it, so they didn’t smudge it with fingerprints. The beautiful hood centers proudly over the stunning black enamel and brass LaCornue Range. “I had a friend who had a LaCornue range and after learning how easy it was to cook perfect meals, I was convinced I wanted to have one”, says Jennifer. This unique, breathtaking combination anchors the entire kitchen and is apparent immediately as you walk into the great room the surrounds the space.
DuraSupreme Crestwood cabinets with a Kendall Panel add function and sophistication. A custom gray paint color paired with a storm blue was developed so that the new kitchen looked like it belonged to the existing space. Unlacquered brass faucets and hardware were important to Jennifer because she wanted the living finishes to age over time. Remarkable brass diamond mesh cabinet door inserts imported from the UK continue to add this one-of-a-kind kitchen renovation; giving it a “you won’t see this everywhere” quality. The use of old railcar flooring for the coffee bar countertop and reclaimed oak for the open shelving gives an authenticity to the space uncommon in kitchens today.
Jennifer and Michelle fell in love with the Limestone Grey Stone while they were investigating unique island countertop ideas. They liked the fact that the limestone as a living finish will age and change over time. Calcutta Miel Quartz countertops made for an excellent pairing around the perimeter, as it’s durable and perfect for cooking preparations. A textured white subway tile backsplash that runs to the ceiling keeps your eye moving towards the open shelving, and to the main focal point of the stunning range hood combination.
“The kitchen functions beautifully, and it’s gorgeous,” beams Jennifer as she gestures with both hands while smiling ear to ear. “The most important thing was I wanted a kitchen that had a wonderful flow, cooked beautiful meals and was a great gathering place for family and friends, and this space does that perfectly! Beauty wise, it turned out exactly how I had envisioned. I felt the function part was the hardest part, and that was nailed”!
Relocating the garage entry to the new mudroom was a huge priority and has finally separated the family’s arriving home functions from their kitchen. Now coats and shoes and bags have their own area for dropping once members arrive home. Matching gray DuraSupreme cabinetry helped create gorgeous, purposeful lockers for the family. A reclaimed vintage sink and custom wall paper were added to the tiny powder room to beautify the once previously only functional space. Advance Design was even able to create a custom space for their dog to sleep while the family is away.
“It was unbelievable that a project of this size was completed in such a short time, and I think that’s because of the large amount of planning and preparation that went into it,” Jennifer marveled, “When we started, we were ready, and everything was prepared”.
When it came to execution, Project Manager Justin Davis and his crew were quick, accessible, and organized. Projects like this kitchen are typically completed in as little as 8-10 weeks. Jennifer’s kitchen however despite the relocation of some challenging HVAC in a soffit and moving of an exterior door was completed remarkably fast in part because the team was working with an existing tile floor that ran throughout the first floor that the client really loved.
“You get to know these people really well because they’re living in your house while you’re living in your house. They were so fast and really good, it didn’t take as long as even planned” reported Jennifer. “I would text Justin and he always responded almost immediately. I got to know all the guys who were working in our house and they were all wonderful people”.
Details in a customized kitchen like this one require skill and care from the people who install it. “All the guys on the job were skilled at what the did. I wanted small details like little feet to look like furniture, that is where their carpentry skill came in to make these all perfect”, said Jennifer. “The tile guys were wonderful. They even let me determine how I wanted the texture with the grout to appear for a salt and pepper look; now that is a very skilled trade person making it custom”.
In Jennifer’s interview, she continued to reference Advance Design’s “Common Sense Remodeling”, so I took a minute to ask her exactly what that phrase meant to her and how it played out in her experience with her project and the Advance Design team. Here is what she said: “I was intrigued about Common Sense Remodeling and in my head that there would be clear costs and prices, great communication between the design team, the execution team and me”, said Jennifer. They did deliver on that, it was so clear about the cost breakdown, what I could expect from everyone who came to my house, and everything that we had ordered. That to me is the Common Sense”!
It’s great to see a client take literally our assertion that a well-planned remodeling project is simply “Common Sense”! She anticipated each step of the way would be clear, concise, and predictable, all the while protecting the outcome due to the careful upfront planning. “Advance Design delivered on their ‘Common Sense Remodeling’ promise,” Jennifer said. “From the design team, to the execution team - everything was straight forward like I imagined. The project turned out exactly how I envisioned, I enjoyed this process and absolutely would recommend Advance Design Studio to anyone.”

 Sans Soucie Art Glass
Glass Front Doors, Entry Doors that Make a Statement! Your front door is your home's initial focal point and glass doors by Sans Soucie with frosted, etched glass designs create a unique, custom effect while providing privacy AND light thru exquisite, quality designs! Available any size, all glass front doors are custom made to order and ship worldwide at reasonable prices. Exterior entry door glass will be tempered, dual pane (an equally efficient single 1/2" thick pane is used in our fiberglass doors). Selling both the glass inserts for front doors as well as entry doors with glass, Sans Soucie art glass doors are available in 8 woods and Plastpro fiberglass in both smooth surface or a grain texture, as a slab door or prehung in the jamb - any size. From simple frosted glass effects to our more extravagant 3D sculpture carved, painted and stained glass .. and everything in between, Sans Soucie designs are sandblasted different ways creating not only different effects, but different price levels. The "same design, done different" - with no limit to design, there's something for every decor, any style. The privacy you need is created without sacrificing sunlight! Price will vary by design complexity and type of effect: Specialty Glass and Frosted Glass. Inside our fun, easy to use online Glass and Entry Door Designer, you'll get instant pricing on everything as YOU customize your door and glass! When you're all finished designing, you can place your order online! We're here to answer any questions you have so please call (877) 331-339 to speak to a knowledgeable representative! Doors ship worldwide at reasonable prices from Palm Desert, California with delivery time ranges between 3-8 weeks depending on door material and glass effect selected. (Doug Fir or Fiberglass in Frosted Effects allow 3 weeks, Specialty Woods and Glass [2D, 3D, Leaded] will require approx. 8 weeks).

 FLOORIANS
Natural colour sisal carpet with black edging on wood stairs. Custom workmanship,
Example of a large classic wooden straight staircase design in Toronto with wooden risers
Example of a large classic wooden straight staircase design in Toronto with wooden risers

 down2earth Interior Design, LLC.
Is your closet busting at the seams? Or do you perhaps have no closet at all? Time to consider adding a mudroom to your house. Mudrooms are a popular interior design trend these days, and for good reason - they can house far more than a simple coat closet can. They can serve as a family command center for kids' school flyers and menus, for backpacks and shoes, for art supplies and sports equipment. Some mudrooms contain a laundry area, and some contain a mail station. Some mudrooms serve as a home base for a dog or a cat, with easy to clean, low maintenance building materials. A mudroom may consist of custom built-ins, or may simply be a corner of an existing room with pulled some clever, freestanding furniture, hooks, or shelves to house your most essential mudroom items.
Whatever your storage needs, extensive or streamlined, carving out a mudroom area can keep the whole family more organized. And, being more organized saves you stress and countless hours that would otherwise be spent searching for misplaced items.
While we love to design mudroom niches, a full mudroom interior design allows us to do what we do best here at Down2Earth Interior Design: elevate a space that is primarily driven by pragmatic requirements into a space that is also beautiful to look at and comfortable to occupy. I find myself voluntarily taking phone calls while sitting on the bench of my mudroom, simply because it's a comfortable place to be. My kids do their homework in the mudroom sometimes. My cat loves to curl up on sweatshirts temporarily left on the bench, or cuddle up in boxes on their way out to the recycling bins, just outside the door. Designing a custom mudroom for our family has elevated our lifestyle in so many ways, and I look forward to the opportunity to help make your mudroom design dreams a reality as well.
Photos by Ryan Macchione
Sponsored
Columbus, OH

Wannemacher Interiors
Customized Award-Winning Interior Design Solutions in Franklin Cnty OH

 Jennifer Garner Interiors
The exercise room features cork flooring.
Inspiration for a timeless home gym remodel in Austin
Inspiration for a timeless home gym remodel in Austin

 Rick & Cindy Black Architects
Bathroom cabinets: Sherwin Williams 'Persimmon'
Silestone Blanco City
Circa Lighting 'Go Lightly' sconce
2" travertine hex tile
Hardware by Nameeks Geesa / Emtek
Leonid Furmansky Photography

 Halls Fence of NJ
Fence installation is an art. It requires an intense ability to focus on the overall look of the project while still focusing on the logistics (landscape, property details, government approvals). Our team of fence installation experts have worked for nearly two and a half decades in the NJ area on every type of fence project you can imagine.
Residential fence installation is our speciality. We have worked with family all over the state of New Jersey to help them find a fence style that complements their home and adds to its overall value. We once had a young couple install a new fence and increase the value of their property by $10,000 before selling it. Our job is to walk you through the entire process and make it simple. We will make sure that we find you a fence that meets all of your needs. Have a dog? You might want to invest in a chain link fence since they hold up long against pets. Need more safety and privacy? You might want to look into have an aluminum fence installed since they can be tall and protect against intruders. We take a lot into consideration when finding you the best fence for your home.
Commercial fencing is another specialty of ours. We have worked on a wide variety of commercial jobs - athletic fields, government projects, large apartment buildings, and more. If you have a commercial job but only need the materials, we can do that too. Our most popular commercial fencing styles we work with are chain link fences and plastic, temporary fences. Whatever your need, we've got you covered.
For your free fence installation estimate, give us a call or shoot us a message today! http://www.hallsfence.com/contact/

 FormLA Landscaping
Interspersed with California native Giant Chain Fern, Alumroot's delicate pink bells dance a happy hello along the garden walkway.
This is an example of a coastal partial sun front yard concrete paver landscaping in Los Angeles for spring.
This is an example of a coastal partial sun front yard concrete paver landscaping in Los Angeles for spring.
 Tile Doctor Ltd
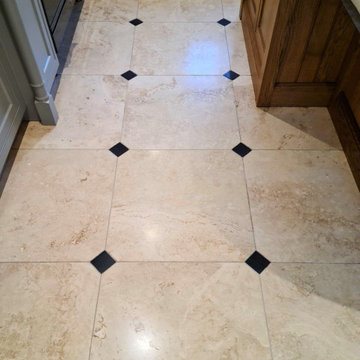
The pictures show a large Limestone floor laid through much of the ground floor of a property situated on the outskirts of York seventeen years prior.
The owners had three dogs that slept in their own doggy room. The floor in this room was in the worst condition of the five rooms as it had been subject to significant wear and tear. The Limestone tiles looked dull with ingrained dirt and the grout was stained and patchy.
The original tiler had laid the floor well, but he had applied a satin topical sealer to the stone most of which had worn off over the years. A floor like this would need a little maintenance and the sealer reapplying from time to time to maintain it.
I completed a test clean for the client to show them what could be achieved which came out well. Happy with the result they accepted my quote for the restoration work, and we booked in a suitable time to complete the work.
The area was quite large, so I separated the job into rooms and started by protecting the skirtings and woodwork from splashing etc. I decided to do a chemical clean first to remove what was left of the old sealer but more importantly to give the grout a thorough clean which was making the floor look scruffy.
For this I opted to apply a strong dilution of Tile Doctor Pro-Clean which was left to dwell for a short while and then worked in with a mechanical rotary cleaner. It gets to work on the ingrained dirt and sealer. It should also help to get rid of the doggy smells. This process turns the cleaning solution black and is then extracted using a wet vacuum keeping the mess to a minimum. I paid particular attention to the grout which was deeply discoloured and found that some areas required going over a couple of times to get them clean. I was only just getting started on the cleaning but immediately the floor was looking so much better.
I then deep cleaned the Limestone with a set of diamond burnishing pads, working in sequence from the 400 grit through to 1500 grit. A small amount of water was used to aid the lubrication and after each pad have been over the entire area few times the solution is rinsed off with more water and extracted with the wet vacuum.
The floor came back to almost new and as the client wanted a satin finish, I ended by applying a 3000-grit pad to add a deeper polish to the Limestone. The floor was then left overnight to dry.
The last step of polishing with the 3000-grit pad already leaves the floor quite dry however I always like to check before sealing so just to be sure I took some reading with a damp meter. The readings were fine, so I started applying the first of two coats of Tile Doctor Ultra Seal to finish the floor. This is an impregnating sealer (as opposed to the previous topical sealer) that soaks into the stone protecting it from within but without affecting its appearance. This product was chosen in consultation with the client who was specific about how they wanted to floor to look.
The floor now looked superb. Both the client and l were very pleased with the finished floor and so where the dogs! For aftercare I recommended Tile Doctor Stone Soap which is designed for cleaning polished stone floors like these, it’s a gentle stone cleaner that helps maintain the patina and ideal for this type of floor.
Nigel Stoker
North West Yorkshire Tile Doctor

 Irons Brothers Construction Inc
We remodeled this unassuming mid-century home from top to bottom. An entire third floor and two outdoor decks were added. As a bonus, we made the whole thing accessible with an elevator linking all three floors.
The 3rd floor was designed to be built entirely above the existing roof level to preserve the vaulted ceilings in the main level living areas. Floor joists spanned the full width of the house to transfer new loads onto the existing foundation as much as possible. This minimized structural work required inside the existing footprint of the home. A portion of the new roof extends over the custom outdoor kitchen and deck on the north end, allowing year-round use of this space.
Exterior finishes feature a combination of smooth painted horizontal panels, and pre-finished fiber-cement siding, that replicate a natural stained wood. Exposed beams and cedar soffits provide wooden accents around the exterior. Horizontal cable railings were used around the rooftop decks. Natural stone installed around the front entry enhances the porch. Metal roofing in natural forest green, tie the whole project together.
On the main floor, the kitchen remodel included minimal footprint changes, but overhauling of the cabinets and function. A larger window brings in natural light, capturing views of the garden and new porch. The sleek kitchen now shines with two-toned cabinetry in stained maple and high-gloss white, white quartz countertops with hints of gold and purple, and a raised bubble-glass chiseled edge cocktail bar. The kitchen’s eye-catching mixed-metal backsplash is a fun update on a traditional penny tile.
The dining room was revamped with new built-in lighted cabinetry, luxury vinyl flooring, and a contemporary-style chandelier. Throughout the main floor, the original hardwood flooring was refinished with dark stain, and the fireplace revamped in gray and with a copper-tile hearth and new insert.
During demolition our team uncovered a hidden ceiling beam. The clients loved the look, so to meet the planned budget, the beam was turned into an architectural feature, wrapping it in wood paneling matching the entry hall.
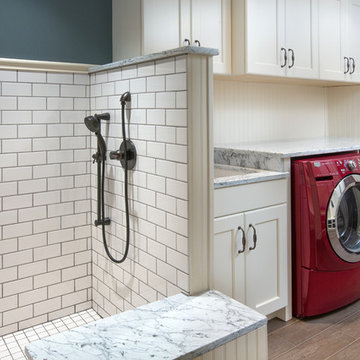
The entire day-light basement was also remodeled, and now includes a bright & colorful exercise studio and a larger laundry room. The redesign of the washroom includes a larger showering area built specifically for washing their large dog, as well as added storage and countertop space.
This is a project our team is very honored to have been involved with, build our client’s dream home.
Sponsored
Columbus, OH

Trish Takacs Design
Award Winning & Highly Skilled Kitchen & Bath Designer in Columbus
 down2earth Interior Design, LLC.
Is your closet busting at the seams? Or do you perhaps have no closet at all? Time to consider adding a mudroom to your house. Mudrooms are a popular interior design trend these days, and for good reason - they can house far more than a simple coat closet can. They can serve as a family command center for kids' school flyers and menus, for backpacks and shoes, for art supplies and sports equipment. Some mudrooms contain a laundry area, and some contain a mail station. Some mudrooms serve as a home base for a dog or a cat, with easy to clean, low maintenance building materials. A mudroom may consist of custom built-ins, or may simply be a corner of an existing room with pulled some clever, freestanding furniture, hooks, or shelves to house your most essential mudroom items.
Whatever your storage needs, extensive or streamlined, carving out a mudroom area can keep the whole family more organized. And, being more organized saves you stress and countless hours that would otherwise be spent searching for misplaced items.
While we love to design mudroom niches, a full mudroom interior design allows us to do what we do best here at Down2Earth Interior Design: elevate a space that is primarily driven by pragmatic requirements into a space that is also beautiful to look at and comfortable to occupy. I find myself voluntarily taking phone calls while sitting on the bench of my mudroom, simply because it's a comfortable place to be. My kids do their homework in the mudroom sometimes. My cat loves to curl up on sweatshirts temporarily left on the bench, or cuddle up in boxes on their way out to the recycling bins, just outside the door. Designing a custom mudroom for our family has elevated our lifestyle in so many ways, and I look forward to the opportunity to help make your mudroom design dreams a reality as well.
Photos by Ryan Macchione

 MAZURKA SPIRITUAL TEMPLE
Dear friends,
You are at liberty to understand that the spiritual control the Physical.
Do you have problems at the place of work, or you have not gotten the promotions you need in your place of work. Do you
always have disappointments in your life, Have you been in shambles, a situation where you feel frustrated and inferior
before your contemporaries, are you into gambling and yet you never win, Are you into any curse, have your love
disappointed you, have you been scammed and you need back your money from your scammer, have you spoken to people and
afterwards, you had no favor from them despite your qualifications. Have you been turned down on your request for favor.
Do you need love at all expense without struggling about it. Are you a pastor who's churches are not growing despite your
fasting and prayers,have you had different business failures, do you need good luck spell and or love. Have you had a
sickness that the doctors could not help, such as all manner of CANCER and HIV, at MAZURKA SPIRITUAL TEMPLE you would
have a long lasting solutions without any side effects. We charge minimal and we will deliver
For people living with HIV/AIDS OR CANCER, you would required to buy a DOG OR any Animal of your choice and we will
immediately cast the sickness upon the animals and within few months the animal will die with the sickness and you will be
totally free.
We are no 1 in Asia, Africa, and Europe. We are genuine.
Worry less and contact us immediately on email at: mst.spiritualhealings@gmail.com OR through our website at:
http://www.spiritualsolutionsandhealing.com for your spiritual needs
 Sosna Inc
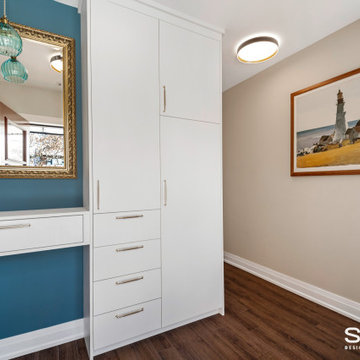
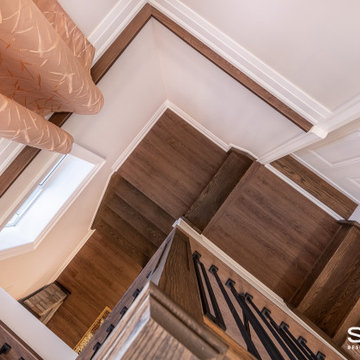
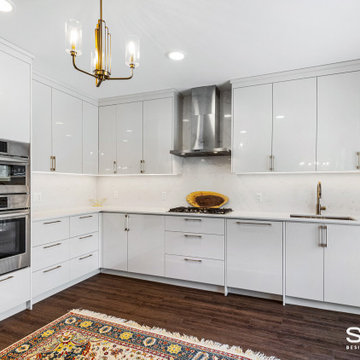
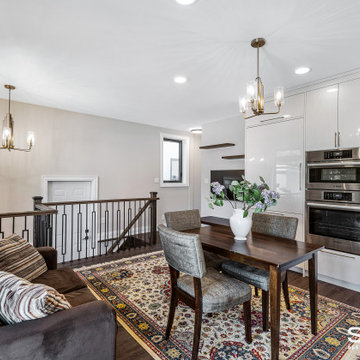
After serving as a rental for some time, this home was ready to be reclaimed by its owner and her son.
Gutting “back to the studs” was an understatement for this one. This transformation involved replanning everything; including the roof, the HVAC system, the entire plumbing system, and relocating the side entrance and staircase to the back of the house. Only the subfloors, the exterior framing structure, and the brick remains from this original 1940’s-built bungalow.
When we’re renovating an old structure, we’re bound to find some surprises. This renovation did not disappoint! From basement to roof, we found more than a few, shall we say, potentially catastrophic surprises along the way.
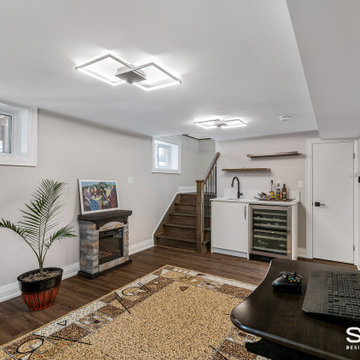
Let’s start with the basement. The homeowner wanted to update the basement and make it a usable living space for her adult son as well as a spa with a sauna for her. This required bringing the 6 foot ceiling height up to code at 7 feet. To do this, we had to re-think the HVAC system that was in the basement ceiling. When we opened up the basement ceiling to remove the HVAC supply and return trunks, we discovered asbestos! The asbestos had to be removed before we could dismantle and remove the HVAC system.
For the main floor, when we were replanning the existing 2-bedroom layout to create two master bedrooms each with their own ensuites, we looked at the possibility of removing the main load-bearing wall. But our investigations led to the discovery that the load bearing wall was not lined up with the roof or the basement load points, so the load of the house was not continuous throughout. This was a disaster waiting to happen. And as we found out, this lack of alignment was causing major issues with the roof when we went to replace the shingles. We discovered portions of the roof truss in very poor condition, literally moments away from giving out. These were replaced and other truss components were fortified before we went on to re-shingle the roof and replace all the soffits and eavestroughs.
Once the structural and space planning elements were sorted out, we could turn our focus to helping this homeowner select the finishes she and her son wanted for their new spaces. She wanted white all the way, and he wanted bold colours. You will see these color choices reflected in their private bathrooms as well as in the upper kitchen and living area that she will mostly use, and the basement entertainment area that he will mostly use.
To round out the personalization of this made-new-again home, we converted the basement into an entertainment center with a bar for her son, and a sauna and third full bathroom with a jacuzzi tub for a spa-like feel for her.
Without having to build from scratch, this homeowner got the custom home of her dreams.
While you “can’t teach an old dog new tricks”, the sky’s the limit on how you can transform an old home into the home of your dreams. When your “old dog” needs some new tricks, we are the Renovator You Can Count On.
 Sosna Inc
After serving as a rental for some time, this home was ready to be reclaimed by its owner and her son.
Gutting “back to the studs” was an understatement for this one. This transformation involved replanning everything; including the roof, the HVAC system, the entire plumbing system, and relocating the side entrance and staircase to the back of the house. Only the subfloors, the exterior framing structure, and the brick remains from this original 1940’s-built bungalow.
When we’re renovating an old structure, we’re bound to find some surprises. This renovation did not disappoint! From basement to roof, we found more than a few, shall we say, potentially catastrophic surprises along the way.
Let’s start with the basement. The homeowner wanted to update the basement and make it a usable living space for her adult son as well as a spa with a sauna for her. This required bringing the 6 foot ceiling height up to code at 7 feet. To do this, we had to re-think the HVAC system that was in the basement ceiling. When we opened up the basement ceiling to remove the HVAC supply and return trunks, we discovered asbestos! The asbestos had to be removed before we could dismantle and remove the HVAC system.
For the main floor, when we were replanning the existing 2-bedroom layout to create two master bedrooms each with their own ensuites, we looked at the possibility of removing the main load-bearing wall. But our investigations led to the discovery that the load bearing wall was not lined up with the roof or the basement load points, so the load of the house was not continuous throughout. This was a disaster waiting to happen. And as we found out, this lack of alignment was causing major issues with the roof when we went to replace the shingles. We discovered portions of the roof truss in very poor condition, literally moments away from giving out. These were replaced and other truss components were fortified before we went on to re-shingle the roof and replace all the soffits and eavestroughs.
Once the structural and space planning elements were sorted out, we could turn our focus to helping this homeowner select the finishes she and her son wanted for their new spaces. She wanted white all the way, and he wanted bold colours. You will see these color choices reflected in their private bathrooms as well as in the upper kitchen and living area that she will mostly use, and the basement entertainment area that he will mostly use.
To round out the personalization of this made-new-again home, we converted the basement into an entertainment center with a bar for her son, and a sauna and third full bathroom with a jacuzzi tub for a spa-like feel for her.
Without having to build from scratch, this homeowner got the custom home of her dreams.
While you “can’t teach an old dog new tricks”, the sky’s the limit on how you can transform an old home into the home of your dreams. When your “old dog” needs some new tricks, we are the Renovator You Can Count On.
 Sosna Inc
After serving as a rental for some time, this home was ready to be reclaimed by its owner and her son.
Gutting “back to the studs” was an understatement for this one. This transformation involved replanning everything; including the roof, the HVAC system, the entire plumbing system, and relocating the side entrance and staircase to the back of the house. Only the subfloors, the exterior framing structure, and the brick remains from this original 1940’s-built bungalow.
When we’re renovating an old structure, we’re bound to find some surprises. This renovation did not disappoint! From basement to roof, we found more than a few, shall we say, potentially catastrophic surprises along the way.
Let’s start with the basement. The homeowner wanted to update the basement and make it a usable living space for her adult son as well as a spa with a sauna for her. This required bringing the 6 foot ceiling height up to code at 7 feet. To do this, we had to re-think the HVAC system that was in the basement ceiling. When we opened up the basement ceiling to remove the HVAC supply and return trunks, we discovered asbestos! The asbestos had to be removed before we could dismantle and remove the HVAC system.
For the main floor, when we were replanning the existing 2-bedroom layout to create two master bedrooms each with their own ensuites, we looked at the possibility of removing the main load-bearing wall. But our investigations led to the discovery that the load bearing wall was not lined up with the roof or the basement load points, so the load of the house was not continuous throughout. This was a disaster waiting to happen. And as we found out, this lack of alignment was causing major issues with the roof when we went to replace the shingles. We discovered portions of the roof truss in very poor condition, literally moments away from giving out. These were replaced and other truss components were fortified before we went on to re-shingle the roof and replace all the soffits and eavestroughs.
Once the structural and space planning elements were sorted out, we could turn our focus to helping this homeowner select the finishes she and her son wanted for their new spaces. She wanted white all the way, and he wanted bold colours. You will see these color choices reflected in their private bathrooms as well as in the upper kitchen and living area that she will mostly use, and the basement entertainment area that he will mostly use.
To round out the personalization of this made-new-again home, we converted the basement into an entertainment center with a bar for her son, and a sauna and third full bathroom with a jacuzzi tub for a spa-like feel for her.
Without having to build from scratch, this homeowner got the custom home of her dreams.
While you “can’t teach an old dog new tricks”, the sky’s the limit on how you can transform an old home into the home of your dreams. When your “old dog” needs some new tricks, we are the Renovator You Can Count On.
 Sosna Inc
After serving as a rental for some time, this home was ready to be reclaimed by its owner and her son.
Gutting “back to the studs” was an understatement for this one. This transformation involved replanning everything; including the roof, the HVAC system, the entire plumbing system, and relocating the side entrance and staircase to the back of the house. Only the subfloors, the exterior framing structure, and the brick remains from this original 1940’s-built bungalow.
When we’re renovating an old structure, we’re bound to find some surprises. This renovation did not disappoint! From basement to roof, we found more than a few, shall we say, potentially catastrophic surprises along the way.
Let’s start with the basement. The homeowner wanted to update the basement and make it a usable living space for her adult son as well as a spa with a sauna for her. This required bringing the 6 foot ceiling height up to code at 7 feet. To do this, we had to re-think the HVAC system that was in the basement ceiling. When we opened up the basement ceiling to remove the HVAC supply and return trunks, we discovered asbestos! The asbestos had to be removed before we could dismantle and remove the HVAC system.
For the main floor, when we were replanning the existing 2-bedroom layout to create two master bedrooms each with their own ensuites, we looked at the possibility of removing the main load-bearing wall. But our investigations led to the discovery that the load bearing wall was not lined up with the roof or the basement load points, so the load of the house was not continuous throughout. This was a disaster waiting to happen. And as we found out, this lack of alignment was causing major issues with the roof when we went to replace the shingles. We discovered portions of the roof truss in very poor condition, literally moments away from giving out. These were replaced and other truss components were fortified before we went on to re-shingle the roof and replace all the soffits and eavestroughs.
Once the structural and space planning elements were sorted out, we could turn our focus to helping this homeowner select the finishes she and her son wanted for their new spaces. She wanted white all the way, and he wanted bold colours. You will see these color choices reflected in their private bathrooms as well as in the upper kitchen and living area that she will mostly use, and the basement entertainment area that he will mostly use.
To round out the personalization of this made-new-again home, we converted the basement into an entertainment center with a bar for her son, and a sauna and third full bathroom with a jacuzzi tub for a spa-like feel for her.
Without having to build from scratch, this homeowner got the custom home of her dreams.
While you “can’t teach an old dog new tricks”, the sky’s the limit on how you can transform an old home into the home of your dreams. When your “old dog” needs some new tricks, we are the Renovator You Can Count On.
 Sosna Inc
After serving as a rental for some time, this home was ready to be reclaimed by its owner and her son.
Gutting “back to the studs” was an understatement for this one. This transformation involved replanning everything; including the roof, the HVAC system, the entire plumbing system, and relocating the side entrance and staircase to the back of the house. Only the subfloors, the exterior framing structure, and the brick remains from this original 1940’s-built bungalow.
When we’re renovating an old structure, we’re bound to find some surprises. This renovation did not disappoint! From basement to roof, we found more than a few, shall we say, potentially catastrophic surprises along the way.
Let’s start with the basement. The homeowner wanted to update the basement and make it a usable living space for her adult son as well as a spa with a sauna for her. This required bringing the 6 foot ceiling height up to code at 7 feet. To do this, we had to re-think the HVAC system that was in the basement ceiling. When we opened up the basement ceiling to remove the HVAC supply and return trunks, we discovered asbestos! The asbestos had to be removed before we could dismantle and remove the HVAC system.
For the main floor, when we were replanning the existing 2-bedroom layout to create two master bedrooms each with their own ensuites, we looked at the possibility of removing the main load-bearing wall. But our investigations led to the discovery that the load bearing wall was not lined up with the roof or the basement load points, so the load of the house was not continuous throughout. This was a disaster waiting to happen. And as we found out, this lack of alignment was causing major issues with the roof when we went to replace the shingles. We discovered portions of the roof truss in very poor condition, literally moments away from giving out. These were replaced and other truss components were fortified before we went on to re-shingle the roof and replace all the soffits and eavestroughs.
Once the structural and space planning elements were sorted out, we could turn our focus to helping this homeowner select the finishes she and her son wanted for their new spaces. She wanted white all the way, and he wanted bold colours. You will see these color choices reflected in their private bathrooms as well as in the upper kitchen and living area that she will mostly use, and the basement entertainment area that he will mostly use.
To round out the personalization of this made-new-again home, we converted the basement into an entertainment center with a bar for her son, and a sauna and third full bathroom with a jacuzzi tub for a spa-like feel for her.
Without having to build from scratch, this homeowner got the custom home of her dreams.
While you “can’t teach an old dog new tricks”, the sky’s the limit on how you can transform an old home into the home of your dreams. When your “old dog” needs some new tricks, we are the Renovator You Can Count On.
29