
Search results for "Existing failed" in Home Design Ideas

 Reflections Water Gardens
After two years of fighting with a failing pond liner, the resident decided to replace the liner in the pond. This 150’ x 115’pond sat above and flowed into a larger pond which was lined with PVC liner. We were replacing this with a 45 mil epdm fishsafe rubber liner. This presented a problem: there is no way to adhere the new rubber liner to the existing PVC liner in the lower pond. The solution was to pour a cement 18” wide x 2’ deep footing next to the wier damn between the two ponds in order to connect the two liners together. The old liner was placed on the top of the footing and a water-block sealant was used. The new rubber liner was placed on top and another layer of sealant along with stainless steel bars were laid atop the two materials in order to press them together to maintain a water-tight junction. A drain tile system was installed beneath the liner to relieve ground water pressure and vent off any gasses. Water tight seals also had to be provided for multiple plumbing penetrations through the liner. Non-woven geotextile planting media bags were used to prevent erosion around the perimeter of the pond. As the pond was landscaped with lawn and perennials, these had to be removed and preserved and maintained throughout the project in order to return them upon completion of the lining. All trenching work and removal of plant material was done by hand in order to maintain the surrounding landscape; great care was taken throughout the project in order to protect existing hard and softscape, so that upon completion, the area appeared almost exactly as it had been before work began.
Photo by Larry Carnes
 Reflections Water Gardens
After two years of fighting with a failing pond liner, the resident decided to replace the liner in the pond. This 150’ x 115’pond sat above and flowed into a larger pond which was lined with PVC liner. We were replacing this with a 45 mil epdm fishsafe rubber liner. This presented a problem: there is no way to adhere the new rubber liner to the existing PVC liner in the lower pond. The solution was to pour a cement 18” wide x 2’ deep footing next to the wier damn between the two ponds in order to connect the two liners together. The old liner was placed on the top of the footing and a water-block sealant was used. The new rubber liner was placed on top and another layer of sealant along with stainless steel bars were laid atop the two materials in order to press them together to maintain a water-tight junction. A drain tile system was installed beneath the liner to relieve ground water pressure and vent off any gasses. Water tight seals also had to be provided for multiple plumbing penetrations through the liner. Non-woven geotextile planting media bags were used to prevent erosion around the perimeter of the pond. As the pond was landscaped with lawn and perennials, these had to be removed and preserved and maintained throughout the project in order to return them upon completion of the lining. All trenching work and removal of plant material was done by hand in order to maintain the surrounding landscape; great care was taken throughout the project in order to protect existing hard and softscape, so that upon completion, the area appeared almost exactly as it had been before work began.
Photo by Larry Carnes
 Reflections Water Gardens
After two years of fighting with a failing pond liner, the resident decided to replace the liner in the pond. This 150’ x 115’pond sat above and flowed into a larger pond which was lined with PVC liner. We were replacing this with a 45 mil epdm fishsafe rubber liner. This presented a problem: there is no way to adhere the new rubber liner to the existing PVC liner in the lower pond. The solution was to pour a cement 18” wide x 2’ deep footing next to the wier damn between the two ponds in order to connect the two liners together. The old liner was placed on the top of the footing and a water-block sealant was used. The new rubber liner was placed on top and another layer of sealant along with stainless steel bars were laid atop the two materials in order to press them together to maintain a water-tight junction. A drain tile system was installed beneath the liner to relieve ground water pressure and vent off any gasses. Water tight seals also had to be provided for multiple plumbing penetrations through the liner. Non-woven geotextile planting media bags were used to prevent erosion around the perimeter of the pond. As the pond was landscaped with lawn and perennials, these had to be removed and preserved and maintained throughout the project in order to return them upon completion of the lining. All trenching work and removal of plant material was done by hand in order to maintain the surrounding landscape; great care was taken throughout the project in order to protect existing hard and softscape, so that upon completion, the area appeared almost exactly as it had been before work began.
Photo by Larry Carnes
Find the right local pro for your project
 Reflections Water Gardens
After two years of fighting with a failing pond liner, the resident decided to replace the liner in the pond. This 150’ x 115’pond sat above and flowed into a larger pond which was lined with PVC liner. We were replacing this with a 45 mil epdm fishsafe rubber liner. This presented a problem: there is no way to adhere the new rubber liner to the existing PVC liner in the lower pond. The solution was to pour a cement 18” wide x 2’ deep footing next to the wier damn between the two ponds in order to connect the two liners together. The old liner was placed on the top of the footing and a water-block sealant was used. The new rubber liner was placed on top and another layer of sealant along with stainless steel bars were laid atop the two materials in order to press them together to maintain a water-tight junction. A drain tile system was installed beneath the liner to relieve ground water pressure and vent off any gasses. Water tight seals also had to be provided for multiple plumbing penetrations through the liner. Non-woven geotextile planting media bags were used to prevent erosion around the perimeter of the pond. As the pond was landscaped with lawn and perennials, these had to be removed and preserved and maintained throughout the project in order to return them upon completion of the lining. All trenching work and removal of plant material was done by hand in order to maintain the surrounding landscape; great care was taken throughout the project in order to protect existing hard and softscape, so that upon completion, the area appeared almost exactly as it had been before work began.
Photo by Larry Carnes
 Reflections Water Gardens
After two years of fighting with a failing pond liner, the resident decided to replace the liner in the pond. This 150’ x 115’pond sat above and flowed into a larger pond which was lined with PVC liner. We were replacing this with a 45 mil epdm fishsafe rubber liner. This presented a problem: there is no way to adhere the new rubber liner to the existing PVC liner in the lower pond. The solution was to pour a cement 18” wide x 2’ deep footing next to the wier damn between the two ponds in order to connect the two liners together. The old liner was placed on the top of the footing and a water-block sealant was used. The new rubber liner was placed on top and another layer of sealant along with stainless steel bars were laid atop the two materials in order to press them together to maintain a water-tight junction. A drain tile system was installed beneath the liner to relieve ground water pressure and vent off any gasses. Water tight seals also had to be provided for multiple plumbing penetrations through the liner. Non-woven geotextile planting media bags were used to prevent erosion around the perimeter of the pond. As the pond was landscaped with lawn and perennials, these had to be removed and preserved and maintained throughout the project in order to return them upon completion of the lining. All trenching work and removal of plant material was done by hand in order to maintain the surrounding landscape; great care was taken throughout the project in order to protect existing hard and softscape, so that upon completion, the area appeared almost exactly as it had been before work began.
Photo by Larry Carnes
 Reflections Water Gardens
After two years of fighting with a failing pond liner, the resident decided to replace the liner in the pond. This 150’ x 115’pond sat above and flowed into a larger pond which was lined with PVC liner. We were replacing this with a 45 mil epdm fishsafe rubber liner. This presented a problem: there is no way to adhere the new rubber liner to the existing PVC liner in the lower pond. The solution was to pour a cement 18” wide x 2’ deep footing next to the wier damn between the two ponds in order to connect the two liners together. The old liner was placed on the top of the footing and a water-block sealant was used. The new rubber liner was placed on top and another layer of sealant along with stainless steel bars were laid atop the two materials in order to press them together to maintain a water-tight junction. A drain tile system was installed beneath the liner to relieve ground water pressure and vent off any gasses. Water tight seals also had to be provided for multiple plumbing penetrations through the liner. Non-woven geotextile planting media bags were used to prevent erosion around the perimeter of the pond. As the pond was landscaped with lawn and perennials, these had to be removed and preserved and maintained throughout the project in order to return them upon completion of the lining. All trenching work and removal of plant material was done by hand in order to maintain the surrounding landscape; great care was taken throughout the project in order to protect existing hard and softscape, so that upon completion, the area appeared almost exactly as it had been before work began.
Photo by Larry Carnes
 Griffith Indoor & Outdoor Living
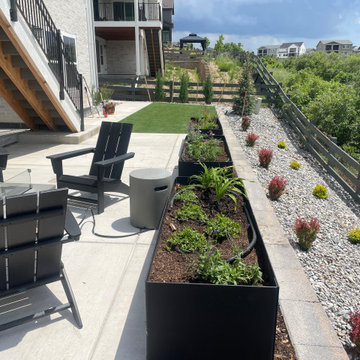
This Castle Pines landscape transformation was designed for a newer home with strict HOA requirements, significant drainage challenges and large slopes across both the front and backyard. Griffith Designs created a customized, HOA-compatible landscape plan focused on extremely low maintenance, water-wise performance and lasting curb appeal.
Failing and poorly suited plant material was removed and replaced with resilient, drought-tolerant shrubs and perennials selected for Colorado’s climate. Seasonal pops of color keep the landscape visually interesting throughout the year, while existing shrubs were selectively trimmed and retained where they continued to complement the new design.
The irrigation system was expanded to support all new planting areas and encourage healthy, efficient growth. In the backyard, two custom raised garden beds near the fire-pit area create a tailored focal point and add dimension to the outdoor living space. Existing backyard plantings were also replaced with more durable, water-wise varieties.
Refreshed hardscape materials, rock, mulch and planting-bed finishes bring the entire property together with a clean, cohesive appearance. Griffith Designs also prepared the landscape design for HOA review and approval, resulting in a polished Castle Pines xeriscape that addresses the property’s slopes and drainage conditions while meeting the homeowners’ desire for beauty, color and minimal upkeep.

Sponsored
Columbus, OH

Hope Restoration & General Contracting
Columbus Design-Build, Kitchen & Bath Remodeling, Historic Renovations
 Griffith Indoor & Outdoor Living
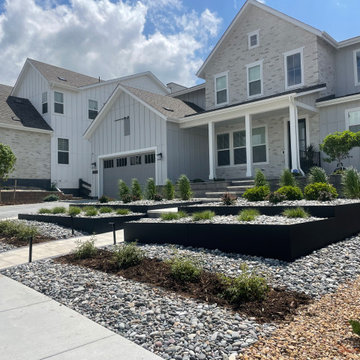
This Castle Pines landscape transformation was designed for a newer home with strict HOA requirements, significant drainage challenges and large slopes across both the front and backyard. Griffith Designs created a customized, HOA-compatible landscape plan focused on extremely low maintenance, water-wise performance and lasting curb appeal.
Failing and poorly suited plant material was removed and replaced with resilient, drought-tolerant shrubs and perennials selected for Colorado’s climate. Seasonal pops of color keep the landscape visually interesting throughout the year, while existing shrubs were selectively trimmed and retained where they continued to complement the new design.
The irrigation system was expanded to support all new planting areas and encourage healthy, efficient growth. In the backyard, two custom raised garden beds near the fire-pit area create a tailored focal point and add dimension to the outdoor living space. Existing backyard plantings were also replaced with more durable, water-wise varieties.
Refreshed hardscape materials, rock, mulch and planting-bed finishes bring the entire property together with a clean, cohesive appearance. Griffith Designs also prepared the landscape design for HOA review and approval, resulting in a polished Castle Pines xeriscape that addresses the property’s slopes and drainage conditions while meeting the homeowners’ desire for beauty, color and minimal upkeep.
 Griffith Indoor & Outdoor Living
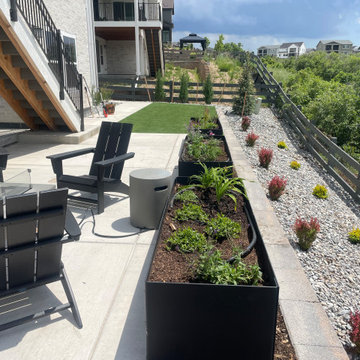
This Castle Pines landscape transformation was designed for a newer home with strict HOA requirements, significant drainage challenges and large slopes across both the front and backyard. Griffith Designs created a customized, HOA-compatible landscape plan focused on extremely low maintenance, water-wise performance and lasting curb appeal.
Failing and poorly suited plant material was removed and replaced with resilient, drought-tolerant shrubs and perennials selected for Colorado’s climate. Seasonal pops of color keep the landscape visually interesting throughout the year, while existing shrubs were selectively trimmed and retained where they continued to complement the new design.
The irrigation system was expanded to support all new planting areas and encourage healthy, efficient growth. In the backyard, two custom raised garden beds near the fire-pit area create a tailored focal point and add dimension to the outdoor living space. Existing backyard plantings were also replaced with more durable, water-wise varieties.
Refreshed hardscape materials, rock, mulch and planting-bed finishes bring the entire property together with a clean, cohesive appearance. Griffith Designs also prepared the landscape design for HOA review and approval, resulting in a polished Castle Pines xeriscape that addresses the property’s slopes and drainage conditions while meeting the homeowners’ desire for beauty, color and minimal upkeep.
 Drury Design
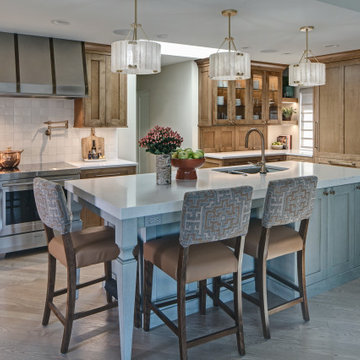
THE SETUP
Senior Designer Diana Burton’s client loved her sixties-era home – it just needed some work. The cozy galley kitchen was narrow and mostly closed off from the family room. A pass-through window served as a limited pipeline for treats and chatter. The appliances were failing, too. It was simply time for an overhaul.
Design Objectives:
Remove load bearing wall and open kitchen to the family room
Omit large unused fireplace in family room
Increase work surfaces and overall storage solutions
Dedicated small countertop appliance storage
Seating for 3 or 4 at island
Add pantry storage
Offer solution for lack of mudroom
Upgrade all appliances
THE REMODEL
Design Challenges:
Finding a location to hide structural support for new beam
Reworking awkward configuration of existing walls
Adding a walk-in pantry
Creating mudroom storage
Allowing room for large sectional in family room
Design Solutions:
Add a discreet column by the fridge to hide essential support
Flush out wall by bath to be even with the range wall, where the new walk in pantry exists
Use void space behind new wall for large appliance garage
Create combination walk in pantry/mudroom by adding bench with shoe storage and hooks
Maintain island depth for comfortable seating without infringing on space for the sectional
THE RENEWED SPACE
This cramped, dated kitchen has a new lease on life! Opening it to the family room dramatically transformed the space. Diana’s client now has plenty of storage, a big island for food prep, and an open-concept space that’s perfect for entertaining and hanging out with friends and family.
 Reflections Water Gardens
After two years of fighting with a failing pond liner, the resident decided to replace the liner in the pond. This 150’ x 115’pond sat above and flowed into a larger pond which was lined with PVC liner. We were replacing this with a 45 mil epdm fishsafe rubber liner. This presented a problem: there is no way to adhere the new rubber liner to the existing PVC liner in the lower pond. The solution was to pour a cement 18” wide x 2’ deep footing next to the wier damn between the two ponds in order to connect the two liners together. The old liner was placed on the top of the footing and a water-block sealant was used. The new rubber liner was placed on top and another layer of sealant along with stainless steel bars were laid atop the two materials in order to press them together to maintain a water-tight junction. A drain tile system was installed beneath the liner to relieve ground water pressure and vent off any gasses. Water tight seals also had to be provided for multiple plumbing penetrations through the liner. Non-woven geotextile planting media bags were used to prevent erosion around the perimeter of the pond. As the pond was landscaped with lawn and perennials, these had to be removed and preserved and maintained throughout the project in order to return them upon completion of the lining. All trenching work and removal of plant material was done by hand in order to maintain the surrounding landscape; great care was taken throughout the project in order to protect existing hard and softscape, so that upon completion, the area appeared almost exactly as it had been before work began.
Photo by Larry Carnes
 Griffith Indoor & Outdoor Living
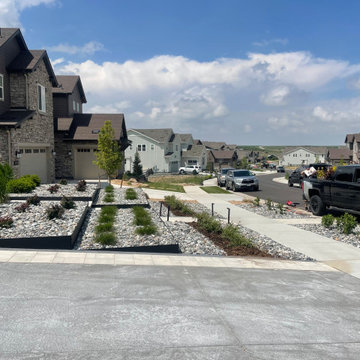
This Castle Pines landscape transformation was designed for a newer home with strict HOA requirements, significant drainage challenges and large slopes across both the front and backyard. Griffith Designs created a customized, HOA-compatible landscape plan focused on extremely low maintenance, water-wise performance and lasting curb appeal.
Failing and poorly suited plant material was removed and replaced with resilient, drought-tolerant shrubs and perennials selected for Colorado’s climate. Seasonal pops of color keep the landscape visually interesting throughout the year, while existing shrubs were selectively trimmed and retained where they continued to complement the new design.
The irrigation system was expanded to support all new planting areas and encourage healthy, efficient growth. In the backyard, two custom raised garden beds near the fire-pit area create a tailored focal point and add dimension to the outdoor living space. Existing backyard plantings were also replaced with more durable, water-wise varieties.
Refreshed hardscape materials, rock, mulch and planting-bed finishes bring the entire property together with a clean, cohesive appearance. Griffith Designs also prepared the landscape design for HOA review and approval, resulting in a polished Castle Pines xeriscape that addresses the property’s slopes and drainage conditions while meeting the homeowners’ desire for beauty, color and minimal upkeep.
 Griffith Indoor & Outdoor Living
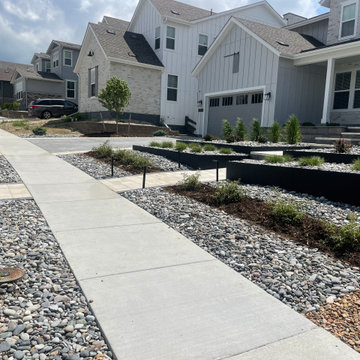
This Castle Pines landscape transformation was designed for a newer home with strict HOA requirements, significant drainage challenges and large slopes across both the front and backyard. Griffith Designs created a customized, HOA-compatible landscape plan focused on extremely low maintenance, water-wise performance and lasting curb appeal.
Failing and poorly suited plant material was removed and replaced with resilient, drought-tolerant shrubs and perennials selected for Colorado’s climate. Seasonal pops of color keep the landscape visually interesting throughout the year, while existing shrubs were selectively trimmed and retained where they continued to complement the new design.
The irrigation system was expanded to support all new planting areas and encourage healthy, efficient growth. In the backyard, two custom raised garden beds near the fire-pit area create a tailored focal point and add dimension to the outdoor living space. Existing backyard plantings were also replaced with more durable, water-wise varieties.
Refreshed hardscape materials, rock, mulch and planting-bed finishes bring the entire property together with a clean, cohesive appearance. Griffith Designs also prepared the landscape design for HOA review and approval, resulting in a polished Castle Pines xeriscape that addresses the property’s slopes and drainage conditions while meeting the homeowners’ desire for beauty, color and minimal upkeep.

Sponsored
Columbus, OH
Hope Restoration & General Contracting
Columbus Design-Build, Kitchen & Bath Remodeling, Historic Renovations
 Griffith Indoor & Outdoor Living
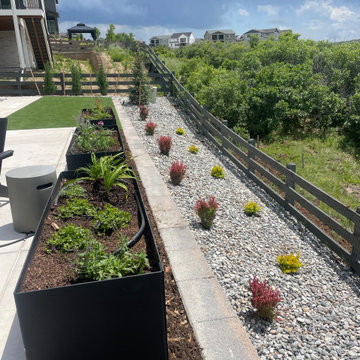
This Castle Pines landscape transformation was designed for a newer home with strict HOA requirements, significant drainage challenges and large slopes across both the front and backyard. Griffith Designs created a customized, HOA-compatible landscape plan focused on extremely low maintenance, water-wise performance and lasting curb appeal.
Failing and poorly suited plant material was removed and replaced with resilient, drought-tolerant shrubs and perennials selected for Colorado’s climate. Seasonal pops of color keep the landscape visually interesting throughout the year, while existing shrubs were selectively trimmed and retained where they continued to complement the new design.
The irrigation system was expanded to support all new planting areas and encourage healthy, efficient growth. In the backyard, two custom raised garden beds near the fire-pit area create a tailored focal point and add dimension to the outdoor living space. Existing backyard plantings were also replaced with more durable, water-wise varieties.
Refreshed hardscape materials, rock, mulch and planting-bed finishes bring the entire property together with a clean, cohesive appearance. Griffith Designs also prepared the landscape design for HOA review and approval, resulting in a polished Castle Pines xeriscape that addresses the property’s slopes and drainage conditions while meeting the homeowners’ desire for beauty, color and minimal upkeep.
 Drury Design
THE SETUP
Senior Designer Diana Burton’s client loved her sixties-era home – it just needed some work. The cozy galley kitchen was narrow and mostly closed off from the family room. A pass-through window served as a limited pipeline for treats and chatter. The appliances were failing, too. It was simply time for an overhaul.
Design Objectives:
Remove load bearing wall and open kitchen to the family room
Omit large unused fireplace in family room
Increase work surfaces and overall storage solutions
Dedicated small countertop appliance storage
Seating for 3 or 4 at island
Add pantry storage
Offer solution for lack of mudroom
Upgrade all appliances
THE REMODEL
Design Challenges:
Finding a location to hide structural support for new beam
Reworking awkward configuration of existing walls
Adding a walk-in pantry
Creating mudroom storage
Allowing room for large sectional in family room
Design Solutions:
Add a discreet column by the fridge to hide essential support
Flush out wall by bath to be even with the range wall, where the new walk in pantry exists
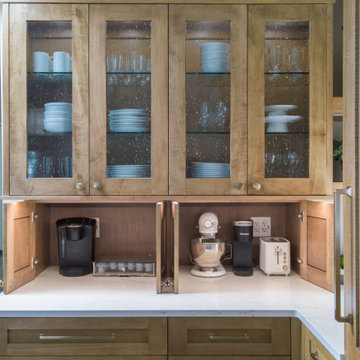
Use void space behind new wall for large appliance garage
Create combination walk in pantry/mudroom by adding bench with shoe storage and hooks
Maintain island depth for comfortable seating without infringing on space for the sectional
THE RENEWED SPACE
This cramped, dated kitchen has a new lease on life! Opening it to the family room dramatically transformed the space. Diana’s client now has plenty of storage, a big island for food prep, and an open-concept space that’s perfect for entertaining and hanging out with friends and family.
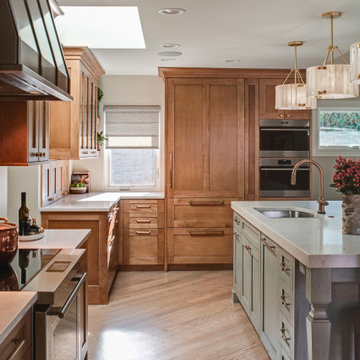 Drury Design
THE SETUP
Senior Designer Diana Burton’s client loved her sixties-era home – it just needed some work. The cozy galley kitchen was narrow and mostly closed off from the family room. A pass-through window served as a limited pipeline for treats and chatter. The appliances were failing, too. It was simply time for an overhaul.
Design Objectives:
Remove load bearing wall and open kitchen to the family room
Omit large unused fireplace in family room
Increase work surfaces and overall storage solutions
Dedicated small countertop appliance storage
Seating for 3 or 4 at island
Add pantry storage
Offer solution for lack of mudroom
Upgrade all appliances
THE REMODEL
Design Challenges:
Finding a location to hide structural support for new beam
Reworking awkward configuration of existing walls
Adding a walk-in pantry
Creating mudroom storage
Allowing room for large sectional in family room
Design Solutions:
Add a discreet column by the fridge to hide essential support
Flush out wall by bath to be even with the range wall, where the new walk in pantry exists
Use void space behind new wall for large appliance garage
Create combination walk in pantry/mudroom by adding bench with shoe storage and hooks
Maintain island depth for comfortable seating without infringing on space for the sectional
THE RENEWED SPACE
This cramped, dated kitchen has a new lease on life! Opening it to the family room dramatically transformed the space. Diana’s client now has plenty of storage, a big island for food prep, and an open-concept space that’s perfect for entertaining and hanging out with friends and family.
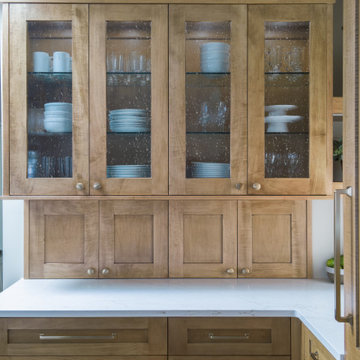 Drury Design
THE SETUP
Senior Designer Diana Burton’s client loved her sixties-era home – it just needed some work. The cozy galley kitchen was narrow and mostly closed off from the family room. A pass-through window served as a limited pipeline for treats and chatter. The appliances were failing, too. It was simply time for an overhaul.
Design Objectives:
Remove load bearing wall and open kitchen to the family room
Omit large unused fireplace in family room
Increase work surfaces and overall storage solutions
Dedicated small countertop appliance storage
Seating for 3 or 4 at island
Add pantry storage
Offer solution for lack of mudroom
Upgrade all appliances
THE REMODEL
Design Challenges:
Finding a location to hide structural support for new beam
Reworking awkward configuration of existing walls
Adding a walk-in pantry
Creating mudroom storage
Allowing room for large sectional in family room
Design Solutions:
Add a discreet column by the fridge to hide essential support
Flush out wall by bath to be even with the range wall, where the new walk in pantry exists
Use void space behind new wall for large appliance garage
Create combination walk in pantry/mudroom by adding bench with shoe storage and hooks
Maintain island depth for comfortable seating without infringing on space for the sectional
THE RENEWED SPACE
This cramped, dated kitchen has a new lease on life! Opening it to the family room dramatically transformed the space. Diana’s client now has plenty of storage, a big island for food prep, and an open-concept space that’s perfect for entertaining and hanging out with friends and family.
Sponsored
Columbus, OH
Hope Restoration & General Contracting
Columbus Design-Build, Kitchen & Bath Remodeling, Historic Renovations
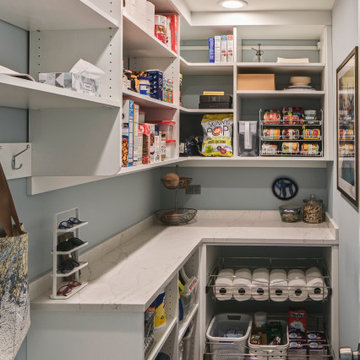 Drury Design
THE SETUP
Senior Designer Diana Burton’s client loved her sixties-era home – it just needed some work. The cozy galley kitchen was narrow and mostly closed off from the family room. A pass-through window served as a limited pipeline for treats and chatter. The appliances were failing, too. It was simply time for an overhaul.
Design Objectives:
Remove load bearing wall and open kitchen to the family room
Omit large unused fireplace in family room
Increase work surfaces and overall storage solutions
Dedicated small countertop appliance storage
Seating for 3 or 4 at island
Add pantry storage
Offer solution for lack of mudroom
Upgrade all appliances
THE REMODEL
Design Challenges:
Finding a location to hide structural support for new beam
Reworking awkward configuration of existing walls
Adding a walk-in pantry
Creating mudroom storage
Allowing room for large sectional in family room
Design Solutions:
Add a discreet column by the fridge to hide essential support
Flush out wall by bath to be even with the range wall, where the new walk in pantry exists
Use void space behind new wall for large appliance garage
Create combination walk in pantry/mudroom by adding bench with shoe storage and hooks
Maintain island depth for comfortable seating without infringing on space for the sectional
THE RENEWED SPACE
This cramped, dated kitchen has a new lease on life! Opening it to the family room dramatically transformed the space. Diana’s client now has plenty of storage, a big island for food prep, and an open-concept space that’s perfect for entertaining and hanging out with friends and family.
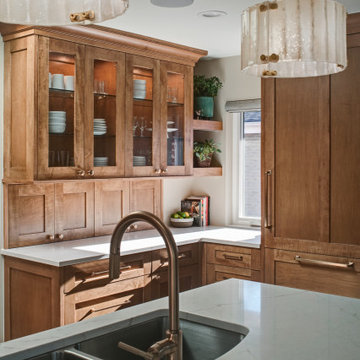 Drury Design
THE SETUP
Senior Designer Diana Burton’s client loved her sixties-era home – it just needed some work. The cozy galley kitchen was narrow and mostly closed off from the family room. A pass-through window served as a limited pipeline for treats and chatter. The appliances were failing, too. It was simply time for an overhaul.
Design Objectives:
Remove load bearing wall and open kitchen to the family room
Omit large unused fireplace in family room
Increase work surfaces and overall storage solutions
Dedicated small countertop appliance storage
Seating for 3 or 4 at island
Add pantry storage
Offer solution for lack of mudroom
Upgrade all appliances
THE REMODEL
Design Challenges:
Finding a location to hide structural support for new beam
Reworking awkward configuration of existing walls
Adding a walk-in pantry
Creating mudroom storage
Allowing room for large sectional in family room
Design Solutions:
Add a discreet column by the fridge to hide essential support
Flush out wall by bath to be even with the range wall, where the new walk in pantry exists
Use void space behind new wall for large appliance garage
Create combination walk in pantry/mudroom by adding bench with shoe storage and hooks
Maintain island depth for comfortable seating without infringing on space for the sectional
THE RENEWED SPACE
This cramped, dated kitchen has a new lease on life! Opening it to the family room dramatically transformed the space. Diana’s client now has plenty of storage, a big island for food prep, and an open-concept space that’s perfect for entertaining and hanging out with friends and family.
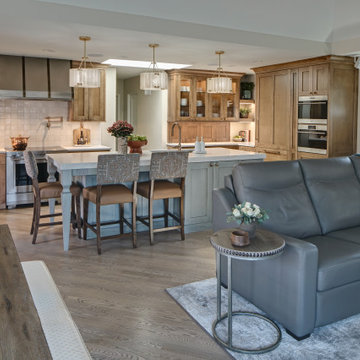 Drury Design
THE SETUP
Senior Designer Diana Burton’s client loved her sixties-era home – it just needed some work. The cozy galley kitchen was narrow and mostly closed off from the family room. A pass-through window served as a limited pipeline for treats and chatter. The appliances were failing, too. It was simply time for an overhaul.
Design Objectives:
Remove load bearing wall and open kitchen to the family room
Omit large unused fireplace in family room
Increase work surfaces and overall storage solutions
Dedicated small countertop appliance storage
Seating for 3 or 4 at island
Add pantry storage
Offer solution for lack of mudroom
Upgrade all appliances
THE REMODEL
Design Challenges:
Finding a location to hide structural support for new beam
Reworking awkward configuration of existing walls
Adding a walk-in pantry
Creating mudroom storage
Allowing room for large sectional in family room
Design Solutions:
Add a discreet column by the fridge to hide essential support
Flush out wall by bath to be even with the range wall, where the new walk in pantry exists
Use void space behind new wall for large appliance garage
Create combination walk in pantry/mudroom by adding bench with shoe storage and hooks
Maintain island depth for comfortable seating without infringing on space for the sectional
THE RENEWED SPACE
This cramped, dated kitchen has a new lease on life! Opening it to the family room dramatically transformed the space. Diana’s client now has plenty of storage, a big island for food prep, and an open-concept space that’s perfect for entertaining and hanging out with friends and family.
12