
Search results for "Extraction process" in Home Design Ideas

 Hoi Ning Wong
Photo: Hoi Ning Wong © 2014 Houzz
Architect: square three design studios
Interior designer: GoGo Creations
Builder: Clarum Homes
Inspiration for a contemporary exterior home remodel in San Francisco
Inspiration for a contemporary exterior home remodel in San Francisco

 DRB Homes and Design
DRB Homes and Design: Modern Kitchen featuring Fumed Eucalyptus cabinetry. "Fuming" is the process of exposing thin wood veneers to ammonia in a large vacuum chamber. This method extracts deeper colors from the wood's tannin that a stain alone could not accomplish. We designed the rest of this kitchen remodel allowing natural light to pair with the Fumed Eucalyptus, in order to give off the vibrancy and deep, rich colors the fuming process achieves.
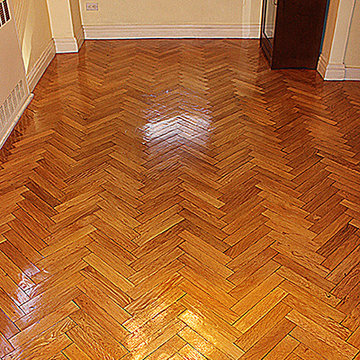
 Wood Vitalize
After: Our Sandless Finish Hardwood Floor Refinishing Process extracts all of the dirt and debris from a wood floor with the use of special machinery and eco-friendly compounds.
Find the right local pro for your project
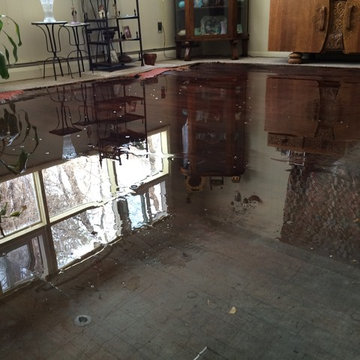
 Dry-Tech Water Damage Flood Restoration Services
Contact Dry-Tech Water Damage Restoration Services for fast 24/7 emergency water damage restoration, mold remediation and smoke and fire damage in the western suburbs of Philadelphia and surrounding areas. Our IICRC trained restoration specialists are qualified and have the equipment to handle any size restoration job. At Dry-Tech Water Damage Restoration Services, we know water, mold and/or smoke and fire damage can be overwhelming for you and costly to your home or commercial building, so our restoration specialists will work with you step-by-step through the entire process.
Call 610-304-5117 to Contact Us Today! Dry-Tech Restoration Services 24 hr Service, Basement Flood, Basement Water Removal, Broken Pipes, Building Drying, Carpet Cleaning, Carpet Drying, Carpet Extraction, Carpet Repair, Carpet Restoration,
Carpet Water Extraction, Cleaning, Damage Repair, Damage Restoration, Dehumidification, Disaster Restoration, Disinfecting, Drying, Emergency Service, Extraction,
Fire, Fire Restoration, Flood, Flood Clean Up, Flood Damage, Flood Damage Repair, Flood Restoration, Flood Water Removal, Flooded Basement, Floor Drying, Free Estimates,
Leak Detection, Moisture, Odor Removal, Plumbing, Plumbing Repairs, Rain Damage, Remediation, Repairs, Restorations, Roof Leak, Sanitizing, Sewage Clean Up,
Sewage Extraction, Sewage Removal, Sewer Back Up, Sewer Damage Restoration,Smoke, Smoke Damage Repair, Smoke Removal, Steam Cleaning, Storm Damage Repair,
Structural Drying, Sump Pump Failure, Tile Cleaning, Toilet Overflow, Upholstery Cleaning, Wall Drying, Water Damage Clean Up, Water Damage Company,
Water Damage Repair, Water Damage Restoration, Water Drying, Water Extraction, Water Removal, Wind Damage, Wet Carpet, Wood Floor Drying, Wet Basement http://www.restore-911.com
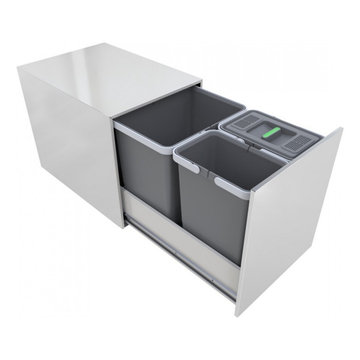
 Elletipi Inc.
Elegant and luxurious pull out system ELLETIPI for waste separation, provided with metal sliders for total extraction, and soft closing return mechanism. The buckets are installed inside a stainless steel structure (AISI 430) which is 100% recyclable, as are all its components. The simple lines, the finishes, the materials and processing, render this series the top of the range. It contains a bucket with a special anti-odor lid with a filter (washable cloth that can be regenerated many times using soap and water). You can install these bins in kitchen bases, specifically under the sink. Its installation on the bottom of the kitchen base with the 8 supplied self-tapping screws is easy and practical.

 Tile Doctor Ltd
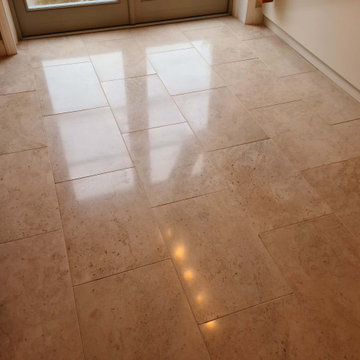
I recently went to survey a floor in Harrogate which I immediately recognised as beige Moleanos Limestone which comes from Portugal. If you have been reading my previous posts you will remember I am not a fan of this type of stone as it is very difficult to clean, polish or seal. This particular floor was laid around 5 years prior and was now looking quite dull and was in need of reviving.
The client didn’t want to spend much so l suggested l could spray burnish the floor to get her shine back again and remove the splash marks. We do this a lot for owners of polished stone floors as part of an annual maintenance package, it is a low cost option that uses a very fine 3,000 grit burnishing pad to renovate the stone and bring up the shine. However, I pointed out to her that this process wouldn’t clean her grout which was making her floor look scruffy.
I priced up the different options and after weighing up the quotes I’m pleased to say she decided to go for a full clean and seal. The full process involves the use of different grades of diamond encrusted burnishing pads from low to very fine grits to renovate the Limestone and also a chemical clean of the grout followed by a fresh seal.
I returned on the scheduled date and after preparing the floor I started cleaning the Limestone by running over the tiles with a 400-grit coarse burnishing pad lubricated with water. The soil was rinsed off with more water and extracted with a wet vacuum. This process was repeated with the 800 and 1500-grit pads which starts to build-up the polish on the stone.
I then turned my attention to the grout with a strong dilution of Tile Doctor Pro-Clean which was left to soak into the grout for ten minutes before scrubbing it by hand with a stiff brush. After a final rinse and extraction with the wet vacuum the tile and grout were looking much cleaner and was left to dry off overnight.
On Day 2 I stated with the application of the 3,000-grit pad which is the last step in the polishing processed and builds up a lovely satin finish on the stone floor. This is done using only a little water and is basically the spray burnish technique I referred to earlier. This process has the added advantage of leaving the floor dry.
With the stone tiles looking lovely and the grout clean the last step was to seal it all in and protect it from dirt and future staining with the application of a sealer. For this I used two coats of Tile Doctor Ultra Seal.
My client was very pleased she had spent the extra money to achieve the floor she had always wanted, apparently it had never looked this good even when new. We discussed the annual maintenance plan to ensure the floor remained looking this good.
Nigel Stoker
North West Yorkshire TIle Doctor


 Tile Doctor Ltd
This Tumbled Travertine tiled floor at a beautiful house in Horley had been poorly maintained through the years using the wrong type of sealer which quickly wore down allowing dirt to become ingrained in the stone. The owner had become concerned about the state of the tiles and decided it was time to call in an expert that could restore the tiles to a condition that complimented the environment in which it was situated.
Travertine is known for being very distinctive in character and very durable, making it a very popular choice for tiled flooring in properties worldwide. However, the stone does require regular professional maintenance and polishing to keep it looking it top shape and home owners rarely realise this when they decide to have it installed. Fortunately, in the UK at least you can rely on your local tile doctor to maintain it for you.
The first part of the job involved giving the floor a thorough clean to remove what was left of old sealers and any polishing compounds that remained on the floor. Before beginning that however I brought in all my equipment and products into the house and then prepped the area by taping up the woodwork to protect it during the renovation process.
To remove what was left of the old sealers and other coatings still present on the floor a strong solution of Tile Doctor Remove and Go was applied to the floor and left to soak in for about ten minutes before being actively worked in with a rotary machine fitted with a black scrubbing pad. The solution turned black with the soil as it was lifted out of the pores of the stone and it was then rinsed off with water and extracted with a wet vacuum.
Following this, we moved on to a process we know as burnishing that hones the stone and brings up the polished appearance. Working in sections due to the size of the floor It involves the application of a series of diamond encrusted burnishing pads from coarse through to very fine.
The coarse 400-grit pad fitted to the rotary floor buffer and run over the floor using only water for lubrication. The water turns into a slurry as the pad does its job removing dirt and this has to be rinsed off the floor and extracted with the wet vacuum before applying the next pad. The process was then repeated with medium 800 grit pad for an initial polish followed by the Fine 1500 grit pad for the second polish using water for lubrication and rinsing and extracting in between each pad.
The last pad is a very fine 3000 grit pad for the final polish and is applied with only a little water sprayed onto the floor using a technique we call a Spray Burnish. This last pad really brings up the polished appearance of the stone.
To bring up the appearance of the stone even further and add a really durable polish Tile Doctor Shine Powder was applied. This is a crystallising powder sealer that ensures a very high shine and a tough, durable finish. This powder is applied directly to the tiles in combination with approximately ½ a litre of water and a soft white buffing pad.
Last step was to add to the protection provided by the Shine Powder with two coats of Tile Doctor Ultra-Seal which is a natural look sealer that doesn’t change the look of the stone and is applied to the stone and grout. This sealer works by seeping into the stone, occupying the pores and preventing dirt from becoming ingrained.
The customer was ecstatic with the results, being particularly pleased that she got the floor looking the way she originally wanted without significant expense, not to mention stress.
Michael Conlon
East Surrey Tile Doctor


 Tile Doctor Ltd
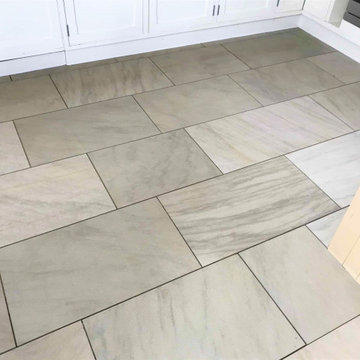
I received an enquiry from a property in Crowthorne to come and survey an unknown Flagstone Floor in a converted barn that was ready to be rented out. The owners where concerned the stone was letting the rest of the property down due to it being dirty and heavily stained, particularly around the kitchen and entrance areas. If your selling or renting out a property it really needs to look its best if you want to achieve a good price. Having spoken over the phone we agreed a date for me to pop over to complete a survey.
From further inspection I confirmed the stone was in fact a Sandstone, it was also clear that the sealer protecting the stone from ingrained dirt had worn away and was now allowing dirt and staining to ruin the appearance of the flagstones. It was a large floor so I measured up so I could work out the quantities of cleaning and sealing products needed and then walked the customer through the cleaning process. Later that day I sent over a detailed quotation which was accepted, and a date agreed for my return.
I should mention this work took place during the Covid restrictions, fortunately being a rental property, I was able to work in the property alone.
To deep clean the floor and remove the ingrained dirt and staining I used a strong dilution of Tile Doctor Pro-Clean. It is sprayed onto the floor and left to soak in for five minutes before agitating with a Black scrubbing pad fitted to a weighted buffing machine. The resultant slurry was then wet extracted away using a powerful high-pressure van mounted extracting system.
This action cleaned up most of the stone nicely however certain areas where heavily stained, particularly in the kitchen area where food and drink stains were more apparent. To tackle this, I applied a stronger cleaner/stripper product called Tile Doctor Remove and Go this time allowing ten minutes for it to soak in before scrubbing the surface with a very coarse 100-grit soft milling pad. This took quite a few attempts each time extracting the slurry away and then inspecting the floor to see if more work was needed.
Happy the stains have been removed, I then focused on renovating the surface Sandstone after the application of the coarse pad. This involves the application of several finer grit burnishing pads which close the pores and adds a subtle polish to the Sandstone. As I started with 100-grit pad it was necessary to gradually refine the surface with an incremental series of pads that included 200, 400 and finally 800-grit pads. Then to ensure a uniform finish across the floor I continued the 400 and 800 grit pads throughout the property. Water is used to lubricate the process and this turns into a fine slurry that is rinse extracted as before.
The cleaning process took up the whole of the first day and I am pleased to say the Sandstone floor looked very clean after I had finished.
The stone was then allowed dry off overnight with the aid of an industrial air mover and I returned later the next day to apply a new protective seal. In the meantime, my customer had been over to check out the floor and were over the moon with how it looked and wanted to keep the finish as natural as possible.
With this in mind, I applied Tile Doctor Ultra-Seal sealer to the Sandstone throughout, only two coats were needed. This is a premium sealer that is almost invisible and works by penetrating the stone thus preventing dirt from becoming ingrained. Once done the floor looked very clean and much brighter than before, it now had that wow factor which will help it attract a good yield in the rental market.
The trouble with rental properties of course is making sure the tenant uses the right product to maintain the floor and not a typical supermarket tile cleaner that are only designed for use on Ceramic and Porcelain tiles. In fact, these types of cleaning product can slowly strip the sealer off the floor so it’s always worth checking the label before purchasing. Fortunately Tile Doctor sells a product called Neutral Cleaner that is ideal for maintaining sealed stone floors, so I left them with a complimentary bottle and recommended they get some more to leave under the sink for the new tenant.
Dennis Buckland
Berkshire Tile Doctor
 Tile Doctor Ltd
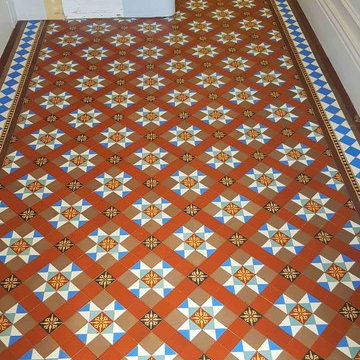
This beautiful Victorian tiled hallway was in desperate need of some TLC. The house had recently changed hands and the new owners of the house were having the entire property renovated. The last part of the renovation plan was to have the Victorian hallway tiles restoring back to their former glory. Floors are always best left until last, especially hallways as last as workmen don’t usually take a lot of care in my experience.
The house was built in the early 1900’s and was situated close to Doncaster town centre a couple of streets away in fact from the famous Doncaster Racecourse which dates to the late 1500’s.
There were a few areas of damage to the floor that would need dealing with first. This is not surprising given the age of the floor which must have seen a lot of comings and goings over the years. Our first task therefore was to repair the damage using replica tiles sourced to be as close a match to the originals as possible. We usually find any slight differences disappear once the floor has been deep cleaned and sealed. Once removing the damaged tile and cleaning the base we use a fast setting adhesive to fix the replacement tiles in place so we can get on with the cleaning as soon as possible.
Once the replacement tiles had set, we unloaded our slow speed rotary floor machine and large wet vacuum which would be used during the cleaning. To start the cleaning the floor was sprayed with Tile Doctor Remove & Go and this was left to dwell on the tiles for twenty minutes. This gives time for the product to break down old floor coatings and grime, this was followed by scrubbing the tiles with a 200-grit diamond pad fitted to the floor machine and assisted with the addition of more water to help lubricate the process. This process generates a lot of slurry as the dirt and old sealers etc are released from the tiles and this is extracted from the surface of the floor using the wet vacuum.
The next step was to give the floor an acid wash using Tile Doctor Acid Gel which is applied to the tiles and left to dwell for fifteen minutes and scrubbed in again with the floor buffer and 200-grit diamond pad. Once done the floor was rinsed with water and then dried using the wet vacuum to extract as much moisture as possible. This last process is designed to counter any alkaline salts that may be present in the floor which may cause efflorescence to appear later. It also removes old mineral deposits and generally get the tiles looking much brighter. Once complete the floor was left to dry off naturally overnight.
I came back the next day to seal the tiles first checking the floor was dry using a moisture meter. Satisfied that the floor was ready for sealing I started to seal the tiles using multiple coats of Tile Doctor Seal and Go Extra which is a fully breathable sealer which is important for old floors like this. Seal and Go Extra also leaves a lovely satin finish which works well on Victorian tiles and brings the floor alive.
This was the last step in this properties renovation, and I think you will agree that the floor responded really well to the restoration process and the colours in the tiles are now very vibrant.
Matthew Lovett
South Yorkshire Tile Doctor
 Environmental Solutions Services(ESS)
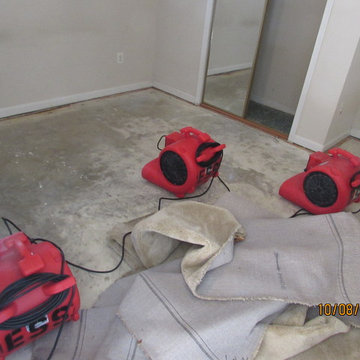
These dryers are facing the most saturated area of the room.
Home design - traditional home design idea in DC Metro
Home design - traditional home design idea in DC Metro
 Tile Doctor Ltd
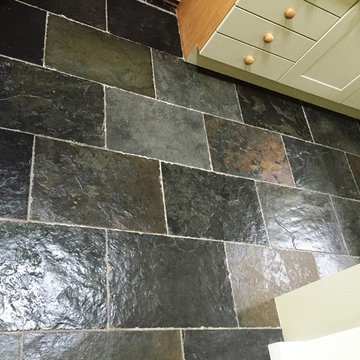
This small rough Chinese Slate floor in the kitchen of a house in the village of Cheadle near Stockport in Greater Manchester had not had any sealer put on it for many years and was very grubby (dishevelled as described by the customer) looking even after the customer had tried to clean it.
Sealers do take a lot of punishment, especially in a high traffic area such as a small kitchen and will wear off over time and once this happens the floor will start to lose its appearance as dirt becomes ingrained in the stone and it can no longer be cleaned effectively.
As we have to apply a liberal amount of water with this sort of work, the first step was to remove the Kicker boards at the bottom of the Kitchen units and silicone the Kitchen units that were fixed; this stops water seeping in and blowing the MDF allowing us to concentrate on cleaning the Slate without causing any damage.
I started the cleaning process by applying a strong dilution of Tile Doctor Pro-Clean to get rid of the built up dirt and any remaining sealer, leaving it to soak into the Slate before scrubbing the floor with a black scrub pad fitted to buffing machine running at slow speed. Tile Doctor Pro-Clean is a strong alkaline cleaner/stripper that is safe to use on natural stone, we do have stronger products available if required but in this case a strong dilution of Pro-Clean was sufficient to tackle any remaining sealer.
This process gave the Slate and grout lines a good deep clean and after rinsing the floor with water which was then extracted using a wet vacuum I repeated the process on stubborn areas until satisfied the floor was as clean and free of old sealer. Last stage of the cleaning process was to give the floor a final rinse and then get it as dry as possible using the wet vacuum to soak up the moisture.
The floor was quite small so I was able to leave the floor to dry off over lunch time and then on my return managed to get it fully dry with a little heat from a heat gun. The customer wanted a mat finish so once dry I applied Tile Doctor Colour Grow sealer which impregnates into the pores of the natural stone protecting it from within and enhancing the natural colours of the Slate at the same time.
For general cleaning of Sealed stone floors, we recommend the use of a PH Neutral Cleaner as anything with a strong PH will degrade the life of the sealer over time.
Steve Keary
Greater Manchester Tile Doctor
 Tile Doctor Ltd
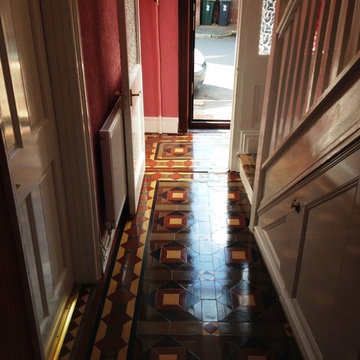
This Victorian tiled hallway at a house in the Forest of Dean had a very interesting pattern, consisting of an array of different colours, including shades of red, yellow and blue. Unfortunately, as you can see from the first photograph below, the tiles had lost all life, with the colours largely masked by months’ – or maybe even years’ – worth of ingrained dirt and muck. The floor as a whole was also suffering from a number of loose tiles that needed to be reset before it could be cleaned.
The property owner was keen to employ some professional assistance to restore the appearance of the floor and prevent it from getting in an even wrote state, and so contacted Tile Doctor who have a lot of experience working with Victorian tiled floors.
As mentioned, the loose tiles had to be repaired before the cleaning process could be started. I removed the tiles and extracted excess grout and old adhesive from the exposed concrete substrate using a vacuum, before putting the original tiles back into place and fixing them back into position carefully using fresh adhesive and matching grout.
Once happy the replaced tiles had set, I started the process of cleaning the entire area of hallway tiles using a combination of Tile Doctor Remove and Go to strip away the old sealer and Tile Doctor NanoTech HBU (formerly Ultra Clean) remover to get the tiles as clean as possible. The latter product contains nano-sized cleaning particles (hence the name) to reach difficult areas of trapped dirt, making it more effective than your run-of-the-mill tile cleaner. These two products were scrubbed into the tiles using a rotary machine fitted with a black scrubbing pad. The floor was then rinsed with water and the soiled residue was extracted with a wet vacuum.
I then paid particular attention to the grout, applying our alkaline-based multi-purpose cleaner Tile Doctor Pro-Clean to the grout lines, before scrubbing them with a narrow grout brush. This quickly had the grout looking clean again: I’d even go as far as to say that it matched it seamlessly with the fresh grout that had just been laid.
With the tile and grout as clean as it was possible to get it, I gave the whole floor a final rinse to neutralise the excess chemicals. I extracted as much water as possible with a wet vacuum and left the floor to dry overnight.
My first task upon returning to the property the next day was to check for any dampness. If you neglect to remove all excess moisture from the surface of the tiles before sealing it is more than likely going to cloud the sealer, rendering it less effective I’m protecting the stone against ingrained dirt and stains.
Once satisfied that the floor was completely dry, I proceeded to seal the tiles using multiple costs of Tile Doctor Seal and Go. Seal and Go is what we would classify as a topical sealer, meaning it rests on the surface of the tiles to act as a durable layer of protection against all kinds of muck. While providing surface protection, Seal and Go also adds a nice subtle sheen to the tiles, as per the customer’s request.
The customer was quite amazed at how quickly the appearance of the tiles had been restored. It was fantastic to see the colours we both knew were hidden in the tiles come to life once again. Another satisfied customer for sure!
Paul Wales
Monmouthshire Tile Doctor
 Tile Doctor Ltd
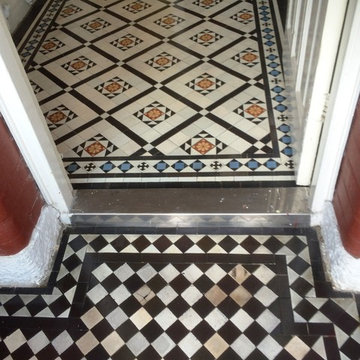
Recently I travelled down to the village of Prestwood in the Chiltern Hills of southern Buckinghamshire, to work on a Victorian tiled porch and hallway. Victorian tiles are commonly found in the entrance areas of older houses and unfortunately in this case the tiles had become heavily ingrained with dirt over time, and had suffered from additional paint and plaster spillages. The result was an unsightly mess; my client was considering covering the floor with lino after several unsuccessful attempts at cleaning it. I was called upon to provide a professional clean and seal, restoring these great Victorian tiles back to looking their best again.
On my first day at the house, I mixed up a solution of 50 per cent Tile Doctor Pro-Clean, a high alkaline cleaner, and NanoTech HBU (formerly known as Ultra Clean), which is a cleaning product that contains nano-sized abrasive particles that penetrate deep into the stone to lift ingrained dirt to the surface. This solution was worked into the tiles using abrasive scrubbing pads fitted to one of my commercial rotary machines.
The cleaning process left over a slurry of residue which I rinsed away with clean water and extracted with a wet vacuum. I was still left with the issue of stubborn paint spillages, so I applied a layer of Tile Doctor Remove & Go, a stripper with cleaning properties which is very effective at breaking down paint and adhesive stains.
Once the paint spillages had been dealt with I gave the area another rinse with clean water. I then left the house, allowing the floor enough time to dry overnight.
Upon my return the day I set about sealing the newly cleaned Victorian tiles. Before starting the sealing process I inspected the floor to check for any dampness, knowing that any excess moisture could potentially damage the performance of the sealer.
When I was satisfied that the tiles were fully dried, I applied Tile Doctor Seal & Go, a sealer which offers durable surface protection, along with an aesthetically pleasing, low-sheen finish which brings out the colour in the stone. This product can be used to seal internal, porous surfaces including Victorian, Slate, textured Quarry and Sandstone tiles.
The process made an amazing difference to the floor as you can see from the photographs; additionally the restoration of such an original feature adds a lot of value and looks so much better than lino!
Colin Ford
South Buckinghamshire Tile Doctor
 Tile Doctor Ltd
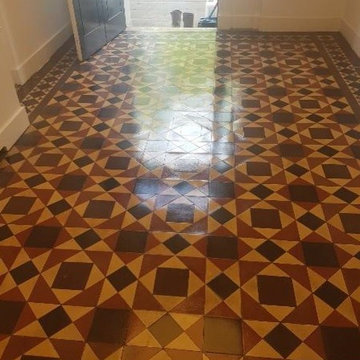
These are photos of a Victorian tiled floor we renovated at the new Scottish head office of the Peoples Postcode Lottery in the centre of Edinburgh City where the building was going through a multi million pound refurbishment. Edinburgh has a lot of Georgian and Victorian architecture, much of which is listed and as a result many still have original Victorian tiled flooring.
I’ve not really looked at the Postcode Lottery until now but put simply you give the lottery £10 a month and your postcode is your winning ticket number, there are prize draws every day and if your postcode comes up every one in the system with that postcode wins; they also give 31% to charity which is impressive.
You can see from the photograph that the floor was in good physical condition but was looking tired and dull. This is not unusual for Victorian tiles as once the sealer wears down dirt can penetrate into the pores of the tile causing it to lose its appearance.
On the first day we set about stripping the floor of what remained of the old sealant using a strong dilution of Tile Doctor Pro-Clean which is an industrial strength alkaline tile and grout cleaning product that is safe to use on Tile and Stone. The product is applied to the floor, left to soak in for ten minutes and the scrubbed into the tile using a black scrubbing pad fitted to a rotary bonnet machine. The floor was then rinsed and the now soiled cleaning solution extracted using a wet vacuum.
The process was repeated several times until we were happy the floor was clean and free of sealer and then given a final rinse with water. Before leaving for the day the floor was dried as much as possible using the wet vacuum to extract as much moisture as possible.
On the second day our first task was to check the floor with a damp meter in several places to ensure the tiles had dried off overnight. All was well and we began the process of sealing the floor with a Tile Doctor Seal and Go. This is a topical sealer which provides a high-quality low-sheen finish and protection against ingrained dirt and stains.
Victorian tiles are quite porous and five coats were needed to fully seal the floor. This took some time to complete as you have to wait until the first coat is dry before applying the next however it was well worth the effort as the floor looked fantastic afterwards.
Thomas Wilson
Edinburgh Tile Doctor
 Williamsons Kitchens
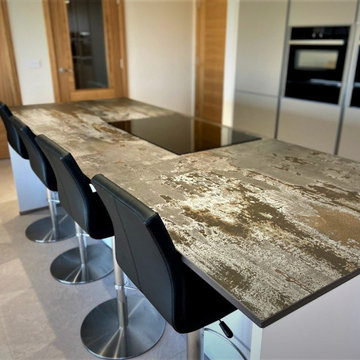
Our client was in the process of building a new house to their specification in Fraserburgh. The centrepiece? A contemporary, open-plan kitchen that not only serves as a functional space but also as an inviting hub for family gatherings.
Opting for the Nolte SoftLack range, we integrated the Silver MatrixArt handleless trims, complemented by elegant integrated lighting. The main furniture showcases a soothing Sahara hue, contrasted smartly by the Lava accent.
The 20mm Dekton Trilium worktop exudes sophistication, while the 40mm Nolte Platinum Bough Oak table adds a touch of warmth. We included a full suite of NEFF appliances: a single oven, combination microwave, induction hob, ceiling extraction, and a full-height fridge and freezer, meeting every culinary need.
Special requests are what make a design truly personal. We incorporated a Blanco Subline undermounted sink in Alumetallic, a state-of-the-art Quooker Fusion Square Stainless Steel instant boiling water tap, and durable Pergo flooring. Notably, the elevated dishwasher was positioned conveniently beside the sink, based on the client's preference. The tall units were seamlessly integrated into the ceiling, complemented by an artful goal-post niche. Furthermore, the extractor finds its home within a stylish ceiling drop box, highlighted by a subtly lit stepped ledge.
Dreaming of your own bespoke kitchen? Let us transform your vision into reality.
 Williamsons Kitchens
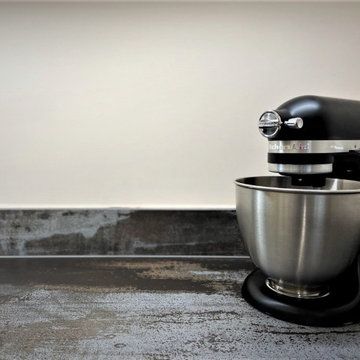
Our client was in the process of building a new house to their specification in Fraserburgh. The centrepiece? A contemporary, open-plan kitchen that not only serves as a functional space but also as an inviting hub for family gatherings.
Opting for the Nolte SoftLack range, we integrated the Silver MatrixArt handleless trims, complemented by elegant integrated lighting. The main furniture showcases a soothing Sahara hue, contrasted smartly by the Lava accent.
The 20mm Dekton Trilium worktop exudes sophistication, while the 40mm Nolte Platinum Bough Oak table adds a touch of warmth. We included a full suite of NEFF appliances: a single oven, combination microwave, induction hob, ceiling extraction, and a full-height fridge and freezer, meeting every culinary need.
Special requests are what make a design truly personal. We incorporated a Blanco Subline undermounted sink in Alumetallic, a state-of-the-art Quooker Fusion Square Stainless Steel instant boiling water tap, and durable Pergo flooring. Notably, the elevated dishwasher was positioned conveniently beside the sink, based on the client's preference. The tall units were seamlessly integrated into the ceiling, complemented by an artful goal-post niche. Furthermore, the extractor finds its home within a stylish ceiling drop box, highlighted by a subtly lit stepped ledge.
Dreaming of your own bespoke kitchen? Let us transform your vision into reality.
 Tile Doctor Ltd
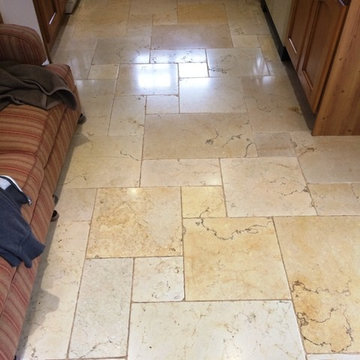
Polished stone floors will lose their shine over time depending on the amount of wear and cleaning products used and this Travertine Tiled Floor in Lower Woodrow had basically experienced this problem. The solution is to burnish the floor with diamond encrusted pads, a process that will remove any dirt and bring back the polish.
We started by smothering the floor is a mild dilution of Tile Doctor Pro-Clean and left it to dwell for ten minutes. We then scrubbed the grout lines using a stiff grout brush to get the grout clean. Next we fitted a course diamond burnishing pad to a rotary machine and slowly burnished each and every tile. We then extracted the slurry using a wet vacuum and rinsed. We continued this procedure with the medium, fine and very fine pads rinsing in-between until the shine had been restored. We then left the floor overnight to dry.
Upon our return we sealed the floor using Tile Doctor Colour Grow which is an impregnating sealer that soaks into he pores of the stone protecting it from within and enhancing the natural colours in the stone. Once the seal had dried I used a white buffing pad attached to the rotary machine and buffed the travertine to a nice shine.
Stuart Ford
Wiltshire Tile Doctor
1