
Search results for "Extracts" in Home Design Ideas
 Hoke Ley
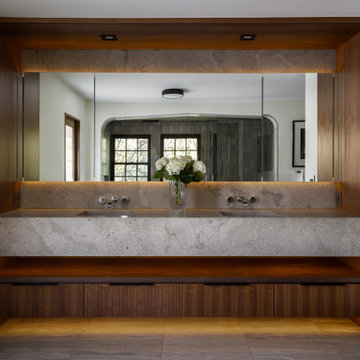
As designers, we have a responsibility to honor the planet we extract precious materials from. One of the best ways that we can do this is by creating spaces that are timeless in their aesthetic, eliminating the desire to tear out and replace what is still in great physical condition.
We used Missouri-mined @phenixmarble extensively throughout the interior and exterior of the Oakwood Residence. The seamless vanity, custom depressed arch, wall base, and shower feature fossilized Fleuri slabs while the floor, wall, and ceiling tile feature various sizes of Napoleon Gray marble.
Our hope is that this beautiful natural stone serves many generations of homeowners over its lifetime.
Plumbing fixtures are Kohler Components. Switches and outlets are Legrand Adorne. Decorative lighting by Rejuvenation. Custom walnut cabinetry. Custom marble tile, countertop, sinks, and wall base in Phenix Fleuri and Napoleon Gray.
 Spin Design Limited
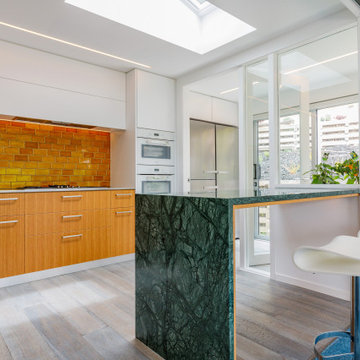
The kitchen and Dining areas are a popular gathering spot in most homes. A lot of entertaining is done in this room as family and friends gather in an area close to where meals and appetizers are being prepared. It also is a place where the family may meet at the end of the day to talk about the day’s events.
There is no doubt about the fact that these spaces are where memories are made and shared on a regular basis.
The colour of the earth beneath your feet, a cup of coffee in the morning, a dollop of honey on toast and a bar of caramel chocolate. The tiles bring warmth and contentment to the space. MIDDLE EARTH TILES’ GOLDEN MANUKA Tile was laid with 33% offset. The tile was chosen as not only for the wonderful tone in colour, but because Middle Earth tiles are a “Cradle to Grave” product. The raw material are extracted close to the manufacturing site, they will last for many years, even centuries and the designs are timeless. Middle Earth tiles can be returned to the environment with no ill effects at the end of their life cycle.
The European Oak Rutherglen Engineered Wood Flooring was chosen because of its subtle blue hue. Continuing the theme of the sea from the carpet. The grain of the wood adds texture and interest and works beautifully with all the other materials in the space.
The VERDE GUATAMALA Stone BENCHTOP is simply gorgeous. Its intensity of colour and its grain make for a wonderful feature island benchtop. The clients fell in love with this stone, as for them it evoked Pounamu.
 24-7 LOCKOUT
24-7 Lockout offers Up to 50% Discounts for Residential & Automotive locksmith services.
☑️Re-key 3 Locks & Get 1 for Free:
https://www.24-7lockout.com/rekey-services
☑️Re-key 5 Locks & Get 2 for Free https://www.24-7lockout.com/rekey-services
☑️AUTOMOTIVE KEYS
Buy 1 get 1 for 50% OFF https://www.24-7lockout.com/automotive-locksmith
☑️RESIDENTIAL LOCKS
Buy 2 Locks & get 1 for free https://www.24-7lockout.com/residential
☑️COMMERCIAL LOCKS
Buy 2 Locks get 1 for 50% OFF https://www.24-7lockout.com/commercial-locksmith
☑️LOCKOUTS SERVICES:
25% OFF - 1st time customer received https://www.24-7lockout.com/emergency-locksmith-services
For more information, you can contact us at:
✅ Email: service247lockout@gmail.com
✅ WhatsApp: https://wa.me/14088999039
✅ Yelp: https://m.yelp.com/biz/24-7-lockout-sunnyvale-3
✅ Website: WWW.24-7Lockout.com
• Top Local Mobile Locksmith Services •
#car_Keys #cars_Keys_sunnyvale #SunnyvaleCA #BMW #BENZ #Locksmith #Tool_ #Programdevice #DiagnosticDevice #KeyProgramming #Locksmith #Automotive #Diagnostic_tool #CarDiagnostic #CarProgram #basic_diagnostic #new_year #christmas #promotion #special_price #limited_time #Gift #Price #Offer #SunnyvaleCA #24_7lockout #California #mobilelocksmithservices
Find the right local pro for your project
 Hoke Ley
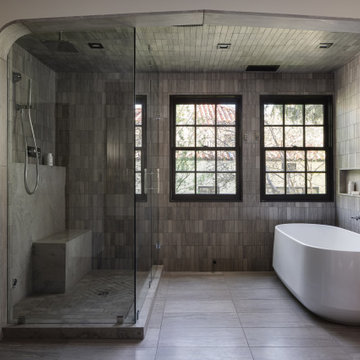
As designers, we have a responsibility to honor the planet we extract precious materials from. One of the best ways that we can do this is by creating spaces that are timeless in their aesthetic, eliminating the desire to tear out and replace what is still in great physical condition.
We used Missouri-mined @phenixmarble extensively throughout the interior and exterior of the Oakwood Residence. The seamless vanity, custom depressed arch, wall base, and shower feature fossilized Fleuri slabs while the floor, wall, and ceiling tile feature various sizes of Napoleon Gray marble.
Our hope is that this beautiful natural stone serves many generations of homeowners over its lifetime.
Plumbing fixtures are Kohler Components. Freestanding bathtub in Kohler Ceric. Steam shower with Kohler Anthem and Kohler Components trims. Switches and outlets are Legrand Adorne. Decorative lighting by Rejuvenation. Custom walnut cabinetry. Custom marble tile, countertop, sinks, and wall base in Phenix Fleuri and Napoleon Gray.
 DHD Architecture and Interior Design
Emily Andrews
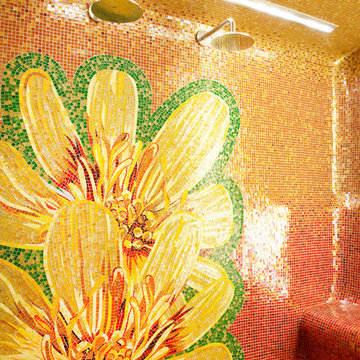
Trendy multicolored tile and mosaic tile double shower photo in New York
Trendy multicolored tile and mosaic tile double shower photo in New York


 Tile Doctor Ltd
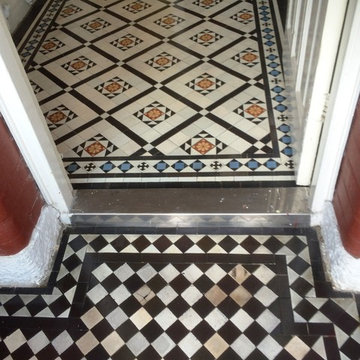
I thought I would share this case history of a Yellow and Black Victorian Tiled floor that we worked on at a large house in Lancaster last year. It’s a great example of the typical problems we face with old Victorian floors, especially around door thresholds where the transition between the different foundation invariable cause problems.
I didn’t know the full history of the floor, but it was now in quite a state and recent renovation work had left the floor unstable with loose and cracked tiles. The tiles needed to be removed and then the damaged subfloor carefully scraped out and replaced. Once that was done the floor would need relaying and then cleaned and sealed so everything would blend in.
After visiting the property and providing a quotation we were given the go ahead and agreed a date to do the work.
We returned on the agreed date and set about carefully removing the loose and cracked Victorian tiles and put them aside for later use. Some would need replacing however this would not present a problem and they are still widely available, and I have several contacts I can turn to for this.
Once this was done and the subfloor exposed and cleaned up, I used self-levelling cement to bring the floor level up and in-line with the existing. This now needed to set hard, so the rest of the day was spent cleaning up the tiles we removed earlier with Tile Doctor Grout Clean-up and Pro-clean. Our goal is to reuse as many of the original tiles as possible to preserve the heritage of the floor.
The next day with the new subfloor set it was ready for tiling. This involves laying out the tiles first without adhesive carefully cutting and fitting new tiles as needed to maintain the overall pattern of the floor. Once I was happy the tiles were moved to a board and then fitted with fresh adhesive.
I came back on day three with the aim of cleaning the floor so it could be sealed however whilst inspecting my new tiling I was disappointed to discover some were not as level as I had hoped. I had noticed the replacement tiles were not the same thickness as the originals the previous day but I had worked around this by using different levels of adhesive, clearly this plan was not as effective as I had hoped for.
To counter this problem, I used a set of 50-Grit, 100-grit and then 200-grit diamond pads in sequence to mill the floor flat and remove the lippage between them. This is done with water to lubricate the process and a weighted floor buffer. The pads generate a lot of slurry and so you need to rinse this off with more water and extract all the soil after each pad.
I followed this up with various Diamond burnishing pads of increasingly finer grits across the whole floor until we achieved a consistent finish and had the added benefit of getting the whole floor clean. More water is used to rinse the tiles after burnishing and the soil extracted with a wet vacuum as before. Once done and inspected the floor was left to dry off overnight.
Tile Doctor Colour Grow was applied to enhance the appearance of the tiles and protect them going forward. This product copes well with damp which can always be a problem with old floors like this one with no damp proof membrane present.
The floor looked amazing when finished and our attention to detail had really paid off, in fact you simply could not tell we had done any tiling work or replaced any tiles. For aftercare I recommend the use of Tile Doctor Neutral Cleaner which is designed for the regular cleaning of sealed tiles.
Russell Taylor
Lancashire Tile Doctor
 Tile Doctor Ltd
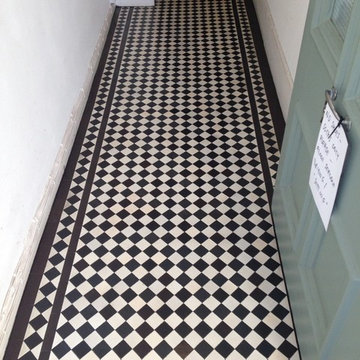
Recently I travelled down to the village of Prestwood in the Chiltern Hills of southern Buckinghamshire, to work on a Victorian tiled porch and hallway. Victorian tiles are commonly found in the entrance areas of older houses and unfortunately in this case the tiles had become heavily ingrained with dirt over time, and had suffered from additional paint and plaster spillages. The result was an unsightly mess; my client was considering covering the floor with lino after several unsuccessful attempts at cleaning it. I was called upon to provide a professional clean and seal, restoring these great Victorian tiles back to looking their best again.
On my first day at the house, I mixed up a solution of 50 per cent Tile Doctor Pro-Clean, a high alkaline cleaner, and NanoTech HBU (formerly known as Ultra Clean), which is a cleaning product that contains nano-sized abrasive particles that penetrate deep into the stone to lift ingrained dirt to the surface. This solution was worked into the tiles using abrasive scrubbing pads fitted to one of my commercial rotary machines.
The cleaning process left over a slurry of residue which I rinsed away with clean water and extracted with a wet vacuum. I was still left with the issue of stubborn paint spillages, so I applied a layer of Tile Doctor Remove & Go, a stripper with cleaning properties which is very effective at breaking down paint and adhesive stains.
Once the paint spillages had been dealt with I gave the area another rinse with clean water. I then left the house, allowing the floor enough time to dry overnight.
Upon my return the day I set about sealing the newly cleaned Victorian tiles. Before starting the sealing process I inspected the floor to check for any dampness, knowing that any excess moisture could potentially damage the performance of the sealer.
When I was satisfied that the tiles were fully dried, I applied Tile Doctor Seal & Go, a sealer which offers durable surface protection, along with an aesthetically pleasing, low-sheen finish which brings out the colour in the stone. This product can be used to seal internal, porous surfaces including Victorian, Slate, textured Quarry and Sandstone tiles.
The process made an amazing difference to the floor as you can see from the photographs; additionally the restoration of such an original feature adds a lot of value and looks so much better than lino!
Colin Ford
South Buckinghamshire Tile Doctor
 Tile Doctor Ltd
This Victorian floor was discovered at a house in Swiss Cottage in the London borough of Camden when the current owner took the old carpet up. It was in need of substantial restoration to bring it back to its former glory however we have had really good results from restoring similar floors so we were confident it could be done.
The carpet had literally just been taken away so we had to remove the gripper rods, underlay and deal with the adhesive which we managed to tackle using a strong solution of Tile Doctor Remove and Go which was left to dwell and penetrate the glue for ten minutes before being scrubbed in.
Once the glue was removed the tiles were given a thorough clean using Tile Doctor Pro-Clean using the same process of leaving it to soak in and then actively scrubbing it into the floor to get the tile and grout as clean as possible. The floor was then rinsed and stubborn areas re-treated until we were satisfied with the result.
The last cleaning step was to use a steam cleaner to pull as much dirt out of the pores of the tiles as possible and a wet vacuum to extract the liquids and get the floor as dry as possible and we also re-grouted where necessary due to the damage caused by the gripper rods.
We also gave the Victorian tiles in the entrance lobby a thorough clean using the same process, although they had not been covered in carpet they were still in need of a deep clean.
The floor was left to dry and when we returned the whole floor was ready to be sealed and for this we used five coats of Tile Doctor Seal and Go which adds a nice shine to the floor as well as providing a surface seal that will help protect the tiles from stains going forward. For the entrance lobby we used two coats of Colour Grow which doesn’t add the shine but as an impregnating sealer we felt it would perform better with the wear at the front of the house.
The owner of the house was very pleased with the outcome and left the following testimonial:
Prompt, courteous, hard working and great results !.
Nigel Voyce
North London Tile Doctor
 Tile Doctor Ltd
My client had recently moved into a bungalow in Godalming where they inherited the Limestone tiled kitchen floor pictured below. The previous owner had not looked after the floor very well and by the time they moved in it was pretty filthy. Limestone is a natural but porous stone where, unless sealed, attracts dirt into its tiny holes and as you would expect Cream Limestone shows the dirt easily. The protective seal had long since worn off this floor and was now ingrained with dirt it was now looking permanently dirty.
Before quoting I conducted a small test clean to work out the best method to renovate the stone and this also gives the client a good idea of how the floor will look after its finished. They were delighted with the initial result and happy with my quote gave me the go ahead.
On arrival first I helped the customer remove his tables and chairs and I then set about tapping up the plinths in the kitchen and the skirtings to protect them from cleaning solutions and equipment. The cleaning equipment I have invested in works more efficiently in open spaces, so it’s worth spending time at the beginning preparing the area first.
Next, I used a deck brush to apply a mixture of water and Tile Doctor Pro-Clean to the dirtiest tiles. Tile Doctor Pro-Clean works well when left to dwell for ten minutes or so. I also applied the same product to the grout over half the room so it could get a head start breaking down the dirt. Then using a stiff brush, I scrubbed the grout clean. Once it was worked loose, I extracted the now dirty solution with a wet vacuum.
With the grout clean I turned my attention back to the tiles with where the Pro-Clean had been left to soak in. Giving them a quick brush, I noted that what appeared to be permanently ingrained dirt had now come loose. To get the tiles really clean I used a 17″ rotary machine fitted with diamond encrusted buffer pads. This removes the tiny dots of dirt on the stone and with it comes any existing sealer and dirt.
A set of four burnishing pads were used, starting with a 400-grit, and finishing with a 3000-grit pad. The first 400-grit pad is coarse, and the grits become smoother as you work through the set. Water is used to lubricate the process and the released dirt is extracted in-between using the wet vacuum mentioned earlier. This process does take time but by the end of day one the floor was looking a lot better.
The next step is sealing however the floor needs to be bone dry for that, so I left a couple of industrial fans in place and left the Limestone to dry off overnight.
Returning the following day my first job was to ensure the floor was dry by taking multiple moisture readings with a damp meter. The readings were good, so I was able to make a start applying the sealer which for this floor was Tile Doctor Ultra Seal.
Ultra-Seal is an impregnating sealer that soaks into those small holes in the stone I mentioned earlier, I occupies the pores thus preventing dirt from becoming ingrained. The other feature of this sealer is it doesn’t change the appearance or colour of the stone leaving it with a very natural finish. Two coats of sealer were applied, leaving the seal to dry between each coat.
After the final coat was dried, I gave it a final polish with a soft nylon pad and the floor was finished. Before leaving we discussed after care which for this floor, I recommended Tile Doctor Stone Soap and I requested that the customer to stay out of the kitchen for a couple of hours while the sealer cured. They were over the moon with the new floor and could not believe the difference it had made to their kitchen.
Rupert Mcleod
West Surrey Tile Doctor
 Williamsons Kitchens
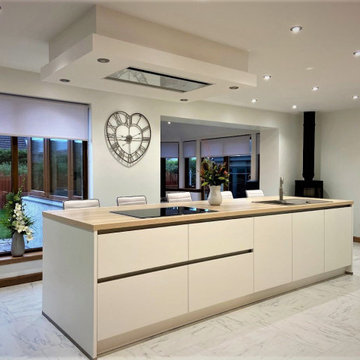
The client approached us with a clear vision in mind for their kitchen in Fraserburgh: an open-plan, modern design that would accommodate their large family. Essential to this vision was the integration of an island, complete with a secondary eating area. This space was not only to be visually appealing but also functionally efficient, as it would need to cater to family gatherings and daily activities. The desire for ample seating and a spacious table, along with additional specific storage solutions, set the stage for our design choices.
Drawing inspiration from the client's requirements, we opted for the Nolte Feel range, complemented by Silver MatrixArt handleless trims. The primary colour for the furniture was chosen as white, with a contrasting accent in Feel Lava to add a touch of modern sophistication. To further enhance the open feel, we made structural modifications: the existing kitchen window was lowered to usher in more natural light and provide an improved viewing angle. Additionally, the entrance to the sun lounge was broadened to foster a more expansive atmosphere.
A kitchen's functionality is determined largely by its worktops and appliances. For this space, we used a sturdy 40mm thick Nolte Silver Ash worktop, providing both durability and style. In terms of appliances, we decided upon NEFF's range, which included a single oven, combination microwave, induction hob, and ceiling extraction, ensuring the client's culinary needs were well catered for.
Recognising the family's unique requirements, we introduced several bespoke features. The Blanco Metra sink in Tartufo and the Quooker Fusion Square Stainless Steel instant boiling water tap combined functionality with modern aesthetics. With the client's large family in mind, we constructed a matching Nolte table and a built-in seating bench replete with storage drawers, maximising both seating and storage. Additionally, a custom-built unit for log storage was designed, mirroring the style of the kitchen, to serve their log-burning stove. The flooring, using Quickstep Arte, tied everything together, adding a touch of elegance to the room.
Experience your dream kitchen with us. Reach out today to start your bespoke kitchen journey.
 Tile Doctor Ltd
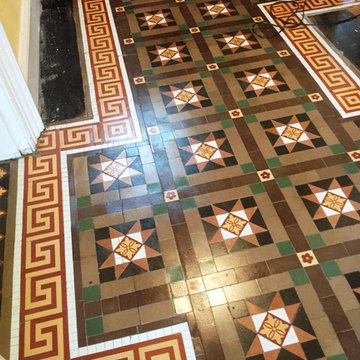
As you can see from the photographs below this Victorian tiled hallway was in quite a state and not only needed a thorough clean and fresh seal but needed to be rebuilt in parts.
Leamington Spa or Royal Leamington Spa to give its full name is one of the original UK Spa towns where people would visit to bathe the waters which are supposed to have medicinal properties, the town has many regency period properties and so Victorian floors
A good 30% of the floor tiles were lose and it took three days to rebuild the screed levelling compound before refitting loose tiles and new ones had to be cut to size, fixed in place and then re-grouted.
On day 4 a 400 grit coarse burnishing pad was applied to clean up the whole floor.
This was followed by scrubbing the tile and grout with Tile Doctor Pro-clean mixed 50/50 with NanoTech HBU remover followed by Remove and Go and finally treated with Acid Gel to remove the grout haze. After that the White tiles were steam cleaned to get them as clean and white as possible.
The floor was thoroughly rinsed after each treatment and the slurry extracted using a wet vacuum.
I left the floor for 5 days so it could thoroughly dry out and settle following the numerous treatments and then came back to seal the tiles, I used a damp test meter first to verify the floor was dry and ready for sealing. Once happy I proceed to apply a couple of coats of Tile Doctor Colour Grow which is a colour enhancing sealer that soaks into the tile protecting it from within and leaves a matt finish.
A lot of work went into restoring this floor but I’m really pleased with the way it came out and as you can imagine the owner was really happy with the transformation that had taken place in their house.
Mick Gayton
Warwickshire Tile Doctor
 Williamsons Kitchens
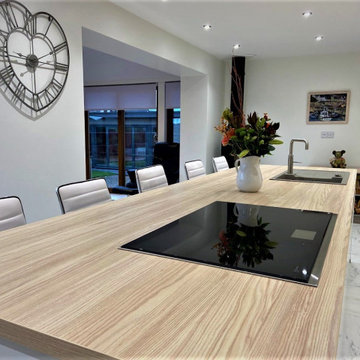
The client approached us with a clear vision in mind for their kitchen in Fraserburgh: an open-plan, modern design that would accommodate their large family. Essential to this vision was the integration of an island, complete with a secondary eating area. This space was not only to be visually appealing but also functionally efficient, as it would need to cater to family gatherings and daily activities. The desire for ample seating and a spacious table, along with additional specific storage solutions, set the stage for our design choices.
Drawing inspiration from the client's requirements, we opted for the Nolte Feel range, complemented by Silver MatrixArt handleless trims. The primary colour for the furniture was chosen as white, with a contrasting accent in Feel Lava to add a touch of modern sophistication. To further enhance the open feel, we made structural modifications: the existing kitchen window was lowered to usher in more natural light and provide an improved viewing angle. Additionally, the entrance to the sun lounge was broadened to foster a more expansive atmosphere.
A kitchen's functionality is determined largely by its worktops and appliances. For this space, we used a sturdy 40mm thick Nolte Silver Ash worktop, providing both durability and style. In terms of appliances, we decided upon NEFF's range, which included a single oven, combination microwave, induction hob, and ceiling extraction, ensuring the client's culinary needs were well catered for.
Recognising the family's unique requirements, we introduced several bespoke features. The Blanco Metra sink in Tartufo and the Quooker Fusion Square Stainless Steel instant boiling water tap combined functionality with modern aesthetics. With the client's large family in mind, we constructed a matching Nolte table and a built-in seating bench replete with storage drawers, maximising both seating and storage. Additionally, a custom-built unit for log storage was designed, mirroring the style of the kitchen, to serve their log-burning stove. The flooring, using Quickstep Arte, tied everything together, adding a touch of elegance to the room.
Experience your dream kitchen with us. Reach out today to start your bespoke kitchen journey.
 Williamsons Kitchens
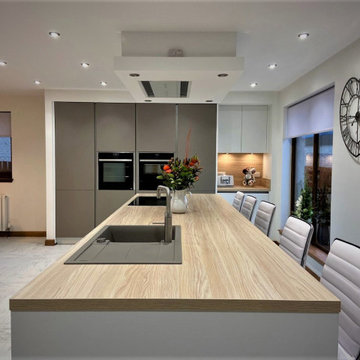
The client approached us with a clear vision in mind for their kitchen in Fraserburgh: an open-plan, modern design that would accommodate their large family. Essential to this vision was the integration of an island, complete with a secondary eating area. This space was not only to be visually appealing but also functionally efficient, as it would need to cater to family gatherings and daily activities. The desire for ample seating and a spacious table, along with additional specific storage solutions, set the stage for our design choices.
Drawing inspiration from the client's requirements, we opted for the Nolte Feel range, complemented by Silver MatrixArt handleless trims. The primary colour for the furniture was chosen as white, with a contrasting accent in Feel Lava to add a touch of modern sophistication. To further enhance the open feel, we made structural modifications: the existing kitchen window was lowered to usher in more natural light and provide an improved viewing angle. Additionally, the entrance to the sun lounge was broadened to foster a more expansive atmosphere.
A kitchen's functionality is determined largely by its worktops and appliances. For this space, we used a sturdy 40mm thick Nolte Silver Ash worktop, providing both durability and style. In terms of appliances, we decided upon NEFF's range, which included a single oven, combination microwave, induction hob, and ceiling extraction, ensuring the client's culinary needs were well catered for.
Recognising the family's unique requirements, we introduced several bespoke features. The Blanco Metra sink in Tartufo and the Quooker Fusion Square Stainless Steel instant boiling water tap combined functionality with modern aesthetics. With the client's large family in mind, we constructed a matching Nolte table and a built-in seating bench replete with storage drawers, maximising both seating and storage. Additionally, a custom-built unit for log storage was designed, mirroring the style of the kitchen, to serve their log-burning stove. The flooring, using Quickstep Arte, tied everything together, adding a touch of elegance to the room.
Experience your dream kitchen with us. Reach out today to start your bespoke kitchen journey.

 Coronado Stone Products
This beautiful Toll Brothers designed outdoor living space is accented with Coronado Stone Products Playa Vista Limestone / Cream. The gorgeous pool and indoor-outdoor living space is tied together with the unique stone veneer textures and colors. This is the perfect environment to enjoy summertime fun with family and friends!
 Williamsons Kitchens
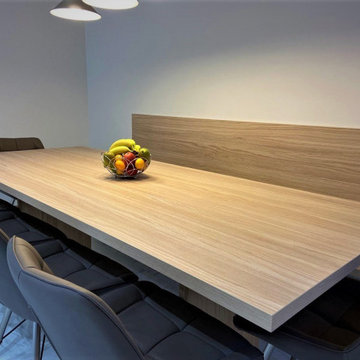
The client approached us with a clear vision in mind for their kitchen in Fraserburgh: an open-plan, modern design that would accommodate their large family. Essential to this vision was the integration of an island, complete with a secondary eating area. This space was not only to be visually appealing but also functionally efficient, as it would need to cater to family gatherings and daily activities. The desire for ample seating and a spacious table, along with additional specific storage solutions, set the stage for our design choices.
Drawing inspiration from the client's requirements, we opted for the Nolte Feel range, complemented by Silver MatrixArt handleless trims. The primary colour for the furniture was chosen as white, with a contrasting accent in Feel Lava to add a touch of modern sophistication. To further enhance the open feel, we made structural modifications: the existing kitchen window was lowered to usher in more natural light and provide an improved viewing angle. Additionally, the entrance to the sun lounge was broadened to foster a more expansive atmosphere.
A kitchen's functionality is determined largely by its worktops and appliances. For this space, we used a sturdy 40mm thick Nolte Silver Ash worktop, providing both durability and style. In terms of appliances, we decided upon NEFF's range, which included a single oven, combination microwave, induction hob, and ceiling extraction, ensuring the client's culinary needs were well catered for.
Recognising the family's unique requirements, we introduced several bespoke features. The Blanco Metra sink in Tartufo and the Quooker Fusion Square Stainless Steel instant boiling water tap combined functionality with modern aesthetics. With the client's large family in mind, we constructed a matching Nolte table and a built-in seating bench replete with storage drawers, maximising both seating and storage. Additionally, a custom-built unit for log storage was designed, mirroring the style of the kitchen, to serve their log-burning stove. The flooring, using Quickstep Arte, tied everything together, adding a touch of elegance to the room.
Experience your dream kitchen with us. Reach out today to start your bespoke kitchen journey.
 Tile Doctor Ltd
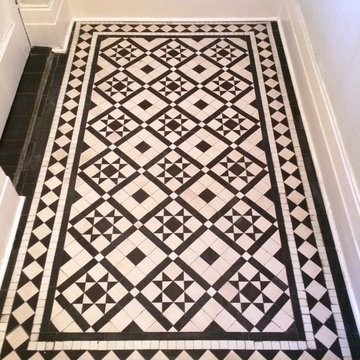
This job was at a house in near Windermere in South Cumbria, a place which is very popular amongst tourists to the Lake District. My client had a Black and White Victorian tiled floor in dire need of a clean and re-seal.
Prior to the application of any cleaning products, my first task was to run damp tests to make sure there were no inherent damp problems. With old floors of this type it’s good to know if there is a damp problem as this will affect the choice of sealer and also the length of time the floor requires to dry.
Fortunately, there were no damp issues present, and I was able to proceed however had the floor been damp and being December I would have offered to carry out the clean and seal in the Summer, when the water tables were lower and the damp levels would be more settled, thus creating a better environment for the sealer to operate in.
I started cleaning the Victorian tiles with Tile Doctor Remove & Go, a product which breaks down old sealers in preparation for a fresh seal to be applied. The product is diluted with water and then scrubbed into the floor with a scrubbing pad fitted to rotary machine; the resulting slurry is then removed using a wet vacuum.
Next step was to apply Tile Doctor Pro-Clean which was applied liberally to the floor, left to dwell for a short period and then agitated with a black scrubbing pad to lift out the ingrained dirt. I also paid special attention to cleaning the grout lines with a stiff scrubbing brush. The floor was then rinsed with clean water, and the resulting residue was extracted using a wet-vac machine.
After the cleaning was completed, the tiles were left for a couple of days to allow them ample time to dry. Upon my return to the house I checked the damp levels again and then applied two coats of the impregnating, colour enhancing sealer Tile Doctor Colour Grow which gives the black tiles more depth of colour, along with the robust surface seal and Matt finish my client had requested.
My client was exceptionally pleased the results – but really, the photographs speak for themselves.
Heidi Taylor
South Cumbria
 Williamsons Kitchens
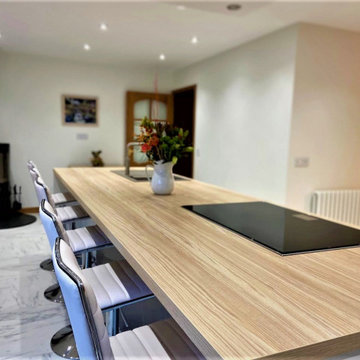
The client approached us with a clear vision in mind for their kitchen in Fraserburgh: an open-plan, modern design that would accommodate their large family. Essential to this vision was the integration of an island, complete with a secondary eating area. This space was not only to be visually appealing but also functionally efficient, as it would need to cater to family gatherings and daily activities. The desire for ample seating and a spacious table, along with additional specific storage solutions, set the stage for our design choices.
Drawing inspiration from the client's requirements, we opted for the Nolte Feel range, complemented by Silver MatrixArt handleless trims. The primary colour for the furniture was chosen as white, with a contrasting accent in Feel Lava to add a touch of modern sophistication. To further enhance the open feel, we made structural modifications: the existing kitchen window was lowered to usher in more natural light and provide an improved viewing angle. Additionally, the entrance to the sun lounge was broadened to foster a more expansive atmosphere.
A kitchen's functionality is determined largely by its worktops and appliances. For this space, we used a sturdy 40mm thick Nolte Silver Ash worktop, providing both durability and style. In terms of appliances, we decided upon NEFF's range, which included a single oven, combination microwave, induction hob, and ceiling extraction, ensuring the client's culinary needs were well catered for.
Recognising the family's unique requirements, we introduced several bespoke features. The Blanco Metra sink in Tartufo and the Quooker Fusion Square Stainless Steel instant boiling water tap combined functionality with modern aesthetics. With the client's large family in mind, we constructed a matching Nolte table and a built-in seating bench replete with storage drawers, maximising both seating and storage. Additionally, a custom-built unit for log storage was designed, mirroring the style of the kitchen, to serve their log-burning stove. The flooring, using Quickstep Arte, tied everything together, adding a touch of elegance to the room.
Experience your dream kitchen with us. Reach out today to start your bespoke kitchen journey.
 Tile Doctor Ltd
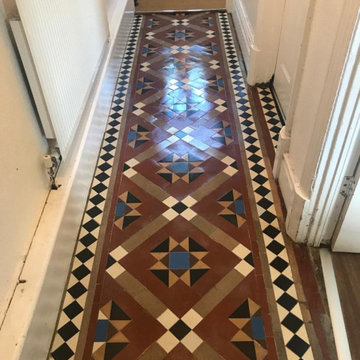
I recently worked on the restoration of a Victorian tiled hallway in Cwmbran Wales which is six miles North of Newport. As you can see from the photographs the floor was in quite a neglected dirty state and many of the the black and white border tiles needed removing and replacing. The worst part was the area by the front door where most of the tiles had been removed and then backfilled with concrete. I can only assume at some point in the past it was deemed to difficult or expensive to restore the floor, so they simply covered it up.
After visiting to survey the floor I did offer to source replacements for the concreted section and restore that as part of the work however my client’s budget would not stretch to that at the time. My quote was therefore focused on the main section of flooring and included replacing border tiles, deep cleaning the whole floor and then sealing the tiles to add protection. Although I did need to check that I could indeed source the replacement tiles before being able to provide the quote which as it turned out would not be an issue.
They were happy to go ahead and we arranged a suitable time to carry out the work which would enable me to work in the property whilst minimising contact with the owners due to the Covid-19 situation.
I spend the first day sorting out the black and white border tiles which needed to be gently prised out of position without upsetting the main part of the floor. The exposed subfloor was then cleaned up to remove old adhesive and replacements were fitted where required and secured into place. The floor would need to be solid before cleaning so that was left for day two so the new adhesive could go off overnight.
On day two I gave the floor an initial clean using a combination of Tile Doctor Pro-Clean and Remove and Go diluted with water. This produces a strong cleaner/stripper that will tackle dirt and remove coatings such as previous sealers. The old tiles had accumulated years of ingrained dirt, so I needed this extra power to remove the years of dirt and contaminates from the tile. It was sprayed onto the tiles and then left to soak in for ten minutes before being actively scrubbed into the tile using a rotary machine fitted with a black scrubbing pad. The soil was then rinsed off with water and extracted with a wet vacuum. The floor was inspected, and the process repeated on the tough stains until I was satisfied all the dirt had been removed.
Next the floor was treated to an acid wash using Tile Doctor Acid Gel using a similar method as before. This is an important treatment for these old Victorian floors that have no damp proof course as it neutralises efflorescent salts trapped in the tile which can appear as white salt deposits later. Once I was happy with the condition of the floor it was given a final rinse and left to dry off. I use a wet vacuum to remove liquids from the floor and on this last extraction I spent extra time to remove as much moisture from the tiles as possible.
I came back a few days later and after checking the tiles were dry using a damp meter, I started the application of the sealer. For this floor I applied seven coats of Tile Doctor Seal and Go for a satin finish. Tile Doctor Seal and Go is a specially formulated water-based sealer that provides both stain resistance and a durable low-sheen finish. It is perfect on a floor of this age where it leaves a lovely finish and will remain durable in what is a essentially a high traffic area.
Although we didn’t manage to sort out the area by the front door the client managed to fit a made to measure coir door mat along with carpet bar which was quite practical and looked fine so they were able to resolve that problem without blowing their budget.
The client was over the moon with results, the floor had a lovely pattern and the colours now shone through. I suggested the use of Tile Doctor Neutral Tile Cleaner to keep the floor clean and in good condition. It is neutral in pH so will ensure that the newly applied sealer stays in place and will ensure maintenance is nice and easy for them.
Paul Wales
Monmouthshire Tile Doctor
 Williamsons Kitchens
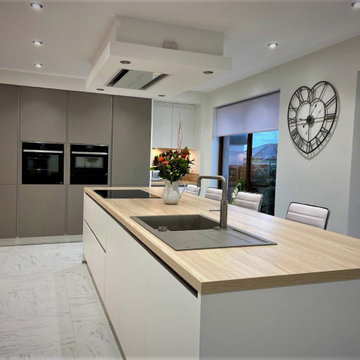
The client approached us with a clear vision in mind for their kitchen in Fraserburgh: an open-plan, modern design that would accommodate their large family. Essential to this vision was the integration of an island, complete with a secondary eating area. This space was not only to be visually appealing but also functionally efficient, as it would need to cater to family gatherings and daily activities. The desire for ample seating and a spacious table, along with additional specific storage solutions, set the stage for our design choices.
Drawing inspiration from the client's requirements, we opted for the Nolte Feel range, complemented by Silver MatrixArt handleless trims. The primary colour for the furniture was chosen as white, with a contrasting accent in Feel Lava to add a touch of modern sophistication. To further enhance the open feel, we made structural modifications: the existing kitchen window was lowered to usher in more natural light and provide an improved viewing angle. Additionally, the entrance to the sun lounge was broadened to foster a more expansive atmosphere.
A kitchen's functionality is determined largely by its worktops and appliances. For this space, we used a sturdy 40mm thick Nolte Silver Ash worktop, providing both durability and style. In terms of appliances, we decided upon NEFF's range, which included a single oven, combination microwave, induction hob, and ceiling extraction, ensuring the client's culinary needs were well catered for.
Recognising the family's unique requirements, we introduced several bespoke features. The Blanco Metra sink in Tartufo and the Quooker Fusion Square Stainless Steel instant boiling water tap combined functionality with modern aesthetics. With the client's large family in mind, we constructed a matching Nolte table and a built-in seating bench replete with storage drawers, maximising both seating and storage. Additionally, a custom-built unit for log storage was designed, mirroring the style of the kitchen, to serve their log-burning stove. The flooring, using Quickstep Arte, tied everything together, adding a touch of elegance to the room.
Experience your dream kitchen with us. Reach out today to start your bespoke kitchen journey.
30